

Introduction
In this article, we will learn to create the consistent layout for the page in your application. We can say that the master page defines the look and standardizes the layout that we want for a group of pages in our application. A master page extension is “.master”. ASP.NET master page works on dynamically changing the common UI elements of master page from content pages .
Let's start our program.
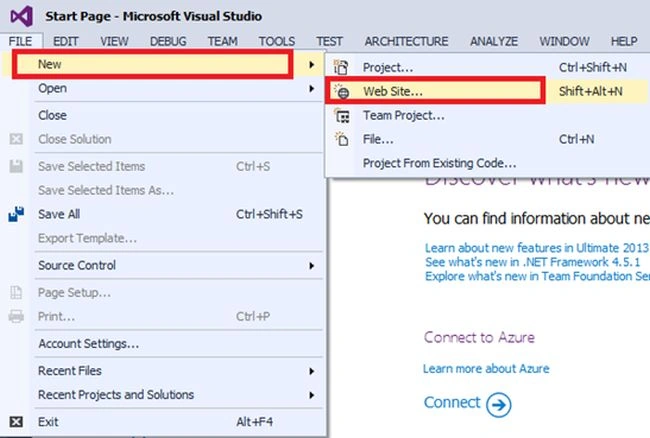
Step 1 - Open Visual Studio and click File=> New=> Web Site.
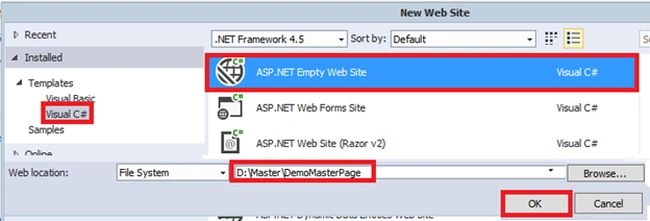
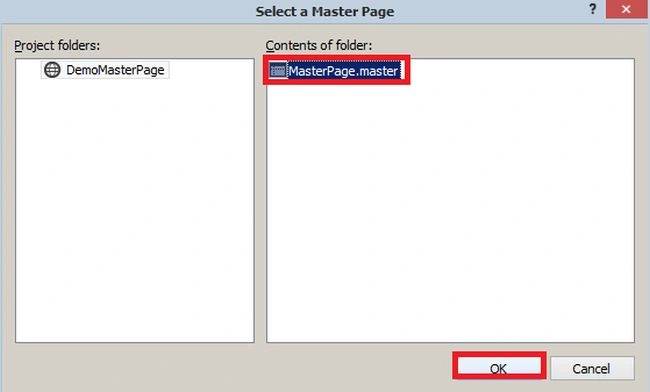
Step 2 - Now, select template ASP.NET Empty Web Site. Assign project name.
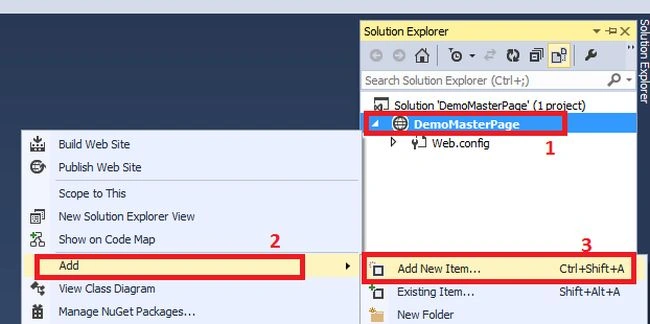
Step 3 - Right click on project name and select Add=>New item.
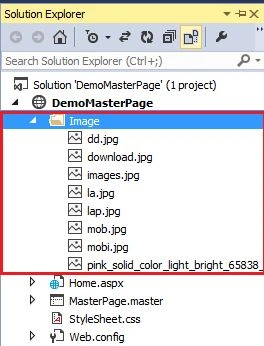
Step 4 - Here, you can copy image folder from your hard drive and right click on your project name. Paste the image folder.
Step 5 - In the following figure, select Master Page and click on Add button.
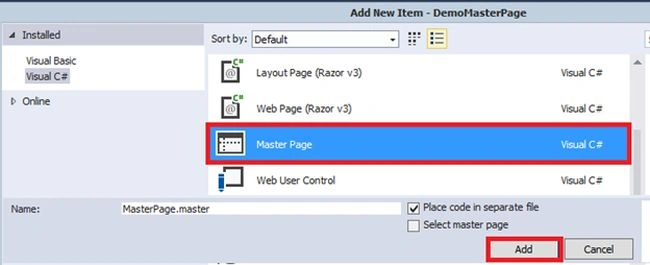
Here is the Master Page code.
- <%@ Master Language="C#" AutoEventWireup="true" CodeFile="MasterPage.master.cs" Inherits="MasterPage" %>
- <!DOCTYPE html>
- <html xmlns="http://www.w3.org/1999/xhtml">
- <head runat="server">
- <title></title>
- <link href="StyleSheet.css" rel="stylesheet" />
- <asp:ContentPlaceHolder id="head" runat="server"> </asp:ContentPlaceHolder>
- </head>
- <body>
- <form id="form1" runat="server">
- <div id="con"> <span id="LgText">Laptop Booking </span>
- <div id="menu">
- <ul>
- <li><a href="#"> Home</a></li>
- <li><a href="#">About Us</a></li>
- <li><a href="#">Contact</a></li>
- <li><a href="#">News</a></li>
- <li><a href="#">Suggestion</a></li>
- </ul>
- </div>
- <div>
- <asp:ContentPlaceHolder id="ContentPlaceHolder1" runat="server"> </asp:ContentPlaceHolder>
- </div>
- </div>
- </form>
- </body>
- </html>
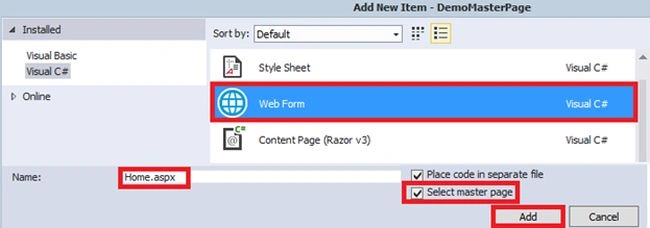
Now, write the Home.aspx coding.
Here, in this code, I have used the marquee tag that's used to move the elements (image, text) up and down or left to right. As per your choice, you can move the elements.
- <%@ Page Title="" Language="C#" MasterPageFile="~/MasterPage.master" AutoEventWireup="true" CodeFile="Home.aspx.cs" Inherits="Home" %>
- <asp:Content ID="Content1" ContentPlaceHolderID="head" Runat="Server"> </asp:Content>
- <asp:Content ID="Content2" ContentPlaceHolderID="ContentPlaceHolder1" Runat="Server">
- <div id="ImgSlide">
- <marquee bahevior="alternate">
- <asp:Image ID="Image1" Width="150" Height="150" ImageUrl="~/Image/dd.jpg" runat="server" />
- <asp:Image ID="Image2" Width="150" Height="150" ImageUrl="~/Image/download.jpg" runat="server" />
- <asp:Image ID="Image3" Width="150" Height="150" ImageUrl="~/Image/la.jpg" runat="server" />
- <asp:Image ID="Image4" Width="150" Height="150" ImageUrl="~/Image/mob.jpg" runat="server" />
- <asp:Image ID="Image5" Width="150" Height="150" ImageUrl="~/Image/lap.jpg" runat="server" />
- <asp:Image ID="Image6" Width="150" Height="150" ImageUrl="~/Image/mob.jpg" runat="server" />
- <asp:Image ID="Image7" Width="150" Height="150" ImageUrl="~/Image/mobi.jpg" runat="server" />
- <asp:Image ID="Image8" Width="150" Height="150" ImageUrl="~/Image/mob.jpg" runat="server" />
- <asp:Image ID="Image9" Width="150" Height="150" ImageUrl="~/Image/lap.jpg" runat="server" />
- <asp:Image ID="Image10" Width="150" Height="150" ImageUrl="~/Image/mob.jpg" runat="server" />
- <asp:Image ID="Image11" Width="150" Height="150" ImageUrl="~/Image/lap.jpg" runat="server" />
- <asp:Image ID="Image12" Width="150" Height="150" ImageUrl="~/Image/mobi.jpg" runat="server" />
- <asp:Image ID="Image13" Width="150" Height="150" ImageUrl="~/Image/lap.jpg" runat="server" />
- <asp:Image ID="Image14" Width="150" Height="150" ImageUrl="~/Image/mob.jpg" runat="server" />
- <asp:Image ID="Image15" Width="150" Height="150" ImageUrl="~/Image/download.jpg" runat="server" />
- <asp:Image ID="Image16" Width="150" Height="150" ImageUrl="~/Image/mob.jpg" runat="server" />
- <asp:Image ID="Image17" Width="150" Height="150" ImageUrl="~/Image/mobi.jpg" runat="server" />
- <asp:Image ID="Image18" Width="150" Height="150" ImageUrl="~/Image/mob.jpg" runat="server" />
- <asp:Image ID="Image19" Width="150" Height="150" ImageUrl="~/Image/lap.jpg" runat="server" />
- <asp:Image ID="Image20" Width="150" Height="150" ImageUrl="~/Image/download.jpg" runat="server" /> </marquee>
- </div>
- </asp:Content>
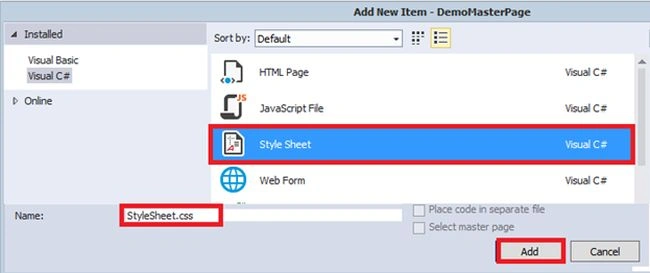
Step 8 - Again, select Style Sheet template and click on Add button.
Now, in this section, we design the page layout. Some CSS modules are given below,
- Selectors
- Box Model
- Backgrounds and Borders
- Image Values and Replaced Content
- 2D/3D Transformations
- Multiple Column Layout
- User Interface
- Text Effects
- body {
- background - image: url('Image/pink_solid_color_light_bright_65838_300x168.jpg');
- }#con {
- margin: 2 % ;
- margin - left: 10 % ;
- width: 80 % ;
- height: 250 px;
- background - image: url('Image/images.jpg');
- } * {
- margin: 0 px;
- padding: 0 px;
- }#LgText {
- position: absolute;
- top: 5 % ;
- left: 11 % ;
- color: white;
- font - family: Arial;
- font - size: 30 pt;
- font - weight: bolder;
- }#menu ul {
- list - style: none;
- }#menu ul li {
- float: left;
- width: 120 px;
- }#menu ul li a {
- text - decoration: none;
- color: white;
- font - family: Arial;
- font - size: 14 pt;
- }#menu {
- position: absolute;
- top: 6 % ;
- right: 16 % ;
- }#ImgSlide {
- position: absolute;
- top: 20 % ;
- left: 12 % ;
- right: 12 % ;
- }
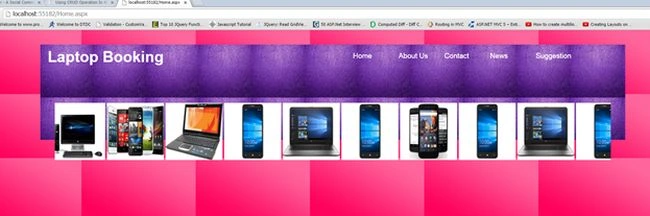
I hope you enjoyed this Creating Master Page tutorial. Follow C# Corner to learn new things about ASP.NET. Thanks for reading this article.
Avinash ThakurPosted Sep 10, 2016, 12:58 PM
Thanks Gagan
Gagan SharmaPosted Sep 7, 2016, 7:55 AM
Gud one..
Avinash ThakurPosted Sep 6, 2016, 12:01 AM
Thanks
Prasanna MuraliPosted Sep 5, 2016, 11:05 AM
Nice post......
Avinash ThakurPosted Sep 2, 2016, 4:52 AM
Thanks
SubashPosted Sep 2, 2016, 4:22 AM
Very nice eexplanation
Avinash ThakurPosted Sep 2, 2016, 12:04 AM
Thanks
Kartik KumarPosted Sep 2, 2016, 12:01 AM
9c one