

ASP.NET Core Blazor Server is a platform for developing modern and dynamic web applications. With Blazor Server, you can write code in C# and create rich user interfaces using HTML and CSS, all while taking advantage of server-side rendering and real-time updates.
Advantages of Blazor
- Server-side rendering
- Interactive user interfaces
- Real-time updates
- .NET runtime
- Easy integration with other .NET technologies
- Cross-platform support
Let's learn about each feature in brief.
- Server-side rendering: Blazor Server enables server-side rendering of the application's user interface, which provides a faster initial load time and improved performance on low-powered devices.
- Interactive user interfaces: Blazor Server allows developers to create interactive user interfaces using C#, HTML, and CSS, without the need for JavaScript.
- Real-time updates: Blazor Server includes support for real-time updates, enabling developers to create responsive and dynamic applications that can update in real-time without requiring a page refresh.
- .NET Runtime: Blazor Server runs on top of the .NET runtime, giving developers access to the full set of.NET features and libraries.
- Easy integration with other.NET technologies: Blazor Server integrates easily with other.NET technologies, such as ASP.NET Core and SignalR, enabling developers to build powerful web applications with a familiar development experience.
- Cross-platform support: Blazor Server supports cross-platform development and can be deployed to a wide range of platforms, including Windows, Linux, and macOS.
In this article, we're going to learn how to implement CRUD operations such as create, read, update, and delete in the Blazor Server application with Azure Cosmos DB and C#. By the end of this article, you will have a good understanding of how to implement CRUD operations in an ASP.NET Core Blazor Server application with Azure Cosmos DB and C#. At the end of the tutorial, you will see the following screen:

Now lets start for the implemention step by step
Step 1. Set up Prerequisites
Set up the following one of the required pre-requisites to perform the CRUD operation in the Azure Cosmos DB
- Azure Subscription OR
- Azure Cosmos DB Emulator
The first approach to using Azure Cosmos DB requires an active Azure subscription and an internet connection, which may not be feasible for those who want to explore or learn about the service. To overcome this limitation, one can use the Azure Cosmos DB Emulator, which provides the same capabilities and features without requiring an active Azure subscription or internet connection.
The following is the link to download the Azure Cosmos DB Emulator.
Clicking on the above link will take you to the official Microsoft documentation website, where you can find and download the latest version of the Azure Cosmos DB Emulator.
Step 2. Create Azure Cosmos DB
In this article, we are going to use the Azure Cosmos DB emulator instead of a Cloud Azure Cosmos DB account. If you are new to Azure Cosmos DB, please read the articles below to learn how to create an Azure Cosmos DB account.
In the first step, we have now installed the Cosmos DB emulator. Now search for the Azure Cosmos DB emulator from the search bar, which looks like the following:
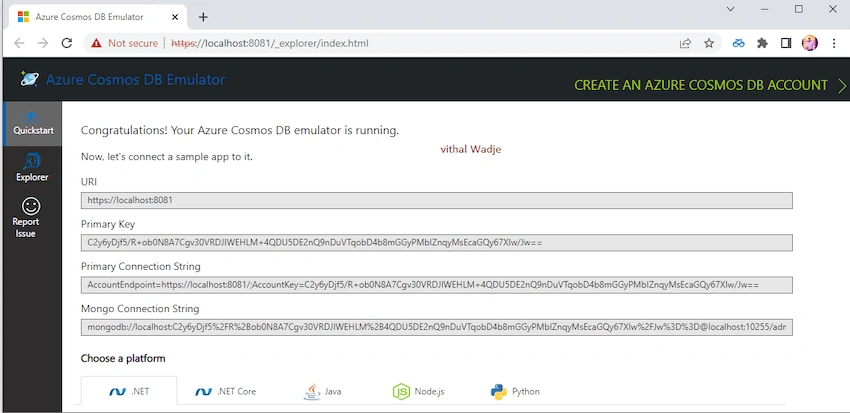
Now click on the explorer and create the database and container. The explorer will then look like this:
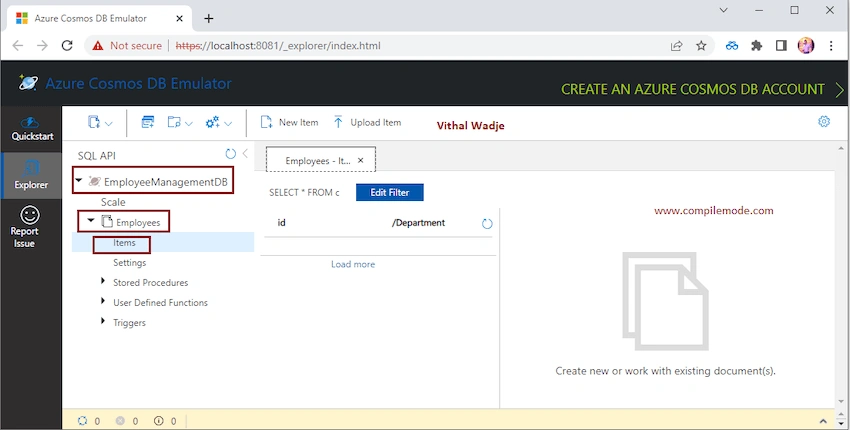
We are storing the employee basic data in the Azure CosmosDB, and we are planning to use Department as a partition key and ID as the unique id for our employee records.
Note:
- The ID and Department properties should be part of your backend input while inserting or updating the records; otherwise, you will get the exceptions.
I hope you have completed the required setup as explained in this article, including the creation of the Azure Cosmos account and database.
Step 3. Create ASP.NET Core Blazor Server App
- Start, then All Programs, and select "Microsoft Visual Studio 2022."
- Once Visual Studio opens, click on "Continue without code."
- Then go to the Visual Studio menu, click on File => New Project,
- Select "Blazor Server App" as the project template and click "Next."
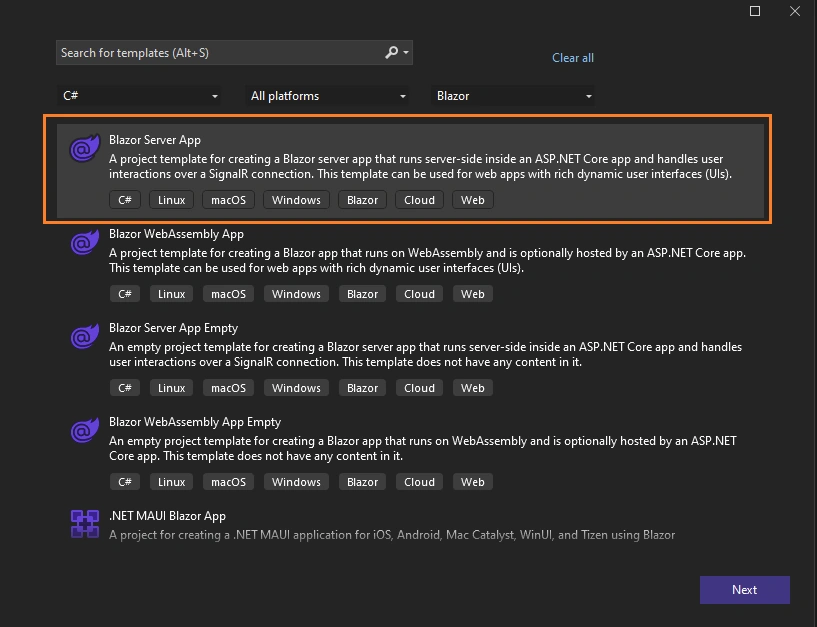
5 . The next screen shows the project configuration window. Enter a name for your project, choose a location for the Blazor server app, and click "Next."
6 . The next window allows to defind the addtional information such as .NET Framework and other configuration as shown in the beleow
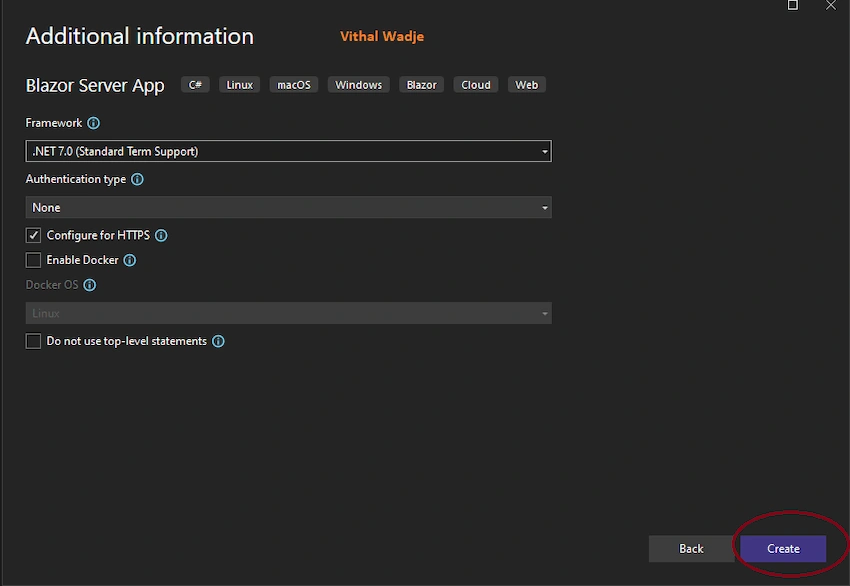
Select the framework.NET 7.0, set the authentication type to none, check the configure for https checkbox, and click on the create button. The preceding steps will create the Blazor server application. after deleting the default filesm, The solution explorer will look like as what is shown in the following image.

Step 4. Add Microsoft.Azure.Cosmos Nuget Package Reference
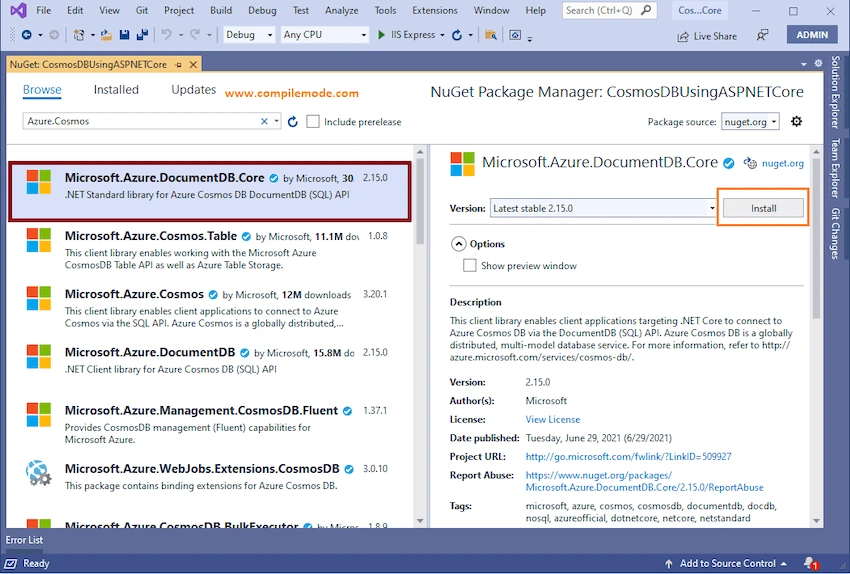
The Microsoft.Azure.Cosmos is the latest nuget package to interact with the Azure Cosmos DB. The Microsoft Azure Cosmos supports basic, custom, and complex database operations. Follow the following steps to add the Nuget package.
- Right-click on the Solution Explorer, find Manage NuGet Package Manager, and click on it.
- After that, as shown in the image, type Microsoft.Azure.Cosmos into the search box.
- Select Microsoft.Azure.Cosmos as shown in the image,
- Choose a version of the Microsoft.Azure.Cosmos library and click on the install button.
Step 5. Create the Model Class
- First, delete the default model class, which is created outside the folder structure, so we can start from scratch.
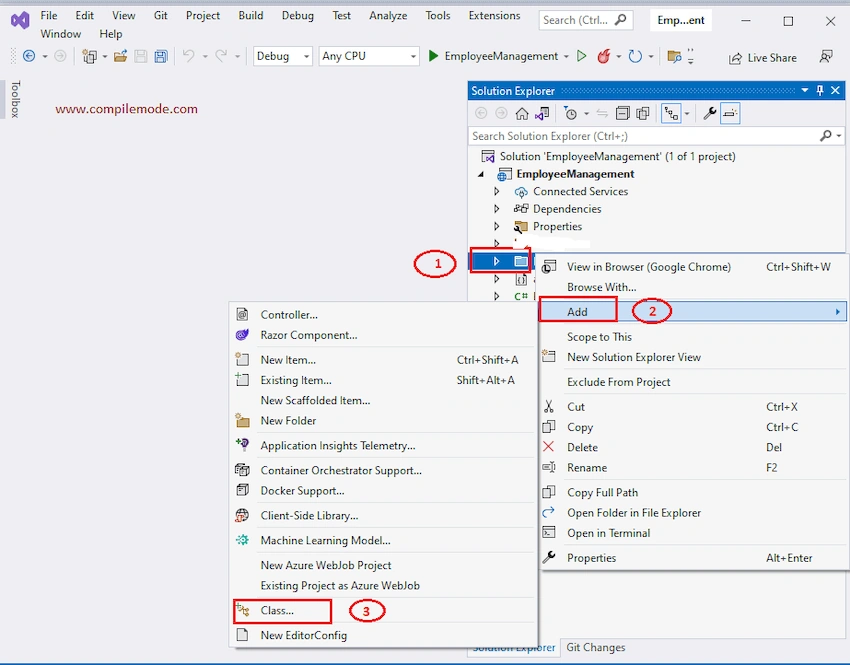
- Next, create the folder named Model by right clicking on the solution explorer.
- Create the class with name EmployeeModel by right clicking on the Model folder, as shown in the following image
Now open the newly created EmployeeModel.cs class file and add the following code.
EmployeeModel.cs
namespace EmployeeMgmtBlazorServerApp.Model
{
    public class EmployeeModel
    {
    public Guid? id { get;set;}
    public string? Name { get; set; }
    public string? Country { get; set; }
    public string? City { get; set; }
    public string? Department { get; set; }
    public string? Designation { get; set; }

    }
}
The code defines a model class with properties that can hold information about an employee, which can be used in a Blazor server application for managing employees.
Step 6. Add the EmployeeService class
Create the EmployeeService.cs class by right clicking on the Data folder as shown in the following image.
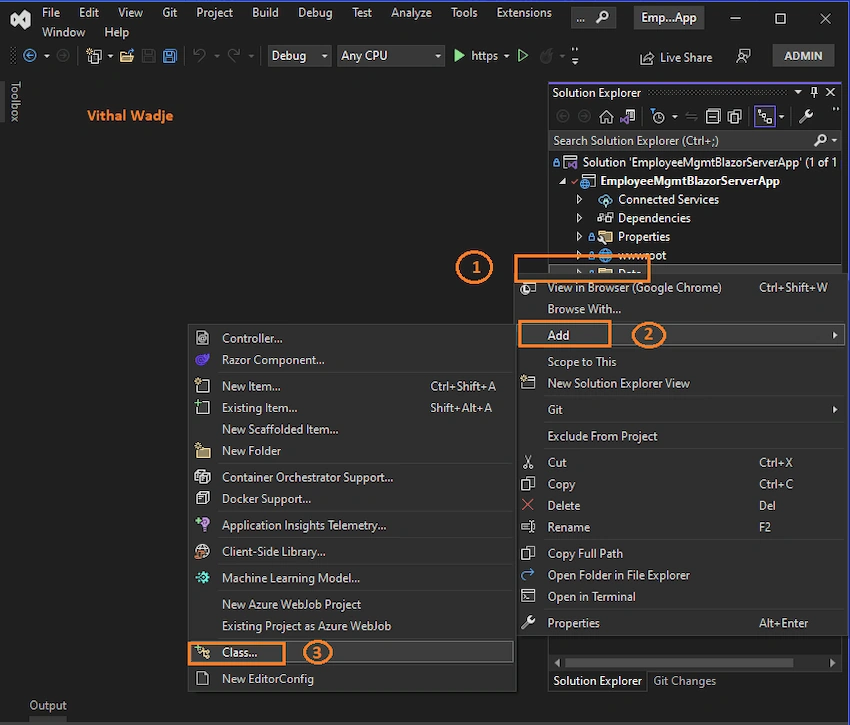
This class will be responsible for adding the CRUD functionality to interact with the Azure Cosmos DB. Now open the EmployeeService .cs class file and add the following methods with code.
Step 7. Method to create Cosmos DB Client
The following method is responsible for creating the Azure Cosmos DB client, which helps to interact with the Cosmos DB from our Blazor server application using the Cosmos DB credentials, Declare the following variable and set the Azure Cosmos DB credentials by copying from the step 2.
// Cosmos DB details, In real use cases, these details should be configured in secure configuraion file.
private readonly string CosmosDBAccountUri = "https://localhost:8081/";
private readonly string CosmosDBAccountPrimaryKey = "C2y6yDjf5/R+ob0N8A7Cgv30VRDJIWEHLM+4QDU5DE2nQ9nDuVTqobD4b8mGGyPMbIZnqyMsEcaGQy67XIw/Jw==";
private readonly string CosmosDbName = "EmployeeManagementDB";
private readonly string CosmosDbContainerName = "Employees";

/// <summary>
/// Commom Container Client, you can also pass the configuration paramter dynamically.
/// </summary>
/// <returns> Container Client </returns>
private Container ContainerClient()
{

    CosmosClient cosmosDbClient = new CosmosClient(CosmosDBAccountUri, CosmosDBAccountPrimaryKey);
    Container containerClient = cosmosDbClient.GetContainer(CosmosDbName, CosmosDbContainerName);
    return containerClient;
}
I hope you have configured the ComosClient with appropriate credentials.
Step 8. Create Method to Add Employee
Add the following code into the EmployeeService.cs class to Add the employees into the CosmosDB. This method takes input values using the EmployeeModel class.
public async Task AddEmployee(EmployeeModel employee)
{
    try
    {
        employee.id = Guid.NewGuid();
        var container = ContainerClient();
        var response = await container.CreateItemAsync(employee, new PartitionKey(employee.Department));

       // return Ok(response);
    }
    catch (Exception ex)
    {
        ex.Message.ToString();
    }
}
The preceding code adds an employee to a database asynchronously. It generates a GUID for the employee's ID, gets a reference to a database container, and creates a new item in the container using the employee object and a partition key. If an exception occurs, it logs the exception message to the console.
Step 9. Create Method to Get Employees
Add the following code into the EmployeeService.cs class to get all the employees from the Cosmos db.
public async Task<List<EmployeeModel>> GetEmployeeDetails()
{
    List<EmployeeModel> employees = new List<EmployeeModel>();
    try
    {
        var container = ContainerClient();
        var sqlQuery = "SELECT * FROM c";
        QueryDefinition queryDefinition = new QueryDefinition(sqlQuery);
        FeedIterator<EmployeeModel> queryResultSetIterator = container.GetItemQueryIterator<EmployeeModel>(queryDefinition);

        while (queryResultSetIterator.HasMoreResults)
        {
            FeedResponse<EmployeeModel> currentResultSet = await queryResultSetIterator.ReadNextAsync();
            foreach (EmployeeModel employee in currentResultSet)
            {
                employees.Add(employee);
            }
        }
    }
    catch (Exception ex)
    {

         ex.Message.ToString();
    }
    return employees;
}
The preceding code retrieves employee details from a Cosmos database asynchronously and returns them as a list of EmployeeModel objects. It initialises an empty list, gets a reference to a container, creates a SQL query to select all data, and iterates over the results to add each employee to the list. If an exception occurs, it logs the exception message to the console. The method returns the list of EmployeeModel objects.
Step 10. Create Method to Get Employee by ID
Create the GetEmployeeDetailsById method in the EmployeeService.cs and add the following code to get the employee by employeeId and partition key from the Cosmos database.
public async Task<EmployeeModel> GetEmployeeDetailsById(string? employeeId, string? partitionKey)
{
    try
    {
        var container = ContainerClient();
        ItemResponse<EmployeeModel> response = await container.ReadItemAsync<EmployeeModel>(employeeId, new PartitionKey(partitionKey));
        return response.Resource;
    }
    catch (Exception ex)
    {

        throw new Exception("Exception ", ex);
    }
}
The preceding code retrieves an employee's details from a cosmos db asynchronously using the employee's ID and partition key. It gets a reference to a container, reads the employee data using the ReadItemAsync method, and returns an EmployeeModel object that corresponds to the specified ID. If an exception occurs, it throws a new exception that includes the original exception message.
Step 11. Create Method to Update Employee
Create the UpdateEmployee method in the EmployeeService.cs and add the following code to update the employee by employeeId and partition key. The Cosmos DB does not support the partial update feature; rather, it actually replaces the existing item by getting the document to be updated and sending the same details to the database after fields to change or update.
public async Task UpdateEmployee(EmployeeModel emp)
{
    try
    {
        var container = ContainerClient();
        ItemResponse<EmployeeModel> res = await container.ReadItemAsync<EmployeeModel>(Convert.ToString(emp.id), new PartitionKey(emp.Department));
        //Get Existing Item
        var existingItem = res.Resource;

        //Replace existing item values with new values
        existingItem.Name = emp.Name;
        existingItem.Country = emp.Country;
        existingItem.City = emp.City;
        existingItem.Department = emp.Department;
        existingItem.Designation = emp.Designation;
        string? id = Convert.ToString(existingItem.id);
        var updateRes = await container.ReplaceItemAsync(existingItem, id, new PartitionKey(existingItem.Department));
        //return updateRes.Resource;
    }
    catch (Exception ex)
    {
        throw new Exception("Exception", ex);
    }
}
The preceding code updates an existing employee's data in a database using an asynchronous programming model. It reads the existing employee data from the database using ReadItemAsync, replaces the existing values with the new ones provided in the input EmployeeModel object, and saves the updated employee data to the database using ReplaceItemAsync. If an exception occurs, it throws a new exception that includes the original exception message.
Step 12. Create Method to Delete Employee
Create the DeleteEmployee method in the EmployeeService.cs and add the following code to delete the employee by employeeId and partition key.
public async Task DeleteEmployee(string? empId, string? partitionKey)
{
    try
    {
        var container = ContainerClient();
        var response = await container.DeleteItemAsync<EmployeeModel>(empId, new PartitionKey(partitionKey));
    }
    catch (Exception ex)
    {
        throw new Exception("Exception", ex);
    }
}
The preceding code deletes an employee's data from a database using an asynchronous programming model. It gets a reference to a container object using ContainerClient() and calls the DeleteItemAsync method on it with the employee's ID and partition key to delete the employee's data from the database. If an exception occurs, it throws a new exception that includes the original exception message.
The entire code of the EmployeeService.cs class file will look like the following after adding all the methods together:
using EmployeeMgmtBlazorServerApp.Model;
using Microsoft.Azure.Cosmos;

namespace EmployeeMgmtBlazorServerApp.Data
{
    public class EmployeeService
    {

        // Cosmos DB details, In real use cases, these details should be configured in secure configuraion file.
        private readonly string CosmosDBAccountUri = "https://localhost:8081/";
        private readonly string CosmosDBAccountPrimaryKey = "C2y6yDjf5/R+ob0N8A7Cgv30VRDJIWEHLM+4QDU5DE2nQ9nDuVTqobD4b8mGGyPMbIZnqyMsEcaGQy67XIw/Jw==";
        private readonly string CosmosDbName = "EmployeeManagementDB";
        private readonly string CosmosDbContainerName = "Employees";


        /// <summary>
        /// Commom Container Client, you can also pass the configuration paramter dynamically.
        /// </summary>
        /// <returns> Container Client </returns>
        private Container ContainerClient()
        {

            CosmosClient cosmosDbClient = new CosmosClient(CosmosDBAccountUri, CosmosDBAccountPrimaryKey);
            Container containerClient = cosmosDbClient.GetContainer(CosmosDbName, CosmosDbContainerName);
            return containerClient;

        }

        public async Task AddEmployee(EmployeeModel employee)
        {
            try
            {
                employee.id = Guid.NewGuid();
                var container = ContainerClient();
                var response = await container.CreateItemAsync(employee, new PartitionKey(employee.Department));

               // return Ok(response);
            }
            catch (Exception ex)
            {

                ex.Message.ToString();
            }

        }

        public async Task<List<EmployeeModel>> GetEmployeeDetails()
        {

            List<EmployeeModel> employees = new List<EmployeeModel>();
            try
            {
                var container = ContainerClient();
                var sqlQuery = "SELECT * FROM c";
                QueryDefinition queryDefinition = new QueryDefinition(sqlQuery);
                FeedIterator<EmployeeModel> queryResultSetIterator = container.GetItemQueryIterator<EmployeeModel>(queryDefinition);
                while (queryResultSetIterator.HasMoreResults)
                {
                    FeedResponse<EmployeeModel> currentResultSet = await queryResultSetIterator.ReadNextAsync();
                    foreach (EmployeeModel employee in currentResultSet)
                    {
                        employees.Add(employee);
                    }
                }
            }
            catch (Exception ex)
            {

                 ex.Message.ToString();
            }
            return employees;
        }

        public async Task<EmployeeModel> GetEmployeeDetailsById(string? employeeId, string? partitionKey)
        {

            try
            {
                var container = ContainerClient();
                ItemResponse<EmployeeModel> response = await container.ReadItemAsync<EmployeeModel>(employeeId, new PartitionKey(partitionKey));
                return response.Resource;
            }
            catch (Exception ex)
            {

                throw new Exception("Exception ", ex);
            }
        }

        public async Task UpdateEmployee(EmployeeModel emp)
        {

            try
            {
                var container = ContainerClient();
                ItemResponse<EmployeeModel> res = await container.ReadItemAsync<EmployeeModel>(Convert.ToString(emp.id), new PartitionKey(emp.Department));

                //Get Existing Item
                var existingItem = res.Resource;

                //Replace existing item values with new values
                existingItem.Name = emp.Name;
                existingItem.Country = emp.Country;
                existingItem.City = emp.City;
                existingItem.Department = emp.Department;
                existingItem.Designation = emp.Designation;
                string? id = Convert.ToString(existingItem.id);
                var updateRes = await container.ReplaceItemAsync(existingItem, id, new PartitionKey(existingItem.Department));

                //return updateRes.Resource;

            }
            catch (Exception ex)
            {
                throw new Exception("Exception", ex);
            }

        }

        public async Task DeleteEmployee(string? empId, string? partitionKey)
        {
            try
            {
                var container = ContainerClient();
                var response = await container.DeleteItemAsync<EmployeeModel>(empId, new PartitionKey(partitionKey));
            }
            catch (Exception ex)
            {
                throw new Exception("Exception", ex);
            }
        }
    }
}
Now, we have all the backend code and required configuration to work with Azure CosmosDB using Blazor server application, let's create the Razor components to integrate the above-created method to make it usable from our Blazor server applications.
Step 13. Add Employee Razor components to Add Employee
Create the Employee razor component by right clicking on the page folder as shown in the following image.
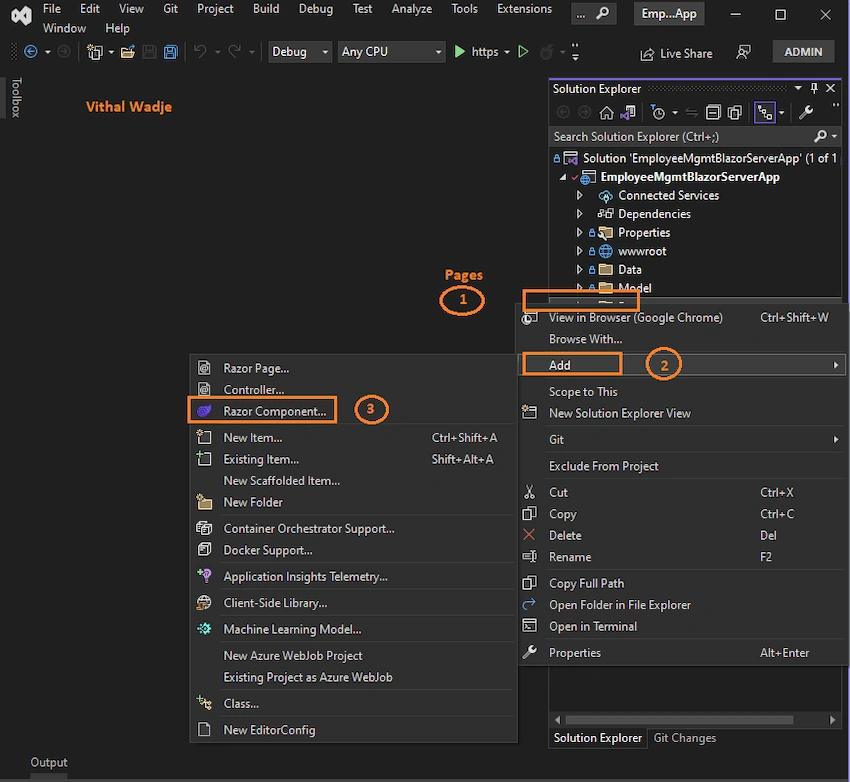
Now, open the Employee.razor page and replace the following code:
@page "/Employee"
@using EmployeeMgmtBlazorServerApp.Data
@using EmployeeMgmtBlazorServerApp.Model
@inject EmployeeService empService
<div class="card p-4">
    <h4 class="card-title">Add Employee</h4>
    <hr />
<EditForm Model="@emp">
        <div class="form-group row p-2">
        <div class="col-md-6">
            <input type="text" class="form-control" placeholder="Name" @bind-value="emp.Name" />
        </div>
        <div class="col-md-6">
            <input type="text" class="form-control" placeholder="Country" @bind-value="emp.Country" />
        </div>
    </div>
        <div class="form-group row p-2">
        <div class="col-md-6">
            <input type="text" class="form-control" placeholder="City" @bind-value="emp.City" />
        </div>
        <div class="col-md-6">
            <input type="text" class="form-control" placeholder="Department" @bind-value="emp.Department" />
        </div>
    </div>
        <div class="form-group row p-2">
        <div class="col-md-6">
            <input type="text" class="form-control" placeholder="Designation" @bind-value="emp.Designation" />
        </div>
    </div>
        <div class="form-group row p-2">
        <div class="text-center">
            <button  class="btn btn-primary" @onclick="@(async () => await AddRecord())">Add Employee</button>

        </div>
    </div>
</EditForm>
</div>
<div class="mt-4">
    <FetchData employees="@employees" />
</div>
@code {

    private EmployeeModel emp = new EmployeeModel();
    [Parameter]
    public List<EmployeeModel>? employees { get; set; }
    FetchData fetch = new FetchData();
    private async Task AddRecord()
    {
        await empService.AddEmployee(emp);
        employees = await empService.GetEmployeeDetails();
    }
}
The preceding Blazor component will add employees to an application. It includes an EmployeeModel object for storing input data, a List<EmployeeModel> property for displaying all employees, and an asynchronous AddRecord() method that adds a new employee to the list using an injected EmployeeService object. This ensures that the displayed employee list is updated with the newly added employee.
Step 14. Add FetchData Razor components to List Employees
Follow the same steps as mentioned in step no. 13 to create the FetchData components to list the employees from Cosmos DB, or you can use the default FetchData components that will be created during the Blazor server application.
Now, open the FetchData .razor page and replace the following code:
@page "/fetchdata"
@using EmployeeMgmtBlazorServerApp.Data
@using EmployeeMgmtBlazorServerApp.Model
@inject EmployeeService empService

@if (employees == null)
{
    <div class="progress">
        <div class="progress-bar progress-bar-striped progress-bar-animated" role="progressbar" aria-valuenow="40" aria-valuemin="0" aria-valuemax="100" style="width: 75%"></div>
    </div>
}
else
{
    <div class="table-responsive">
        <table class="table table-hover">
            <thead class="thead-light">
                <tr>
                    <th>Name </th>
                    <th>Country </th>
                    <th>City </th>
                    <th>Department </th>
                    <th>Designation </th>
                    <th></th>
                </tr>
            </thead>
            <tbody>
                @foreach (var emp in employees)
                {
                    <tr>
                        <td>@emp.Name</td>
                        <td>@emp.Country</td>
                        <td>@emp.City</td>
                        <td>@emp.Department</td>
                        <td>@emp.Designation</td>
                        <td>
                            <a href=@($"EmployeeEdit/{emp.id}/{emp.Department}") class="btn btn-primary"><span class="oi oi-pencil" /> </a>
                            <button class="btn btn-danger" @onclick="async () => await DeleteEmployee(emp.id, emp.Department)"><span class="oi oi-trash" /></button>
                        </td>
                    </tr>
                }
            </tbody>
        </table>
    </div>
}

@code {
    [Parameter]
    public List<EmployeeModel>? employees { get; set; }

    protected override async Task OnInitializedAsync()
    {
        employees = await empService.GetEmployeeDetails();
    }

    private async Task DeleteEmployee(Guid? id, string? department)
    {
        await empService.DeleteEmployee(Convert.ToString(id), department);
        employees = await empService.GetEmployeeDetails();

    }
}
The folllowing is the explantion of the above code
- The component injects an EmployeeService instance, which provides methods for fetching and deleting employee data.
- The component has a nullable List<EmployeeModel> property called employees, which holds the list of employee data fetched from the service.
- The OnInitializedAsync method is an override method that is called when the component is initialized. It uses the empService instance to fetch the employee data and assigns it to the employees property.
- The component contains an if statement that checks whether the employees property is null. If it is null, a progress bar is displayed; otherwise, a table is displayed with the employee data.
- The table has six columns: Name, Country, City, Department, Designation, and an empty column for action buttons.
- The foreach loop iterates over the employees list and creates a row in the table for each employee. Each row displays the employee's name, country, city, department, and designation, and contains two action buttons: an edit button and a delete button.
- The edit button is an HTML link that takes the user to a different page (EmployeeEdit) to edit the employee's data. It uses string interpolation to include the employee's ID and department in the URL.
- The delete button is a Blazor button that calls the DeleteEmployee method when clicked. It passes the employee's ID and department as parameters to the method using lambda expressions.
- The DeleteEmployee method calls the DeleteEmployee method of the empService instance to delete the employee data from the backend. It then fetches the updated employee data and assigns it to the employees property.
Step 15. Add EmployeeEdit Razor components
Follow the same steps as mentioned in step no. 13 to create the EmployeeEdit razor components to update the employees in the Cosmos DB.
Now, open the EmployeeEdit.razor page and replace the following code:
@page "/EmployeeEdit/{id}/{partitionKey}"
@using EmployeeMgmtBlazorServerApp.Data
@using EmployeeMgmtBlazorServerApp.Model
@inject EmployeeService empService
@inject NavigationManager NavManager

<EditForm Model="@employee">
    <div class="form-group row p-2">

        <div class="col-md-6">
            <input type="text" class="form-control" placeholder="Name" @bind-value="employee.Name" />
        </div>

        <div class="col-md-6">
            <input type="text" class="form-control" placeholder="Country" @bind-value="employee.Country" />
        </div>
    </div>
    <div class="form-group row p-2">

        <div class="col-md-6">
            <input type="text" class="form-control" placeholder="City" @bind-value="employee.City" />
        </div>

        <div class="col-md-6">
            <input type="text" class="form-control" readonly placeholder="Department" @bind-value="employee.Department" />
        </div>
    </div>
    <div class="form-group row p-2">

        <div class="col-md-6">
            <input type="text" class="form-control" placeholder="Designation" @bind-value="employee.Designation" />
        </div>
    </div>
    <div class="form-group row p-2">
        <div class="text-center">
            <button  class="btn btn-primary" @onclick="@(async () => await UpdateRecord())">Update</button>

        </div>
    </div>
</EditForm>
@code {
    private EmployeeModel employee=new EmployeeModel();

    [Parameter]
    public string? id { get; set; }
    [Parameter]
    public string? partitionKey { get; set; }

    protected override async Task OnInitializedAsync()
    {
        employee = await empService.GetEmployeeDetailsById(id, partitionKey);
    }
    private async Task UpdateRecord()
    {
        await empService.UpdateEmployee(employee);
        NavManager.NavigateTo("/");
    }
}
Step 16. Call the Employee.Razor component in Index.razor
The employee razor component contains the most of the CRUD functionality since we have included the fetch data component in the employee razor component, which has the functionality to delete and edit, so we will call the employee component in the index. As a result, we will also learn how to call components into the various pages and achieve the abstraction, which will reduce the code on the main page.
Now, open the Index.razor page and replace with the following code:
@page "/"
<PageTitle>Employee Management</PageTitle>
 <Employee></Employee>
Now, we have all the code in the Blazor server application to interact with Azure CosmosDB. After adding all files, the solution explorer will look as shown in the following image:

Step 17. Run the ASP.NET Core Blazor Application
To launch the application, press F5 on the keyboard or the Visual Studio Run button. After running the application, the following screen will be shown in the browser with Blazor UI, as shown in the following image:
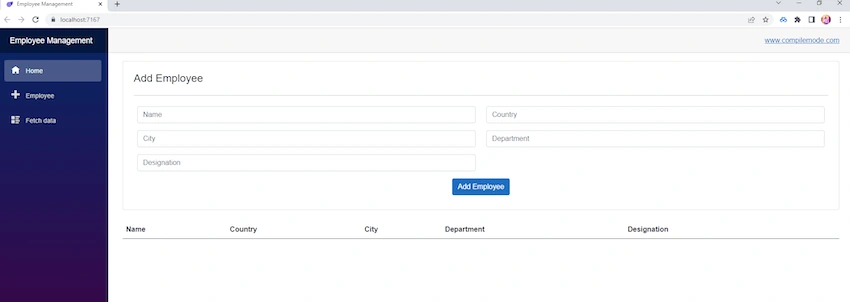
Blazor Server App CRUD Demo With Cosmos DB
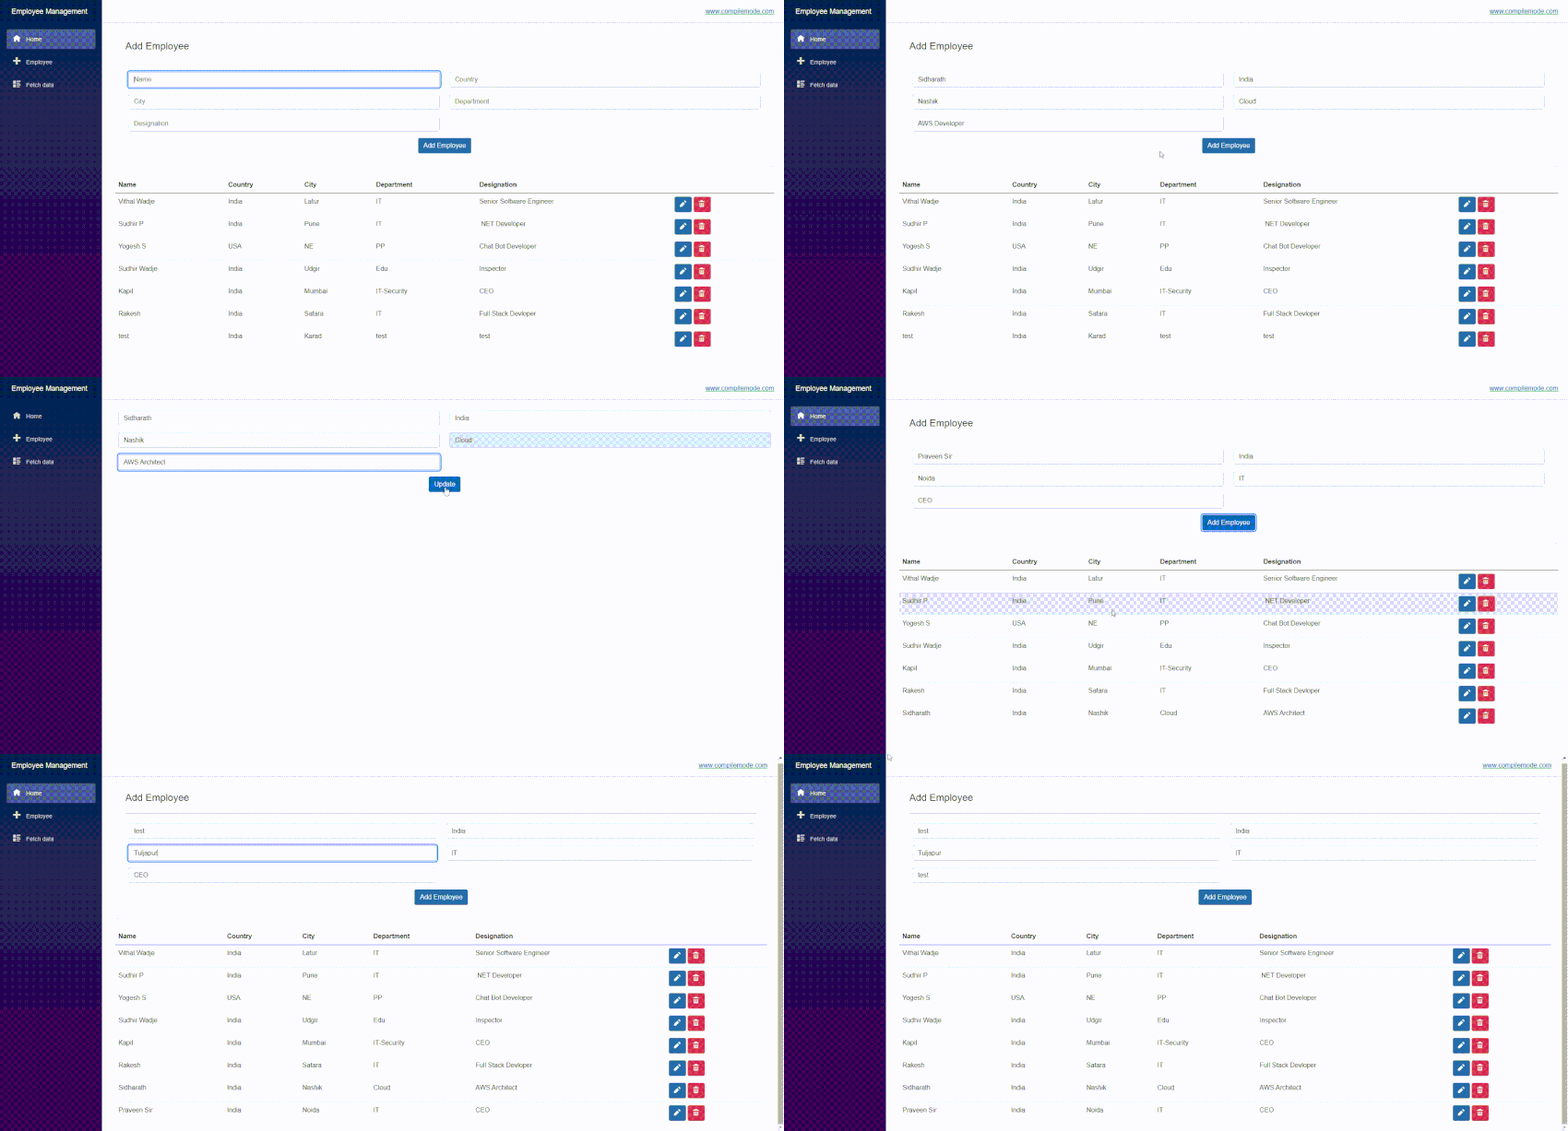
The following animated image explains the exclusive demo of the Blazor server application. Insert, update, delete, and read operations using the Azure Cosmos DB.
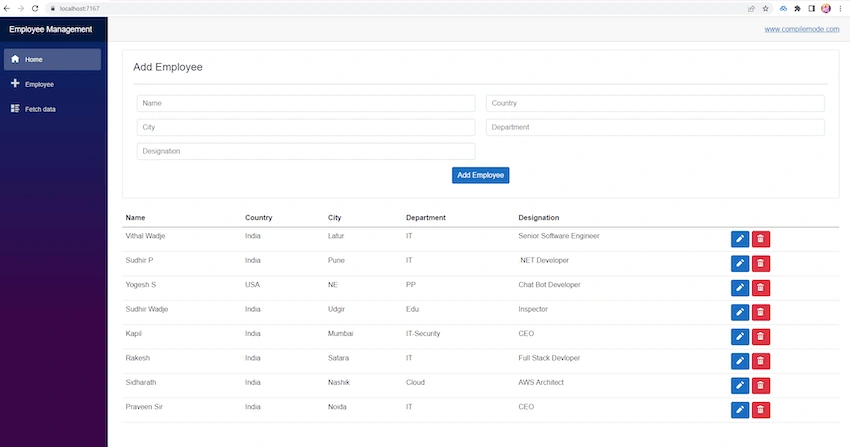
The following is the screen of added records from the above demo session.

The following animated image will show how the records were added to the Cosmos DB backend.
Notes:
- Store the Cosmos database credentials in the secure configuration file.
- Since this is a demo, it might not be using proper standards, so improve it depending on your skills.
- This tutorial is completely focused on beginners.
- Download the source code for your understanding and demo purposes.
- The Blazor Edit form is used to add and edit data.
- The table automatically gets refreshed whenever records are deleted, added, or edited.
Summary
I hope from the above explanation you have learned how to use an ASP.NET Core Blazor Server application to implement CRUD operations with Azure Cosmos DB and C#. Please share with your friends and follow me for more of these types of articles. Don't forget to add your feedback in the comment section.
Read more articles on ASP.NET,
Join the conversation! Your thoughts help the community grow.