
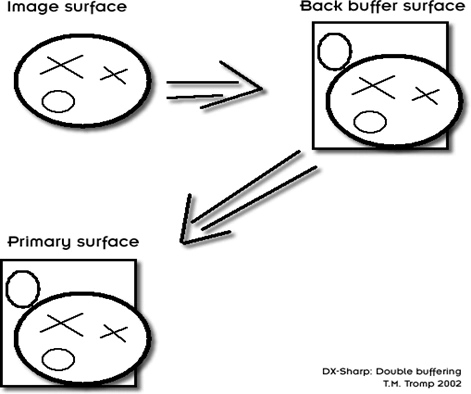
When drawing with DirectDraw, you can specify to use more than one surface to draw on and flip between the primary and secondary screen surfaces. This technique is called double-buffering and is used to get a stable FPS and smooth screen updates. In this article we will create a DirectX wrapped class that will be able to initialize a full-screen DirectX screen and draw a couple of rounded boxes with different visual styles on the secondary surface and then flip the surface to primary output surface. Next to that, we will learn the basics of DirectInput, which we will use to handle the keyboard actions to exit the application.
How we are going to structure the code
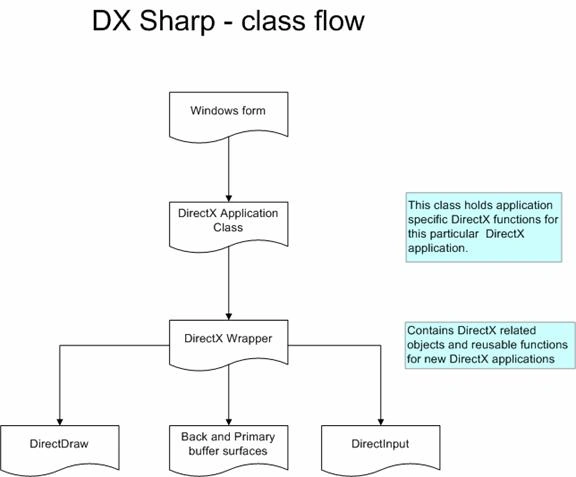
The code we will write consists of three blocks. I really hate to mix reusable code with application specific code, and therefore we will put all application specific DirectX functions in a separate class which we call from the Form class. The DirectX application class will call and initialize the needed DirectX objects by using the reusable DirectX wrapper class, which is there to hold generic DirectX functions and objects.
The application loop
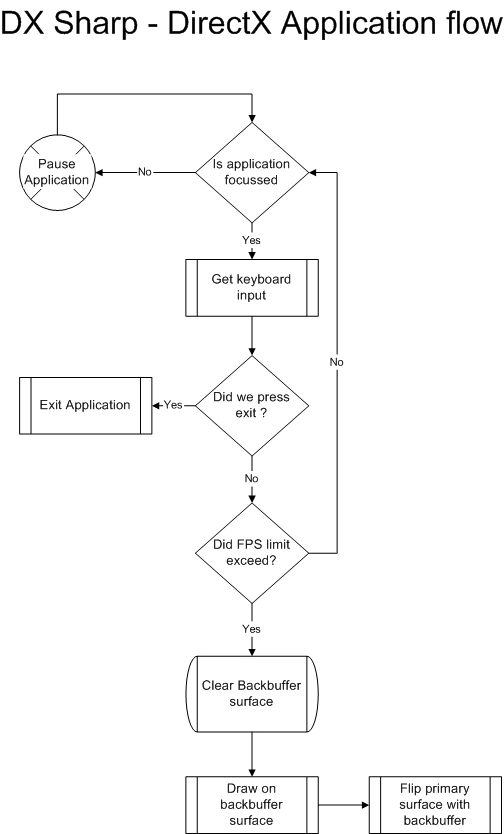
The DirectX application class contains a loop which updates screen surface after a certain frames per second has elapsed, pauses the application when the screen is not focused and exits the application when the Quit button is pressed. Games are generally big loops which contains the same kind of structure, so if you are already thinking about a nice concept; take your time to work this structure out on a piece of paper before writing the code.
Interoping with DirectX
In order to invoke the DirectX COM component, you will need to add the COM reference to your project. Add the reference DirectX 7 for Visual Basic Type Library. This will create an interop object, which can be reached under the name DxVBLib.
Creating the DirectXWrapperClass
We will encapsulate the basic DirectX objects in a separate class, which we will call the wrapper class. Within this class we will store the DirectX objects and functions that are abstract enough to serve most of our future DirectX projects.
1. Within the head of the class add the following using statement to make the COM component accessible directly:
using System;
using DxVBLib;
namespace DirectDraw_lesson1
{
2. Now we will add the DirectX specific classes and objects that we will use throughout almost any DirectDraw application.
namespace DirectDraw_lesson1
{
///<summary>
/// Summary description for DirectXWrapper.
///</summary>
public class DirectXWrapper{
private DirectX7 DirectX = new DirectX7();
private DirectDraw7 directdraw;
private DirectDrawSurface7 dd_primarysurface;
private DirectDrawSurface7 dd_backbuffersurface;
private DDSURFACEDESC2 DD_PrimarySurfaceDesc;
private DDSURFACEDESC2 DD_BackbufferSurfaceDesc;
Lets take a look at these classes and explain what they all mean. The first one you can pretty much guess is the core object of DirectX. Most of the DirectX objects will have to be initialized by using the return value from the DirectX core object functions. We will see that later when we will initialize the DirectDraw object. The DirectDraw class holds all drawing related functions, like e.g. surface painting, buffer swapping. With the DirectDraw class, you will always draw on a surface. A surface can either be the primary output or on an in-memory located buffer (secondary buffer or backbuffer). Most games use at least two surfaces in order to enable double-buffering techniques. This means that all images are first drawn onto an in memory canvas, and then flipped to the primary surface. This causes a nice and smooth update because the screen shown towards the user is updated as an entire frame at once.
Surfaces always need to have a reference pointer to the structure that describes the surface. In order to do so, we will create the DDSURFACEDESC2 structs for both surfaces.
Okay, now we know all this lets update the accessibility of these objects.
Surfaces always need to have a reference pointer to the structure that describes the surface. In order to do so, we will create the DDSURFACEDESC2 structs for both surfaces.
Okay, now we know all this lets update the accessibility of these objects.using System;
using DxVBLib;
namespace DirectDraw_lesson1
{
public class DirectXWrapper
{
// Create and Initialize the DirectX core object class
private DirectX7 DirectX = new DirectX7();
// Create the DirectDraw class
private DirectDraw7 directdraw;
public DirectDraw7 DirectDraw
{
get { return directdraw; }
}
private DirectDrawSurface7 dd_primarysurface;
public DirectDrawSurface7 DD_PrimarySurface
{
get { return dd_primarysurface; }
}
private DirectDrawSurface7 dd_backbuffersurface;
public DirectDrawSurface7 DD_BackbufferSurface
{
get { return dd_backbuffersurface; }
}
private DDSURFACEDESC2 DD_PrimarySurfaceDesc;
private DDSURFACEDESC2 DD_BackbufferSurfaceDesc;
3. Initializing the DirectDraw classOn our main class entry we will initialize the DirectDraw class by using the DirectDrawCreate function from the DirectX object.
public DirectXWrapper()
{
// TODO: Add constructor logic here
//
directdraw = this.DirectX.DirectDrawCreate("");
}
4. The Initialize full screen functionThe following function initializes a new exclusive DirectX screen based on the input parameters.
public void InitializeDirectXFullScreen(int intDisplayFormHandle, int width, int height, int depth)
{
//set co-opperative level for full screen
directdraw.SetCooperativeLevel (intDisplayFormHandle CONST_DDSCLFLAGS.DDSCL_FULLSCREEN | CONST_DDSCLFLAGS.DDSCL_EXCLUSIVE);
directdraw.SetDisplayMode ( width , height , depth , 0 , CONST_DDSDMFLAGS.DDSDM_DEFAULT );
InitializeSurfaces ();
}
The SetCooperativeLevel function sets the behavior of the DirectX screens. In this case, we tell DirectX to provide us a full-screen surface based on the window handle.
5. Surface initialization.Within the function, we will populate the surface describing structs and create the surface by using surface describer struct as reference.
private void InitializeSurfaces()
{ /*
*** Primary Surface : BufferDescription */
//lFlags : indicates that we want to specify the
//DDS_CAPS and backbuffer options
DD_PrimarySurfaceDesc.lFlags = CONST_DDSURFACEDESCFLAGS.DDSD_CAPS | CONST_DDSURFACEDESCFLAGS.DDSD_BACKBUFFERCOUNT;
DD_PrimarySurfaceDesc.ddsCaps.lCaps = CONST_DDSURFACECAPSFLAGS.DDSCAPS_PRIMARYSURFACE | CONST_DDSURFACECAPSFLAGS.DDSCAPS_FLIP | CONST_DDSURFACECAPSFLAGS.DDSCAPS_COMPLEX;
//set backbuffer count to 1 DD_PrimarySurfaceDesc.lBackBufferCount = 1;
/* *** Primary Surface : Initialize */
dd_primarysurface = this.directdraw.CreateSurface (ref DD_PrimarySurfaceDesc);
/* ** Backbuffer : BufferDescription */
DD_BackbufferSurfaceDesc.lFlags = CONST_DDSURFACEDESCFLAGS.DDSD_CAPS;
//set the descriptors caps to backbuffer surface
DD_BackbufferSurfaceDesc.ddsCaps.lCaps = CONST_DDSURFACECAPSFLAGS.DDSCAPS_BACKBUFFER;
/* ** Backbuffer : Initialize */
dd_backbuffersurface = this.dd_primarysurface.GetAttachedSurface (ref DD_BackbufferSurfaceDesc.ddsCaps);
Within DirectX the lFlags property describes which other properties of the object are going to be changed. We will use it to tell that the DD_PrimarySurfaceDesc struct is the primary surface and that it has one extra back-buffer. After the primary surface has been created we add the dd_backbuffersurface as secondary buffer for the primary surface.
6. Flipping buffers.The last step to perform on the game process is to flip the primal surface with the backbuffer surface you will be drawing on. This means that the pointers in memory holding the DirectX surfaces are swapped in order to get a very fast update.
public void FlipBackBufferAndPrimary()
{
//flip backbuffer to primary surface this.dd_primarysurface.Flip(dd_backbuffersurface , CONST_DDFLIPFLAGS.DDFLIP_WAIT);
//.Flip
}
Adding DirectInput supportDirectInput is a DirectX API which handles devices like joysticks, keyboards, and mousses. You can even query its capabilities and then make use of the device specific features like e.g. ForceFeed-back effects and special keyboard buttons. However this article was intended not to dive too deep on this one, we still will create a class to handle certain key actions in order to exit the application. With the DirectInput class you can create a device handler, and populate its buffer data from memory into an object. This is done by using the GetDeviceStateKeyboard command which populates a DIKEYBOARDSTATE object. After this is done, you can search this object for checking if a key was pressed by looping through the .key byte array attribute.
DirectInputClass.cs
using System;using DxVBLib;
namespace DirectDraw_lesson1
{
///<summary>
/// Summary description for DirectInput.
///</summary>
public class DirectInputClass
{
private DirectInput Di;
private DirectInputDevice DiDev;
public DIKEYBOARDSTATE KEYB_STATE = new DIKEYBOARDSTATE();
public DirectInputClass()
{
//
// TODO: Add constructor logic here
//
}
public bool InitializeInputDevice(DirectX7 oDirectX7,int hWND )
{
bool b_return;
try
{
Di = oDirectX7.DirectInputCreate();
DiDev = Di.CreateDevice ("GUID_SysKeyboard");
DiDev.SetCommonDataFormat (CONST_DICOMMONDATAFORMATS.DIFORMAT_KEYBOARD);
DiDev.SetCooperativeLevel (hWND,CONST_DISCLFLAGS.DISCL_NONEXCLUSIVE | CONST_DISCLFLAGS.DISCL_BACKGROUND );
DiDev.Acquire ();
b_return = true;
}
catch
{
b_return = false;
}
return b_return;
}
After creating the DirectInput class by using the DirectX object, we will add a device identified by GUID_SysKeyboard which is the standard keyboard device handler for that buttonized thing in front of you. Then we set the cooperative level by binding it to a window handler. This states out how the device handler is listening to the application.
public void UpdateKeyBoardState()
{
if (Di!=null)
{
DiDev.GetDeviceStateKeyboard (ref KEYB_STATE);
}
}
public bool QuitKeyDown()
{
bool bReturn = false;
if ( KEYB_STATE.key[ ( int )CONST_DIKEYFLAGS.DIK_RETURN ]==0x80 )
{
bReturn = true;
}
return bReturn;
}
public void Acquire()
{
DiDev.Acquire ();
}
public void Unacquire()
{
DiDev.Unacquire ();
}
}
}
Creating the DirectApplication Class
At last!!! All our stuff we will need for the generic part has been put into place. Now we can just hook up the application specific class that will do the stuff we want to do in this article.
DirectXApplication.cs
Join the conversation! Your thoughts help the community grow.