

Introduction
Let's learn the process of uploading and downloading the file in an Angular 9 Web Application using Web API with a back-end of the SQL Server database. After uploading the file, it will display in the UI. A Web API is used to provide data connectivity between the database and the front-end application. Here, we will upload an image and doc file and download both files.
I'm using Visual Studio Code as a tool to build my application. If you don't have Visual Studio Code, you have to download and install it first. Here is the Visual Studio Code download link: Download Visual Studio Code Editor.
You can read my previous articles related to Angular from the following links:
- Cascading Dropdown List Using MVC, Web API And Angular7
- CRUD operations in angular7 using Web API
- Infinite Scroll In Angular 7 Using Web API And SQL Server
- Filtration, Sorting, And Pagination In Angular 7 using Web API And SQL Server
- Import Excel File In Angular 7 Using Web API And SQL Server
- CheckBox Example In Angular 8 Using Web API And SQL Server
- CRUD Operations In Angular Using AG Grid With Web API And SQL
- Deleting Multiple Rows With CheckBoxes In Angular 9 With Web API And SQL
- A Dialog Box In Angular With Angular Material Using Web API And SQL

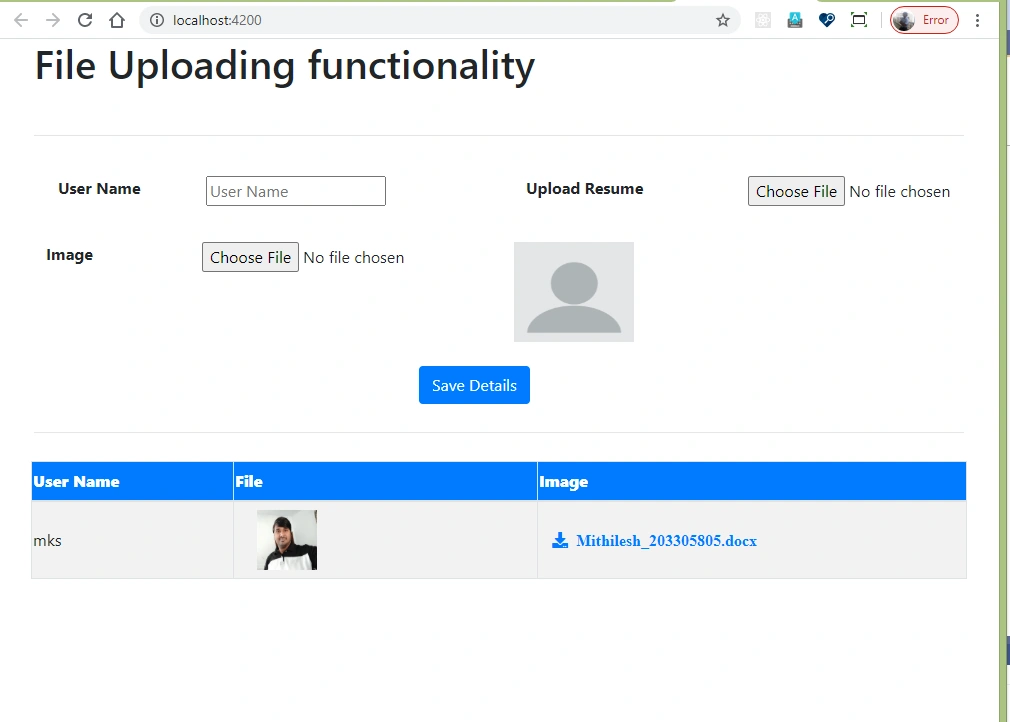
First, take a look at our output:
Step 1 - Create a Database Table
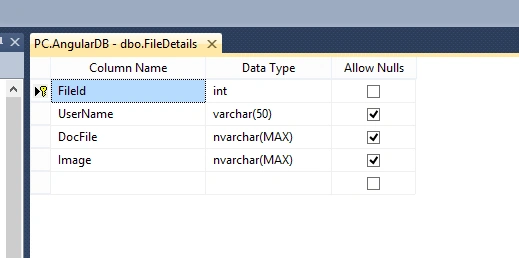
Create a database. Open SQL Server and create a new database table. As you can see from the following image, I have created a database table called File Details with 4 columns.
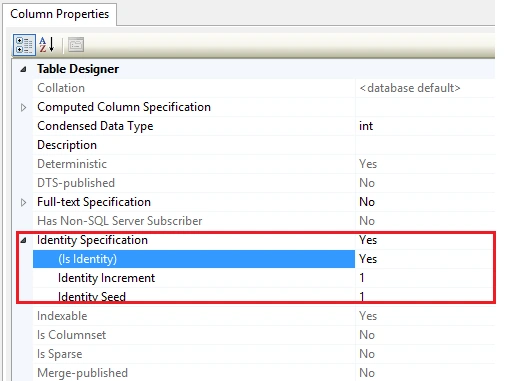
Set Identity to true:
Step 2 - Create a Web API Project
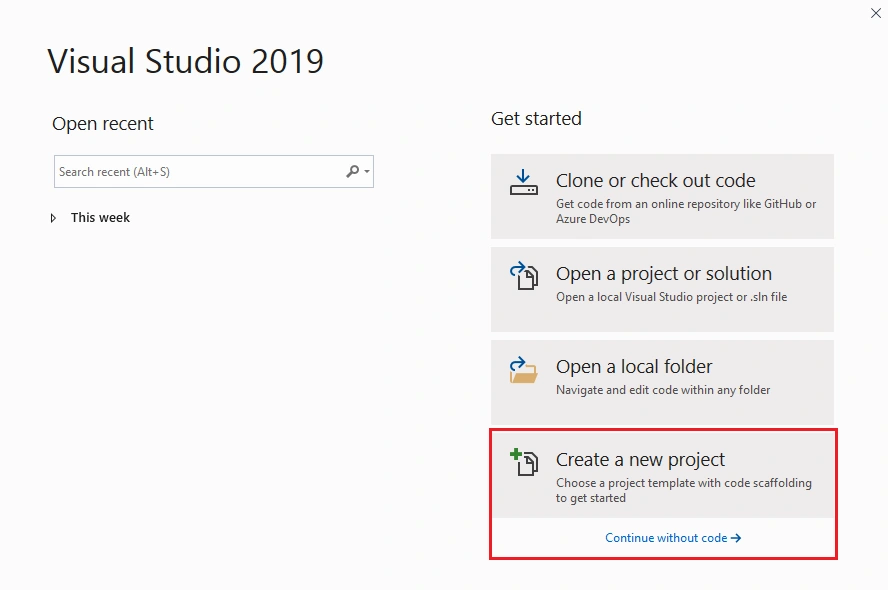
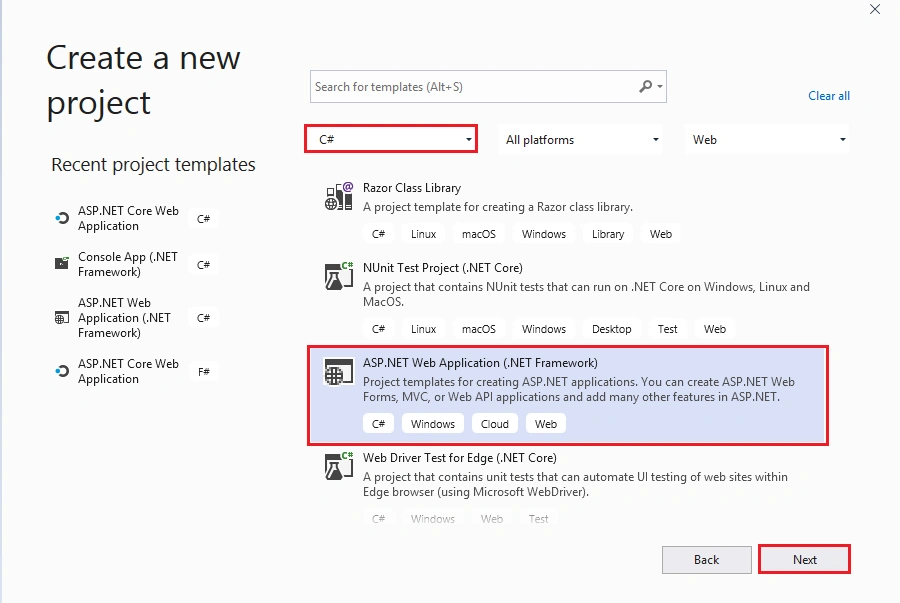
Open Visual Studio and click on create a new project:
Open Visual Studio and click on create a new project:
Select ASP.NET Web Application and click on Next:
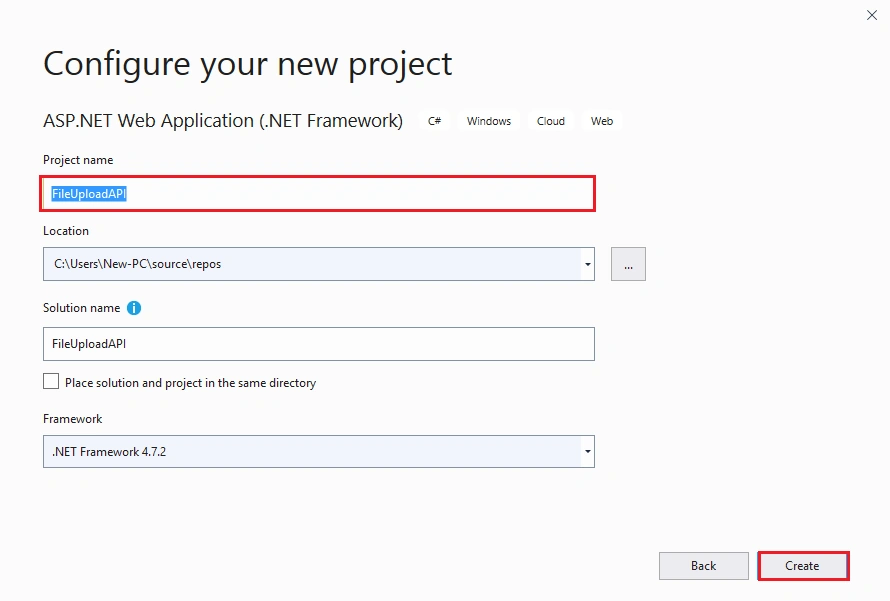
Now give the project a name and click on the create button:
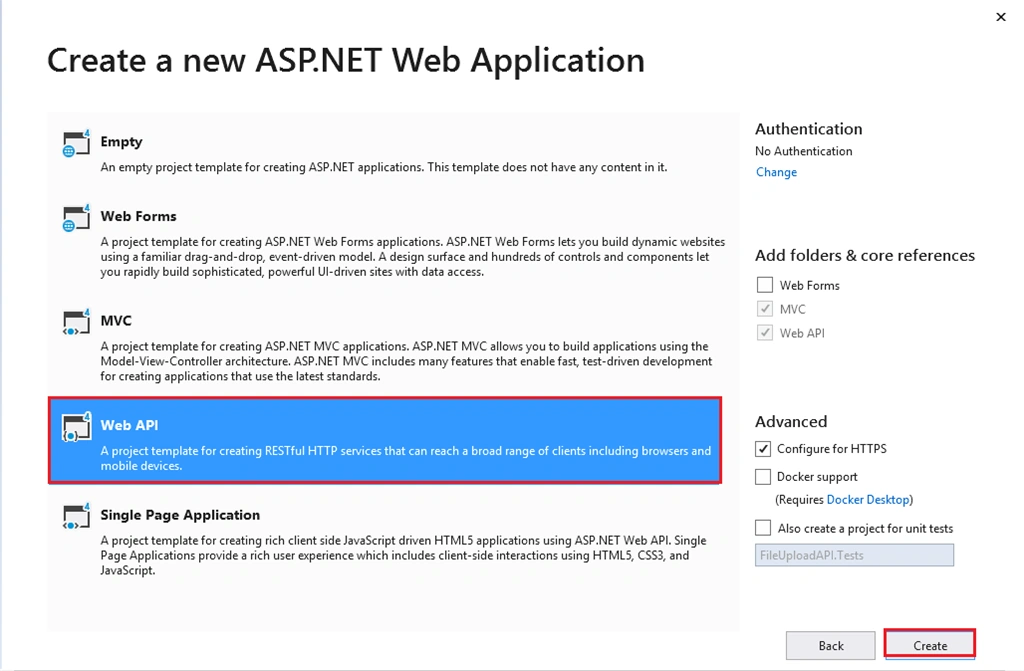
Select Web API.
Step 3 - Add ADO.NET Entity Data Model
Now, select the Models folder and right-click. Then, go to Add >> New Item >> select Data in left panel >>ADO.NET Entity Data Model.
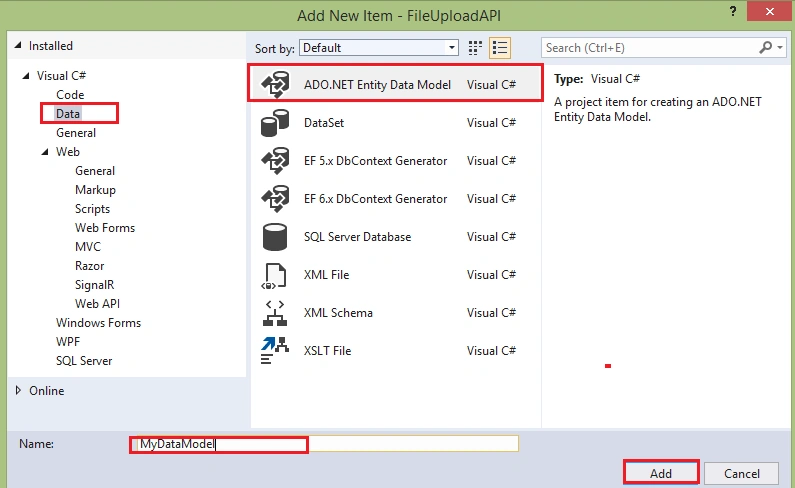
Click Add
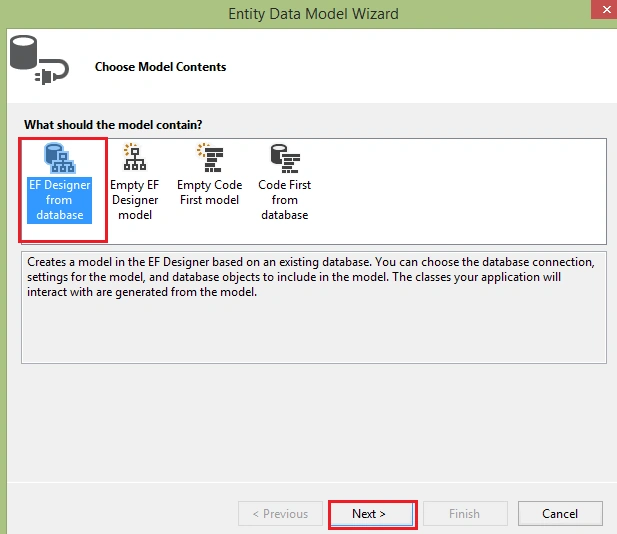
Click Next
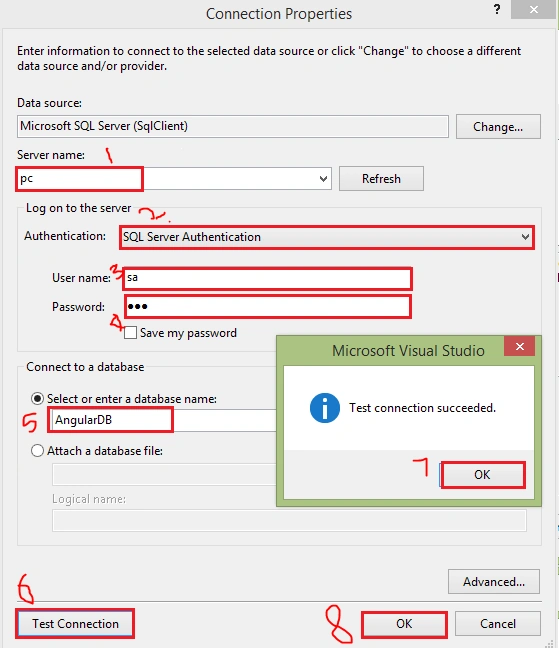
Give the server the name of the SQL server and its credential, then select the database and test connection, then click the ok button.
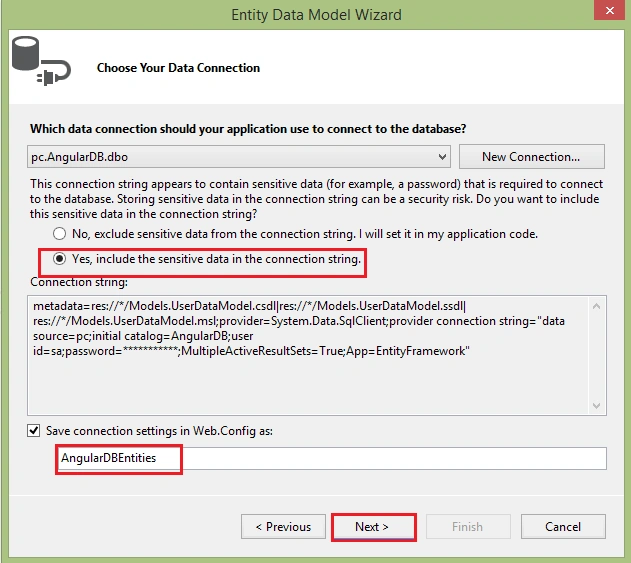
Click Next button.
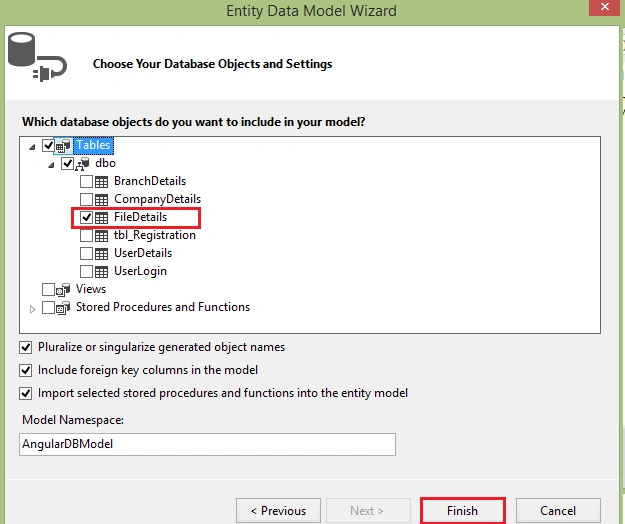
Select the UserDetails table and click Finish.
Step 4 - Add API controller
Go to the Controller folder in your API application and right-click >> Add >> Controller.
Select Web API 2 Controller-Empty.
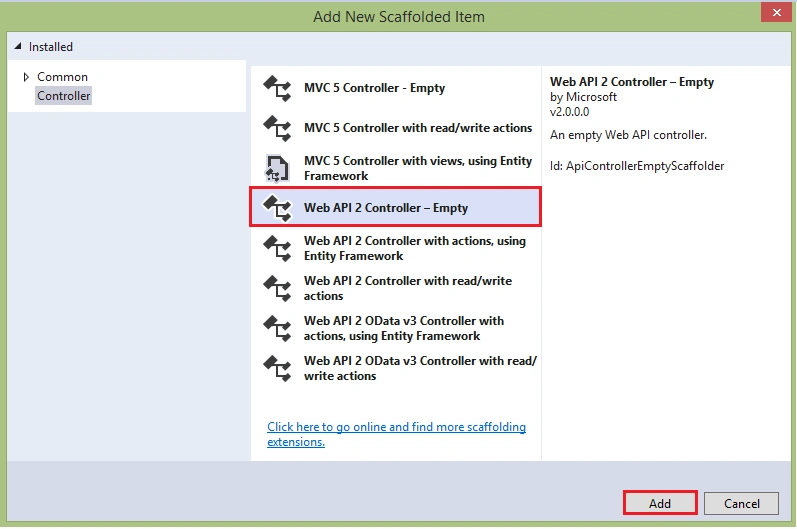
Click on Add button
Step 5
Write the logic for uploading and downloading the file.
- using System;
- using System.Collections.Generic;
- using System.IO;
- using System.Linq;
- using System.Net;
- using System.Net.Http;
- using System.Net.Http.Headers;
- using System.Web;
- using System.Web.Http;
- using FileUploadAPI.Models;
- namespace FileUploadAPI.Controllers {
- [RoutePrefix("API/Demo")]
- public class DemoAPIController: ApiController {
- [HttpPost]
- [Route("AddFileDetails")]
- public IHttpActionResult AddFile() {
- string result = "";
- try {
- AngularDBEntities objEntity = new AngularDBEntities();
- FileDetail objFile = new FileDetail();
- string fileName = null;
- string imageName = null;
- var httpRequest = HttpContext.Current.Request;
- var postedImage = httpRequest.Files["ImageUpload"];
- var postedFile = httpRequest.Files["FileUpload"];
- objFile.UserName = httpRequest.Form["UserName"];
- if (postedImage != null) {
- imageName = new String(Path.GetFileNameWithoutExtension(postedImage.FileName).Take(10).ToArray()).Replace(" ", "-");
- imageName = imageName + DateTime.Now.ToString("yymmssfff") + Path.GetExtension(postedImage.FileName);
- var filePath = HttpContext.Current.Server.MapPath("~/Files/" + imageName);
- postedImage.SaveAs(filePath);
- }
- if (postedFile != null) {
- fileName = new String(Path.GetFileNameWithoutExtension(postedFile.FileName).Take(10).ToArray()).Replace(" ", "-");
- fileName = fileName + DateTime.Now.ToString("yymmssfff") + Path.GetExtension(postedFile.FileName);
- var filePath = HttpContext.Current.Server.MapPath("~/Files/" + fileName);
- postedFile.SaveAs(filePath);
- }
- objFile.Image = imageName;
- objFile.DocFile = fileName;
- objEntity.FileDetails.Add(objFile);
- int i = objEntity.SaveChanges();
- if (i > 0) {
- result = "File uploaded sucessfully";
- } else {
- result = "File uploaded faild";
- }
- } catch (Exception) {
- throw;
- }
- return Ok(result);
- }
- [HttpGet]
- [Route("GetFile")]
- //download file api
- public HttpResponseMessage GetFile(string docFile) {
- //Create HTTP Response.
- HttpResponseMessage response = Request.CreateResponse(HttpStatusCode.OK);
- //Set the File Path.
- string filePath = System.Web.HttpContext.Current.Server.MapPath("~/Files/") + docFile + ".docx";
- //Check whether File exists.
- if (!File.Exists(filePath)) {
- //Throw 404 (Not Found) exception if File not found.
- response.StatusCode = HttpStatusCode.NotFound;
- response.ReasonPhrase = string.Format("File not found: {0} .", docFile);
- throw new HttpResponseException(response);
- }
- //Read the File into a Byte Array.
- byte[] bytes = File.ReadAllBytes(filePath);
- //Set the Response Content.
- response.Content = new ByteArrayContent(bytes);
- //Set the Response Content Length.
- response.Content.Headers.ContentLength = bytes.LongLength;
- //Set the Content Disposition Header Value and FileName.
- response.Content.Headers.ContentDisposition = new ContentDispositionHeaderValue("attachment");
- response.Content.Headers.ContentDisposition.FileName = docFile + ".docx";
- //Set the File Content Type.
- response.Content.Headers.ContentType = new MediaTypeHeaderValue(MimeMapping.GetMimeMapping(docFile + ".docx"));
- return response;
- }
- [HttpGet]
- [Route("GetFileDetails")]
- public IHttpActionResult GetFile() {
- var url = HttpContext.Current.Request.Url;
- IEnumerable < FileDetailsVM > lstFile = new List < FileDetailsVM > ();
- try {
- AngularDBEntities objEntity = new AngularDBEntities();
- lstFile = objEntity.FileDetails.Select(a => new FileDetailsVM {
- FileId = a.FileId,
- UserName = a.UserName,
- Image = url.Scheme + "://" + url.Host + ":" + url.Port + "/Files/" + a.Image,
- DocFile = a.DocFile,
- ImageName = a.Image
- }).ToList();
- } catch (Exception) {
- throw;
- }
- return Ok(lstFile);
- }
- [HttpGet]
- [Route("GetImage")]
- //download Image file api
- public HttpResponseMessage GetImage(string image) {
- //Create HTTP Response.
- HttpResponseMessage response = Request.CreateResponse(HttpStatusCode.OK);
- //Set the File Path.
- string filePath = System.Web.HttpContext.Current.Server.MapPath("~/Files/") + image + ".PNG";
- //Check whether File exists.
- if (!File.Exists(filePath)) {
- //Throw 404 (Not Found) exception if File not found.
- response.StatusCode = HttpStatusCode.NotFound;
- response.ReasonPhrase = string.Format("File not found: {0} .", image);
- throw new HttpResponseException(response);
- }
- //Read the File into a Byte Array.
- byte[] bytes = File.ReadAllBytes(filePath);
- //Set the Response Content.
- response.Content = new ByteArrayContent(bytes);
- //Set the Response Content Length.
- response.Content.Headers.ContentLength = bytes.LongLength;
- //Set the Content Disposition Header Value and FileName.
- response.Content.Headers.ContentDisposition = new ContentDispositionHeaderValue("attachment");
- response.Content.Headers.ContentDisposition.FileName = image + ".PNG";
- //Set the File Content Type.
- response.Content.Headers.ContentType = new MediaTypeHeaderValue(MimeMapping.GetMimeMapping(image + ".PNG"));
- return response;
- }
- }
- }
Step 6 - Create an Angular application for building the UI Application
Now, let's create the web application in Angular 9 that will consume the Web API.
Now, let's create the web application in Angular 9 that will consume the Web API.
First, we have to make sure that we have Angular CLI installed.
Open the command prompt and type the below code and press ENTER.
npm install -g @angular/cli
Now, open the Visual Studio Code and create a project.
Open TERMINAL in Visual Studio Code and type the following syntax to create a new project. Let us name it FileUploading.
ng new FileUploading
After that, hit ENTER. It will take a while to create the project.
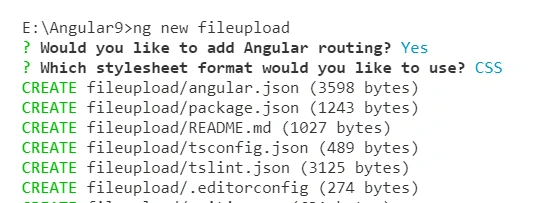
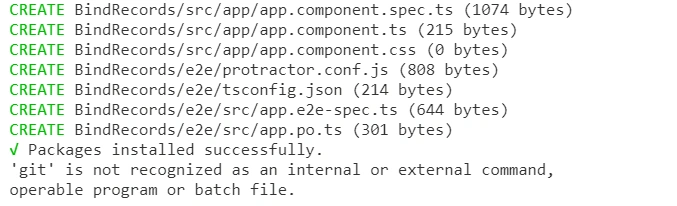
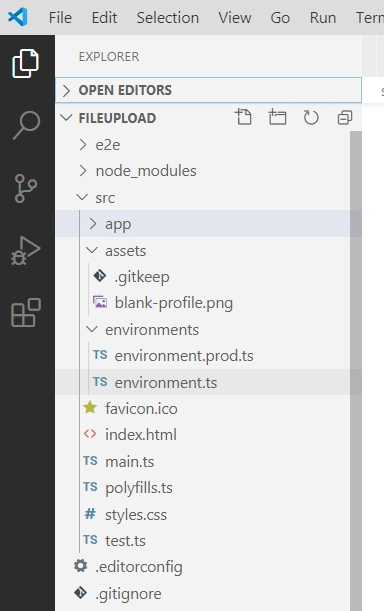
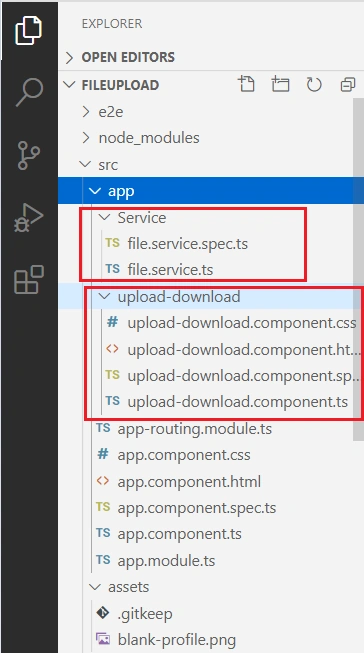
Once created, the project should look like this.
Step 7 - Installing file-server
FileSaver.js is the solution to saving files on the client-side, and is perfect for web apps that generate files on the client.
For more details, check this doc.
Open TERMINAL in Visual Studio Code and type the following syntax to create a new project.
npm i file-saver
Step 8 - Create a component and service
Now, we will create components to provide UI.
I'm going to create a new component, UploadDownload.
Go to the TERMINAL and go our angular project location using the following command:
cd projectName
Now, write the following command that will create a component.
ng g c UploadDownload
Press ENTER.
Now, we create a model class a create a service.
ng g s service/file
Step 9 - Install bootstrap
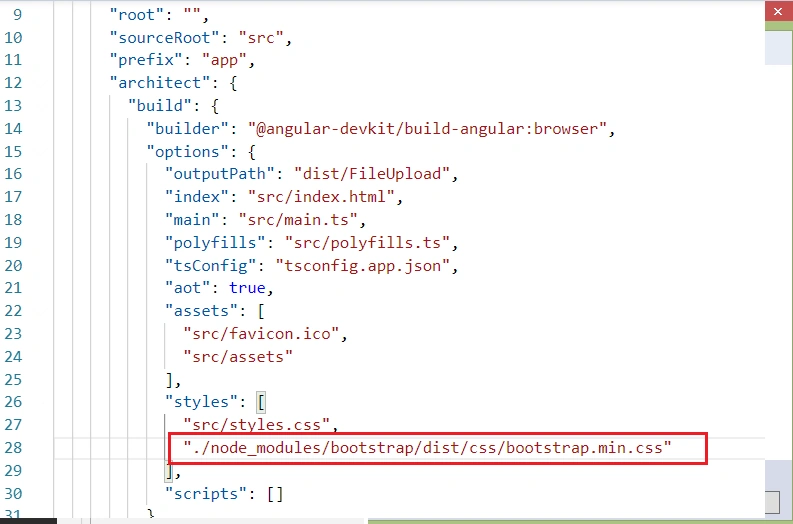
Now, we will install bootstrap to build a beautiful UI of our Angular application.
npm install bootstrap --save
Step 10
Add a library in the app.module.
- import { BrowserModule } from '@angular/platform-browser';
- import { NgModule } from '@angular/core';
- import { AppRoutingModule } from './app-routing.module';
- import { AppComponent } from './app.component';
- import {ReactiveFormsModule} from '@angular/forms';
- import { UploadDownloadComponent } from './upload-download/upload-download.component';
- import { HttpClientModule } from '@angular/common/http';
- @NgModule({
- declarations: [
- AppComponent,
- UploadDownloadComponent
- ],
- imports: [
- BrowserModule,
- AppRoutingModule,
- ReactiveFormsModule,
- HttpClientModule
- ],
- providers: [],
- bootstrap: [AppComponent]
- })
- export class AppModule { }
Step 11
Write typescript code in service:
- import {
- Injectable
- } from '@angular/core';
- import {
- Observable
- } from 'rxjs';
- import {
- HttpClient,
- HttpHeaders
- } from '@angular/common/http';
- @Injectable({
- providedIn: 'root'
- })
- export class FileService {
- url = 'https://localhost:44316/API/Demo';
- constructor(private http: HttpClient) {}
- public downloadFile(docFile: string): Observable < Blob > {
- return this.http.get(this.url + '/GetFile?docFile=' + docFile, {
- responseType: 'blob'
- });
- }
- public downloadImage(image: string): Observable < Blob > {
- return this.http.get(this.url + '/GetImage?image=' + image, {
- responseType: 'blob'
- });
- }
- public getFiles(): Observable < any[] > {
- return this.http.get < any[] > (this.url + '/GetFileDetails');
- }
- AddFileDetails(data: FormData): Observable < string > {
- let headers = new HttpHeaders();
- headers.append('Content-Type', 'application/json');
- const httpOptions = {
- headers: headers
- };
- return this.http.post < string > (this.url + '/AddFileDetails/', data, httpOptions);
- }
- }
Step 12 - Write HTML code in the upload-download.component
Open the upload-download.component.ts and write the below code.
- import {
- Component,
- OnInit,
- ViewChild
- } from '@angular/core';
- import {
- saveAs as importedSaveAs
- } from "file-saver";
- import {
- FileService
- } from '../Service/file.service';
- import {
- Validators,
- FormBuilder
- } from '@angular/forms';
- @Component({
- selector: 'app-upload-download',
- templateUrl: './upload-download.component.html',
- styleUrls: ['./upload-download.component.css']
- })
- export class UploadDownloadComponent implements OnInit {
- @ViewChild('resumeInput', {
- static: true
- }) resumeInput;
- @ViewChild('logoInput', {
- static: true
- }) logoInput;
- selectedFile: File = null;
- imageUrl: string;
- fileToUpload: File = null;
- saveFileForm: any;
- lstFileDetails: any;
- constructor(private service: FileService, private formBuilder: FormBuilder) {}
- ngOnInit(): void {
- this.imageUrl = './assets/blank-profile.png';
- this.saveFileForm = this.formBuilder.group({
- UserName: ['', [Validators.required]]
- });
- this.service.getFiles().subscribe(result => {
- this.lstFileDetails = result;
- })
- }
- downloadDocFile(data) {
- const DocFileName = data.DocFile;
- var DocFile = DocFileName.slice(0, -5);
- this.service.downloadFile(DocFile).subscribe((data) => {
- importedSaveAs(data, DocFile)
- });
- }
- onSelectFile(file: FileList) {
- this.fileToUpload = file.item(0);
- var reader = new FileReader();
- reader.onload = (event: any) => {
- this.imageUrl = event.target.result;
- }
- reader.readAsDataURL(this.fileToUpload);
- }
- downloadImage(data) {
- const ImageName = data.ImageName;
- var image = ImageName.slice(0, -4);
- this.service.downloadImage(image).subscribe((data) => {
- importedSaveAs(data, image)
- });
- }
- onExpSubmit() {
- debugger;
- if (this.saveFileForm.invalid) {
- return;
- }
- let formData = new FormData();
- formData.append('ImageUpload', this.logoInput.nativeElement.files[0]);
- formData.append('FileUpload', this.resumeInput.nativeElement.files[0]);
- formData.append('UserName', this.saveFileForm.value.UserName);
- this.service.AddFileDetails(formData).subscribe(result => {});
- }
- }
Now, we will write the code for the design of view page in Angular UI. Open upload-download.component.html and write the below HTML code.
- <div class="container">
- <h1>File Uploading functionality</h1>
- <br>
- <hr>
- <form [formGroup]="saveFileForm" (ngSubmit)="onExpSubmit()">
- <div class="row">
- <div class="col-md-6">
- <div class="row">
- <div class="col-md-4">
- <b>User Name</b>
- </div>
- <div class="col-md-5">
- <input type="text" formControlName="UserName" placeholder="User Name">
- </div>
- </div>
- </div>
- <div class="col-md-6">
- <div class="row">
- <div class="col-md-6">
- <b>Upload Resume</b>
- </div>
- <div class="col-md-6">
- <input type='file' #resumeInput>
- <br>
- </div>
- </div>
- </div>
- </div>
- <div class="row">
- <div class="col-md-2">
- <b>Image</b>
- </div>
- <div class="col-md-4">
- <input type='file' #logoInput (change)="onSelectFile($event.target.files)">
- <br>
- </div>
- <div class="col-md-4">
- <img [src]="imageUrl" height="100" width="120">
- </div>
- </div>
- <div class="row" align="center" style="padding-left: 400px;">
- <button type="submit" class="button" class="btn btn-primary" color="primary">Save Details
- </button>
- </div>
- </form>
- <hr>
- <div class="row">
- <table width="100%" class="responsive-table table-striped table-bordered table-hover">
- <thead>
- <tr class="btn-primary" style="height: 40px;">
- <th style="width:10%;">
- <b>User Name</b>
- </th>
- <th style="width:15%;">
- <b>File</b>
- </th>
- <th style="width:20%;">
- <b>Image</b>
- </th>
- </tr>
- </thead>
- <tbody>
- <tr *ngFor="let item of lstFileDetails">
- <td>
- <span>{{item.UserName}}</span>
- </td>
- <td>
- <span>
- <button (click)="downloadImage(item)" class="btn btn-link">
- <span>
- <img [src]="item.Image" height="60" width="60">
- </span>
- </button>
- </span>
- </td>
- <td>
- <button (click)="downloadDocFile(item)" class="btn btn-link">
- <span class="fa fa-download"> {{item.DocFile}}</span>
- </button>
- </td>
- </tr>
- </tbody>
- </table>
- <br>
- </div>
- </div>
The core functionality has almost been completed, so now go to app.component.html and set the page.
- <app-upload-download></app-upload-download>
Now, we have completed all the code functionality. Now, we will run the out project but before that, we need to set CORS because if you consume the Web API, Angular blocks the URL and we called this issue CORS(Cross OriginResource Sharing).
Step 13. Set CORS (Cross-Origin Resource Sharing)
Go to the Web API project.
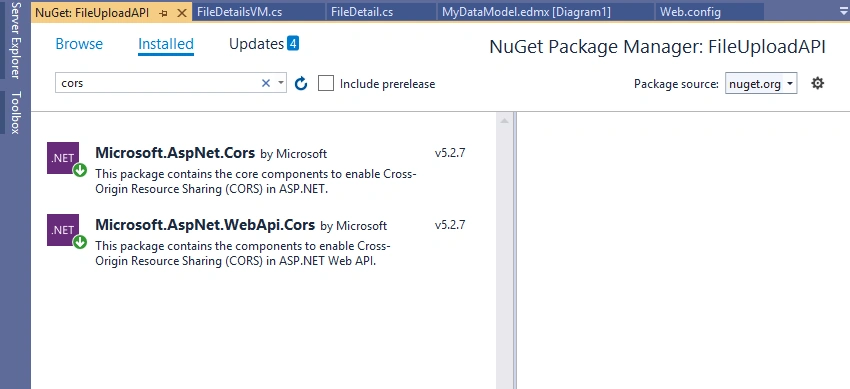
Download a NuGet package for CORS. Go to NuGet Package Manager and download the following file.
After that, go to App_Start folder in Web API project and open WebApiConfig.cs class. Here, modify the Register method with the below code.
Add namespace
- using System.Web.Http.Cors;
After that, add the below code inside Register method.
- var cors = new EnableCorsAttribute("*", "*", "*"); //origins,headers,methods
- config.EnableCors(cors);
Step 14. Run
We have completed all the needed code functionality for our functionality. Before running the application, first, make sure to save your work.
Now, let's run the app and see how it works.
Open TERMINAL and write the following command to run the program.
ng serve -o
The output looks like the following image. It's a stunning UI that's been created.
Conclusion
In this article, we have learned how to perform a file upload and download operation in Angular 9 using Web API and SQL Server. We started by installing and creating the create-angular-app then used it to create our Angular application. Next, we installed file-saver bootstrap in the Angular application. After that, we created two methods for uploading images and doc files and also downloading them to the HTTP request.
I hope you enjoyed this article. I'm always willing to reply to any query or comment.
ARUN EPosted Oct 24, 2025, 10:18 AM
Thanks brother ,
sagar metkarPosted Sep 11, 2022, 4:13 PM
Very nice thanks you so much it's very helpful demo...
ichraq maazouzePosted Jun 24, 2022, 2:34 PM
I got an error on FileDetailsVMI Enumerable<FileDetailsVM> lstFile = new List<FileDetailsVM>();
Rajesh KumarPosted Jun 8, 2022, 8:27 AM
Thanks for providing this solutin
desh deepakPosted May 25, 2022, 1:36 PM
Thanks for providing this solution , I am getting below error in Visual studio :-Schema specified is not valid. Errors: Models.MyDataModels.msl(3,4) : error 2062: No mapping specified for instances of the EntitySet and Association Set in the EntityContainer Angular DBEntities.
Sulakshana DeorePosted Nov 18, 2021, 12:34 PM
Getting error on line Property 'files' does not exist on type 'EventTarget'. <input type='file' #logoInput (change)="onSelectFile($event.target.files)">
franklin francisPosted Sep 27, 2021, 9:04 AM
I tried this for uploading an Image file. In my project the API method is hitting, but the file is not receiving in the HttpContext.Current.Request. what should i do?
kokila priyaPosted Jun 23, 2021, 10:17 AM
Can you please leave a notes on token based auth.?
Abhishek TyagiPosted Jun 10, 2021, 5:48 PM
Hi Mithilesh, I got this error : (Type 'null' is not assignable to type 'File'.ts(2322)), When I try to declare this one: fileToUpload: File = null;
Pranav BajpaiPosted Feb 9, 2021, 7:19 AM
What if I want to upload the files in a folder on the system and not in the API folder
Pranav BajpaiPosted Jan 17, 2021, 11:18 AM
What do I have to do to view a file after uploading it? here we are just downloading it what if I want to view the uploaded file in another window?
Najmul IslamPosted Oct 26, 2020, 2:15 AM
Perfect Working this code, But one draw back is that when I download file it is downloading server site then open save file popup saver. This is not good when file size big (eg. 15-20 MB). But I want to download on client site, Can you provide modify code for GetImage() function.
FernandoPosted Oct 21, 2020, 3:47 AM
Excelente articulo!
Hamid KhanPosted Oct 12, 2020, 1:14 PM
Very good step by stt explain.
Rokeya AkterPosted Aug 25, 2020, 1:15 AM
Hello sir, thank you for helping me to find the solution but File details button is not working or data doesnot save database , i got this kind of error Failed to load resource: net::ERR_CONNECTION_REFUSED, HttpErrorResponse?{headers: HttpHeaders, status: 0, statusText: "Unknown Error", url: "http://localhost:55556/API/Demo/AddFileDetails/", ok: false,?…}..i want to mention you that i try a lot times but couldnot solve it...would you kindly help me..
Rokeya AkterPosted Aug 23, 2020, 6:23 AM
This article is awesome but i face some problems when i try to do this..I would be greatful to you if you help me to solve this problm..
Ramzanali MominPosted Jul 13, 2020, 4:09 AM
Thanks, sir Please suggest how to integrate PayTM service in mvc web api to anugular 8
Prince GoudPosted Jul 7, 2020, 6:02 AM
Thanks mithilesh kumar for you giving this Article. Can you upload multiple roles based authorization using angular 9 + webapi + SQL . I mean dymical change the side bar elements based on the role .
SoNuPosted Jun 20, 2020, 9:37 AM
Informative tutorial, thanks :) Can you write a tutorial for how to export ag grid ( community version ) data into excel in Angular 9 . Can we create excel file in web api and return the file to user.
rd sboaPosted Jun 15, 2020, 11:54 AM
nice and keep writing