

Introduction
ASP.NET Core is a free and open-source web framework and successor to ASP.NET, developed by Microsoft and the community. In this article, I will guide you to create a simple ASP.net core website. We aren't going to go deep in asp.net core but we are just simply creating a basic website that only shows a welcome message. I hope you will like this article.
Here are the steps to create a simple asp.net core website.
Step 1. Open Visual Studio, here I am using Visual Studio 2019.
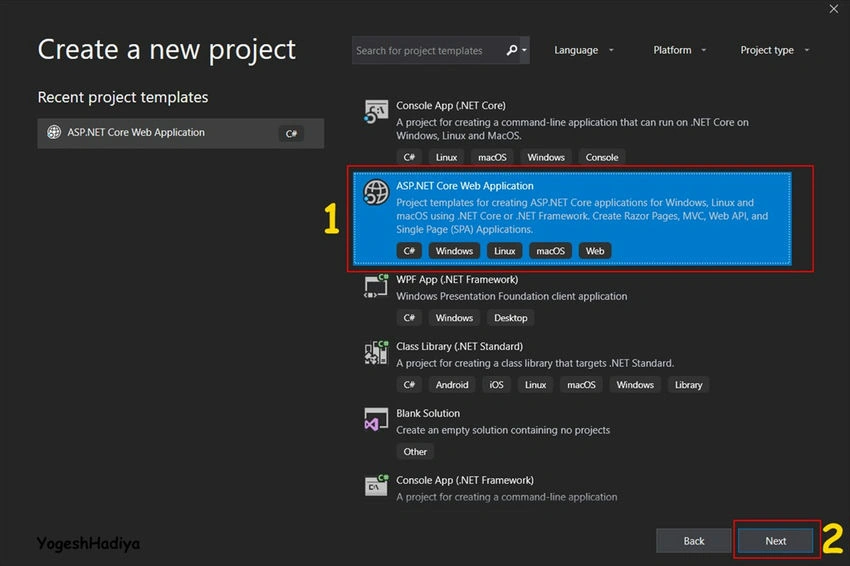
Step 2. Search for the asp.net core web application, select it, and click on the next button.
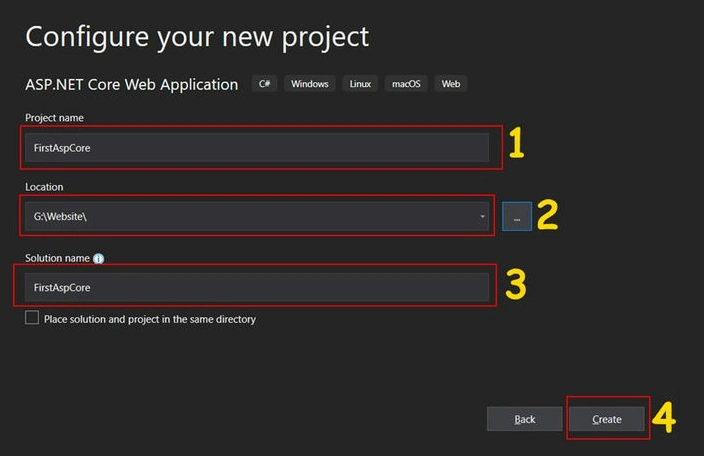
Step 3. On the next screen, you will need to insert a few details, including your project name, your project location, and your solution name. After inserting all these details click on the Create button. Following are the details to enter:
- Project name: In this field, you need to enter your project name.
- Location: In this field, you need to select your project location where you want to store this project. You can select a folder by clicking on the button beside the location field.
- Solution Name: In this field, you need to enter the solution name; this is shown in Solution Explorer.
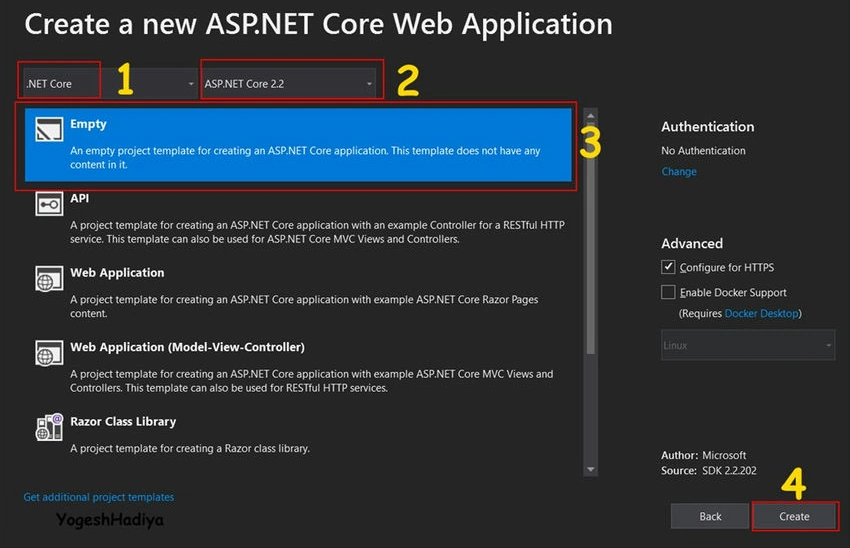
Step 4. Now select the framework as .Net Core and select its version, then select Empty project template and click on create button.
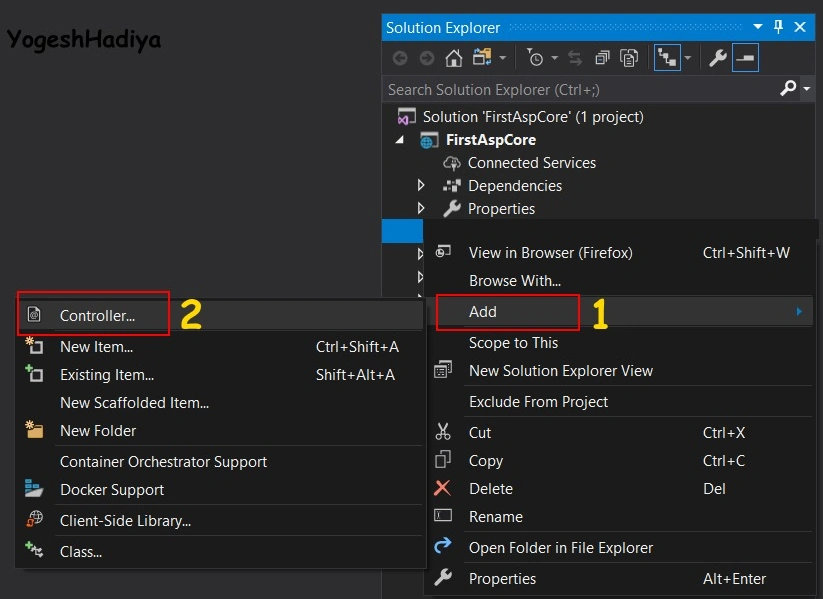
Step 5. Now your website/project is open in Visual Studio. Open Solution Explorer and right-click on your project name, then click on the Add option, then click on New Folder. Right-click on ProjectName -> Add->New Folder. Give this folder the name Controllers (not Controller because that will cause an issue later when you add a new controller.)

Step 6. Now right-click on the Controllers folder, click on the Add option, and then click on Controller.
Step 7. After clicking on the controller option you can see a new popup window. In this popup you will get the following options:
- MVC Controller: Empty
- MVC Controller with read/write action
- MVC Controller with views using entity framework
- API Controller: Empty
- API Controller with read/write action
- API Controller with action using Entity Framework

Select MVC Controller - Empty and click on Add.
Step 8. Give your controller name but do not remove the word Controller from after it, and then click on the add button. This will create a new controller Named 'Home' in your controllers folder.

Step 9. Now your controller is created and there is also one action method called Index. Here visual studio by default creates a method called index. You can create other methods also. Now Right click in that action method and click on Add view for adding an html file for that action method.
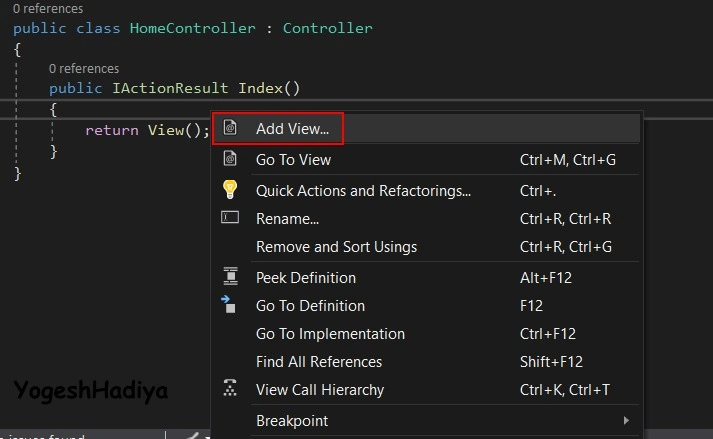
Step 10. Now you will see a new popup window. In this window, you will get the following options.
- View Name: Name of your view or your HTML file.
- Template: There are many templates. Empty templates only provide html files with a title and h1 tag.
- Model class: if you select a template other than empty then you will need to select an entity model.
- Other Options
- Create as a partial view: This type of view does not get called directly, you need to call this type of file in another HTML file or you can call it in a modal popup.
- Reference Script libraries: By default, this option is checked.
- Use a layout file: If you do not create a view as a partial view you need to select a layout file. Layout file is basically a predefined template; if you do not select any layout file then Visual Studio by default selects a layout file which is defined in _the viewstart file.
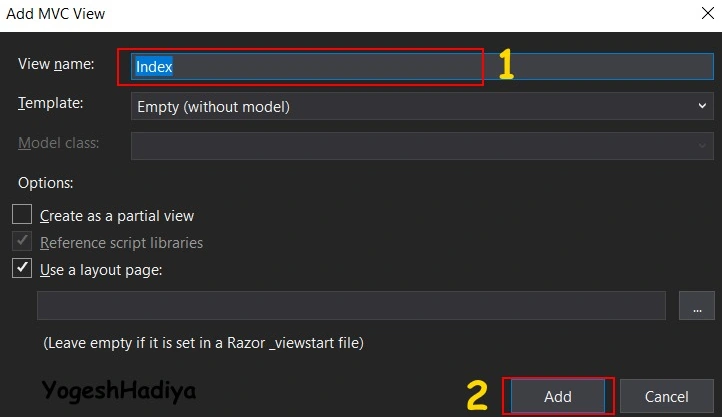
Give your file name, select an empty template, and check on the Use a Layout page. However, we do not have any layout file but check it and click on the Add button. It will add your file to the View folder.
Step 11. Now open your html file in the views folder and change it as per your choice. Here I only add a message.
Step 12. Now open your Setup.cs file and change that file as shown in the below image.
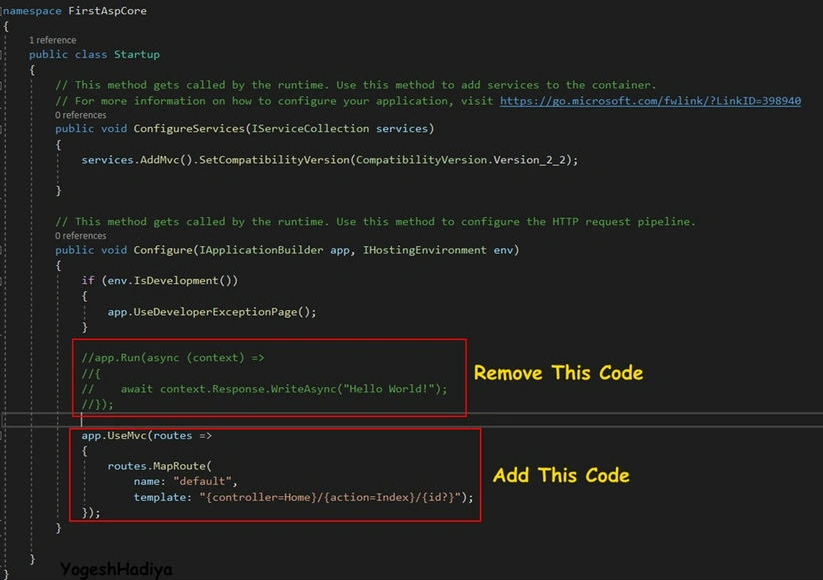
app.UseMvc(routes =>
{
    routes.MapRoute(
        name: "default",
        template: "{controller=Home}/{action=Index}/{id?}");
});
Code Explanation
In the above image, you can see that the compiler already created some code in startup.cs file. This code returns a hello world string on your webpage. But we want to call our html view so we need to change this code.
- app.UserMvc: This defines that this application/website uses MVC.
- Route.MapRoute: This section calls file or controller from the website
- Name: This is an optional name for identifying if you have more routes.
- Template: Here you need to pass the pattern of your application. It is an optional parameter that you can pass. A question mark after id defines that the id may or may not have value, which means this is a nullable object.
Step 13. Now run your application and your first asp.net core website is created.

Summary
In this article, we created a blank website page of the asp.net core framework. I hope you liked this article. If you like it share it with your friends and stay tuned.
Christian ProgrammerPosted Mar 11, 2021, 2:40 AM
This is all deprecated as of step 10