

This is in continuation of the articles of the series “Learning Ansible”. In the previous article, we saw templates and their real-life use case.
Here, in this article, we will be learning the below topics,
- Roles in Ansible.
- Ansible Galaxy
A playbook contains a lot of things like tasks, handlers, templates, files, variables, etc. So, over a period of time, it grows in size and then it becomes really difficult to understand.
For example, when you have songs on your laptop then you categorize them according to language, mood, artists, etc. So, suppose you want to listen to Hindi songs; you can directly go to that directory and look for your song.
Similarly, as Ansible believes in SIMPLICITY, we have something called Roles.
We can have a different role like MySQL, handlers, build server and these roles will have separate YAML files for execution.
So, we will create a directory structure for our playbook and we will distribute everything like tasks, handlers, etc. inside our playbook into different folders.
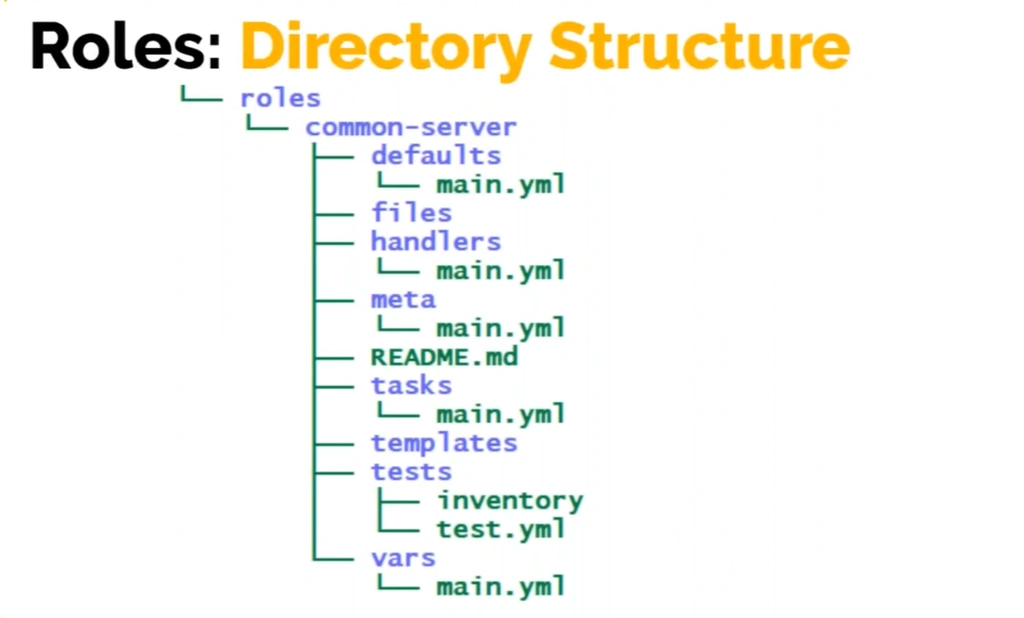
So, we will create a directory with name roles and under that, we will create a subdirectory for the role names and that directory will have further directories, for example tasks and that directory will have main.yml and it will just have a list of tasks.
Similarly, vars/main.yml will contains only variables.
Templates will contain your templates.
Files will contain your file which we can push using the copy module.
Handlers/main.yml will contain only handlers.
Meta/main.yml will contain the metadata.
Defaults/main.yml will also contain variables but vars/main.yml have higher priority as compared to defaults/main.yml
Now let’s get started and write our playbook with the roles and after that, we will create the directory structure.
First, install the tree with the below command so that we can see the roles directory structure.
- sudo snap install tree
Then, create a directory with the name roles and run the below commands.
- mkdir roles

- cd roles
- ansible-galaxy inti post_setup

This command will generate the directory structure for the roles and will create a new role named post_setup (this name can be anything).
Then run tree command.
- tree
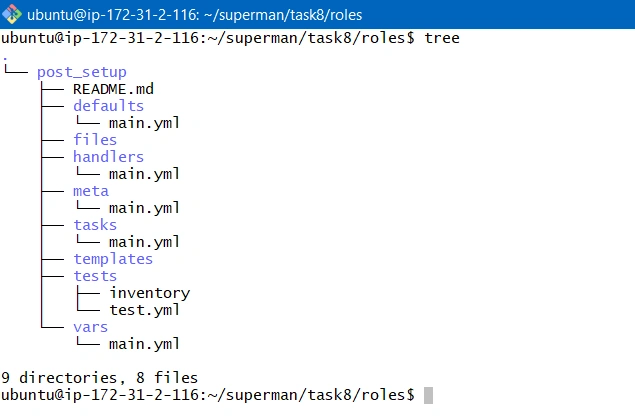
We can see that our directory structure for roles has been generated.

The next step is really simple; we can see that as of now our playbook looks something like below.
Our Existing Playbook Code
- ---
- - name: Deploying NTP Service
- hosts: all
- become: yes
- tasks:
- - name: Install packages on RedHat OS
- yum:
- name: "{{item}}"
- state: present
- loop:
- - ntp
- - unzip
- - git
- - wget
- - zip
- when: ansible_os_family == "RedHat"
- - name: Install packages on Debian OS
- apt:
- name: "{{item}}"
- state: present
- loop:
- - ntp
- - unzip
- - git
- - wget
- - zip
- when: ansible_os_family == "Debian"
- - name: Start and Enable NTP service in RedHat OS
- service:
- name: ntpd
- state: started
- enabled: yes
- when: ansible_os_family == "RedHat"
- - name: Start and Enable NTP service in Debian OS
- service:
- name: ntp
- state: started
- enabled: yes
- when: ansible_os_family == "Debian"
- - name: Deploy the NTP configuration file for Debian OS
- template:
- src: templates/ntp_debian.j2
- dest: /etc/ntp.conf
- backup: yes
- when: ansible_os_family == "Debian"
- notify:
- - Restart NTP service in Debian OS
- - name: Deploy the NTP configuration file for RedHat OS
- template:
- src: templates/ntp_redhat.j2
- dest: /etc/ntp.conf
- backup: yes
- when: ansible_os_family == "RedHat"
- notify:
- - Restart NTP service in RedHat OS
- handlers:
- - name: Restart NTP service in RedHat OS
- service:
- name: ntpd
- state: restarted
- when: ansible_os_family == "RedHat"
- - name: Restart NTP service in Debian OS
- service:
- name: ntp
- state: restarted
- when: ansible_os_family == "Debian"
Taking out Tasks from Playbook
We can see there are lots of tasks and handlers. So now, we just need to copy things from here and paste them in the respective location under roles folder.
So first, we will copy all the tasks from our existing playbook shown above ntp_playbook.yml and will move all the tasks to roles/post_setup/tasks/main.yml file.
Open the file with the below command.
- vim roles/post_setup/tasks/main.yml
and paste all tasks.
Now, our updated roles/post_setup/tasks/main.yml file looks like below.
- ---
- - name: Install packages on RedHat OS
- yum:
- name: "{{item}}"
- state: present
- loop:
- - ntp
- - unzip
- - git
- - wget
- - zip
- when: ansible_os_family == "RedHat"
- - name: Install packages on Debian OS
- apt:
- name: "{{item}}"
- state: present
- loop:
- - ntp
- - unzip
- - git
- - wget
- - zip
- when: ansible_os_family == "Debian"
- - name: Start and Enable NTP service in RedHat OS
- service:
- name: ntpd
- state: started
- enabled: yes
- when: ansible_os_family == "RedHat"
- - name: Start and Enable NTP service in Debian OS
- service:
- name: ntp
- state: started
- enabled: yes
- when: ansible_os_family == "Debian"
- - name: Deploy the NTP configuration file for Debian OS
- template:
- src: templates/ntp_debian.j2
- dest: /etc/ntp.conf
- backup: yes
- when: ansible_os_family == "Debian"
- notify:
- - Restart NTP service in Debian OS
- - name: Deploy the NTP configuration file for RedHat OS
- template:
- src: templates/ntp_redhat.j2
- dest: /etc/ntp.conf
- backup: yes
- when: ansible_os_family == "RedHat"
- notify:
- - Restart NTP service in RedHat OS
Taking out Handlers from Playbook
Similarly, take all handlers from ntp_playbook.yml and move them to roles/post_setup/handlers/main.yml file.
Open the file with the below command.
- vim roles/post_setup/handlers/main.yml
Paste all handlers there and replace all the extra space on the left side like below.

Below is the updated roles/post_setup/handlers/main.yml file.
- ---
- - name: Restart NTP service in RedHat OS
- service:
- name: ntpd
- state: restarted
- when: ansible_os_family == "RedHat"
- - name: Restart NTP service in Debian OS
- service:
- name: ntp
- state: restarted
- when: ansible_os_family == "Debian"
Taking out Variables from Group_vars/all
Next, take out the variables from the group_vars/all file ( Delete the variables in group_vars/all file) and place them inside roles/post_setup/defaults/main.yml file.
Below is the updated roles/post_setup/defaults /main.yml file.
- ---
- ntp0: '0.in.pool.ntp.org'
- ntp1: '1.in.pool.ntp.org'
- ntp2: '2.in.pool.ntp.org'
- ntp3: '3.in.pool.ntp.org'
The main reason for using roles Is reusability and we can use roles across organization across different projects. So different projects may have their data centers at different locations and they may be using different cloud providers as well. So, they are not necessarily going to use your values they may overwrite the values and thus these values defined here will act as the default values.
Taking out templates from Templates directory
We can move our template files with .j2 extension using the below command.
- mv templates/* roles/post_setup/templates/
And we will also need to modify the tasks in roles/post_setup/tasks/main.yml as now ansible will automatically pick up the template so we don’t need to specify the full path for our ntp_debian.j2 and ntp_redhat.j2 template files.
Below is the updated roles/post_setup/tasks/main.yml task file.
- ---
- - name: Install packages on RedHat OS
- yum:
- name: "{{item}}"
- state: present
- loop:
- - ntp
- - unzip
- - git
- - wget
- - zip
- when: ansible_os_family == "RedHat"
- - name: Install packages on Debian OS
- apt:
- name: "{{item}}"
- state: present
- loop:
- - ntp
- - unzip
- - git
- - wget
- - zip
- when: ansible_os_family == "Debian"
- - name: Start and Enable NTP service in RedHat OS
- service:
- name: ntpd
- state: started
- enabled: yes
- when: ansible_os_family == "RedHat"
- - name: Start and Enable NTP service in Debian OS
- service:
- name: ntp
- state: started
- enabled: yes
- when: ansible_os_family == "Debian"
- - name: Deploy the NTP configuration file for Debian OS
- template:
- src: ntp_debian.j2
- dest: /etc/ntp.conf
- backup: yes
- when: ansible_os_family == "Debian"
- notify:
- - Restart NTP service in Debian OS
- - name: Deploy the NTP configuration file for RedHat OS
- template:
- src: ntp_redhat.j2
- dest: /etc/ntp.conf
- backup: yes
- when: ansible_os_family == "RedHat"
- notify:
- - Restart NTP service in RedHat OS
So, we can see that we have just given the name of template file in the template module that we have used.
Now as we have moved our tasks, handlers, variables, and templates to the respective locations in roles directory, so now its time to update our playbook ntp_playbook.yml.
Below is the updated playbook ntp_playbook.yml.
- ---
- - name: Deploying NTP Service
- hosts: all
- become: yes
- roles:
- - post_setup
Now, let’s run and see the output if it works 😊.
OUTPUT
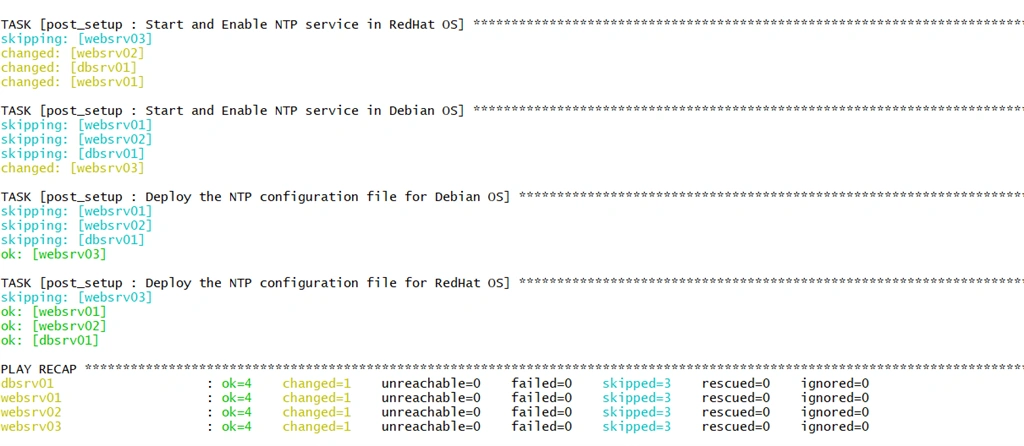
We can see that our tasks defined in post-setup roles got executed successfully.
After all that stuff now, it’s time to see something easy and relaxing which will ease out your work a lot.
Ansible Galaxy
Ansible Galaxy refers to the Galaxy website where users can share roles, and to a command-line tool for installing, creating and managing roles.
By now we have been writing our playbook on our own for the services like NTP, MySQL, Tomcat which are very popular, and they are already written playbooks for them. So instead of writing, we can reuse them.
It is a community repository and all the roles are available here which can be used. For example, there is a role called Java and if we want to install java then we can make use of this link.
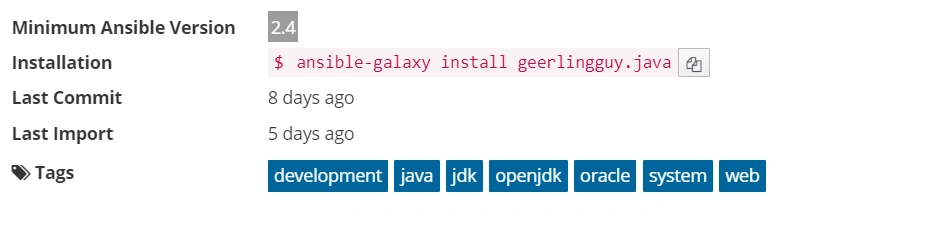
It also shows the OS which it supports and on which OS this role can be installed.
So, we are now going to install java on all our servers. For that, we will run the below command.
ansible-galaxy install geerlingguy.java

We can see that it has downloaded the role from GitHub and has installed the role in /home/ubuntu/.ansible/roles/ directory. We can also move this role to our locally created roles folder.
Now, it is time to update our playbook with the new role and run the playbook.
Below is the updated playbook ntp_playbook.yml,
- ---
- - name: Deploying NTP Service
- hosts: all
- become: yes
- roles:
- - post_setup
- - geerlingguy.java
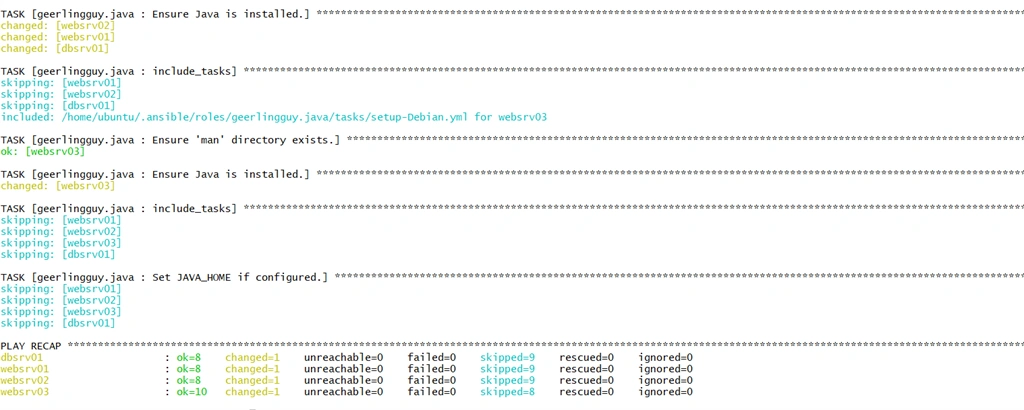
We can see that Java has been installed successfully on all the web servers and db server.
Summary
In this article, we have learned about the roles in Ansible and Ansible Galaxy. I hope you get to learn a lot of interesting things about ansible through the series “Learning Ansible”. Keep learning and if you want to learn more than follow the official documentation of ansible here.
I hope you find this article helpful. Stay tuned for more … Cheers!!
You can also check out some of my previous articles of the series “Learning Ansible” here,
- Introduction to Configuration Management and Ansible
- Getting started with Ansible – Part 1
- Getting started with Ansible – Part 2
- Getting started with Ansible – Part 3
- Getting started with Ansible – Part 4
- Getting started with Ansible – Part 5
- Getting started with Ansible – Part 6
- Getting started with Ansible – Part 7
- Getting started with Ansible – Part 8
- Getting started with Ansible – Part 9
- Getting started with Ansible – Part 10
- Getting started with Ansible – Part 11
Join the conversation! Your thoughts help the community grow.