

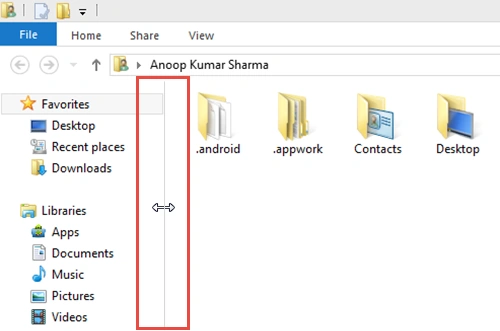
A GridSplitter is a divider that divides a Grid into two sections. A GridSplitter allows us to resize rows or columns in a Grid by dragging the GridSplitter Bar. An example of a GridSplitter is the Windows Explorer.
Let's Begin:
Adding a Vertical GridSplitter to a Grid

In this example, I have added three columns. Out of the three Columns, I have added a GridSplitter in the second column. Here, I set the width of second column to auto so that the second column is sized automatically to fit the GridSplitter. I am using the entire second column for placing the GridSplitter that is the best way for placing the GridSplitter in a Grid. We can also place the Splitter within the column containing some content. For creating a vertical Splitter, set the VerticalAlignment property to stretch and HorizontalAlignment property of GridSplitter to Center (to create a Horizontal Splitter set the VerticalAlignment property to Center and HorizontalAlignment property of GridSplitter to stretch). Set the width and background color property of the GridSplitter so that the GridSplitter is easily visible.
- <Grid>
- <Grid.ColumnDefinitions>
- <ColumnDefinition Width="150"></ColumnDefinition>
- <ColumnDefinition Width="Auto"></ColumnDefinition>
- <ColumnDefinition></ColumnDefinition>
- </Grid.ColumnDefinitions>
- <StackPanel Grid.Column="0">
- <TextBlock Text="Some Text here" FontSize="16" Margin="10" TextWrapping="Wrap"></TextBlock>
- <TextBlock Text="Some Text here" FontSize="16" Margin="10" TextWrapping="Wrap"></TextBlock>
- <TextBlock Text="Some Text here" FontSize="16" Margin="10" TextWrapping="Wrap"></TextBlock>
- <TextBlock Text="Some Text here" FontSize="16" Margin="10" TextWrapping="Wrap"></TextBlock>
- </StackPanel>
- <TextBlock Text="Some Text here.Some Text here.Some Text here.Some Text here.Some Text here.Some Text here.Some Text here.Some Text here.Some Text here" Grid.Column="2" TextWrapping="Wrap" FontSize="16" Margin="10"></TextBlock>
- <GridSplitter HorizontalAlignment="Center"
- VerticalAlignment="Stretch"
- Grid.Column="1"
- Width="5" Background="Silver">
- </GridSplitter>
- </Grid>
GridSplitters in Nested Grid
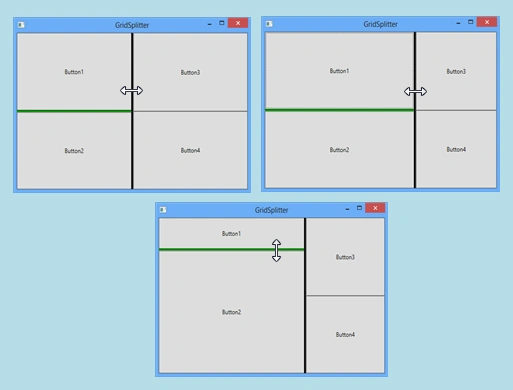
For showing this, I have added 3 columns to the Grid and placed a GridSplitter in the second Column. In the first column, I added another Grid with three Rows and placed a GridSplitter in the second row.
- <Grid>
- <Grid.ColumnDefinitions>
- <ColumnDefinition></ColumnDefinition>
- <ColumnDefinition Width="auto"></ColumnDefinition>
- <ColumnDefinition></ColumnDefinition>
- </Grid.ColumnDefinitions>
- <Grid.RowDefinitions>
- <RowDefinition></RowDefinition>
- </Grid.RowDefinitions>
- <!--Creating Sub-Grid in Column 0-->
- <Grid Grid.Column="0">
- <Grid.RowDefinitions>
- <RowDefinition></RowDefinition>
- <RowDefinition Height="auto"></RowDefinition>
- <RowDefinition></RowDefinition>
- </Grid.RowDefinitions>
- <Button Content="Button1" Grid.Row="0"></Button>
- <Button Content="Button2" Grid.Row="2"></Button>
- <GridSplitter HorizontalAlignment="Stretch"
- VerticalAlignment="Center"
- Grid.Row="1" Height="4" Background="Green">
- </GridSplitter>
- </Grid>
- <!--Creating Sub-Grid in Column 2-->
- <Grid Grid.Column="2">
- <Grid.RowDefinitions>
- <RowDefinition></RowDefinition>
- <RowDefinition></RowDefinition>
- </Grid.RowDefinitions>
- <Button Content="Button3" Grid.Row="0"></Button>
- <Button Content="Button4" Grid.Row="1"></Button>
- </Grid>
- <GridSplitter HorizontalAlignment="Center"
- VerticalAlignment="Stretch"
- Grid.Column="1" Grid.Row="0"
- Grid.RowSpan="3" Width="4" Background="Black">
- </GridSplitter>
- </Grid>
ShowsPreview property of GridSplitter

When we set the ShowsPreview property to true, a preview of the change in row or column size is shown and the size of a row or column changes when the GridSplitter is released. On setting the ShowPreview property to false, the size of the row and column updates in real time on the dragging of the GridSplitter.
- <Grid>
- <Grid.ColumnDefinitions>
- <ColumnDefinition></ColumnDefinition>
- <ColumnDefinition Width="auto"></ColumnDefinition>
- <ColumnDefinition></ColumnDefinition>
- </Grid.ColumnDefinitions>
- <TextBlock Text="Some Text Here.Some Text Here.Some Text Here.Some Text Here." FontSize="16" TextWrapping="Wrap" Grid.Column="0" Margin="10"></TextBlock>
- <TextBlock Text="Some Text Here.Some Text Here.Some Text Here.Some Text Here." FontSize="16" TextWrapping="Wrap" Grid.Column="2" Margin="10"></TextBlock>
- <GridSplitter HorizontalAlignment="Center" VerticalAlignment="Stretch" Width="4" Background="Gray" Grid.Column="1" ShowsPreview="True"></GridSplitter>
- </Grid>
I hope you like it. Thanks.
Other Related Articles
Sachin VarkeyPosted Jun 8, 2021, 5:54 AM
Thanks for tutorial, I have a viewbox with Grid as child. This Grid is separated into columns. Each columns size is * .If I place a gridsplitter in between this grid, the grid splitter is not working.But if I keep the size of grid as Auto then grid splitter is working fine.What could be the issue?
Matt BristowPosted Nov 27, 2017, 7:28 AM
Sorry to be picky but the formatting of your Xaml could be most consistent and easier to read. I would to close tags if not holding content e.g. <ColumnDefinition></ColumnDefinition> becomes <ColumnDefinition /> and put individual properties on new lines rather than on one line so we don't have to scroll to see the full code. Other than that great examples.