

Download the source code from MSDN galleries.
Previously, I was thinking about how we could find the faces in the uploaded image. So, why not create a small module that automatically finds the faces and renders them when we want to load the images on our web pages? That was a pretty easy task but I would love to share what and how I did it. The entire procedure may look a bit complex but trust me, it is really very simple and straight-forward. However, you might be required to know about a few frameworks beforehand as I won’t be covering most of the in-depth stuff of that scenario, such as — computer vision which is used to perform actions, like face detection.
In this post, you will learn the basics of many things that range from:
- Performing computer vision operations — the most basic one used for finding the faces in the images.
- Sending and receiving content from the web server based on the image data uploaded.
- Using the canvas HTML element to render the results.
I won’t be guiding you through each and every step of the computer vision, or the processes that are required to perform the facial detection in the images. For that, I would like to ask you to go and read this post of mine.
Facial biometric authentication on your connected devices.
Making the web app face-aware
There are two steps needed in order to make our web applications face aware and to determine whether there is a face in the uploaded image or not. There are many uses of this technique which I will enlist in the final words section below.
In this sample, I am going to use a canvas element to draw objects whereas this can be done using multiple div containers to contain span elements. And, they can be rendered over the actual image to show the face boxes with their positions set to absolute.
First of all, let us program the ASP.NET web application to get the image, process the image, find the faces, and generate the response to be collected on the client-side.
Programming file processing part
On the server side, we would preferably use the Emgu CV library. This library has been of a great use in the C# wrappers list of OpenCV library. I will be using the same library to program the face detectors in ASP.NET. The benefits are:
- It is a very light-weight library.
- The entire processing can take less than a second or two, and the views would be generated in a second later.
- It is better than most of other computer vision libraries; as it is based on OpenCV.
First, we create a new Controller in our web application that would handle the requests for this purpose. We would later add the POST method handler to the controller action to upload and process the image. You can create any controller. I named it “FindFacesController” in my own application. To create a new Controller, follow:
The following HTML snippet would do this,
- <form method="post" enctype="multipart/form-data" id="form">
- <input type="file" name="image" id="image" onchange="this.form.submit()" />
- </form>
Now, for the ASP.NET part, I will be using the HttpMethod property of the Request to determine if the request was to upload the image or to just load the page.
- if(Request.HttpMethod == "POST") {
- // Image upload code here.
- }
- We need to save the image that was uploaded in the request.
- We would then get the file that was uploaded, and process that image using Emgu CV.
- We would get the locations of the faces in the image and then serialize them to JSON string, using Json.NET library.
- Later part would be taken care of on the client-side using JavaScript code.
Before I actually write the code, let me first show you the helper objects that I have created. I needed two helper objects. One for storing the location of the faces and the other one to perform the facial detection in the images.
- public class Location {
- public double X {
- get;
- set;
- }
- public double Y {
- get;
- set;
- }
- public double Width {
- get;
- set;
- }
- public double Height {
- get;
- set;
- }
- }
- // Face detector helper object
- public class FaceDetector {
- public static List < Rectangle > DetectFaces(Mat image) {
- List < Rectangle > faces = new List < Rectangle > ();
- var facesCascade = HttpContext.Current.Server.MapPath("~/haarcascade_frontalface_default.xml");
- using(CascadeClassifier face = new CascadeClassifier(facesCascade)) {
- using(UMat ugray = new UMat()) {
- CvInvoke.CvtColor(image, ugray, Emgu.CV.CvEnum.ColorConversion.Bgr2Gray);
- //normalizes brightness and increases contrast of the image
- CvInvoke.EqualizeHist(ugray, ugray);
- //Detect the faces from the gray scale image and store the locations as rectangle
- //The first dimensional is the channel
- //The second dimension is the index of the rectangle in the specific channel
- Rectangle[] facesDetected = face.DetectMultiScale(ugray, 1.1, 10, new Size(20, 20));
- faces.AddRange(facesDetected);
- }
- }
- return faces;
- }
- }
- public ActionResult Index() {
- if (Request.HttpMethod == "POST") {
- ViewBag.ImageProcessed = true;
- // Try to process the image.
- if (Request.Files.Count > 0) {
- // There will be just one file.
- var file = Request.Files[0];
- var fileName = Guid.NewGuid().ToString() + ".jpg";
- file.SaveAs(Server.MapPath("~/Images/" + fileName));
- // Load the saved image, for native processing using Emgu CV.
- var bitmap = new Bitmap(Server.MapPath("~/Images/" + fileName));
- var faces = FaceDetector.DetectFaces(new Image < Bgr, byte > (bitmap).Mat);
- // If faces where found.
- if (faces.Count > 0) {
- ViewBag.FacesDetected = true;
- ViewBag.FaceCount = faces.Count;
- var positions = new List < Location > ();
- foreach(var face in faces) {
- // Add the positions.
- positions.Add(new Location {
- X = face.X,
- Y = face.Y,
- Width = face.Width,
- Height = face.Height
- });
- }
- ViewBag.FacePositions = JsonConvert.SerializeObject(positions);
- }
- ViewBag.ImageUrl = fileName;
- }
- }
- return View();
- }
Programming client-side canvas elements
You can create a sense of opening a modal popup to show the faces in the images. I used the canvas element on the page itself because I just wanted to demonstrate the usage of this coding technique. As we have seen, the controller action would generate a few ViewBag properties that we can later use in the HTML content to render the results based on our previous actions.
The View content is shown below:
- @if(ViewBag.ImageProcessed == true) {
- // Show the image.
- if (ViewBag.FacesDetected == true) {
- // Show the image here.
- < img src = "~/Images/@ViewBag.ImageUrl"
- alt = "Image"
- id = "imageElement"
- style = "display: none; height: 0; width: 0;" / > < p > < b > @ViewBag.FaceCount < /b> @if (ViewBag.FaceCount == 1) { <text><b>face</b > was < /text> } else { <text><b>faces</b > were < /text> } detected in the following image.</p > < p > A < code > canvas < /code> element is being used to render the image and then rectangles are being drawn on the top of that canvas to highlight the faces in the image.</p > < canvas id = "faceCanvas" > < /canvas>
- <!-- HTML content has been loaded, run the script now. -->
- // Get the canvas.
- var canvas = document.getElementById("faceCanvas");
- var img = document.getElementById("imageElement");
- canvas.height = img.height;
- canvas.width = img.width;
- var myCanvas = canvas.getContext("2d");
- myCanvas.drawImage(img, 0, 0);
- @if(ViewBag.ImageProcessed == true && ViewBag.FacesDetected == true) {
- img.style.display = "none";
- var facesFound = true;
- var facePositions = JSON.parse(JSON.stringify(@Html.Raw(ViewBag.FacePositions)));
- }
- if (facesFound) {
- // Move forward.
- for (face in facePositions) {
- // Draw the face.
- myCanvas.lineWidth = 2;
- myCanvas.strokeStyle = selectColor(face);
- console.log(selectColor(face));
- myCanvas.strokeRect(facePositions[face]["X"], facePositions[face]["Y"], facePositions[face]["Width"], facePositions[face]["Height"]);
- }
- }
- function selectColor(iteration) {
- if (iteration == 0) {
- iteration = Math.floor(Math.random());
- }
- var step = 42.5;
- var randomNumber = Math.floor(Math.random() * 3);
- // Select the colors.
- var red = Math.floor((step * iteration * Math.floor(Math.random() * 3)) % 255);
- var green = Math.floor((step * iteration * Math.floor(Math.random() * 3)) % 255);
- var blue = Math.floor((step * iteration * Math.floor(Math.random() * 3)) % 255);
- // Change the values of rgb, randomly.
- switch (randomNumber) {
- case 0:
- red = 0;
- break;
- case 1:
- green = 0;
- break;
- case 2:
- blue = 0;
- break;
- }
- // Return the string.
- var rgbString = "rgb(" + red + ", " + green + " ," + blue + ")";
- return rgbString;
- }
- } else { < p > No faces were found in the following image. < /p>
- // Show the image here.
- < img src = "~/Images/@ViewBag.ImageUrl"
- alt = "Image"
- id = "imageElement" / >
- }
- }
Running the application for testing
Since we have developed the application, now, it is time to actually run the application to see if that works as expected. The following are the results generated of multiple images that were passed to the server.

The above image shows the default HTML page that is shown to the users when they visit the page for the first time. Then, they will upload the image and the application would process the content of the image that was uploaded. Following images show the results of those images.

I uploaded my image and it found my face. As shown above in bold text, “1 face was detected…”. It also renders the box around the area where the face was detected.
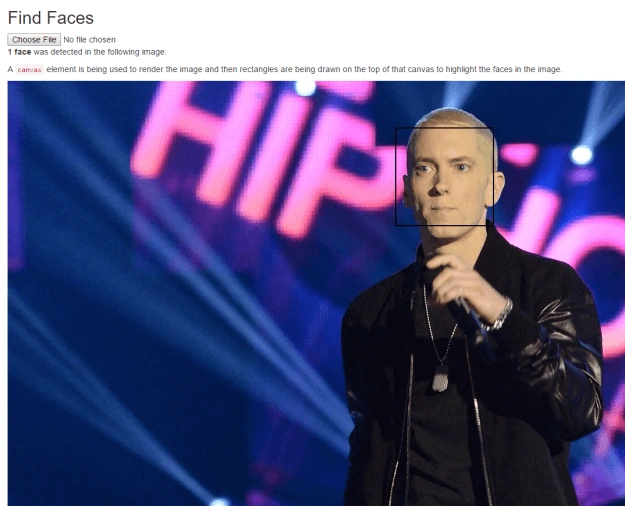
This article would have never been complete, without Eminem being a part of it! Love this guy.
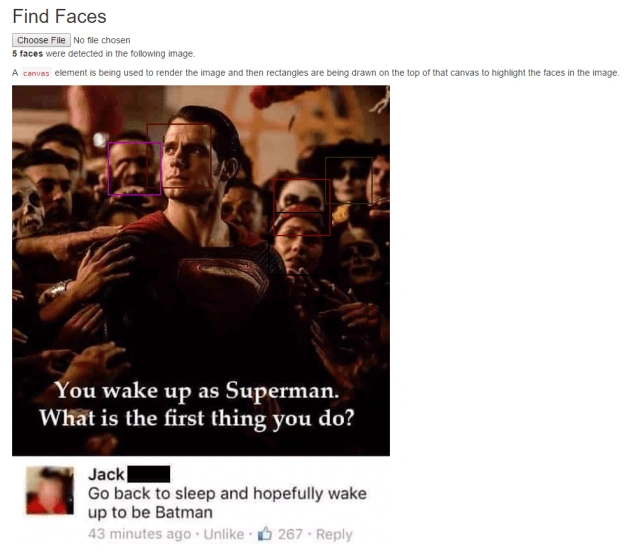
Secondly, I wanted to show how this application processes multiple faces. On the top, see that it shows “5 faces were detected…” and it renders 5 boxes around the areas where faces were detected. I also seem to like the photo as I am a fan of Batman too.
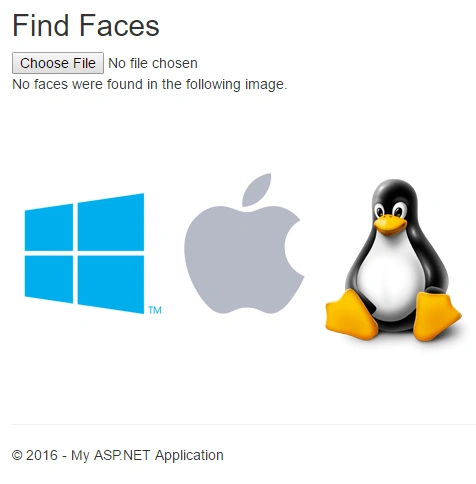
This image shows what happens if the image does not contain a detected face (by detected it means there are many possibilities where a face might not be detected, such as having hairs, wearing glasses etc.) In this image, I just used the three logos of companies and the system told me there were no faces in the image. It also rendered the image but no boxes were made since there were no faces in the image.
Final words
This is it for this post. This method is useful in many facial detection software applications, many areas where you want the users to upload a photo of their faces etc. This is an ASP,NET web application project. That means, you can use this code in your own web applications too. The library usage is also very simple and straight-forward as you have already seen in the article above.
There are other uses too, such as in the cases where you want to perform analysis of peoples’ faces to detect their emotions, locations, and other parameters.
VineetaPosted Feb 8, 2023, 5:00 PM
Please post the source code
ali naeemPosted Mar 12, 2020, 9:21 AM
What is url of the source code?
Ramesh PalaniappanPosted Aug 22, 2016, 1:54 AM
Good One
Vivek KumarPosted Aug 21, 2016, 4:41 PM
Good one
Hanif HefazPosted Aug 19, 2016, 2:42 AM
Great i like it
Muhammad Aqib ShehzadPosted Aug 19, 2016, 1:47 AM
Very nice article
Nikhil SanganiPosted Aug 19, 2016, 12:23 AM
Nice one.
Debasis SahaPosted Aug 19, 2016, 12:13 AM
Nice one..
RajaPosted Aug 19, 2016, 12:08 AM
Great...
Ramesh PalaniappanPosted Aug 18, 2016, 5:15 AM
Good One
Humayun Kabir MamunPosted Aug 18, 2016, 12:57 AM
Thanks Zeeshan for this nice article...
RakeshPosted Aug 17, 2016, 11:00 PM
Good one
Bhavik PatelPosted Aug 17, 2016, 6:26 PM
Nice