

Introduction
This article will help you to create a responsive website using ASP.NET. Learn more about responsive from What is Foundation?.
Step 1
Download the responsive CSS and JavaScript files from Download Foundation 5 (you can customize your download).
Step 2
Open your Visual Studio then add your downloaded file into your project then add a default.aspx page and call your necessary files within the head tag from that downloaded folder.
- <head runat="server">
- <title></title>
- <script src="Foundation/js/foundation.min.js" type="text/javascript"></script>
- <link href="Foundation/css/foundation.min.css" rel="stylesheet" type="text/css" />
- </head>
Foundation zurb provides so many functions in responsive. You can learn about it from my previous link :(http://foundation.zurb.com/docs/index.html) .
Now I will explain how to create a simple signup form with a responsive page. Once you add foundation.min.js and foundation.min.css you can get very many classes.
Before starting a responsive design you must specify <div class="row"></div>. Here the class row is a new line (for example: <tr></tr> in the table tag).
- <div class="row">
- </div>
- <div class="row">
- <div class="large-4 columns">...</div>
- <div class="large-4 columns">...</div>
- <div class="large-4 columns">...</div>
- </div>

Full Example
- <%@ Page Language="C#" AutoEventWireup="true" CodeBehind="Index.aspx.cs" Inherits="Responsive_Site.Index" %>
- <!DOCTYPE html PUBLIC "-//W3C//DTD XHTML 1.0 Transitional//EN" "http://www.w3.org/TR/xhtml1/DTD/xhtml1-transitional.dtd">
- <html xmlns="http://www.w3.org/1999/xhtml">
- <head runat="server">
- <title></title>
- <script src="Foundation/js/foundation.min.js" type="text/javascript"></script>
- <link href="Foundation/css/foundation.min.css" rel="stylesheet" type="text/css" />
- </head>
- <body>
- <form id="form1" runat="server">
- <br /><br />
- <div class="row" style="border:2px solid blue">
- <div class="large-12 columns">
- <br /><br />
- <div class="row">
- <div class="large-12 columns text-center">
- <b>Signup Form</b>
- </div>
- </div><br /><br />
- <div class="row">
- <div class="large-12 columns">
- Name:
- </div>
- </div>
- <div class="row">
- <div class="large-12 columns">
- <asp:TextBox ID="txtUName" runat="server" placeholder="User name"></asp:TextBox>
- </div>
- </div>
- <br /><br />
- <div class="row">
- <div class="large-12 columns">
- Email id:
- </div>
- </div>
- <div class="row">
- <div class="large-12 columns">
- <asp:TextBox ID="txtEmail" runat="server" placeholder="Email id"></asp:TextBox>
- </div>
- </div>
- <br /><br />
- <div class="row">
- <div class="large-12 columns">
- Phone no:
- </div>
- </div>
- <div class="row">
- <div class="large-12 columns">
- <asp:TextBox ID="txtPhone" runat="server" placeholder="Phone number"></asp:TextBox>
- </div>
- </div>
- <br /><br />
- <div class="row">
- <div class="large-12 columns">
- Address:
- </div>
- </div>
- <div class="row">
- <div class="large-12 columns">
- <asp:TextBox ID="txtAddress" runat="server" placeholder="Address" TextMode="MultiLine"></asp:TextBox>
- </div>
- </div>
- <br /><br />
- <div class="row">
- <div class="large-6 columns">
- <asp:Button ID="btnSubmit" runat="server" Text="Submit"></asp:Button>
- </div>
- <div class="large-6 columns">
- <asp:Button ID="btnCancel" runat="server" Text="Cancel"></asp:Button>
- </div>
- </div>
- </div>
- </div>
- </form>
- </body>
- </html>
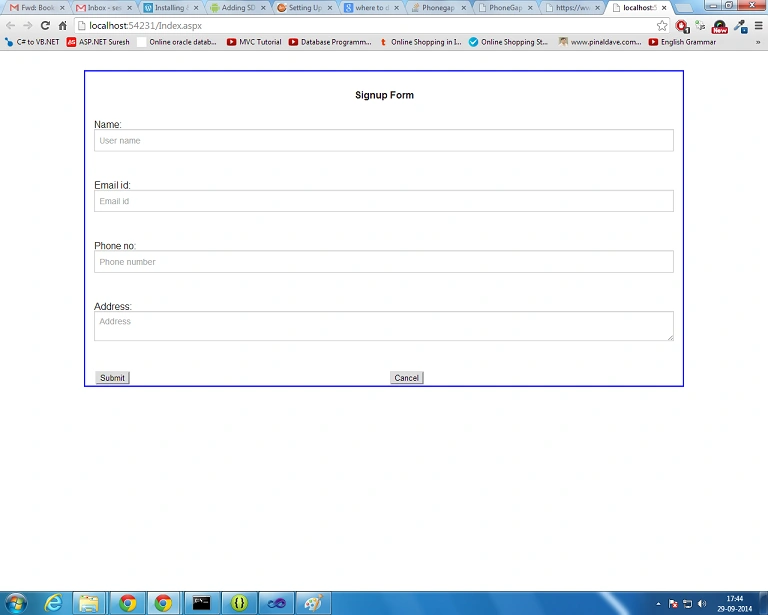
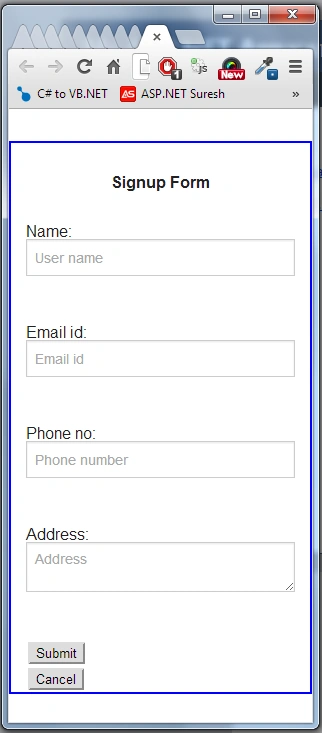
Output (on small screens)
Fatih GENÇPosted May 29, 2019, 10:10 AM
How can i use this with images . ?
Bj BhaiPosted Feb 22, 2018, 3:14 AM
This is not responsive bro
Nazmul BadshaPosted Sep 17, 2017, 6:48 AM
How can I add it in Existing project.
support teamPosted Mar 10, 2016, 9:40 AM
this is very awesome....but how to add this files to existing project
Padmavathi APosted Dec 23, 2015, 9:05 AM
nice one.
Utkarsh SrivastavaPosted Mar 14, 2015, 5:33 AM
Nice man
ADEEL RAUFPosted Nov 9, 2014, 4:07 PM
Very nice responsiveness in this page. I added gridview but its length is much large. Its becoming problem to create responsiveness. Please give its solution
Abhinav AbhishekPosted Oct 19, 2014, 3:15 AM
very helpful