

In this article, you will learn how to perform CRUD operations on Dataverse using the Web API in Power Pages.
Prerequisites
Before starting with the CRUD operations, make sure the following setup is completed:
Configure site settings for Web API access
Configure the required Dataverse tables.
Add appropriate table permissions.
Assign web roles to the site users.
Before moving to the implementation steps, these configurations must be in place. If you are new to this setup, refer to the step-by-step guide for configuring the Power Pages Web API for Dataverse integration. Read it here.
How Web API works in Power Pages
Power Pages provides a built-in Web API that allows you to interact with Dataverse tables using standard HTTP requests such as GET, POST, PATCH, and DELETE. This API runs in the context of the logged-in portal user, not as a system admin.
When a request is made from Power Pages, the platform checks:
Whether Web API access is enabled in site settings
Whether the user has the required web role
Whether the assigned table permissions allow the requested operation
If any of these checks fail, the request is blocked, even if the table exists in Dataverse.
Power Pages uses the /_api endpoint to communicate with Dataverse. Authentication and authorization are handled automatically, so you do not need to pass access tokens manually. This makes it secure and suitable for client side JavaScript usage.
Each Web API call maps directly to a Dataverse operation:
GET is used to read records
POST is used to create records
PATCH is used to update records
DELETE is used to remove records
Dataverse Tables used in this Demo
For this demo, i have used this Dataverse table named "Idea Requests" for storing and managing records from Power Pages. this table act as backend data source for all CRUD operations performed through the Web API.
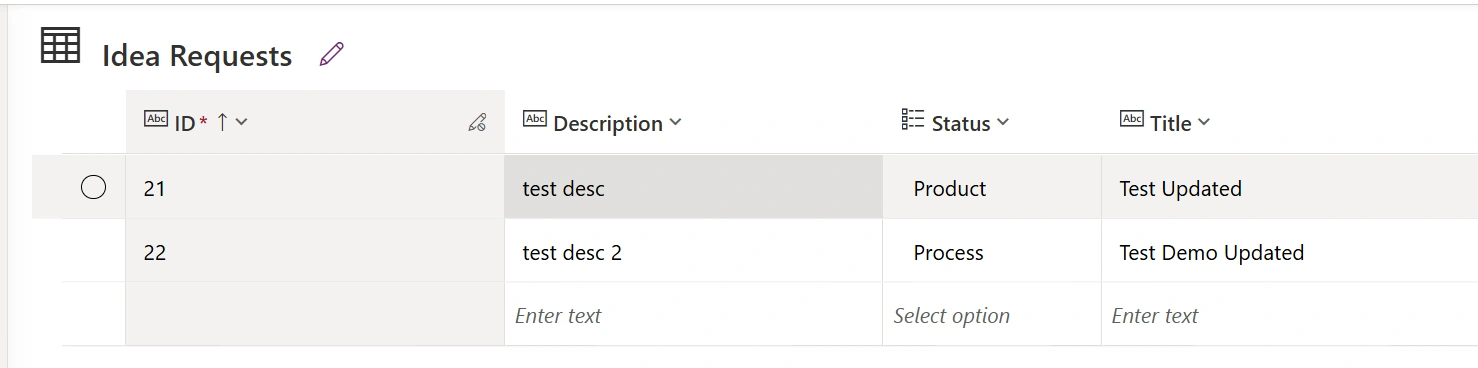
The table is enabled for Power Pages access and appropriate table permissions are configured to allow create, read, update, and delete operations.
Power Pages UI used in this demo
The user interface for this demo is built using HTML, CSS, and JavaScript in Power Pages. The top section of the page is designed as a gallery that displays existing records along with action buttons such as edit and delete.
Below the gallery, a custom form is provided to create and update records.
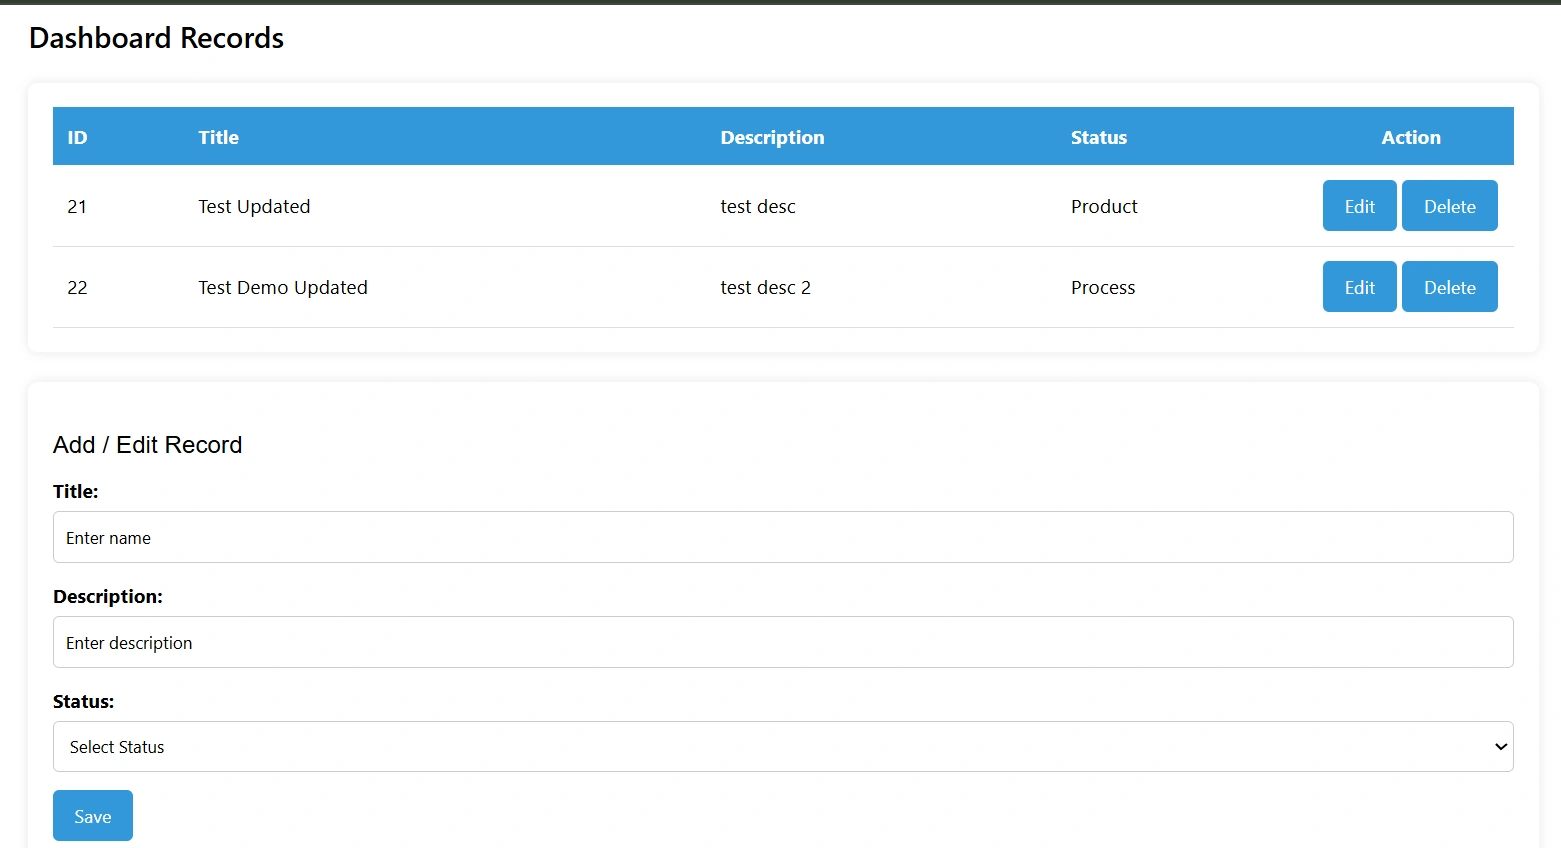
Steps to create pages and make ready to code
1 - Create new subpage in site.
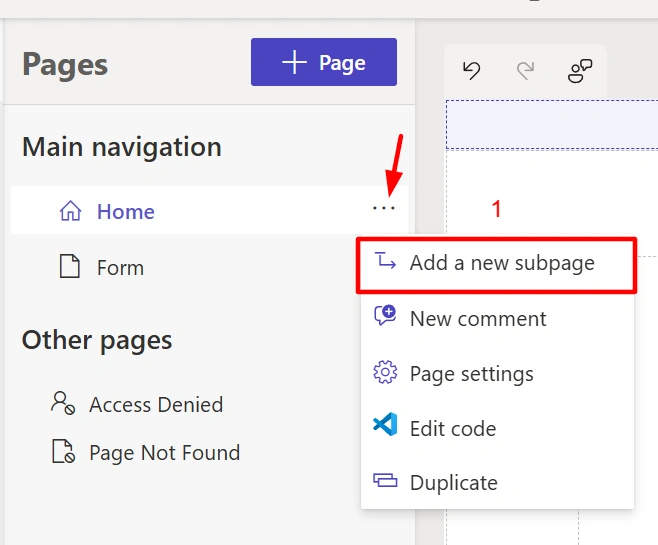
2 - Enter page name and select start from blank.
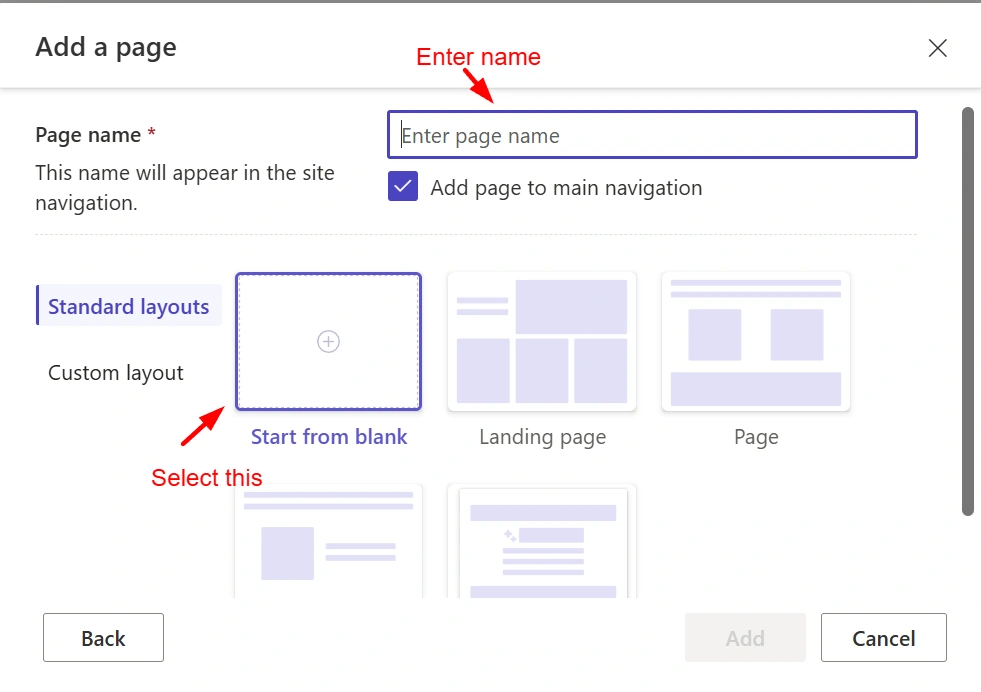
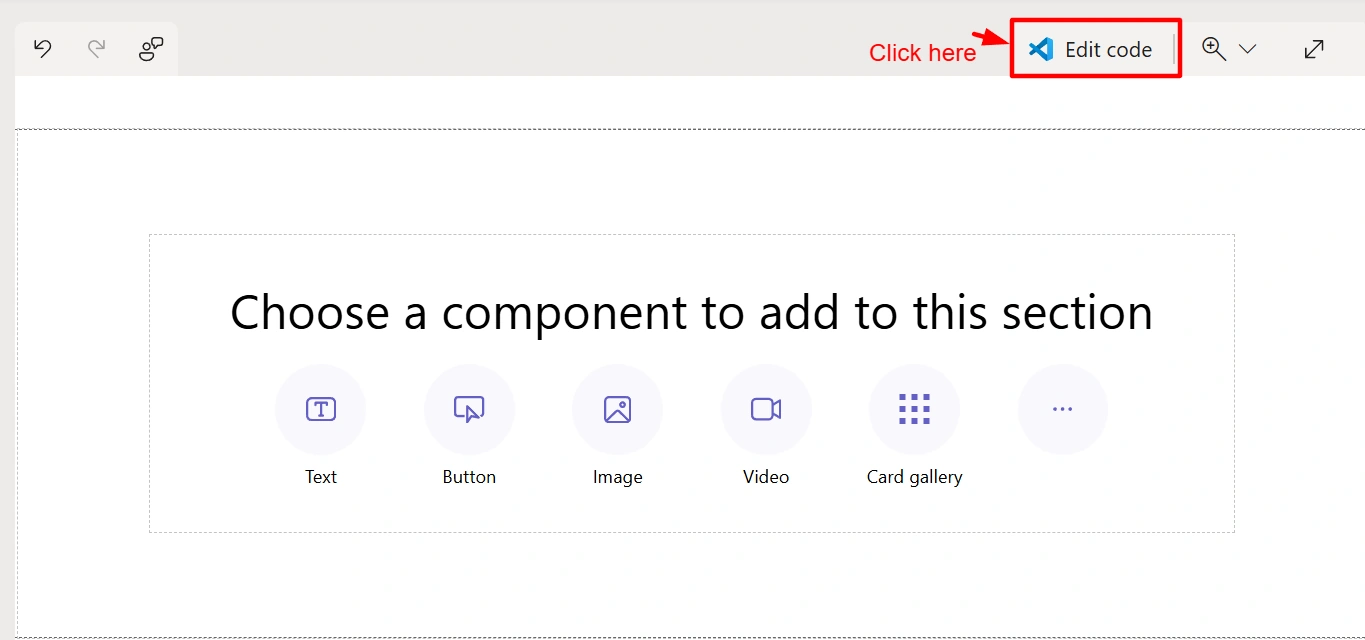
3 - After page is created, to edit code click on "Edit Code" (Visual Studio icon) as it will open in VS Code.
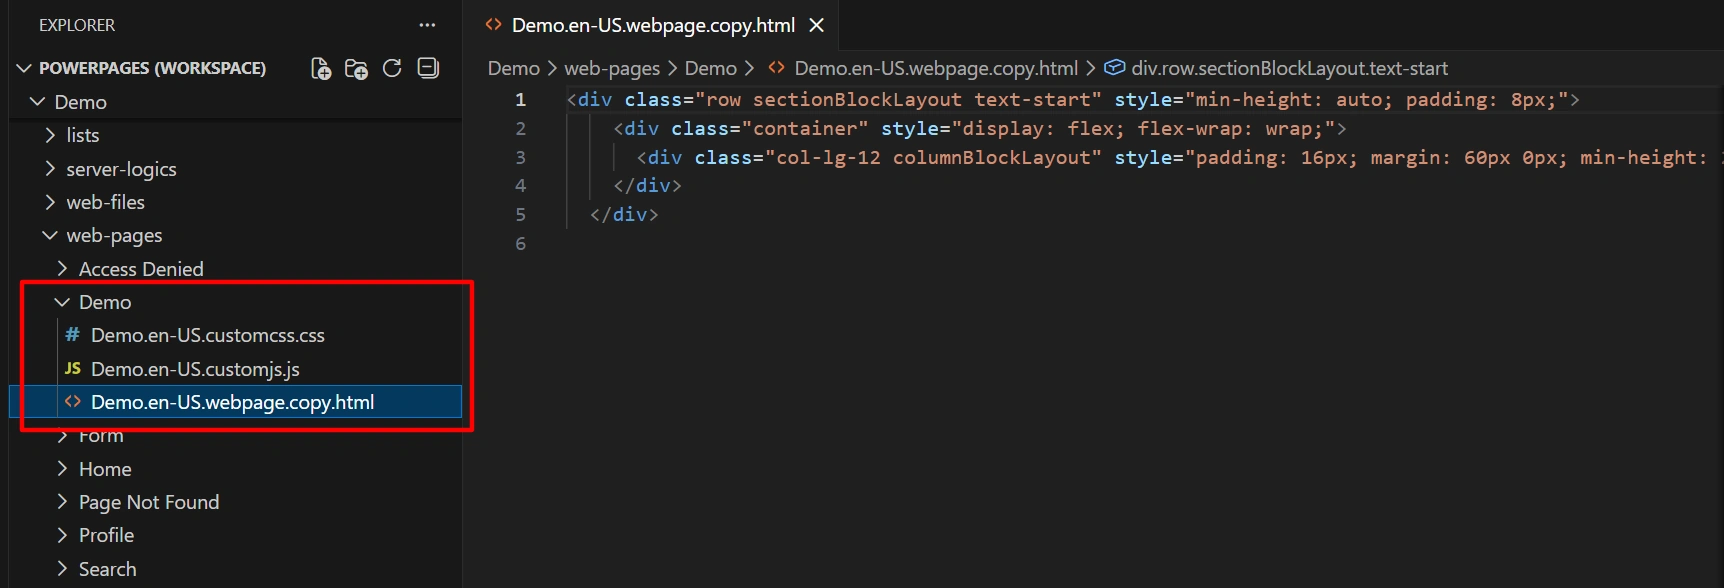
4 - Here you will see code of newly created page in VS Code.
Implementing CRUD operations using Web API
The complete code for this demo is available on GitHub. You can find the repository link at the end of this article.
Webapi ajax wrapper code
(function (webapi, $) {
    function safeAjax(ajaxOptions) {
        var deferredAjax = $.Deferred();
        shell.getTokenDeferred().done(function (token) {
            if (!ajaxOptions.headers) {
                $.extend(ajaxOptions, {
                    headers: {
                        "__RequestVerificationToken": token
                    }
                });
            } else {
                ajaxOptions.headers["__RequestVerificationToken"] = token;
            }
            $.ajax(ajaxOptions).done(function (data, textStatus, jqXHR) {
                validateLoginSession(data, textStatus, jqXHR, deferredAjax.resolve);
            }).fail(deferredAjax.reject);
        }).fail(function () {
            deferredAjax.rejectWith(this, arguments);
        });
        return deferredAjax.promise();
    }
    webapi.safeAjax = safeAjax;
})(window.webapi = window.webapi || {}, jQuery)
Explantation
This wrapper function is used to make secure Web API calls from Power Pages. Power Pages requires a request verification token for client side Web API requests, and this wrapper automatically handles that requirement.
The safeAjax function retrieves the security token using shell.getTokenDeferred() and attaches it to the request headers before making the AJAX call. This ensures that all Web API requests are authenticated and authorized correctly.
By centralizing this logic in a single wrapper, we avoid repeating token handling code for every CRUD operation. All create, read, update, and delete requests use this safeAjax method, making the code cleaner and easier to maintain.
In the next sections, this wrapper will be reused to perform CRUD operations on the Dataverse table using different HTTP methods.
Read Operation
In this section, we will retrieve all records from the Idea Request Dataverse table using the Power Pages Web API.
function displayData() {
    webapi.safeAjax({
        type: "GET",
        url: "/_api/cr097_idearequests",
        contentType: "application/json",
        success: function (res) {
            allRecords = res?.value
            console.log(res);
            let tableBody = document.getElementById("records-body")
            let tableData = ""
            if (res?.value?.length > 0) {
                res.value.forEach((item) => {
                    tableData +=
                        `
                    <tr id="record">
                        <td>${item.cr097_id}</td>
                        <td>${item.cr097_title ?? "N/A"}</td>
                        <td>${item.cr097_description ?? "N/A"}</td>
                        <td>${item["[email protected]"]}</td>
                        <td>
                        <button class="edit-btn" data-id="${item.cr097_idearequestid}">Edit</button>
                        <button class="delete-btn" data-id="${item.cr097_idearequestid}">Delete</button>
                        </td>
                    <tr>
                    `
                })
                tableBody.innerHTML = tableData
            } else {
                tableBody.innerHTML = "No records to display"
            }
        }
    })
}
Explanation of key parameters:
type
The request type is set to "GET" because we are retrieving records from Dataverse.
url
The URL uses the Power Pages Web API endpoint followed by the entity set name of the table.
In this example, /cr097_idearequests represents the entity set name of the Idea Request table.
contentType
Set to application/json to handle JSON data in the request and response.
success callback
The response data is available in res.value, which contains all retrieved records. These records are then dynamically rendered in the UI table.
How to get set name for Dataverse table
Go to your table page then click on Tools then you will find "set name"

Create Operation
In this section, we will create a new record in the Idea Request Dataverse table using data entered in the Power Pages form.
function saveRecord() {
  const record = {
    cr097_title: title.value,
    cr097_description: desc.value,
    cr097_status: testStatus.value,
  };


  webapi.safeAjax({
    type: "POST",
    url: "/_api/cr097_idearequests",
    contentType: "application/json",
    data: JSON.stringify(record),
    success: function (res) {
      alert("Data saved");
      displayData();
      ideaRequestForm.reset();
      submitBtn.textContent = "Save";
      // location.refresh()
    },
    error: function (error) {
      console.error("Failed to save record");
    },
  });
}
Explanation of key parameters:
record
It represents a single Dataverse record to be created. Each property must use the column logical name.
type
"POST" is used to create a new record in Dataverse.
url
It points to the entity set name of the Idea Request table.
data
The record object is converted into JSON and sent in the request body.
Update Operation
In this section, we will update an existing record in the Idea Request Dataverse table using data entered in the Power Pages form.
function saveRecord() {
  const record = {
    cr097_title: title.value,
    cr097_description: desc.value,
    cr097_status: testStatus.value,
  };


  webapi.safeAjax({
    type: "PATCH",
    url:  `/_api/cr097_idearequests(${editRecordId})`,
    contentType: "application/json",
    data: JSON.stringify(record),
    success: function (res) {
      alert("Data saved");
      displayData();
      ideaRequestForm.reset();
      submitBtn.textContent = "Save";
      // location.refresh()
    },
    error: function (error) {
      console.error("Failed to save record");
    },
  });
}
Explanation of key parameters
type
"PATCH" is used to update an existing record in Dataverse.
url
The URL includes the entity set name followed by the record ID in parentheses.
editRecordId represents the unique identifier of the record being updated.
record
It contains only the fields that need to be updated. Dataverse updates these fields without affecting other column values.
data
The updated record object is converted to JSON and sent in the request body.
Delete Operation
In this section, we will remove record from Idea request Datavers table.
function deleteRecord(id) {
  console.log(id);
  webapi.safeAjax({
    type: "DELETE",
    url: `/_api/cr097_idearequests(${id})`,
    success: function (res) {
      console.log("Deleted", res);
      alert("Deleted");
      location.reload();
    },
    error: function (error) {
      console.error("Failed to delete", error);
    },
  });
}
Explanation of key parameters
type
"DELETE" is used to remove a record from Dataverse.
url
The API URL includes the entity set name followed by the record ID in parentheses.
This ID uniquely identifies the record to be deleted.
id
It passed from the UI action, usually from a delete button associated with a specific record.
Source Code
The complete source code for this demo, including the Power Pages UI and all CRUD operations using the Web API, is available on GitHub.
Repository link: https://github.com/ParthivSuthar/Power-Pages-CRUD
Conclusion
In this article, we explored how to perform CRUD operations on Dataverse using the Web API in Power Pages. Starting with the Dataverse table setup and the custom Power Pages UI, we implemented read, create, update, and delete operations using JavaScript and a Web API wrapper.
Join the conversation! Your thoughts help the community grow.