

In this article, I will guide you on how to use DaisyUI Navigation components in Vue.js
Prerequisites
- node.js installed
- Tailwind CSS
You can check how to install Tailwind CSS in vue.js from the below link
Create Vue.js Project
To create a Vue.js app, use the following command in the terminal.
vue create tailwindcss
Install daisyUI
Install daisyUI using following npm command
npm i daisyui
Open tailwind.config.js and add following code.
module.exports = {
  content: [
    "./index.html",
    "./src/**/*.{vue,js,ts,jsx,tsx}",
  ],
  theme: {
    extend: {},
  },
  plugins: [require("daisyui")],
}
Now right-click on the components folder and add a new component named 'navigationdemo.vue'. Now open navigationdemo.vue component and add the following code. In the article, I will use daisyUI swap component.
<template>
    <div>
        <div class="text-sm breadcrumbs">
            <ul>
                <li><a>Home</a></li>
                <li><a>Documents</a></li>
                <li>Add Document</li>
            </ul>
        </div>
        <br /><br />
        <div class="tabs">
            <a class="tab tab-lifted">Tab 1</a>
            <a class="tab tab-lifted tab-active">Tab 2</a>
            <a class="tab tab-lifted">Tab 3</a>
        </div>

        <br /><br />
        <div class="navbar bg-base-100">
            <div class="flex-1">
                <a class="btn btn-ghost normal-case text-xl">daisyUI</a>
            </div>
            <div class="flex-none">
                <ul class="menu menu-horizontal p-0">
                    <li><a>Item 1</a></li>
                    <li tabindex="0">
                        <a>
                            Parent
                            <svg class="fill-current" xmlns="http://www.w3.org/2000/svg" width="20" height="20"
                                viewBox="0 0 24 24">
                                <path d="M7.41,8.58L12,13.17L16.59,8.58L18,10L12,16L6,10L7.41,8.58Z" />
                            </svg>
                        </a>
                        <ul class="p-2 bg-base-100">
                            <li><a>Submenu 1</a></li>
                            <li><a>Submenu 2</a></li>
                        </ul>
                    </li>
                    <li><a>Item 3</a></li>
                </ul>
            </div>
        </div>
    </div>
</template>

<script>
export default {
    name: 'navigationdemo',
    props: {
        msg: String
    }
}
</script>

<style scoped>
h3 {
    margin: 40px 0 0;
}
ul {
    list-style-type: none;
    padding: 0;
}
li {
    display: inline-block;
    margin: 0 10px;
}
a {
    color: #42b983;
}
</style>
Now open App.vue componen. Add the following code in App.vue component.
<template>
  <div id="app">
    <navigationdemo/>
  </div>
</template>

<script>
import navigationdemo from './components/navigationdemo.vue'

export default {
  name: 'App',
  components: {
    navigationdemo
  }
}
</script>

<style>
#app {
  font-family: Avenir, Helvetica, Arial, sans-serif;
  -webkit-font-smoothing: antialiased;
  -moz-osx-font-smoothing: grayscale;
  text-align: center;
  color: #2c3e50;
}
</style>
Now run the application by using following command.
npm run serve
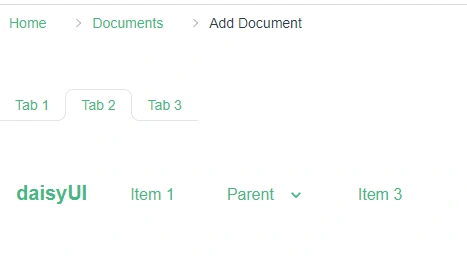
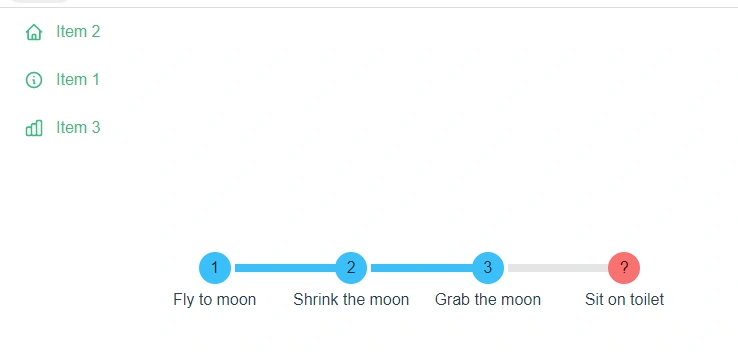
We create menu and steps using the DaisyUI Components. Add the following code in navigationdemo.vue.
<template>
    <div>
        <ul class="menu bg-base-100 w-56 p-2 rounded-box">
            <li>
                <a>
                    <svg xmlns="http://www.w3.org/2000/svg" class="h-5 w-5" fill="none" viewBox="0 0 24 24"
                        stroke="currentColor">
                        <path stroke-linecap="round" stroke-linejoin="round" stroke-width="2"
                            d="M3 12l2-2m0 0l7-7 7 7M5 10v10a1 1 0 001 1h3m10-11l2 2m-2-2v10a1 1 0 01-1 1h-3m-6 0a1 1 0 001-1v-4a1 1 0 011-1h2a1 1 0 011 1v4a1 1 0 001 1m-6 0h6" />
                    </svg>
                    Item 2
                </a>
            </li>
            <li>
                <a>
                    <svg xmlns="http://www.w3.org/2000/svg" class="h-5 w-5" fill="none" viewBox="0 0 24 24"
                        stroke="currentColor">
                        <path stroke-linecap="round" stroke-linejoin="round" stroke-width="2"
                            d="M13 16h-1v-4h-1m1-4h.01M21 12a9 9 0 11-18 0 9 9 0 0118 0z" />
                    </svg>
                    Item 1
                </a>
            </li>
            <li>
                <a>
                    <svg xmlns="http://www.w3.org/2000/svg" class="h-5 w-5" fill="none" viewBox="0 0 24 24"
                        stroke="currentColor">
                        <path stroke-linecap="round" stroke-linejoin="round" stroke-width="2"
                            d="M9 19v-6a2 2 0 00-2-2H5a2 2 0 00-2 2v6a2 2 0 002 2h2a2 2 0 002-2zm0 0V9a2 2 0 012-2h2a2 2 0 012 2v10m-6 0a2 2 0 002 2h2a2 2 0 002-2m0 0V5a2 2 0 012-2h2a2 2 0 012 2v14a2 2 0 01-2 2h-2a2 2 0 01-2-2z" />
                    </svg>
                    Item 3
                </a>
            </li>
        </ul>
        <br /><br />
        <br /><br />
        <ul class="steps">
            <li class="step step-info">Fly to moon</li>
            <li class="step step-info">Shrink the moon</li>
            <li class="step step-info">Grab the moon</li>
            <li class="step step-error" data-content="?">Sit on toilet</li>
        </ul>
    </div>
</template>

<script>
export default {
    name: 'navigationdemo',
    props: {
        msg: String
    }
}
</script>

<style scoped>
h3 {
    margin: 40px 0 0;
}

ul {
    list-style-type: none;
    padding: 0;
}

li {
    display: inline-block;
    margin: 0 10px;
}

a {
    color: #42b983;
}
</style>
Now run the project,
Summary
In this article, we learned how to use DaisyUI Navigation components in Vue.js.
Join the conversation! Your thoughts help the community grow.