

In this article, we will use Visual Studio 2010 to build a HelloWorld WCF service by carrying out the following steps:
- Create the solution and project
- Create the WCF service contract interface
- Implement the WCF service
- Host the WCF service in the ASP.NET Development Server
- Create a client application to consume this WCF service
We will create the WCF service manually from scratch, meaning we will not use any Visual Studio template to create the service. We will also create the host application and the test client application manually, including generating the proxy and config files manually with the tool svcutils.exe. In your real project, you can and should utilize Visual Studio to help with these tasks, but manually doing the actual work is a great way for you to understand what WCF is really like under the hood. This will help you to better understand the why of those WCF templates within Visual Studio.
Creating the HelloWorld solution and project
Before we can build the WCF service, we need to create a solution for our service projects. We also need a directory in which to save all the files. Throughout this book, we will save our project source codes in the C:\SOAwithWCFandLINQ\Projects directory. We will have a subfolder for each solution we create, and under this solution folder, we will have one subfolder for each project.
For this HelloWorld solution, the final directory structure is shown in the following image:
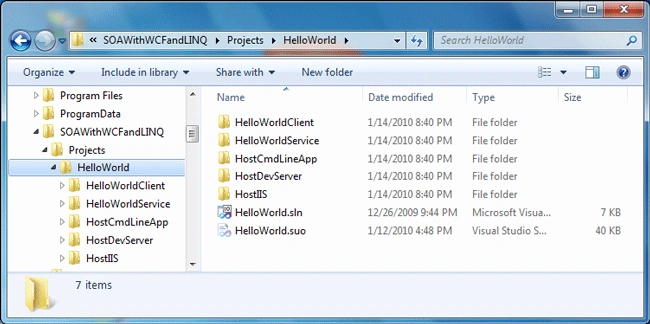
You don't need to manually create these directories via Windows Explorer; Visual Studio will create them automatically when you create the solutions and projects.
Now, follow these steps to create our first solution and the HelloWorld project:
- Start Visual Studio 2010. If the Open Project dialog box pops up, click Cancel to close it.
- Go to menu File | New | Project. The New Project dialog window will appear.
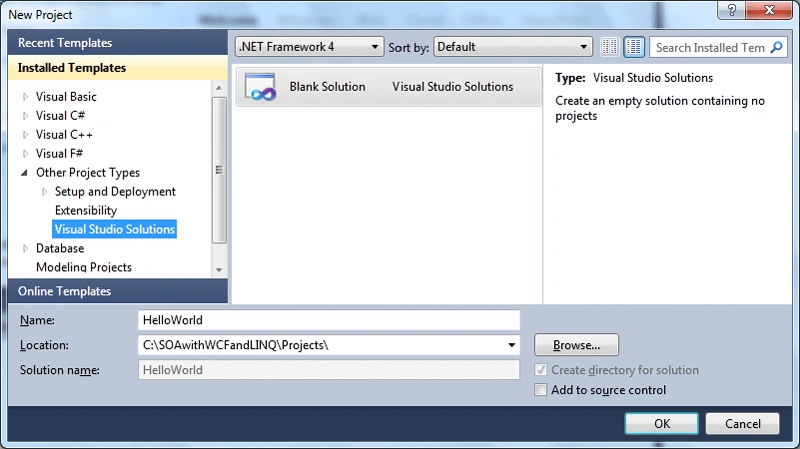
- From the left-hand side of the window (Installed Templates), expand Other Project Types and then select Visual Studio Solutions as the template. From the middle side of the window, select Blank Solution.
- At the bottom of the window, type HelloWorld as the Name, and C:\SOAwithWCFandLINQ\Projects\ as the Location. Note that you should not enter HelloWorld within the location, because Visual Studio will automatically create a folder for a new solution.
- Click the OK button to close this window and your screen should look like the following image, with an empty solution.
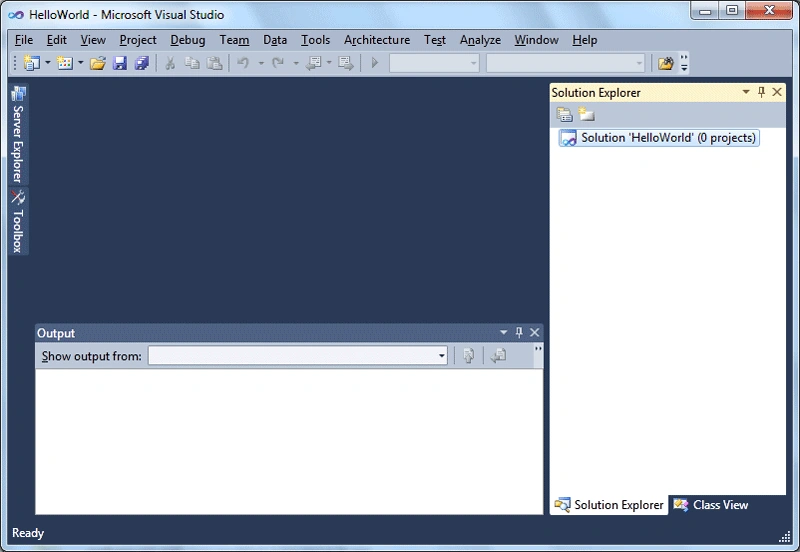
- Depending on your settings, the layout may be different. But you should still have an empty solution in your Solution Explorer. If you don't see Solution Explorer, go to menu View | Solution Explorer, or press Ctrl+Alt+L to bring it up.
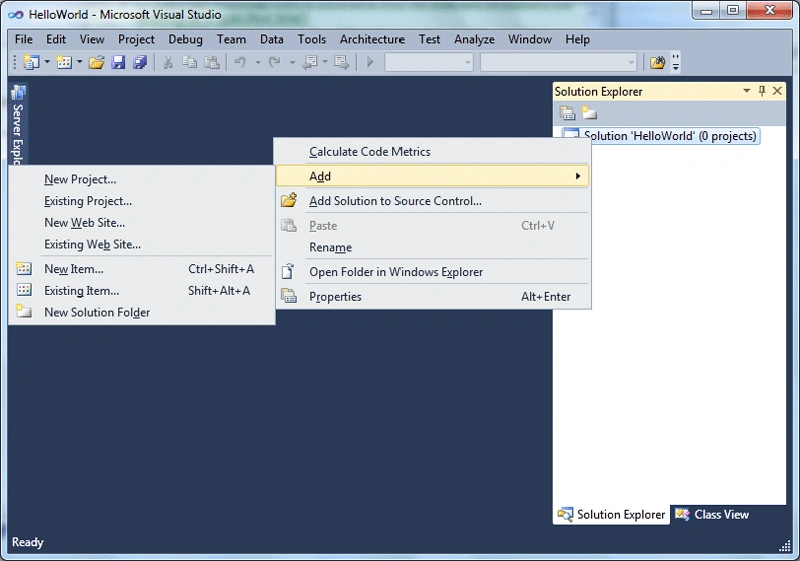
- In the Solution Explorer, right-click on the solution, and select Add | New Project... from the context menu. You can also go to menu File | Add | New Project... to get the same result. The following image shows the context menu for adding a new project.
- The Add New Project window should now appear on your screen. In the left-hand side of this window (Installed Templates), select Visual C# as the template, and on the middle side of the window, select Class Library.
- At the bottom of the window, type HelloWorldService as the Name. Leave C:\SOAwithWCFandLINQ\Projects\HelloWorld as the Location. Again, don't add HelloWorldService to the location, as Visual Studio will create a subfolder for this new project (Visual Studio will use the solution folder as the default base folder for all the new projects added to the solution).
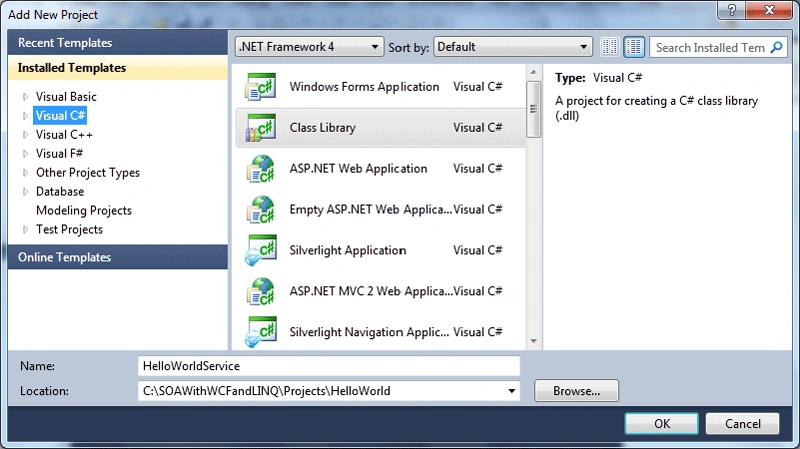
You may have noticed that there is already a template for WCF Service Application in Visual Studio 2010. For this very first example, we will not use this template. Instead, we will create everything by ourselves so you know what the purpose of each template is. This is an excellent way for you to understand and master this new technology. - Now, you can click the OK button to close this window.
Once you click the OK button, Visual Studio will create several files for you. The first file is the project file. This is an XML file under the project directory, and it is called HelloWorldService.csproj.
Visual Studio also creates an empty class file, called Class1.cs. Later, we will change this default name to a more meaningful one, and change its namespace to our own one.
Three directories are created automatically under the project folder-one to hold the binary files, another to hold the object files, and a third one for the properties files of the project.
The window on your screen should now look like the following image:
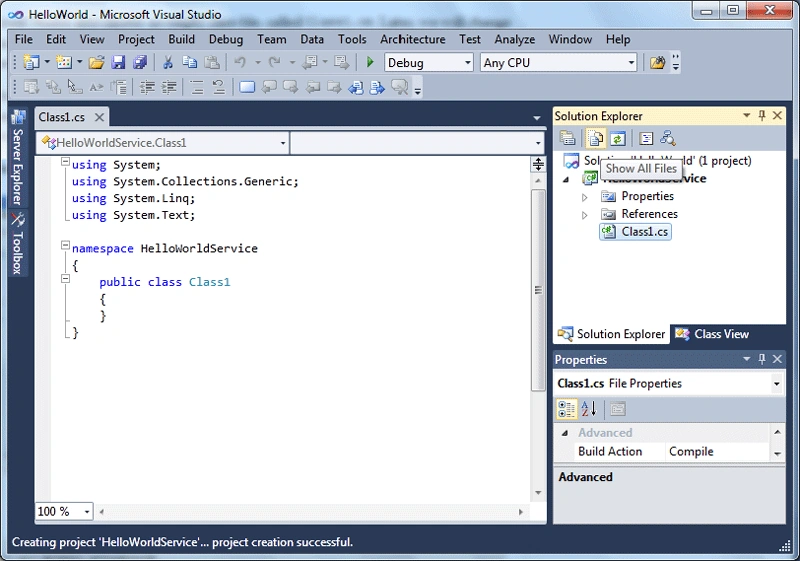
We now have a new solution and project created. Next, we will develop and build this service. But before we go any further, we need to do two things to this project:
- Click the Show All Files button on the Solution Explorer toolbar. It is the second button from the left, just above the word Solution inside the Solution Explorer. If you allow your mouse to hover above this button, you will see the hint Show All Files, as shown in above diagram. Clicking this button will show all files and directories in your hard disk under the project folder-even those items that are not included in the project. Make sure that you don't have the solution item selected. Otherwise, you can't see the Show All Files button.
- Change the default namespace of the project. From the Solution Explorer, right-click on the HelloWorldService project, select Properties from the context menu, or go to menu item Project | HelloWorldService Properties.... You will see the project properties dialog window. On the Application tab, change the Default namespace to MyWCFServices.
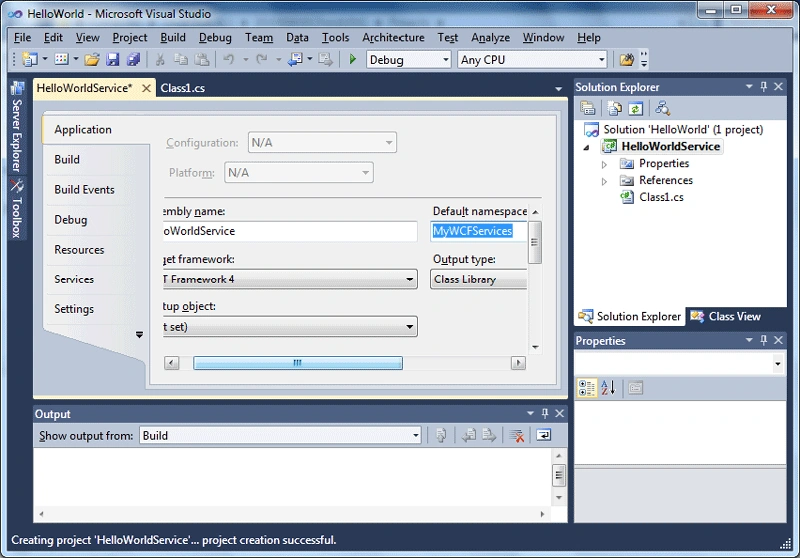
Lastly, in order to develop a WCF service, we need to add a reference to the System.ServiceModel namespace.
- On the Solution Explorer window, right-click on the HelloWorldService project, and select Add Reference... from the context menu. You can also go to the menu item Project | Add Reference... to do this. The Add Reference dialog window should appear on your screen.
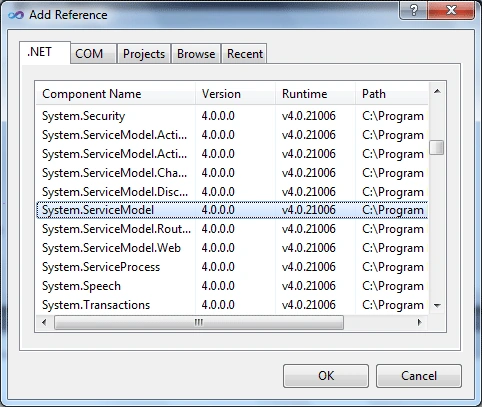
- Select System.ServiceModel from the .NET tab, and click OK.
Now, on the Solution Explorer, if you expand the references of the HelloWorldService project, you will see that System.ServiceModel has been added. Also note that System.Xml.Linq is added by default. We will use this later when we query a database.
Creating the HelloWorldService service contract interface
In the previous section, we created the solution and the project for the HelloWorld WCF Service. From this section on, we will start building the HelloWorld WCF service. First, we need to create the service contract interface.
- In the Solution Explorer, right-click on the HelloWorldService project, and select Add | New Item.... from the context menu. The following Add New Item - HelloWorldService dialog window should appear on your screen.
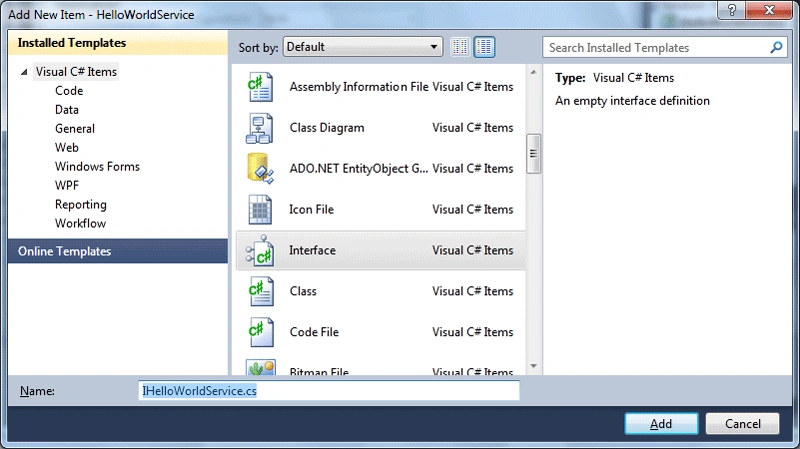
- On the left-hand side of the window (Installed Templates), select Visual C# Items as the template, and on the middle side of the window, select Interface.
- At the bottom of the window, change the Name from Interface1.cs to IHelloWorldService.cs.
- Click the Add button.
Now, an empty service interface file has been added to the project. Follow the steps below to customize it.
- Add a using statement:
- using System.ServiceModel;
- Add a ServiceContract attribute to the interface. This will designate the interface as a WCF service contract interface.
[ServiceContract]
- Add a GetMessage method to the interface. This method will take a string as the input, and return another string as the result. It also has an attribute, OperationContract.
- [OperationContract]
- String GetMessage(String name);
- Change the interface to public.
The final content of the file IHelloWorldService.cs should look like the following:
- using System;
- using System.Collections.Generic;
- using System.Linq;
- using System.Text;
- using System.ServiceModel;
- namespace MyWCFServices
- {
- [ServiceContract]
- public interface IHelloWorldService
- {
- [OperationContract]
- String GetMessage(String name);
- }
- }
Implementing the HelloWorldService service contract
Now that we have defined a service contract interface, we need to implement it. For this purpose, we will re-use the empty class file that Visual Studio created for us earlier, and modify this to make it the implementation class of our service.
Before we modify this file, we need to rename it. In the Solution Explorer window, right-click on the file Class1.cs, select rename from the context menu, and rename it to HelloWorldService.cs.
Visual Studio is smart enough to change all related files, references to use this new name. You can also select the file, and change its name from the Properties window.
Next, follow the steps below to customize this class file.
- Change its namespace from HelloWorldService to MyWCFServices. This is because this file was added before we changed the default namespace of the project.
- Make it inherit from the interface IHelloWorldService.
- public class HelloWorldService : IHelloWorldService
- Add a GetMessage method to the class. This is an ordinary C# method that returns a string.
The final content of the file HelloWorldService.cs should look like the following:- public String GetMessage(String name)
- {
- return "Hello world from " + name + "!";
- }
- using System;
- using System.Collections.Generic;
- using System.Linq;
- using System.Text;
- namespace MyWCFServices
- {
- public class HelloWorldService : IHelloWorldService
- {
- public String GetMessage(String name)
- {
- return "Hello world from " + name + "!";
- }
- }
- }
Now, build the project. If there is no build error, it means that you have successfully created your first WCF service. If you see a compilation error, such as "'ServiceModel' does not exist in the namespace 'System'", this is probably because you didn't add the System.ServiceModel namespace reference correctly. Revisit the previous section to add this reference, and you are all set.
Next, we will host this WCF service in an environment and create a client application to consume it.
Hosting the WCF service in ASP.NET Development Server
The HelloWorldService is a class library. It has to be hosted in an environment so that client applications may access it. In this section, we will explain how to host it using the ASP.NET Development Server. Later, in the next chapter, we will discuss more hosting options for a WCF service.
Creating the host application
There are several built-in host applications for WCF services within Visual Studio 2010. However, in this section, we will manually create the host application so that you can have a better understanding of what a hosting application is really like under the hood. In subsequent chapters, we will explain and use the built-in hosting application.
To host the library using the ASP.NET Development Server, we need to add a new web site to the solution. Follow these steps to create this web site:
- In the Solution Explorer, right-click on the solution file, and select Add | New Web Site... from the context menu. The Add New Web Site dialog window should pop up.
- Select Visual C# | Empty Web Site as the template, and leave the Location set as File System. Change the web site name from WebSite1 to C:\SOAwithWCFandLINQ\Projects\HelloWorld\HostDevServer, and click OK.
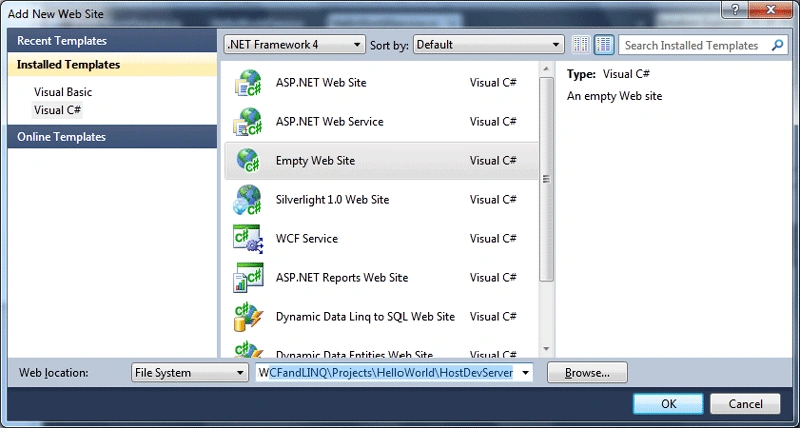
- Now in the Solution Explorer, you have one more item (HostDevServer) within the solution. It will look like the following:
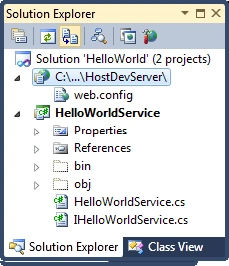
- Next, we need to set the website as the startup project. In the Solution Explorer, right-click on the web site C:\...\HostDevServer, select Set as StartUp Project from the context menu (or you can first select the web site from the Solution Explorer, and then select menu item Website | Set as StartUp Project). The web site C:\...\HostDevServer should be highlighted in the Solution Explorer indicating that it is now the startup project.
- Because we will host the HelloWorldService from this web site, we need to add a HelloWorldService reference to the web site. In the Solution Explorer, right-click on the web site C:\...\HostDevServer, and select Add Reference... from the context menu. The following Add Reference dialog box should appear:
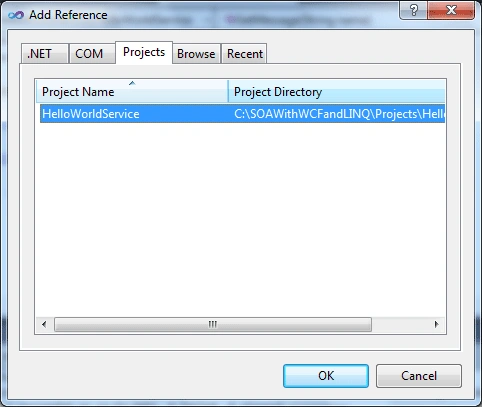
- In the Add Reference dialog box, click on the Projects tab, select HelloWorldService project, and then click OK. You will see that a new directory (bin) has been created under the HostDevServer web site, and two files from HelloWorldService project have been copied to this new directory. Later on, when this web site is accessed, the web server (either ASP.NET Development Server or IIS) will look for executable code in this bin directory.
Testing the host application
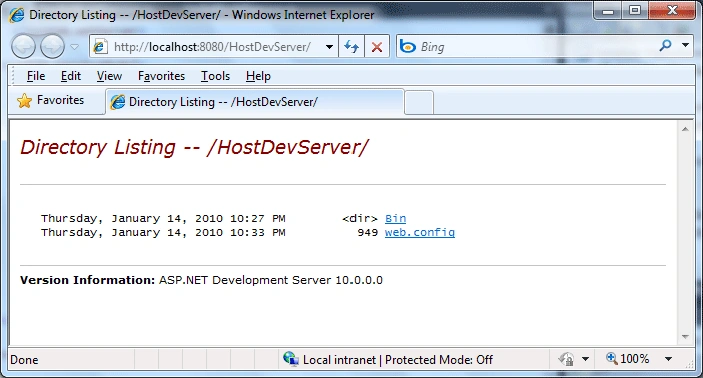
Now we can run the website inside the ASP.NET Development Server. If you start the web site HostDevServer, by pressing Ctrl+F5, or select the Debug | Start Without Debugging... menu, you will see an empty web site in your browser. Because we have set this website as the startup project, but haven't set any start page, it lists all of the files and directories inside the HostDevServer directory (Directory Browsing is always enabled for a website within the ASP.NET Development Server).
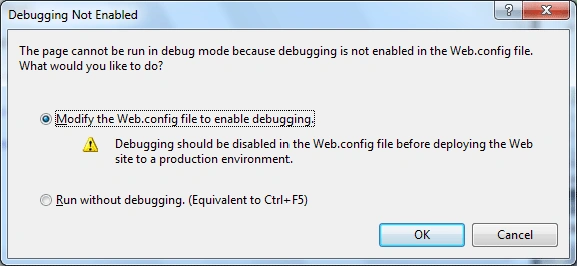
If you pressed F5 (or selected Debug | Start Debugging from the menu), you may see a dialog saying Debugging Not Enabled (as shown below). Choose the option Run without debugging. (Equivalent to Ctrl+F5) and click the OK button to continue. We will explore the debugging options of a WCF service later. Until then, we will continue to use Ctrl+F5 to start the website without debugging.
ASP.NET Development Server
At this point, you should have the HostDevServer site up and running. This site is actually running inside the built-in ASP.NET Development Server. It is a new feature that was introduced in Visual Studio 2005. This web server is intended to be used by developers only, and has functionality similar to that of the Internet Information Services (IIS) server. It also has some limitations; for example, you can run ASP.NET applications only locally. You can't use it as a real IIS server to publish a web site.
By default, the ASP.NET Development Server uses a dynamic port for the web server each time it is started. You can change it to use a static port via the Properties page of the web site. Just change the Use dynamic ports setting to false, and specify a static port, such as 8080, from the Properties window of the HostDevServer web site. You can't set the port to 80, because IIS is already using this port. However, if you stop your local IIS, you can set your ASP.NET Development Server to use port 80.
Even you set its port to 80 it is still a local web server. It can't be accessed from outside your local PC.
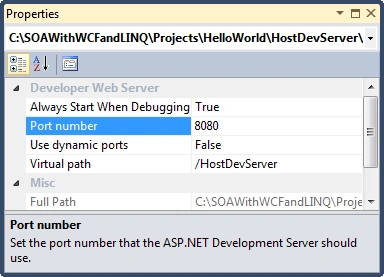
It is recommended that you use a static port so that client applications know in advance where to connect to the service. From now on, we will always use port 8080 in all of our examples.
The ASP.NET Development Server is normally started from within Visual Studio when you need to debug or unit test a web project. If you really need to
start it from outside Visual Studio, you can use a command line statement in the following format:
start /B WebDev.WebServer [/port:<port number>] /path:<physical path> [/vpath:<virtual path>]
For our web site, the statement should be like this:
start /B webdev.webserver.exe /port:8080 /path:"C:\SOAwithWCFandLINQ\Projects\HelloWorld\HostDevServer" /vpath:/HostDevServer
The webdev.webserver.exe is located under your .NET framework installation directory (C:\WINDOWS\Microsoft.NET\Framework\v2.0.50727 or C:\Program Files\Common Files\Microsoft Shared\DevServer), and it may be called a different name such as webdev.webserver20.exe, or webdev.webserver40.exe.
Adding an svc file to the host application
Although we can start the web site now, it is only an empty site. Currently, it does not host our HelloWorldService. This is because we haven't specified which service this web site should host, or an entry point for this web site. Just as an asmx file is the entry point for a non-WCF web service, a .svc file is the entry point for a WCF service, if it is hosted on a web server. We will now add such a file to our web site.
From the Solution Explorer, right-click on the web site C:\...\HostDevServer, and select Add New Item... from the context menu. The Add New Item dialog window should appear, as shown below. Select Text File as the template, and change the Name from TextFile.txt to HelloWorldService.svc in this dialog window.
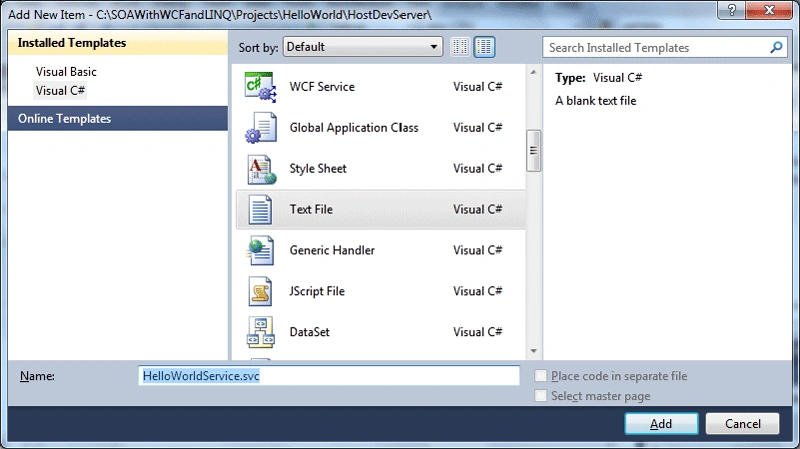
You may have noticed that there is a template, WCF Service, in the list. We won't use it now as it will create a new WCF service within this web site for you (we will use this template later).
After you click the Add button in the Add New Item dialog box, an empty svc file will be created and added to the web site. Now enter the following line in this file:
- <%@ServiceHost Service="MyWCFServices.HelloWorldService"%>
Modifying the web.config file
The final step is to modify the web.config file of the web site. Open the web.config file of the web site and change it to be like this:
- <?xml version="1.0"?>
- <configuration>
- <system.web>
- <compilation debug="false" targetFramework="4.0" />
- </system.web>
- <system.webServer>
- <modules runAllManagedModulesForAllRequests="true"/>
- </system.webServer>
- <system.serviceModel>
- <behaviors>
- <serviceBehaviors>
- <behavior name="MyServiceTypeBehaviors">
- <serviceMetadata httpGetEnabled="true" />
- <serviceDebug includeExceptionDetailInFaults="false" />
- </behavior>
- </serviceBehaviors>
- </behaviors>
- <services>
- <service name="MyWCFServices.HelloWorldService" behaviorConfiguration="MyServiceTypeBehaviors">
- <endpoint address="" binding="wsHttpBinding" contract="MyWCFServices.IHelloWorldService"/>
- <endpoint contract="IMetadataExchange" binding="mexHttpBinding" address="mex"/>
- </service>
- </services>
- </system.serviceModel>
- </configuration>
We use wsHttpBinding for this hosting, which means that it is secure (messages are encrypted while being transmitted), and transaction-aware (we will discuss this in a later chapter). However, because this is a WS-* standard, some existing applications (for example: a QA tool) may not be able to consume this service. In this case, you can change the service to use the basicHttpBinding, which uses plain unencrypted texts when transmitting messages, and is backward compatible with traditional ASP.NET web services (asmx web services).
The following is a brief explanation of the other elements in this configuration file:
- Configuration is the root node of the file.
- system.serviceModel is the top node for all WCF service specific settings.
- Within the services node, you can specify WCF services that are hosted on this web site. In our example, we have only one WCF service HelloWorldService hosted in this web site.
- Each service element defines one WCF service, including its name, behavior, and endpoint.
- Two endpoints have been defined for the HelloWorldService, one for the service itself (an application endpoint), and another for the metadata exchange (an infrastructure endpoint).
- Within the serviceBehaviors node, you can define specific behaviors for a service. In our example, we have specified one behavior, which enables the service meta data exchange for the service.
Starting the host application
Now, if you start the web site by pressing Ctrl+F5 (again, don't use F5 or menu option Debug | Start Debugging until we discuss these, later), you will now find the file HelloWorldService.svc listed on the web page. Clicking on this file will give the description of this service, that is, how to get the wsdl file of this service, and how to create a client to consume this service. You should see a page similar to the following one. You can also set this file as the start page file so that every time you start this web site, you will go to this page directly. You can do this by right-clicking on this file in the Solution Explorer and selecting Set as Start Page from the context menu.
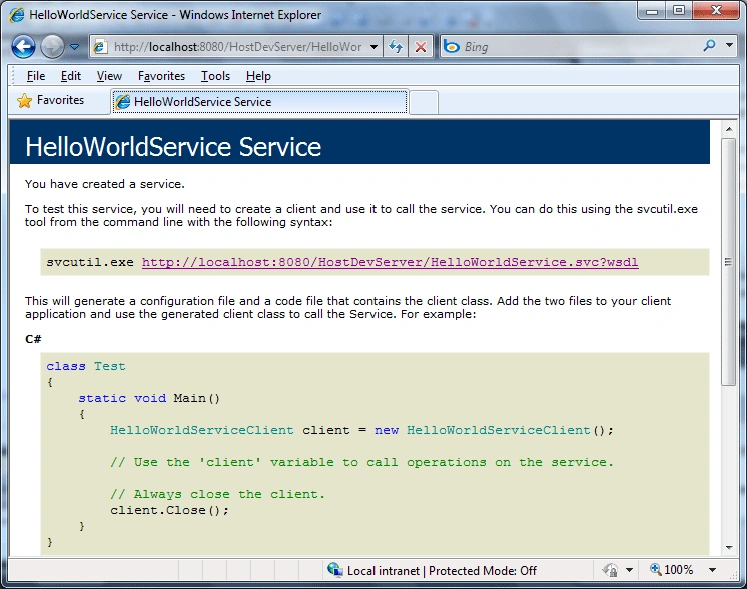
Now, click on the wsdl link on this page, and you will get the wsdl xml file for this service. The wsdl file gives all of the contract information for this service. In the next section, we will use this wsdl to generate a proxy for our client application.
Close the browser. Then, from the Windows system tray (systray), find the little icon labeled ASP.NET Development Server – Port 8080 (it is on the lower-right of your screen, just next to the clock), right-click on it, and select Stop to stop the service.
Creating a client to consume the WCF service
Now that we have successfully created and hosted a WCF service, we need a client to consume the service. We will create a C# client application to consume the HelloWorldService.
In this section, we will create a Windows console application to call the WCF service.
Creating the client application project
First, we need to create a console application project and add it to the solution. Follow these steps to create the console application:
- In the Solution Explorer, right-click on the solution HelloWorld, and select Add | New Project... from the context menu. The Add New Project dialog window should appear, as shown below.
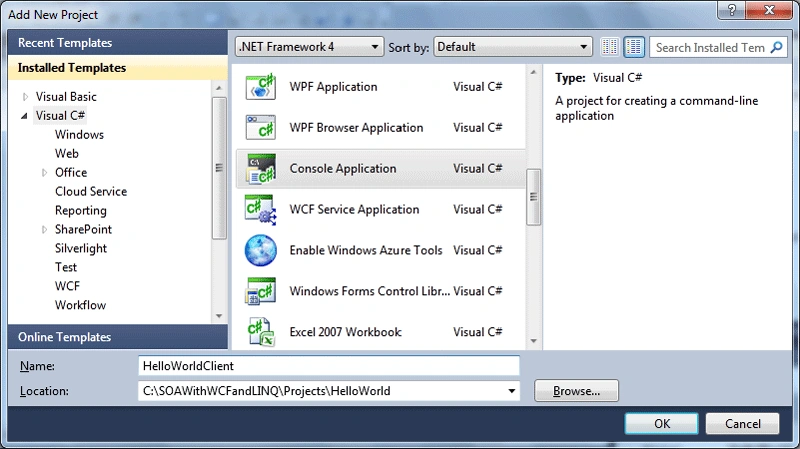
- Select Visual C# | Console Application as the template; change the project name from the defaulted value of ConsoleApplication1 to HelloWorldClient, and leave the location as C:\SOAwithWCFandLINQ\Projects\HelloWorld. Click the OK button. The new client project has now been created and added to the solution.
Generating the proxy and configuration files
In order to consume a WCF service, a client application must first obtain or generate a proxy class.
We also need a configuration file to specify things such as the binding of the service, the address of the service, and the contract.
To generate these two files, we can use the svcutil.exe tool from the command line. You can follow these steps to generate the two files:
- Start the service by pressing Ctrl+F5 or by selecting menu option Debug | Start Without Debugging (at this point your startup project should still be HostDevServer; if not, you need to set this to be the startup project). Now, you should see the introduction window for the HelloWorldService service, as we saw in the previous section.
- After the service has been started, run the command line svcutil.exe tool with the following syntax (SvcUtil.exe may be in a different directory in your machine, for example in Windows 7, it is under v7.0A directory):
C:\SOAWithWCFandLINQ\Projects\HelloWorld\HelloWorldClient>
"C:\Program Files\Microsoft SDKs\Windows\v6.0\Bin\SvcUtil.exe"
http://localhost:8080/HostDevServer/HelloWorldService.svc?wsdl
/out:HelloWorldServiceRef.cs /config:app.config
You will see output similar to that shown in the following screenshot:
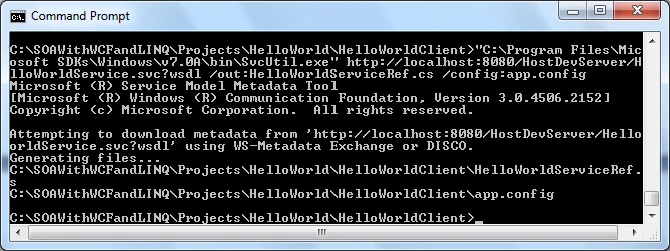
Now, two files have been generated- one for the proxy (HelloWorldServiceRef.cs), and the other for the configuration (app.config).
If you open the proxy file, you will see that the interface of the service (IHelloWorldService) is mimicked inside the proxy class, and a client class (HelloWorldServiceClient) is created to implement this interface. Inside this client class, the implementation of the service operation (GetMessage) is only a wrapper that delegates the call to the actual service implementation of the operation.
Inside the configuration file, you will see the definitions of the HelloWorldService, such as the endpoint address, binding, timeout settings, and security behaviors of the service.
Customizing the client application
Before we can run the client application, we still have some more work to do. Follow these steps to finish the customization:
- Adding the two generated files to the project: In the Solution Explorer, click Show All Files to show all the files under the HelloWorldClient folder, and you will see these two files. However, they are not included in the project. Right-click on each of them and select Include In Project to include both of them in the client project. You can also use menu Project | Add Existing Item ... (or the context menu Add | Existing Item...) to add them to the project.
- Adding a reference to the System.ServiceModel namespace: Just as we did for the project HelloWorldService, we also need to add a reference to the WCF .NET System.ServiceModel assembly. From the Solution Explorer, just right-click on the HelloWorldClient project, select Add Reference... and choose .NET System.ServiceModel. Then, click the OK button to add the reference to the project.
- Modify the program.cs to call the service: In program.cs, add the following line to initialize the service client object:
HelloWorldServiceClient client = new HelloWorldServiceClient();
Then, we can call its method just as we would do for any other object:
Console.WriteLine(client.GetMessage("Mike Liu"));
Pass your name as the parameter to the GetMessage method, so that it prints out a message for you.
Running the client application
We are now ready to run this client program.
First, make sure the HelloWorldService has been started. If you previously stopped it, start it now (you need to set HostDevServer as the startup project, and press Ctrl+F5 to start it in non-debugging mode).
Then, from the Solution Explorer, right-click on the project HelloWorldClient, select Set as StartUp Project, and then press Ctrl+F5 to run it.
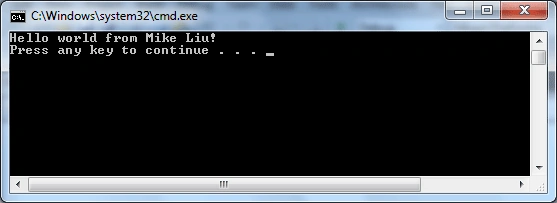
You will see output as shown in the following image:
Setting the service application to AutoStart
Because we know we have to start the service before we run the client program, we can make some changes to the solution to automate this task; that is, to automatically start the service immediately before we run the client program.
To do this, in the Solution Explorer, right-click on the Solution, select Properties from the context menu, and you will see the Solution 'HelloWorld' Property
Pages dialog box.
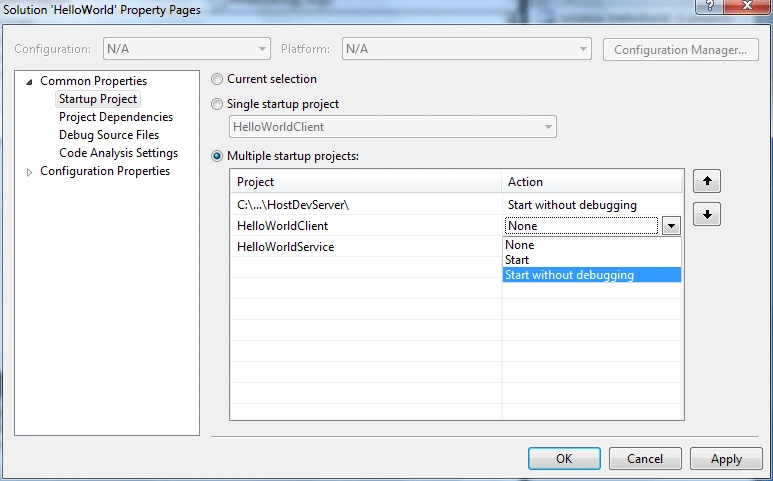
On this page, first select the option button Multiple startup projects. Then, change the action of C:\...\HostDevServer\ to Start without debugging. Change the HelloWorldClient to the same action.
The HostDevServer must be above HelloWorldClient. If it is not, use the arrows to move it to the top.
To try it, first stop the service, and then press Ctrl+F5. You will notice that the HostDevServer is started first, and then the client program runs without errors.
Note that this will only work inside Visual Studio IDE. If you start the client program from Windows Explorer (C:\SOAwithWCFandLINQ\Projects\HelloWorld\
HelloWorldClient\bin\Debug\HelloWorldClient.exe) without first starting the service, the service won't get started automatically and you will get an error message saying 'Could not connect to http://localhost:8080/HostDevServer/ HelloWorldService.svc'.
Summary
In this article, we have implemented a basic WCF service, hosted it within the ASP.NET Development Server, and created a command line program to reference and consume this basic WCF service. At this point, you should have a thorough understanding as to what a WCF is under the hood. You will benefit from this when you develop WCF services using Visual Studio WCF templates, or automation guidance packages. The key points covered in this chapter are:
- A WCF service is a class library, which defines one or more WCF service interface contracts
- System.ServiceModel assembly is referenced by all of the WCF service projects
- The implementations of a WCF service are just regular C# classes
- A WCF service must be hosted in a hosting application
- Visual Studio 2010 has a built-in hosting application for WCF services, which is called ASP.NET Development Server
- A client application uses a proxy to communicate with WCF services
- A configuration file can be used to specify settings for WCF services
Note this article is based on a chapter of my book "WCF Multi-Layer Services Development with Entity Framework, 4th Edition" (ISBN 978-1784391041). You can get this book from here: http://www.amazon.com/Multi-Layer-Services-Development-Entity-Framework/dp/1784391042/ref=sr_1_1?ie=UTF8&qid=1460598562&sr=8-1.
Update
For an updated article, check out this link: Implementing a Basic Hello World WCF Service (v4.5)
You can also find my other article here:
Peter MortensenPosted Jul 26, 2015, 10:25 AM
Your article has been plagiarised (leaving out the author information) at http://mycodeXXXXlogic.blogspot.dk/2011/07/implementing-basic-hello-world-wcf.html (I have inserted four "X"s in the URL to prevent any link juice).
MrDoucheChill .Posted Jul 22, 2015, 2:14 PM
Hey Mike, great article! You can find a completely plagiarized copy of this whole page here: http://mycodelogic.blogspot.dk/2011/07/implementing-basic-hello-world-wcf.html Please smack them for all web content creators.
Md Eqbal AnsariPosted Dec 18, 2012, 6:01 AM
Good Post...
Nishantha HettigodaPosted Dec 18, 2012, 1:41 AM
Thanks for sharing such a nice article.
siddu lakkarsuPosted Jul 6, 2012, 8:43 AM
Thank u very much 4 u r post
Salah MohamedPosted Mar 28, 2012, 10:39 AM
Hello Mike, this is best Thank Thank you Salah
Shashi SinghPosted Nov 6, 2010, 1:29 PM
Thanks, Mike...Really its very well composed article.
Vijay KumarPosted Sep 23, 2010, 12:15 AM
Dear Mike., Thanks for sharing such a nice article.
robert paulPosted Sep 3, 2010, 2:43 AM
Thanks for sharing this nice and useful information...call center services
Muhammad IrfanPosted Jul 31, 2010, 5:46 AM
Thank you for such a nice article....
Ganesh DevadharPosted Jul 12, 2010, 3:15 AM
Thanks Mike. This helped a lot. Ganesh
Dinesh BeniwalPosted Jul 9, 2010, 10:19 AM
Dear Mike, Thanx for the article, in this article beginner can learn about WCF Service. Dinesh