

Introduction
In this article we will explore the pivot control of Windows Phone Application to implement a restaurant menulist of food items. The Windows Phone pivot control provides a quick way to manage views or pages. It can be used for filtering large datasets, viewing multiple data sets, or switching application views, pivot controls as a great control for giving your user different slices of the data. At the base of an application is a pivot control that is essentially a container for a secondary control called a PivotItem control. The PivotItem controls contain individual page content such as controls, grids, or links inside each page. The Pivot control comes with built-in support for touch interaction and navigation. You do not have to implement any special gesture functionality in your application because it is enabled by default. The pivot control supports the following gestures and navigational effects:
- Horizontal pan (tap and drag left/right)
- Horizontal flick (tap and swipe quickly left/right)
- Navigating hosted controls—for example, links can be tapped and lists can be scrolled
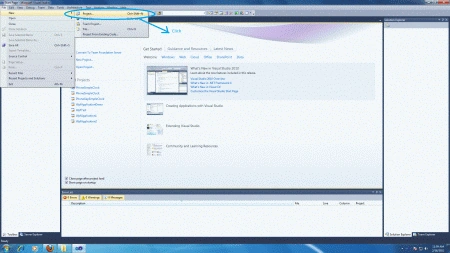
- Select new -> project
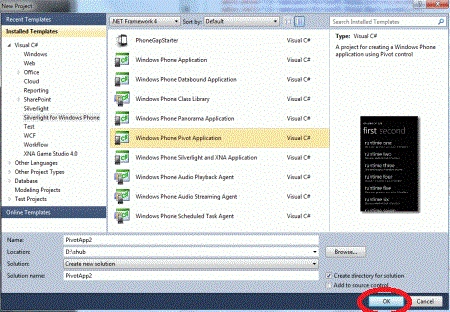
- Select your preferred language
- Select Silverlight for Windows Phone Pivot application
- Name the project
- Now name of project is "PivotApplication1"
Step 2 : Now customize the MainPage.xaml code according to our need; the code is given below.
Code
<controls:Pivot Title="FOODS" Visibility="Visible">
<controls:PivotItem Header=">>FastFood" FontSize="8" Height="Auto">
<ListBox x:Name="FastFood" Margin="0,0,-12,0">
<ListBox.ItemTemplate>
<DataTemplate>
<StackPanel Margin="0,0,0,17" >
<TextBlock Text="{Binding Name}" TextWrapping="Wrap" Style="{StaticResource PhoneTextExtraLargeStyle}"/>
</StackPanel>
</DataTemplate>
</ListBox.ItemTemplate>
</ListBox>
</controls:PivotItem>
<controls:PivotItem Header=">>VegItem" FontSize="8">
<ListBox x:Name="VegList" Margin="0,0,-12,0">
<ListBox.ItemTemplate>
<DataTemplate>
<StackPanel Margin="0,0,0,17" >
<TextBlock Text="{Binding Name}" TextWrapping="Wrap" Style="{StaticResource PhoneTextExtraLargeStyle}"/>
</StackPanel>
</DataTemplate>
</ListBox.ItemTemplate>
</ListBox>
</controls:PivotItem>
<controls:PivotItem Header=">>NonVeg" FontSize="8">
<ListBox x:Name="NonVegList" Margin="0,0,-12,0">
<ListBox.ItemTemplate>
<DataTemplate>
<StackPanel Margin="0,0,0,17" >
<TextBlock Text="{Binding Name}" TextWrapping="Wrap" Style="{StaticResource PhoneTextExtraLargeStyle}"/>
</StackPanel>
</DataTemplate>
</ListBox.ItemTemplate>
</ListBox>
</controls:PivotItem>
</controls:Pivot>
Step 3 : The whole code of the MainPage.xaml page is:
Code
<phone:PhoneApplicationPage xmlns:controls="clr-namespace:Microsoft.Phone.Controls;assembly=Microsoft.Phone.Controls"
x:Class="PivotControl.MainPage"
xmlns="http://schemas.microsoft.com/winfx/2006/xaml/presentation"
xmlns:x="http://schemas.microsoft.com/winfx/2006/xaml"
xmlns:phone="clr-namespace:Microsoft.Phone.Controls;assembly=Microsoft.Phone"
xmlns:shell="clr-namespace:Microsoft.Phone.Shell;assembly=Microsoft.Phone"
xmlns:d="http://schemas.microsoft.com/expression/blend/2008"
xmlns:mc="http://schemas.openxmlformats.org/markup-compatibility/2006"
mc:Ignorable="d" d:DesignWidth="480" d:DesignHeight="768"
FontFamily="{StaticResource PhoneFontFamilyNormal}"
FontSize="{StaticResource PhoneFontSizeNormal}"
Foreground="{StaticResource PhoneForegroundBrush}"
SupportedOrientations="Portrait" Orientation="Portrait"
shell:SystemTray.IsVisible="True">
<!--LayoutRoot is the root grid where all page content is placed-->
<controls:Pivot Title="FOODS" Visibility="Visible">
<controls:PivotItem Header=">>FastFood" FontSize="8" Height="Auto">
<ListBox x:Name="FastFood" Margin="0,0,-12,0">
<ListBox.ItemTemplate>
<DataTemplate>
<StackPanel Margin="0,0,0,17" >
<TextBlock Text="{Binding Name}" TextWrapping="Wrap" Style="{StaticResource PhoneTextExtraLargeStyle}"/>
</StackPanel>
</DataTemplate>
</ListBox.ItemTemplate>
</ListBox>
</controls:PivotItem>
<controls:PivotItem Header=">>VegItem" FontSize="8">
<ListBox x:Name="VegList" Margin="0,0,-12,0">
<ListBox.ItemTemplate>
<DataTemplate>
<StackPanel Margin="0,0,0,17" >
<TextBlock Text="{Binding Name}" TextWrapping="Wrap" Style="{StaticResource PhoneTextExtraLargeStyle}"/>
</StackPanel>
</DataTemplate>
</ListBox.ItemTemplate>
</ListBox>
</controls:PivotItem>
<controls:PivotItem Header=">>NonVeg" FontSize="8">
<ListBox x:Name="NonVegList" Margin="0,0,-12,0">
<ListBox.ItemTemplate>
<DataTemplate>
<StackPanel Margin="0,0,0,17" >
<TextBlock Text="{Binding Name}" TextWrapping="Wrap" Style="{StaticResource PhoneTextExtraLargeStyle}"/>
</StackPanel>
</DataTemplate>
</ListBox.ItemTemplate>
</ListBox>
</controls:PivotItem>
</controls:Pivot>
</phone:PhoneApplicationPage>
-
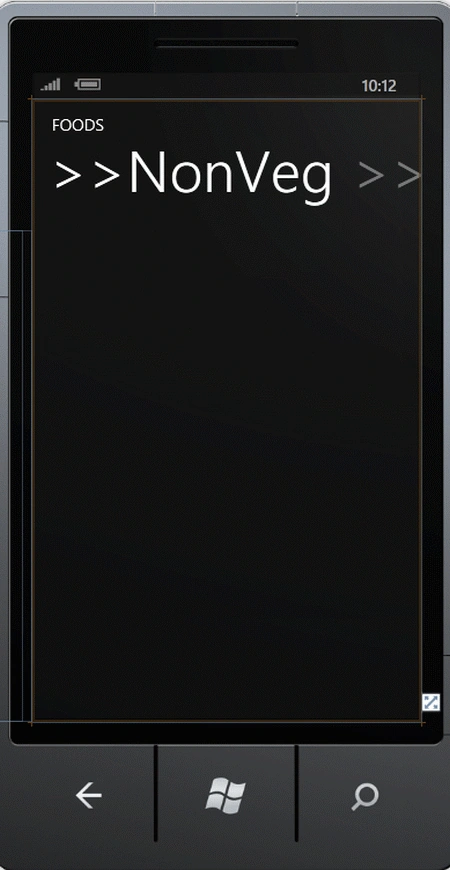
At design time the application looks like this:
Step 4 : The final source code of the MainPage.xaml.cs file is:
Code
using System;
using System.Collections.Generic;
using System.Linq;
using System.Net;
using System.Windows;
using System.Windows.Controls;
using System.Windows.Documents;
using System.Windows.Input;
using System.Windows.Media;
using System.Windows.Media.Animation;
using System.Windows.Shapes;
using Microsoft.Phone.Controls;
namespace PivotControl
{
public partial class MainPage : PhoneApplicationPage
{
FoodName[] names = new FoodName[20] {new FoodName("Barger", 1, 0),
newFoodName("chapati", 2, 3),
newFoodName("Dosa", 1, 2),
newFoodName("pizza", 1, 2),
new FoodName("nudal", 1, 2),
new FoodName("chaomin", 1, 0),
new FoodName("pao Bhaji", 1, 2),
new FoodName("Dam AAlu", 2, 0),
new FoodName("kadhi Panner", 2, 0),
new FoodName("Masala Masroom", 2, 0),
new FoodName("Rice", 2, 3),
new FoodName("Mix Veg", 2, 0),
new FoodName("Daal Makhni", 2, 0),
new FoodName("Butter Chapati", 2, 3),
new FoodName("Naan Rooti", 2, 3),
new FoodName("Masala Chikan", 3, 0),
new FoodName("Masala Muton", 3, 0),
new FoodName("Fry Fish", 3, 0),
new FoodName("Kadhi Chikan", 3, 0),
new FoodName("Kadhi Muton", 3, 0)};
// Constructor
public MainPage()
{
InitializeComponent();
FastFood.ItemsSource = from n in names
where (n.Gender1 == 1)
orderby n.Name
select new FoodName(n.Name, n.Gender1, n.Gender2);
VegList.ItemsSource = from n in names
where (n.Gender1 == 2 || n.Gender2 == 2)
orderby n.Name
select new FoodName(n.Name, n.Gender1, n.Gender2);
NonVegList.ItemsSource = from n in names
where (n.Gender1 == 3 || n.Gender2 == 3)
orderby n.Name
select new FoodName(n.Name, n.Gender1, n.Gender2);
}
}
}
Step 5 : Add a class in the Project to define the source for pivot items.
Code
using System;
using System.Net;
using System.Windows;
using System.Windows.Controls;
using System.Windows.Documents;
using System.Windows.Ink;
using System.Windows.Input;
using System.Windows.Media;
using System.Windows.Media.Animation;
using System.Windows.Shapes;
namespace PivotControl
{
public class FoodName
{
public string Name { get; set; }
public int Gender1 {get; set; }
public int Gender2 { get; set; }
public FoodName()
{
}
public FoodName(string name, int gender1, int gender2)
{
Gender1 = gender1;
Gender2 = gender2;
Name = name;
}
}
}
Step 6 : Press F5 to run the application.
Output
-
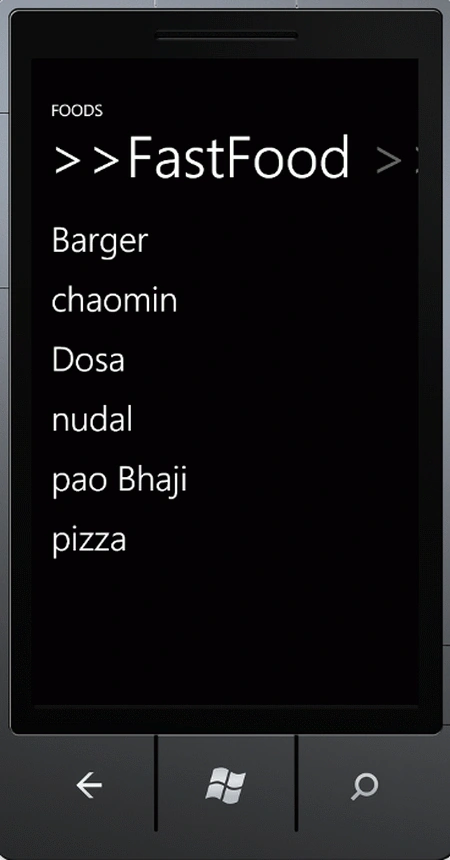
After running the application, it will open like this and show the the first subcategory of menulist "FastFood":
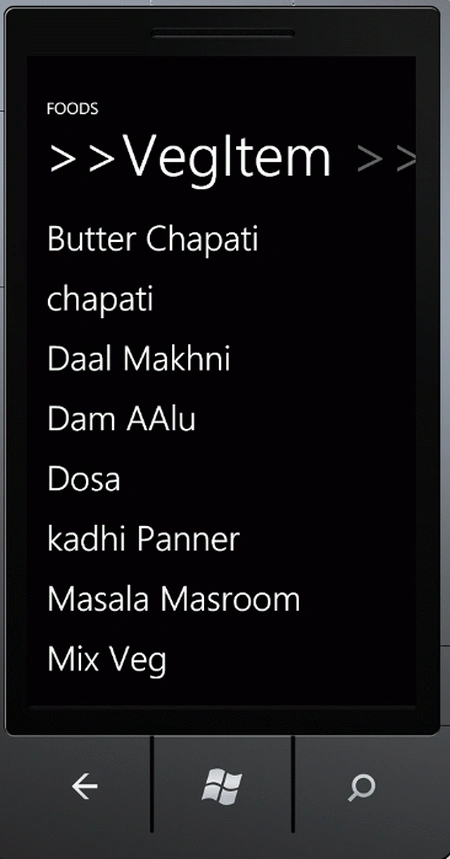
- Just click on the ">>" symbol and then the next category will be shown:
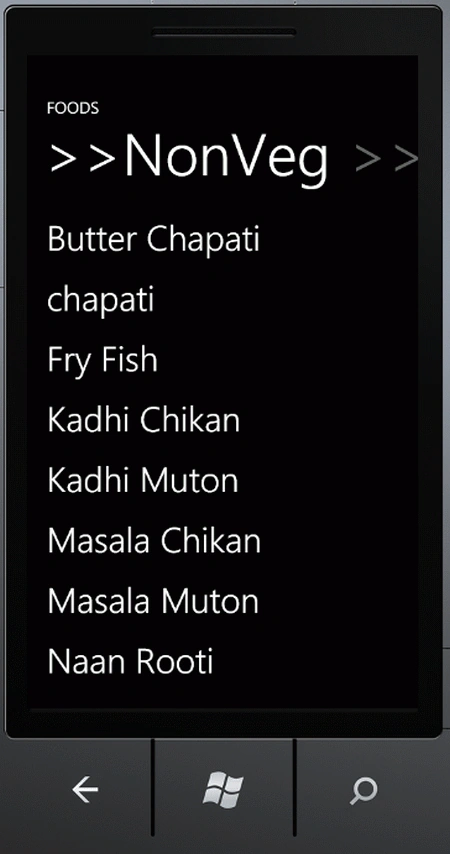
- Click again to show the next category:
Resources
Join the conversation! Your thoughts help the community grow.