

Introduction
This article shows how to create a Master and Detail Grid using AngularJS and WCF. In this article we will see:
- How to create a WCF Rest service and retrieve data from the database.
- How to install an AngularJS Package in our MVC application.
- How to create our AngularJS application to create our own Master Detail Grid.
- How to use a WCS service in AngularJS and bind the data of both a Master and Detail to our MVC View.
Here we can see some basic and reference links for the following.
Windows Communication Foundation (WCF): WCF is a framework for building service-oriented applications.
Service-oriented application: Using this protocol the service can be shared and used over a network.
For example let's consider now we are working on a project and we need to create some common database function and those functions need to be used in multiple projects and the projects are in multiple places and connected via a network such as the internet.
In this case we can create a WCF service and we can write all our common database functions in our WCF service class. We can deploy our WCF in IIS and use the URL in our application to do DB functions. In the code part let's see how to create a WCF REST service and use it in our AngularJS application.
If you are interested in reading more details about WCF then kindly go to this link.
AngularJS
We might be be familiar with what is Model, View and View Model (MVVM) and Model, View and Controller (MVC) are. AngularJS is a JavaScript framework that is purely based on HTML CSS and JavaScript .
Similar to the MVC and MVVM patterns AngularJS uses the Model, View and Whatever (MVW) pattern.
In our example I have used Model, View and Service. In the code part let's see how to Install and create AngularJS in our MVC application.
If you are interested in reading more details about AngularJS then kindly go to this link.
Code Part
Create Database and Table
We will create an Order Master and Order Detail table to be used for the Master and Detail Grid data binding.
The following is the script to create a database, table and sample insert query.
Run this script in your SQL Server. I have used SQL Server 2008 R2.
- --create DataBase
- Create Database OrderManagement
- -- Create OrderMasters Table
- CREATE TABLE [dbo].[OrderMasters](
- [Order_No] [varchar](20) NOT NULL,
- [Table_ID] [varchar](20) NOT NULL,
- [Description] [varchar](200) NOT NULL,
- [Order_DATE] [datetime] NOT NULL,
- [Waiter_Name] [varchar](20) NOT NULL
- CONSTRAINT [PK_OrderMasters] PRIMARY KEY CLUSTERED
- (
- [Order_No] ASC
- )WITH (PAD_INDEX = OFF, STATISTICS_NORECOMPUTE = OFF, IGNORE_DUP_KEY = OFF, ALLOW_ROW_LOCKS = ON, ALLOW_PAGE_LOCKS = ON) ON [PRIMARY]
- ) ON [PRIMARY]
- -- Insert OrderMasters sample data
- INSERT INTO [OrderMasters]
- ([Order_No],[Table_ID] ,[Description],[Order_DATE],[Waiter_Name])
- VALUES
- ('ORD_001','T1','Order for Table T1',GETDATE(),'SHANU' )
- INSERT INTO [OrderMasters]
- ([Order_No],[Table_ID] ,[Description],[Order_DATE],[Waiter_Name])
- VALUES
- ('ORD_002','T2','Order for Table T2',GETDATE(),'Afraz' )
- INSERT INTO [OrderMasters]
- ([Order_No],[Table_ID] ,[Description],[Order_DATE],[Waiter_Name])
- VALUES
- ('ORD_003','T3','Order for Table T3',GETDATE(),'Afreen')
- CREATE TABLE [dbo].[OrderDetails](
- [Order_Detail_No] [varchar](20) NOT NULL,
- [Order_No] [varchar](20) CONSTRAINT fk_OrderMasters FOREIGN KEY REFERENCES OrderMasters(Order_No),
- [Item_Name] [varchar](20) NOT NULL,
- [Notes] [varchar](200) NOT NULL,
- [QTY] INT NOT NULL,
- [Price] INT NOT NULL
- CONSTRAINT [PK_OrderDetails] PRIMARY KEY CLUSTERED
- (
- [Order_Detail_No] ASC
- )WITH (PAD_INDEX = OFF, STATISTICS_NORECOMPUTE = OFF, IGNORE_DUP_KEY = OFF, ALLOW_ROW_LOCKS = ON, ALLOW_PAGE_LOCKS = ON) ON [PRIMARY]
- ) ON [PRIMARY]
- --Now let’s insert the 3 items for the above Order No 'Ord_001'.
- INSERT INTO [OrderDetails]
- ([Order_Detail_No],[Order_No],[Item_Name],[Notes],[QTY] ,[Price])
- VALUES
- ('OR_DT_001','ORD_001','Ice Cream','Need very Cold',2 ,160)
- INSERT INTO [OrderDetails]
- ([Order_Detail_No],[Order_No],[Item_Name],[Notes],[QTY] ,[Price])
- VALUES
- ('OR_DT_002','ORD_001','Coffee','Hot and more Suger',1 ,80)
- INSERT INTO [OrderDetails]
- ([Order_Detail_No],[Order_No],[Item_Name],[Notes],[QTY] ,[Price])
- VALUES
- ('OR_DT_003','ORD_001','Burger','Spicy',3 ,140)
- INSERT INTO [OrderDetails]
- ([Order_Detail_No],[Order_No],[Item_Name],[Notes],[QTY] ,[Price])
- VALUES
- ('OR_DT_004','ORD_002','Pizza','More Chees and Large',1 ,350)
- INSERT INTO [OrderDetails]
- ([Order_Detail_No],[Order_No],[Item_Name],[Notes],[QTY] ,[Price])
- VALUES
- ('OR_DT_005','ORD_002','Cola','Need very Cold',3 ,50)
- INSERT INTO [OrderDetails]
- ([Order_Detail_No],[Order_No],[Item_Name],[Notes],[QTY] ,[Price])
- VALUES
- ('OR_DT_006','ORD_003','IDLY','Hot',3 ,40)
- INSERT INTO [OrderDetails]
- ([Order_Detail_No],[Order_No],[Item_Name],[Notes],[QTY] ,[Price])
- VALUES
- ('OR_DT_007','ORD_003','Thosa','Hot',3 ,50)
- -- To Select and test Order Master and Details
- Select * FROM OrderMasters
- Select * From OrderDetails
Create WCF REST Service
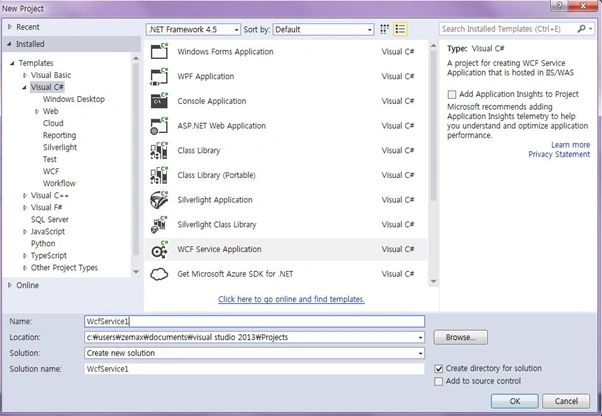
Open Visual Studio 2013 then select "File" -> "New" -> "Project..." then select WCF Service Application then select your project path and name your WCF service and click OK.
Once we have created our WCF Service we can see “IService.CS” and “Service1.svc” in the Solution Explorer as in the following.
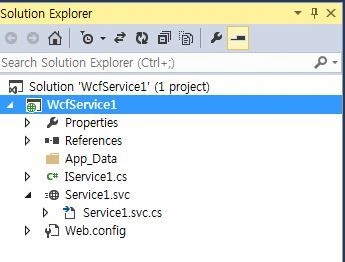
- IService.CS: In “IService.CS” we can see 3 Contracts by defaul.
- [ServiceContract]: Describes the methods or any operations available for the service. The Service Contract is an interface and methods can be declared inside the Service Interface using the Operation Contract attribute.
- [OperationContract]: is similar to the web service [WEBMETHOD].
- [DataContract]: describes the data exchange between the client and the service.
- [ServiceContract]
The following code will be automatically created for all the IService.CS files. We can change and write our own code here.
- public interface IService1
- {
- [OperationContract]
- string GetData(int value);
- [OperationContract]
- CompositeType GetDataUsingDataContract(CompositeType composite);
- // TODO: Add your service operations here
- }
- // Use a data contract as illustrated in the sample below to add composite types to service operations.
- [DataContract]
- public class CompositeType
- {
- bool boolValue = true;
- string stringValue = "Hello ";
- [DataMember]
- public bool BoolValue
- {
- get { return boolValue; }
- set { boolValue = value; }
- }
- [DataMember]
- public string StringValue
- {
- get { return stringValue; }
- set { stringValue = value; }
- }
- }
Data Contract
In our example we need to get both an Order Master and an Order Details from the database, so I have created two Data Contracts, “OrderMasterDataContract” and “OrderDetailDataContract”.
Here we can see we have declarared all our Table column names as Data Member.
- public class OrderDataContract
- {
- [DataContract]
- public class OrderMasterDataContract
- {
- [DataMember]
- public string Order_No { get; set; }
- [DataMember]
- public string Table_ID { get; set; }
- [DataMember]
- public string Description { get; set; }
- [DataMember]
- public string Order_DATE { get; set; }
- [DataMember]
- public string Waiter_Name { get; set; }
- }
- [DataContract]
- public class OrderDetailDataContract
- {
- [DataMember]
- public string Order_Detail_No { get; set; }
- [DataMember]
- public string Order_No { get; set; }
- [DataMember]
- public string Item_Name { get; set; }
- [DataMember]
- public string Notes { get; set; }
- [DataMember]
- public string QTY { get; set; }
- [DataMember]
- public string Price { get; set; }
- }
- }
Service Contract
In the Operation Contract we can see “WebInvoke” and “WebGet” for retrieving the data from the database in the REST Serivce.
- RequestFormat = WebMessageFormat.Json,
- ResponseFormat = WebMessageFormat.Json,
Here we can see both of the request and response formats. Here I have used the JavaScript Object Notation (JSON) format.
- JSON is a lightweight data interchange format.
- UriTemplate: Here we provide our Method Name.
Here I have declared the 3 methods “GetOrderMaster”, “SearchOrderMaster” and “OrderDetails” . The “GetOrderMaster” method gets the Order Master records. In the “OrderDetails” method the Order_No parameter provides the order detail filter by Order Number.
- [ServiceContract]
- public interface IService1
- {
- [OperationContract]
- [WebInvoke(Method = "GET",
- RequestFormat = WebMessageFormat.Json,
- ResponseFormat = WebMessageFormat.Json,
- UriTemplate = "/GetOrderMaster/")]
- List<OrderDataContract.OrderMasterDataContract> GetOrderMaster();
- [OperationContract]
- [WebGet(RequestFormat = WebMessageFormat.Json,
- ResponseFormat = WebMessageFormat.Json,
- UriTemplate = "/SearchOrderMaster/{Order_No}")]
- OrderDataContract.OrderMasterDataContract SearchOrderMaster(string Order_No);
- [OperationContract]
- [WebInvoke(Method = "GET",
- RequestFormat = WebMessageFormat.Json,
- ResponseFormat = WebMessageFormat.Json,
- UriTemplate = "/OrderDetails/{Order_No}")]
- List<OrderDataContract.OrderDetailDataContract> OrderDetails(string Order_No);
- }
Iservice.Cs: Complete Source Code
- using System;
- using System.Collections.Generic;
- using System.Linq;
- using System.Runtime.Serialization;
- using System.ServiceModel;
- using System.ServiceModel.Web;
- using System.Text;
- namespace Shanu_WCFDBService
- {
- // NOTE: You can use the "Rename" command on the "Refactor" menu to change the interface name "IService1" in both code and config file together.
- [ServiceContract]
- public interface IService1
- {
- [OperationContract]
- [WebInvoke(Method = "GET",
- RequestFormat = WebMessageFormat.Json,
- ResponseFormat = WebMessageFormat.Json,
- UriTemplate = "/GetOrderMaster/")]
- List<OrderDataContract.OrderMasterDataContract> GetOrderMaster();
- [OperationContract]
- [WebGet(RequestFormat = WebMessageFormat.Json,
- ResponseFormat = WebMessageFormat.Json,
- UriTemplate = "/SearchOrderMaster/{Order_No}")]
- OrderDataContract.OrderMasterDataContract SearchOrderMaster(string Order_No); [OperationContract]
- [WebInvoke(Method = "GET",
- RequestFormat = WebMessageFormat.Json,
- ResponseFormat = WebMessageFormat.Json,
- UriTemplate = "/OrderDetails/{Order_No}")]
- List<OrderDataContract.OrderDetailDataContract> OrderDetails(string Order_No);
- }
- public class OrderDataContract
- {
- [DataContract]
- public class OrderMasterDataContract
- {
- [DataMember]
- public string Order_No { get; set; }
- [DataMember]
- public string Table_ID { get; set; }
- [DataMember]
- public string Description { get; set; }
- [DataMember]
- public string Order_DATE { get; set; }
- [DataMember]
- public string Waiter_Name { get; set; }
- }
- [DataContract]
- public class OrderDetailDataContract
- {
- [DataMember]
- public string Order_Detail_No { get; set; }
- [DataMember]
- public string Order_No { get; set; }
- [DataMember]
- public string Item_Name { get; set; }
- [DataMember]
- public string Notes { get; set; }
- [DataMember]
- public string QTY { get; set; }
- [DataMember]
- public string Price { get; set; }
- }
- }
- }
Add Database using ADO.NET Entity Data Model
Right-click your WCF project and select Add New Item tehn select ADO.NET Entity Data Model and click Add.
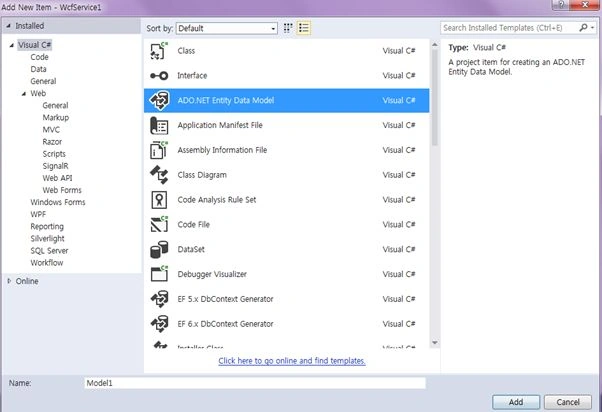
Select EF Designer from the Database and click "Next".
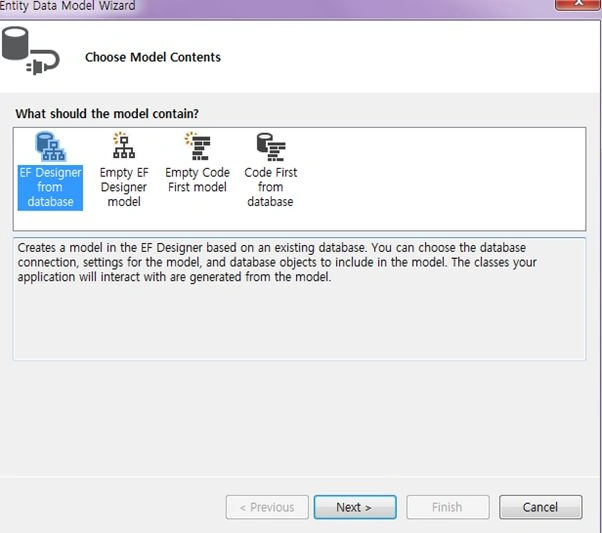
Click "New Connection".
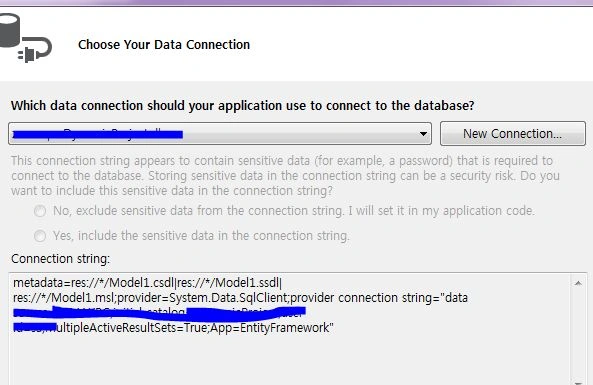
Here we can select our Database Server Name and enter your DB server SQL Server Authentication User ID and Password. We have already created our database as “OrderManagement” so we can select the database and click OK. 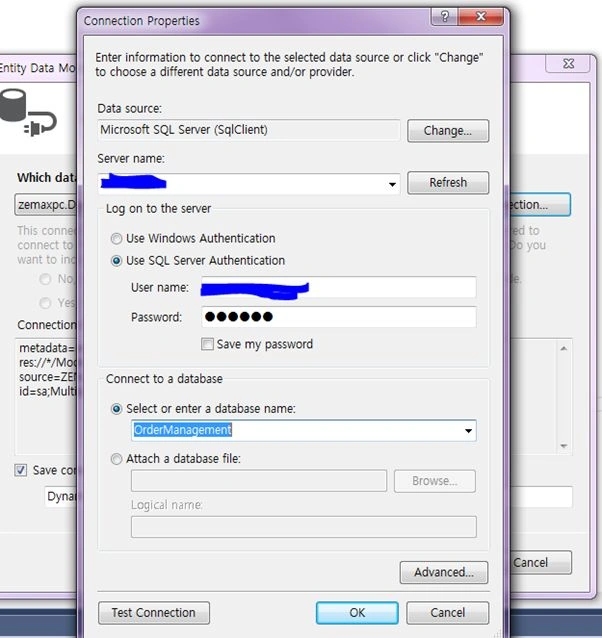
Click Next and select tables that need to be used. In our example we need to use “OrderMasters" and “orderDetails”. Select both tables and click "Finish".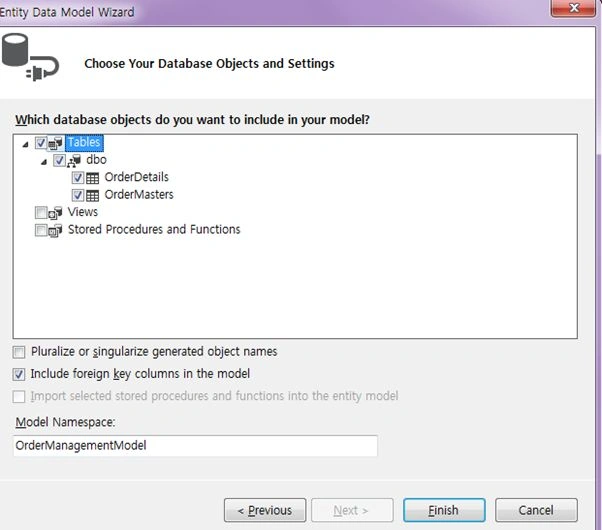
Here we can see that now we have created our OrderManagementModel.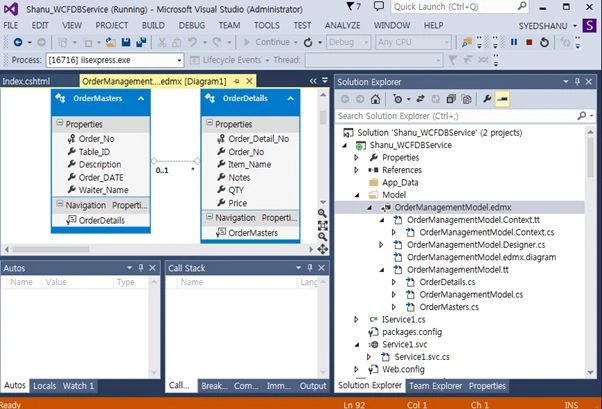
Service1.SVC
“Service.SVC.CS” implements the IService Interface and overrides and defines all the methods of the Operation Contract.
For example here we can see I have implemented the IService1 in the Service1 class. Created the object for our Entity model and in GetOrderMaster using a LINQ Query I have selected the data from the OrderMasters table and the result was added to the list.
- public class Service1 : IService1
- {
- OrderManagementEntities OME;
- public Service1()
- {
- OME = new OrderManagementEntities();
- }
- public List<OrderDataContract.OrderMasterDataContract> GetOrderMaster()
- {
- var query = (from a in OME.OrderMasters
- select a).Distinct();
- List<OrderDataContract.OrderMasterDataContract> orderMasterList = new List<OrderDataContract.OrderMasterDataContract>();
- query.ToList().ForEach(rec =>
- {
- orderMasterList.Add(new OrderDataContract.OrderMasterDataContract
- {
- Order_No = Convert.ToString(rec.Order_No),
- Table_ID = rec.Table_ID,
- Description = rec.Description,
- Order_DATE = Convert.ToString(rec.Order_DATE),
- Waiter_Name = rec.Waiter_Name
- });
- });
- return orderMasterList;
- }
Service.SVC.CS: Complete Source Code
- using System;
- using System.Collections.Generic;
- using System.Linq;
- using System.Runtime.Serialization;
- using System.ServiceModel;
- using System.ServiceModel.Web;
- using System.Text;
- using Shanu_WCFDBService.Model;
- namespace Shanu_WCFDBService
- {
- public class Service1 : IService1
- {
- OrderManagementEntities OME;
- public Service1()
- {
- OME = new OrderManagementEntities();
- }
- public List<OrderDataContract.OrderMasterDataContract> GetOrderMaster()
- {
- var query = (from a in OME.OrderMasters
- select a).Distinct();
- List<OrderDataContract.OrderMasterDataContract> orderMasterList = new List<OrderDataContract.OrderMasterDataContract>();
- query.ToList().ForEach(rec =>
- {
- orderMasterList.Add(new OrderDataContract.OrderMasterDataContract
- {
- Order_No = Convert.ToString(rec.Order_No),
- Table_ID = rec.Table_ID,
- Description = rec.Description,
- Order_DATE = Convert.ToString(rec.Order_DATE),
- Waiter_Name = rec.Waiter_Name
- });
- });
- return orderMasterList;
- }
- public OrderDataContract.OrderMasterDataContract SearchOrderMaster(string Order_No)
- {
- OrderDataContract.OrderMasterDataContract OrderMaster = new OrderDataContract.OrderMasterDataContract();
- try
- {
- var query = (from a in OME.OrderMasters
- where a.Order_No.Equals(Order_No)
- select a).Distinct().FirstOrDefault();
- OrderMaster.Order_No = Convert.ToString(query.Order_No);
- OrderMaster.Table_ID = query.Table_ID;
- OrderMaster.Description = query.Description;
- OrderMaster.Order_DATE = Convert.ToString(query.Order_DATE);
- OrderMaster.Waiter_Name = query.Waiter_Name;
- }
- catch (Exception ex)
- {
- throw new FaultException<string>
- (ex.Message);
- }
- return OrderMaster;
- }
- public List<OrderDataContract.OrderDetailDataContract> OrderDetails(string Order_No)
- {
- var query = (from a in OME.OrderDetails
- where a.Order_No.Equals(Order_No)
- select a).Distinct();
- List<OrderDataContract.OrderDetailDataContract> OrderDetailList = new List<OrderDataContract.OrderDetailDataContract>();
- query.ToList().ForEach(rec =>
- {
- OrderDetailList.Add(new OrderDataContract.OrderDetailDataContract
- {
- Order_Detail_No = Convert.ToString(rec.Order_Detail_No),
- Order_No = Convert.ToString(rec.Order_No),
- Item_Name = rec.Item_Name,
- Notes = rec.Notes,
- QTY = Convert.ToString(rec.QTY),
- Price = Convert.ToString(rec.Price)
- });
- });
- return OrderDetailList;
- }
- }
- }
Web.Config
In the WCF project's “Web.Config”, make the following changes:
- Change <add binding="basicHttpsBinding" scheme="https" /> to <add binding="webHttpBinding" scheme="http" />
- Replace the </behaviors> to:
- <endpointBehaviors>
- <behavior>
- <webHttp helpEnabled="True"/>
- </behavior>
- </endpointBehaviors>
- </behaviors>
Now we have created our WCF Rest service, let's run and test our service.
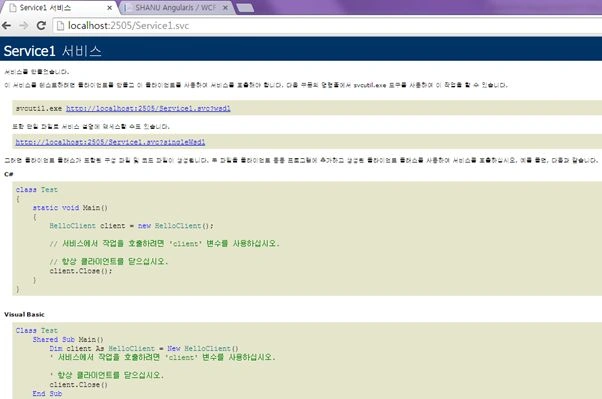
In our service URL we can add our method name and we can see the JSON result data from the database.

So now we have completed our WCF and now it's time to create our MVC AngularJS application.
We can add a new project to our existing project and create a new MVC web application as in the following.
Right-click the project in the solution and click Add New Project then enter your project name and click "OK".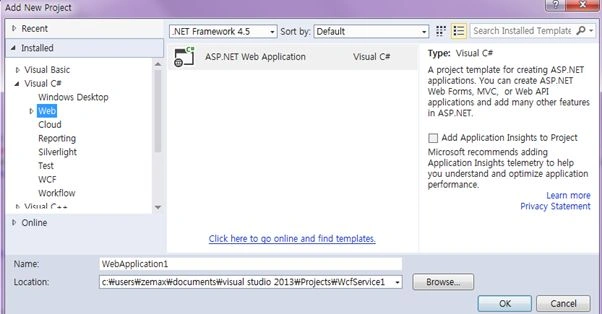
Select MVC and click "OK".
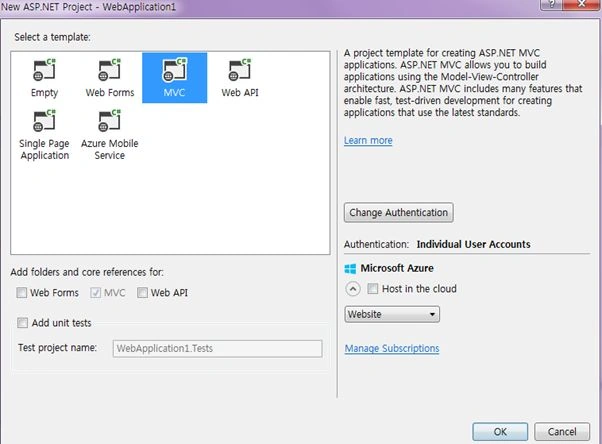
Now we have created our MVC application and it's time to add our WCF Service and install the AngularJS package to our solution.
Add WCF Service: Right-click MVC Solution and click Add then click Service Reference.
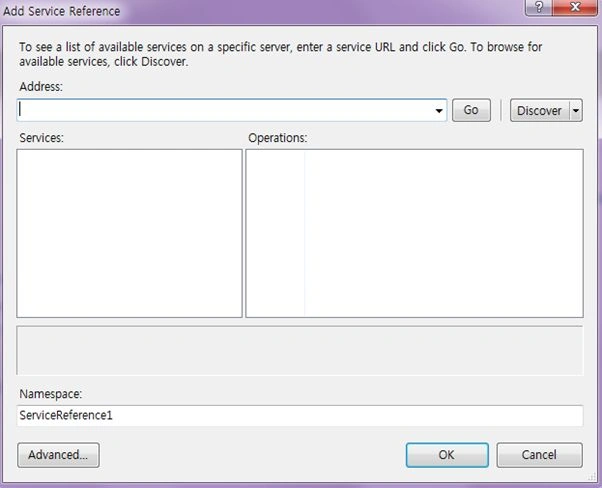
Enter your WCF URL and click GO. Here my WCF URL is http://localhost:2505/Service1.svc.
Add your name and click "OK".
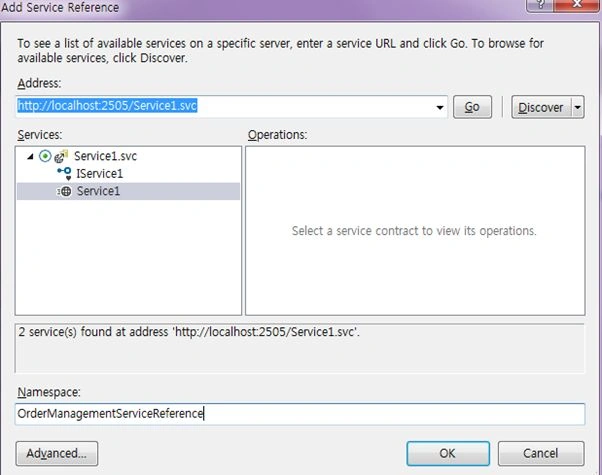
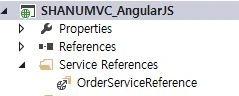
Now we have successfully added our WCF Service to our MVC application.
Procedure to Install AngularJS package
Right-click your MVC project and click "Manage NuGet Packages".
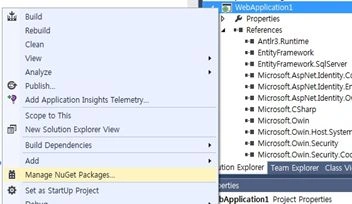
Select Online and Search for AngularJS. Select the AngularJs and click Install.
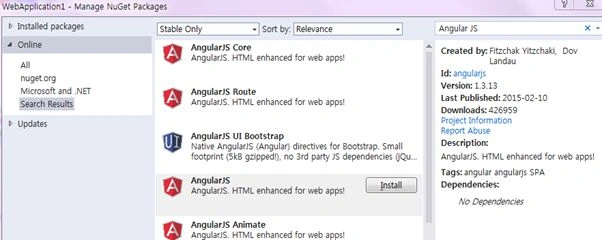
Now we have Installed the AngularJS package into our MVC Project. Now let's create our AngularJs.
- Modules.js
- Controllers.js
- Services.js
Procedure to Create AngularJs Script Files
Right-click the Script folder and create your own folder to create the AngularJs Model/Controller and Service JavaScript. In your script folder add three JavaScript files and name them Modules.js, Controllers.js and Services.js as in the following.
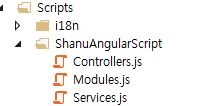
Modules.js: Here we add the reference to the Angular.js JavaScript and create an angular module named “RESTClientModule”.
- /// <reference path="../angular.js" />
- /// <reference path="../angular.min.js" />
- var app;
- (function () {
- app = angular.module("RESTClientModule", []);
- })();
Services.js: Here we add the reference to the Angular.js JavaScript and our Module.js.
Here we provide a name for our service and we use this name in controllers.js. Here for the Angular service I have given the name "AngularJs_WCFService". You can give your own name but be careful of changing the name in Controllers.js. Here we can see in the method since I have passed the URL of our webservice.
- /// <reference path="../angular.js" />
- /// <reference path="../angular.min.js" />
- /// <reference path="Modules.js" />
- app.service("AngularJs_WCFService", function ($http) {
- //Get Order Master Records
- this.getOrdermaster = function () {
- return $http.get("http://localhost:2505/Service1.svc/GetOrderMaster");
- };
- //Search Order Master Records
- this.getSearchOrder = function (OrderNO) {
- return $http.get("http://localhost:2505/Service1.svc/SearchOrderMaster/" + OrderNO);
- }
- //Search Order Details Records
- this.getOrderDetail = function (OrderNO) {
- return $http.get("http://localhost:2505/Service1.svc/OrderDetails/" + OrderNO);
- }
- });
Controllers.js: Here we add the reference to the Angular.js JavaScript and our Module.js and Services.js. The same as for the services for the controller I have given the name "AngularJs_WCFController".
First I get the current data and store the date using $scope.date.
I have created the method GetOrderMasters() and using the Services module I get the obtained Order Master table and bind the result to the “$scope.OrderMastersDisp = pl.data”. The same as that we create all the rest of the methods.
- /// <reference path="../angular.js" />
- /// <reference path="../angular.min.js" />
- /// <reference path="Modules.js" />
- /// <reference path="Services.js" />
- app.controller("AngularJs_WCFController", function ($scope, $window, AngularJs_WCFService) {
- $scope.date = new Date();
- GetOrderMasters();
- //To Get All Records
- function GetOrderMasters() {
- var promiseGet = AngularJs_WCFService.getOrdermaster();
- promiseGet.then(function (pl) {
- $scope.OrderMastersDisp = pl.data
- },
- function (errorPl) {
- });
- }
- Hidetables()
- function Hidetables() {
- $scope.isRowHidden = false;
- }
- $scope.get = function (Order) {
- if (Order == null) {
- return;
- }
- if (Order.isRowHidden == true) {
- Order.isRowHidden = false;
- var promiseGet = AngularJs_WCFService.getOrderDetail(Order.Order_No);
- promiseGet.then(function (pl) {
- $scope.OrderDetailDisp = pl.data
- },
- function (errorPl) {
- });
- }
- else {
- Order.isRowHidden = true;
- }
- }
- });
So now we have created our Angular Js Module, Controller and Service. So what is next?
Create MVC Control and View to display our result.
Add Controller
Right-click Controllers then select Add Controller then select MVC 5 Controller –Empty then click Add.
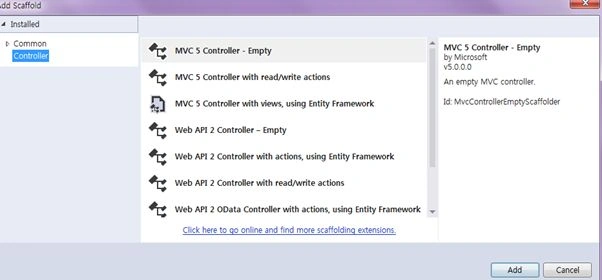
Change the Controller name and here I have given it the name “OrderManagementController” and click OK.
Add View
Right-click on the Controller Index and click Add View.
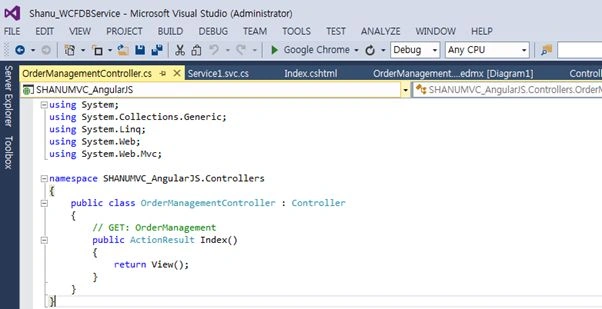
Name the View “Index”.
In the View design your page and reference angular.Js, Modules.js, Services.js and Controllers.js.
In AngulaJS we use {{ }} to bind or display the data. Here we can see that first I create one table and for that a table.
First in the table I have used the data-ng-controller="AngularJs_WCFController" and here we can see the data-ng-controller will be used to bind the data of the controller to our HTML table.
Using <tbody data-ng-repeat="detail in OrderDetailDisp"> we can get all the records and using the <td><span>{{order.Order_No}}</span></td> bind all the data inside the table. The same as that we create an Inner Table. When the user clicks on the Details button I will display the Order Details table.
- <html data-ng-app="RESTClientModule">
- @{
- ViewBag.Title = "SHANU AngularJs / WCF and Master Detail Grid";
- }
- <body>
- <img src="~/Images/blank.gif" alt="" width="1" height="10" />
- <table width="99%" style=" border-bottom:3px solid #3273d5;">
- <tr>
- <td width=" 250">
- <table width="99%">
- <tr>
- <td>
- Welcome Mr. {{'SHANU'}} .
- </td>
- </tr>
- </table>
- </td>
- <td class="style1" align="center">
- <h3>Order Master / Detail Grid using Angular JS and WCF in MVC :)</h3>
- </td>
- <td align="right">
- <div ng-controller="AngularJs_WCFController">
- Today Date is :
- {{date | date:'yyyy-MM-dd'}}
- </div>
- </td>
- </tr>
- </table>
- <img src="~/Images/blank.gif" alt="" width="1" height="10" />
- <table id="tblContainer" data-ng-controller="AngularJs_WCFController" style='width: 99%;table-layout:fixed;'>
- <tr>
- <td>
- <table style=" background-color:#ECF3F4; border: solid 2px #3273d5; padding: 5px;width: 99%;table-layout:fixed;">
- <tr style="height: 30px; background-color:#336699 ; color:#FFFFFF ;">
- <th width="60"></th>
- <th>Order No</th>
- <th>Table ID</th>
- <th>Notes</th>
- <th>Order DATE</th>
- <th>Waiter Name</th>
- <th></th>
- </tr>
- <tbody data-ng-repeat="order in OrderMastersDisp">
- <tr>
- <td width="60">
- <input type="button" id="Detail" value="Detail" data-ng-click="get(order)" />
- </td>
- <td><span>{{order.Order_No}}</span></td>
- <td><span>{{order.Table_ID}}</span></td>
- <td><span>{{order.Description}}</span></td>
- <td><span>{{order.Order_DATE}}</span></td>
- <td><span>{{order.Waiter_Name}}</span></td>
- <td></td>
- </tr>
- <tr id={{order.Order_No}} ng-hide="order.isRowHidden" ng-init="get(order)">
- <td> </td>
- <td colspan="6">
- <table style=" background-color:#ECF3F4; border: solid 2px #3273d5; padding: 5px;width: 99%;table-layout:fixed;">
- <tr style="height: 30px; background-color:#336699 ; color:#FFFFFF ;">
- <th>Order No</th>
- <th>Order Detail No</th>
- <th>Item Name</th>
- <th>Comments</th>
- <th>QTY</th>
- <th>Price</th>
- </tr>
- <tbody data-ng-repeat="detail in OrderDetailDisp">
- <tr>
- <td><span>{{detail.Order_No}}</span></td>
- <td><span>{{detail.Order_Detail_No}}</span></td>
- <td><span>{{detail.Item_Name}}</span></td>
- <td><span>{{detail.Notes}}</span></td>
- <td><span>{{detail.QTY}}</span></td>
- <td><span>{{detail.Price}}</span></td>
- </tr>
- </tbody>
- </table>
- </td>
- </tr>
- </tbody>
- </table>
- </td>
- </tr>
- </table>
- </body>
- </html>
- <script src="~/Scripts/angular.js"></script>
- <script src="~/Scripts/ShanuAngularScript/Modules.js"></script>
- <script src="~/Scripts/ShanuAngularScript/Services.js"></script>
- <script src="~/Scripts/ShanuAngularScript/Controllers.js"></script>
Run your program
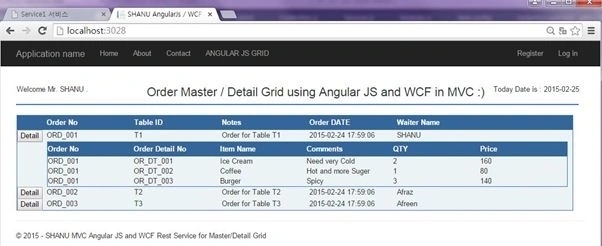
Here we can see that when I run the program, first I display the Order Master records in the table.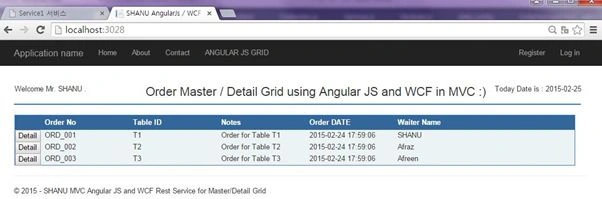
When the user clicks on the Detail button I will display the details of the order in the next row.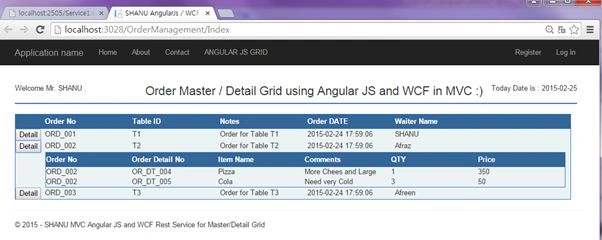
Supported browsers: Chrome and Firefox.
kalu singh raoPosted Jul 22, 2016, 2:00 AM
Nice Sir
Syed ShanuPosted Mar 2, 2015, 1:49 AM
Thank You.
Jitendra KumarPosted Mar 2, 2015, 1:30 AM
Nice One..
Tom MohanPosted Mar 1, 2015, 9:55 PM
Your are welcome Syed Shanu
Syed ShanuPosted Mar 1, 2015, 8:43 PM
Thank You Tom Mohan.
Tom MohanPosted Mar 1, 2015, 7:51 PM
Really nice one. Good work
Sourabh SomaniPosted Feb 27, 2015, 8:01 PM
You welcome... :)
Syed ShanuPosted Feb 27, 2015, 7:59 PM
Thank you sourabh
Sourabh SomaniPosted Feb 27, 2015, 9:35 AM
Very good article :)
Syed ShanuPosted Feb 26, 2015, 11:36 AM
Thank you Mahsa and Vithal
Vithal WadjePosted Feb 26, 2015, 11:25 AM
nice start keep it up
Mahsa HassankashiPosted Feb 26, 2015, 9:57 AM
Another Great by Syed Shanu
Sibeesh VenuPosted Feb 26, 2015, 3:37 AM
Syed Shanu You are welcome.
Syed ShanuPosted Feb 26, 2015, 2:47 AM
Thank You Sibeesh
Sibeesh VenuPosted Feb 26, 2015, 2:39 AM
Good One.
Syed ShanuPosted Feb 26, 2015, 1:34 AM
Thank You Velkumar for your feedback.Have to write one more article for that.
Velkumar SanthanarajPosted Feb 26, 2015, 1:32 AM
can you please tell me, how to bind those values in grid (kendo or UI grid) instead of tables?
Syed ShanuPosted Feb 26, 2015, 12:22 AM
Thank You Dinesh Beniwal
Dinesh BeniwalPosted Feb 26, 2015, 12:19 AM
Appreciate your hard work, thanks for sharing, my vote 5/5.
Syed ShanuPosted Feb 26, 2015, 12:16 AM
Thank you manish and rahul
Rahul Kumar SaxenaPosted Feb 26, 2015, 12:15 AM
Great Work bro...
Manish Kumar ChoudharyPosted Feb 26, 2015, 12:11 AM
Nice one Syed Shanu sir.