

You can get the theoretical details of MVVM on the Intenet before moving further.
In this article, I am implementing WPF solution in MVVM approach for small requirement mentioned below:
Requirement
We need to display the Employee details based on the Employee id value entered by the user using MV-VM approach.
Solution
Let's create the sample WPF projects with the following items/files.
- View: MainWindow.Xaml
- MainWindow.Xaml.CS -->In MV-VM approach, codebehind plays very minor role.
- View Model: SearchEmpVM.CS.
- Model:Employee Class: EmpCls.cs – Created class file to hold the searched employee details.
.
I will walk you through the Code of each entity in the order I have created.
EmpCls.cs (Entity class)
This class will contain the structure of Student entity. Here's the code:
- using System;
- using System.Collections.Generic;
- using System.Linq;
- using System.Text;
- using System.Threading.Tasks;
- namespace SampleWPFMVVM.Entity
- {
- class EmpCls
- {
- private int _empNo;
- public int EmpNo
- {
- get
- {
- return _empNo;
- }
- set
- {
- _empNo = value;
- }
- }
- private string _name;
- public string Name
- {
- get
- {
- return _name;
- }
- set
- {
- _name = value;
- }
- }
- private string _designation;
- public string Designation
- {
- get
- {
- return _designation;
- }
- set
- {
- _designation = value;
- }
- }
- private string _department;
- public string Department
- {
- get
- {
- return _department;
- }
- set
- {
- _department = value;
- }
- }
- }
- }
Write the Xaml code as below:
- <Window x:Class="SampleWPFMVVM.MainWindow"
- xmlns="http://schemas.microsoft.com/winfx/2006/xaml/presentation"
- xmlns:x="http://schemas.microsoft.com/winfx/2006/xaml"
- xmlns:mc="http://schemas.openxmlformats.org/markup-compatibility/2006"
- xmlns:d="http://schemas.microsoft.com/expression/blend/2008"
- mc:Ignorable="d"
- xmlns:vm="clr-namespace:SampleWPFMVVM.ViewModel"
- Title="MainWindow" Height="350" Width="333"
- x:Name="Window">
- <Window.DataContext>
- <vm:SearchEmpVM />
- </Window.DataContext>
- <Grid>
- <Grid.RowDefinitions>
- <RowDefinition Height="auto" ></RowDefinition>
- <RowDefinition Height="auto"></RowDefinition>
- <RowDefinition Height="auto"></RowDefinition>
- <RowDefinition Height="auto" ></RowDefinition>
- </Grid.RowDefinitions>
- <StackPanel>
- <Grid Margin="0,51,0,-48" Grid.RowSpan="4">
- <Grid.RowDefinitions>
- <RowDefinition Height="auto"></RowDefinition>
- <RowDefinition Height="auto"></RowDefinition>
- </Grid.RowDefinitions>
- <Grid.ColumnDefinitions>
- <ColumnDefinition Width="auto"/>
- <ColumnDefinition Width="auto"/>
- </Grid.ColumnDefinitions>
- <Label Grid.Row="0" Grid.Column="0" Content="EmpId:"/>
- <TextBox x:Name="txtEmpId1" Text="{Binding ElementName=Window,Path=DataContext.EmpId,Mode=TwoWay,UpdateSourceTrigger=PropertyChanged}" Grid.Row="0" Grid.Column="1" ></TextBox>
- <StackPanel DataContext="{Binding SearchCls}" Grid.Column="1" Grid.Row="1">
- <GroupBox>
- <GroupBox.HeaderTemplate>
- <DataTemplate>
- <Label Content="Employee Information"/>
- </DataTemplate>
- </GroupBox.HeaderTemplate>
- <Grid >
- <Grid.RowDefinitions>
- <RowDefinition Height="26*"/>
- <RowDefinition Height="26*"/>
- <RowDefinition Height="26*"/>
- <RowDefinition Height="26*"/>
- <RowDefinition Height="26*"/>
- </Grid.RowDefinitions>
- <Grid.ColumnDefinitions>
- <ColumnDefinition Width="Auto"/>
- <ColumnDefinition Width="Auto"/>
- <ColumnDefinition Width="Auto"/>
- <ColumnDefinition Width="Auto"/>
- <ColumnDefinition Width="Auto"/>
- </Grid.ColumnDefinitions>
- <Label Grid.Row="0" Grid.Column="0" Content="Name:" Grid.ColumnSpan="3" />
- <TextBox Text="{Binding Name}" Grid.Row="0" Grid.Column="3" Width="174"/>
- <Label Grid.Row="1" Grid.Column="0" Content="Designation:" Grid.ColumnSpan="3"/>
- <TextBox Text="{Binding Designation}" Grid.Row="1" Grid.Column="3" Width="174"/>
- <Label Grid.Row="2" Grid.Column="0" Content="Department:" Grid.ColumnSpan="3" />
- <TextBox Text="{Binding Department}" Grid.Row="2" Grid.Column="3" Width="174"/>
- </Grid>
- </GroupBox>
- </StackPanel>
- </Grid>
- </StackPanel>
- </Grid>
- </Window>
- xmlns:vm="clr-namespace:SampleWPFMVVM.ViewModel" - This will import the namespace of our ViewModel "SearchEmpVM.CS".
- The following lines will bind the viewModel class as datacontext to the form:
- <Window.DataContext>
- <vm:SearchEmpVM />
- </Window.DataContext>
- The following code will bind the property "EmpId" of the viewModel class and fires the logic in the set procedure/block of the property of "EmpId" property.
- <TextBox x:Name="txtEmpId1" Text=" {Binding ElementName=Window,Path=DataContext.EmpId,Mode=TwoWay,UpdateSourceTrigger=PropertyChanged}" Grid.Row="0" Grid.Column="1" >
- </TextBox>
- The following code will bind the property "SearchCls" . This property will hold the object of the searched employees i.e "EmpCls" class,
- <StackPanel DataContext="{Binding SearchCls}" Grid.Column="1" Grid.Row="1">
- The following code will bind the property "Name" of the class "searchCls" (internal property of "EmpCls"), so whenever the Value is assigned to "Name" property the value will be displayed in the text box. Similarly we will bind the properties of the "EmpCls" to all the controls to display the selected employee values.
- <TextBox Text="{Binding Name}" Grid.Row="0" Grid.Column="3" Width="174"/>
ViewModel (SearchEmpVM.CS)
This will contain the business logic:
- using System;
- using System.Collections.Generic;
- using System.ComponentModel;
- using System.Linq;
- using System.Text;
- using System.Threading.Tasks;
- using SampleWPFMVVM.Entity; //namespace of Employee class
- namespace SampleWPFMVVM.ViewModel
- {
- class SearchEmpVM : INotifyPropertyChanged
- {
- List<EmpCls> EmpList = new List<EmpCls>();
- public SearchEmpVM()
- {
- // Add sample employee details into employee list
- EmpList.Clear();
- EmpList.Add(new EmpCls { EmpNo = 1, Name = "John", Department = "IT", Designation = "Developer" });
- EmpList.Add(new EmpCls { EmpNo = 2, Name = "Mark", Department = "IT", Designation = "Tester" });
- EmpList.Add(new EmpCls { EmpNo = 3, Name = "Robert", Department = "IT", Designation = "DB Developer" });
- }
- #region properties
- private EmpCls _searchcls = new EmpCls();
- public EmpCls SearchCls
- {
- get { return _searchcls; }
- set
- {
- _searchcls = value;
- RaisePropertyChanged("SearchCls");
- }
- }
- private int _empid;
- public int EmpId
- {
- get {
- return _empid;
- }
- set {
- _empid = value;
- RaisePropertyChanged("EmpId");
- PopulteEmpDetails(_empid);
- }
- }
- #endregion
- private void PopulteEmpDetails(int _empid)
- {
- SearchCls= EmpList.Where(x => x.EmpNo == _empid).Single();
- }
- #region INotifyPropertyChanged
- public event PropertyChangedEventHandler PropertyChanged;
- public void RaisePropertyChanged(string propertyName)
- {
- if (PropertyChanged != null)
- {
- PropertyChanged(this, new PropertyChangedEventArgs(propertyName));
- }
- }
- #endregion
- }
- }
A . Our viewModel should implement interface to notify the client on binded property has changed .For more details
Refer the following link INotifyPropertyChanged.
B. Implement the method "RaisePropertyChanged" of interface "INotifyPropertyChanged" as highlighted in the above code
C. Call the method "RaisePropertyChanged" in the set procedures of all the properties which are binded to the controls.
For example:
Call as mentioned below:
- RaisePropertyChanged("EmpId"); //Pass the Property name as parameter
Since we have bind this property to the text box "EmpId" in the xaml file , whenever the user enter the value in the textbox the logic in the set procedure of "EmpId" property will be exited. Hence the Textbox value will be passed to our method ""PopulteEmpDetails" as in the following code.
- private int _empid;
- public int EmpId
- {
- get {
- return _empid;
- }
- set {
- _empid = value;
- RaisePropertyChanged("EmpId");
- PopulteEmpDetails(_empid);
- }
- }
- private void PopulteEmpDetails(int _empid)
- {
- SearchCls= EmpList.Where(x => x.EmpNo == _empid).Single();
- }
Since we are binding the properties of the "SearchCls" property (i.e properties of the Class "EmpCls") to the textboxes, whenever the value is set to property ""SearchCls" then the properties of the "EmpCls" will be filled and then the textboxes will be filled with the same values as in the following image.
Output
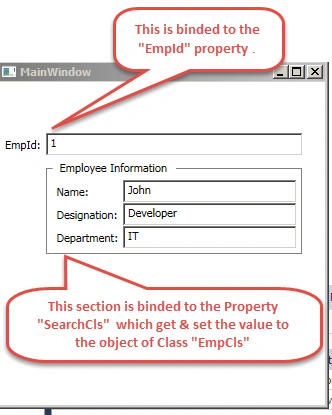
Hence, we implemented the required functionality as shown in the preceding image. Hope this article gives you the understanding on the basic implementation technique.
Randy WolfPosted Jan 28, 2021, 3:37 PM
I really appreciate the straightforward approach and showing the M, V, and VM fully. A lot of examples fail in one of these areas.
Santhakumar MunuswamyPosted Nov 28, 2015, 1:47 AM
Good One
Mukesh KumarPosted Nov 19, 2015, 1:18 AM
Good Job
Raja TPosted Nov 19, 2015, 12:42 AM
Nice, Thanks for Sharing..
Banketeshvar NarayanPosted Nov 18, 2015, 12:33 PM
Nice
Harshad PansuriyaPosted Nov 18, 2015, 2:24 AM
Nice one
Ajay GandhiPosted Nov 17, 2015, 1:59 PM
Good
Praveen KPosted Nov 17, 2015, 11:28 AM
Gul Md Ershad , Please note , we should be very polite while sharing the comments/feedback to maintain the quality and reputation of C-sharpCorner.com /any public forum . your comments looks very unprofessional (sorry to say this ). hence pls takeback your comments . Hope you understand
Sibeesh VenuPosted Nov 17, 2015, 3:56 AM
Nice Share
Harshad PansuriyaPosted Nov 17, 2015, 3:29 AM
Nice one
Ankit BansalPosted Nov 17, 2015, 12:43 AM
nice one..
Sujit BhujbalPosted Nov 17, 2015, 12:10 AM
Please check easy 5 step http://www.sujitbhujbal.com/2014/02/wpf-mvvm-with-easy-5-steps-with-example.html
Former memberPosted Nov 16, 2015, 1:57 PM
Just go through the link to get better understanding of MVVM : http://www.codeproject.com/Articles/100175/Model-View-ViewModel-MVVM-Explained
Former memberPosted Nov 16, 2015, 1:56 PM
Praveen k : Line '"Model: MainWindow.Xaml.CS -->In MV-VM approach, we don’t write any business logic in this file and it plays very minor role." is absolutely wrong. It will mislead the new learner and new WPF developer. Could you please correct and update it?
Santhakumar MunuswamyPosted Nov 16, 2015, 1:12 PM
Good one