Description
This article will explain how the developer can optimize the use of Nunit to shorten their daily workflow dramatically.
Introduction
In the last article, we explored how we can use Nunit for simple Unit Tests. You can get a copy of that article here. In this part, I want to go over the special "tricks" on how we can use NUnit more efficiently during coding.
In order for me to keep these articles always up-to-date (in the case that a new NUnit comes out), I made a small page over here. Be sure to check that page for new articles, since I have a bit more control over that site and can therefore add articles faster.
During this article, I will revealingly outline the current bottleneck (the step which is really a pain in the neck) of the current workflow and then go further by always tackling the next bottleneck. Consequently, the article will grow more advanced the further down you go.
Problem A:
If you have read Part 1 of this article, then you might remember that the current way we use NUnit is far from perfect. The biggest problem currently is that we need to start NUnitGUI (remember the nice program with the red bar : ) manually in order for the Unit Tests to run. This is really a productivity killer, and with such a time block, the whole concept of constant unit testing is impractical.
Solution:
There is a way to start NUnitGUI automatically whenever you press "run" in VS.Net. In order to accomplish this, however, we need to do some low-level work since VS.NET B2 is not perfectly compatible with version 1.10 of NUnit. (In later versions some of the following steps are not needed.)
- Rename NUnitGUI.exe into NUnitGUI.dll
In the NUnit/bin directory, you need to rename NUnitGUI.exe into NUnitGUI.dll since in VS.NET B2, you can only reference to a dll from within your project. Future versions of NUnit (I am currently using 1.10) will probably ship already with a dll version of NUnitGUI.
To rename the file, go to your NUnit Directory on you computer. Go to the bin directory. Here you need to copy and rename the file NUnitGUI.exe into a NUnitGUI.dll. In WindowsXP, this is not possible over the Explorer since the file will always remain an .exe file. So you need to use the MSDOS Prompt with the command "ren" (just type in "ren /?") to get some help about it.
- Reference the NUnitGUI.dll in the project
OK, assuming you have a file called NUnitGUI.dll, you can now simply reference this file in your project. Just add a reference to this file as described in part 1 of this article. (You can read the first part of the article here.)
- Include the startup code in your project
Now we just need to include some code inside of your project which will start up the NUnitGUI instead of your standard application. Include the following code snipplet in your Main() function as the first statement.
static void Main()
{
//NUnit must be the first command in Main()
NUnit.Top.Main(new string[] {"YourNameSpace.YourUnitTest,resultfile.exe"});
//... rest of program
}
Replace YourNameSpace.YourUnitTest with an actual unit test which should start up when you press run. The resultfile.exe must be your program file which is built from your project. If you are not sure how your program file is called (most times it is your project name), then look under the project properties.
Now simply press run and the GUI of NUnit should pop-up, run the UnitTest, and if you have been a good programmer, you might even get a green bar. From here you can select the other UnitTests of your project.
Problem B:
Here comes the next bottleneck; we always need to comment the NUnit.Top.Main out when we want to run the actual program.
Solution:
We can simply make a second build configuration called Test to automate this process. With this new build configuration, we can simply switch in VS.NET to enable the tests or the program.
- Right-Click on your project and select properties.
- Click on Configuration Properties.
- Now click on Configuration Manager and from the Active Solution select "<new>" name your new configuration Test. Click OK to get again to your project properties.
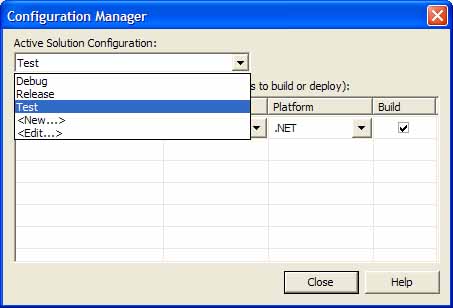
- With "Test" as your active configuration, enter "TEST" in Conditional Compilation Constant field.
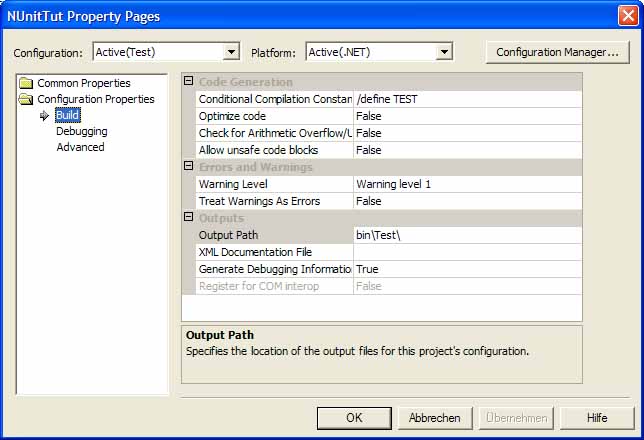
- OK, what happened is that the compiler is now going to set an internal flag called TEST. During compilation, you can check if this is defined and include code depending if it is existing or not. To use this, we need to put our code in #if TEST pre-processors commands. The code looks now like this:
static void Main()
{
#if TEST
NUnit.Top.Main(new string[], {"YourNameSpace.YourUnitTest,resultfile.exe"});
#else
//run normal program
Application.Run(); //as an example
#endif
}
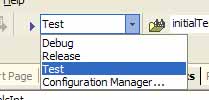
- Now you are all set. Just change your build to the Test configuration if you want to run your tests, or to the Debug configuration if you want to run your normal program.
Problem C:
OK, now the whole NUnitGUI starts up perfectly smooth; however whenever we want to run multiple TestCases, we need to switch between them manually and press run each time.
Solution:
We can create a class which summarizes all TestCases so that whenever this class is given to NUnit.Top.Main(), it will run all including TestCases.
- Write a class like following
//this can be a normal class which does not have to inherit from TestSuite
class AllTests
{
public static ITest Suite
{
get
{
TestSuite suite= new TestSuite("All NUnit Tests");
//add here all the TestCases in your program
//you need to add the ".Suite" behind your TestCase.
suite.AddTest(TestingMe.Suite);
suite.AddTest(TestingMe2.Suite);
suite.AddTest(TestingCalcInt.Suite);
return suite;
}
}
}
The class only needs to have one member, and that is the property "Suite". The class is not required to be inherited from TestSuite. Inside of the class, just AddTest() to all your TestCases with their Suite property.
- Reference this class AllTests in your NUnit.Top.Main line in the first argument.
NUnit.Top.Main(new string[] {"YourNameSpace.AllTests,YourProjectFile.exe"});
Problem D:
Now we are slowly talking. The NUnitGUI is starting automatically, all TestCases are run at startup, and we can disable this colourful process by just changing the build in the drop-down menu. However, there is one thing which was still quite annoying to me. Whenever you write a new TestCase somewhere deep in the application, you need to remember to include it in the TestSuite AllTests. This is quite disruptive to our programming, since the AllTests normally resides in a separate file. The worst is that sometimes, we might think a test passed, but the TestCase was actually just not added to the AllTests.
Solution:
To my knowledge, there is no built in solution from NUnit for this. Therefore, I created a small class which looks through your application with the help of reflection and adds all classes which inherit from TestCase to its TestSuite. You can simply call the Suite property of my class and you will get back all TestCases in your whole assembly.
- Just download the class from here.
The class currently exists only as source file.
- Include the file (by adding it as a existing item) in your project as a source file.
- Change the NUnit.Top.Main
Change NUnit.Top.Main() so that on startup the NUnitGUI calls this Class:
//...
//UnitTests is the NameSpace of the class and AllUnitTests is the name
NUnit.Top.Main(new string[] {"UnitTests.AllUnitTests,YourProjectFile.exe"});
//Remember to replace YourProjectFile.exe with you project file
//...
The class with all the TestCases lives in the namespace UnitTests and is called AllUnitTests; that is why UnitTests.AllUnitTests is called. Sounds quite obvious, doesn't it? :
Conclusion
OK, now you are armed with an efficient workflow to make Unit Tests. With its help, Unit Testing can become as fast as hitting F5 and a lot more fun. The only overhead which still exists is that you need three functions to get a TestCase up and running. But that is another article to be written in another series.