

Introduction
In the first part of this tutorial series we got a glimpse of MVC. In this part we'll focus on the practical implementation of the MVC Pattern. I don't need to explain the theory of MVC since we have already covered that in the previous part of the article.
Our Roadmap
Our agenda is as follows:
- Part1: Introduction to MVCarchitecture and Separation of Concerns.VCarchitecture and Separation of Concerns.
- Part 2: Creating MVC Application fromscratch and connecting it with database using LINQ to SQL.
- Part 3: Connecting the MVC Application with the help of EntityFramework DB-First approach.
- Part 4: Connecting the MVC Application with the help of EntityFramework Code-First approach.
- Part 5: Implementing Repository Pattern in MVC Application with EntityFramework.
- Part 6: Implementing a generic Repository Pattern and Unit Of Work pattern in MVC Application with EntityFramework.
Topics to be covered
The following are the topics to be covered here:
- Creating a MVC project from scratch.
- Adding Controllers, Views and Models.
- Creating a sample database and use LINQ to SQL for communication.
- Perform CRUD operations in a MVC application using LINQ to SQL.
- Understand ViewData, ViewBag and TempData.
- Model Validation by System.Component.DataAnnotation.
1. Creating MVC project
Step 1: Open Visual Studio 2010/201. ,I am using 2010. Go to "File" -> "New" -> "Project..." and select "ASP.Net MVC3 Web Application", as in the following:

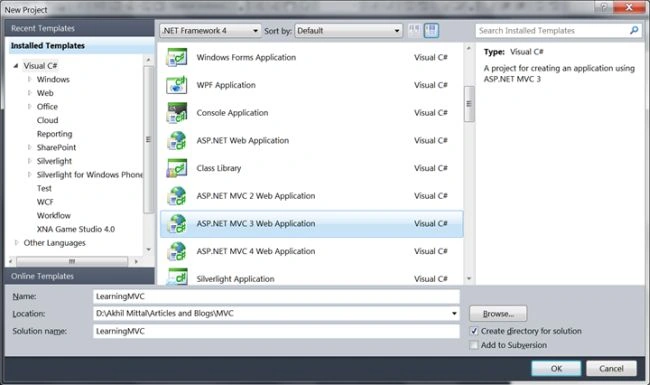
Name the application as LearningMVC.
Step 2: A project template selection window will be opened, select "Empty" in that. Select "View Engine as Razor" and press "OK".
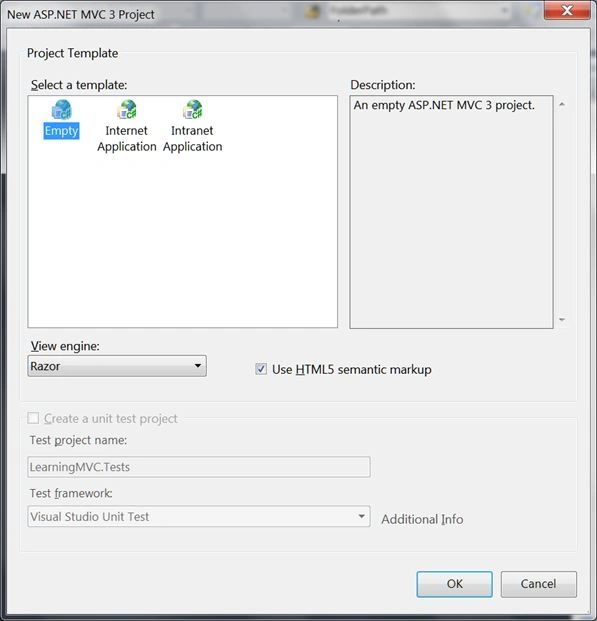
Step 3: Now our solution is ready with an empty MVC application.

We can clearly see that the solution contains some extra folders in comparison to a traditional ASP.Net web application.
We have a Models, Views and Controllers folder and a Shared folder in the Views folder. The folders, as the name implies, hold the respective MVC players model-view-controllers, the shared folder in Views contains the _Layout.cshtml, that can be used as the master page for the views that we create.
We see the global.asax file that contains a default routing table, that defines the route to be followed when the request is received, it says that when the request is received by the Home controller, the Index action of that Home Controller must be called.

Actions are the methods defined in Controllers that can be called defining a route. The Action methods can also contain parameters; in the figure mentioned above, it says that the Home controller has an Action Index that contains an optional parameter id.
When we run our application, we get something as in the following,

It says that the resource that we are looking for cannot be found. The request by default follows the default route as mentioned in global.asax, in other words go to the controller Home and invoke the method Index. Since we don't have any of these yet, the browser shows this error.
Never mind, let's make the browser happy.
2. Adding Controllers, View and Models
Step 1: Create a My Controller by right-clicking on the Controllers folder and add a controller named My, add the controller with empty read/write actions, it will give us a class with a few default generated actions.
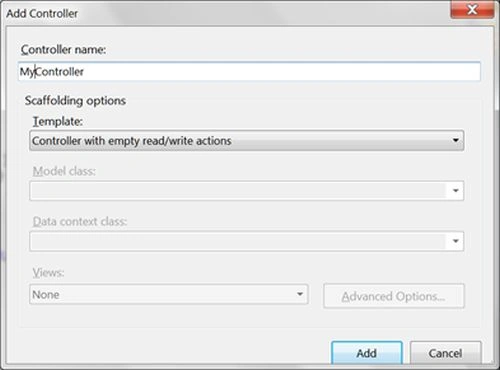

Note that there are two Actions for every Action name, one is for Get, in other words when a view loads for the first time, and second one is for POST, when the View is submitted with some data.
Change global.asax RegisterRoutes method to be as:
- public static void RegisterRoutes(RouteCollection routes)
- {
- routes.IgnoreRoute("{resource}.axd/{*pathInfo}");
- routes.MapRoute(
- "Default", // Route name
- "{controller}/{action}/{id}", // URL with parameters
- new { controller = "My", action = "Index", id = UrlParameter.Optional } // Parameter defaults
- );
- }
Note: we have changed the name of controller as per our added controller.
Step 2: We will see that we have Actions but they return a View, so we need to create Views for them. But before this we'll create a Model named User for our Views. Right-click on the Model folder and add a class named User.

Add the following properties to the User class:

Now our model is created and we can create Views bound to this particular model.
Step 3: Go to the controller, right-click on the empty Actions of the controller and from the context menu select "AddView" on the top. By default the View name is the same as the Actions name.
For example, for Details:

Select Viewname as Details,Model class as User, and Scaffold Template as Details.This template specifies the role of the View, that this view will show the details of the User (entity). Click add.
Likewise perform this operation for all the Actions, and create Views.
Note that Views are automatically added to the Views folder under My folder (auto created as per the Controller's name). This is to maintain a particular structure for MVC, so that we don't need to use overhead to maintain it.

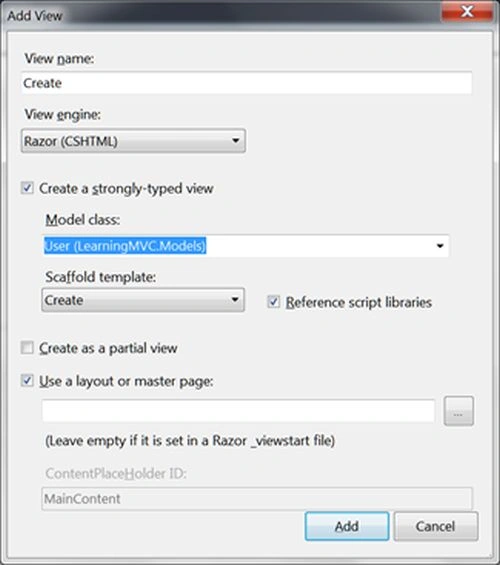
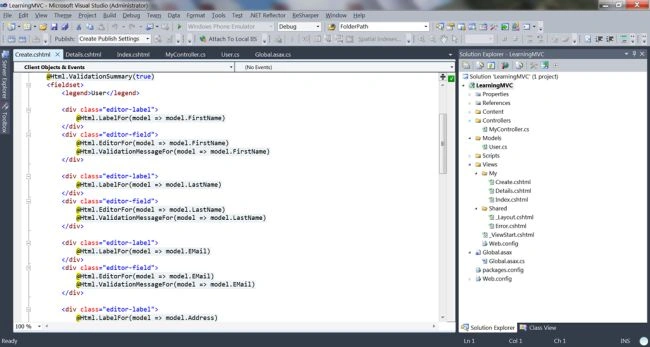

Now we have a controller as well as Views, so if we run the application we get:

In other words, the Index Action of our My controller is fired that returned Index View.

3. Creating sample database and use LINQ to SQL for communication
Our MVC application is ready, but rather than displaying dummy data, I will run the application talking to a data base so that we can cover wider aspects of the application.
Step 1: Create a database. The script is given in the attachment, just execute it over SQL Server 2005/2008.
Step 2: Add a new item to the solution and select LINQ to SQL class, call it MyDB.dbml.

Our solution looks like:

Step 3: Open Server Explorer of Visual Studio, open a connection by providing the server name and existing database name in the Server Explorer Open Connection window.
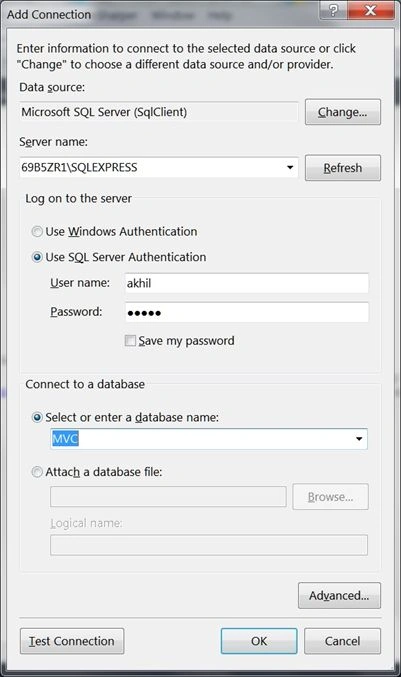
Click OK. Our solution looks like:

Step 4: Drag the User table to the dbml designer window, we get the table in a class diagram format in the designer window.


Debasis SahaPosted Apr 15, 2016, 12:23 AM
Nice article..
Sr KarthigaPosted Mar 2, 2016, 7:24 AM
good one
Sr KarthigaPosted Mar 2, 2016, 7:24 AM
Nice explanation
alois bakePosted Sep 15, 2015, 3:44 AM
Great stuff
Chandu KumawatPosted Jul 1, 2015, 7:06 AM
sir plz tell me about this error public ActionResult Create(Mvc4CRUD.Models.User user) { try { // TODO: Add insert logic here var dbcontext = new MyDBlinqclassDataContext(); dbcontext.UserTables.InsertOnSubmit(user); dbcontext.SubmitChanges(); return RedirectToAction("Index"); return RedirectToAction("Index"); } catch { return View(); } } Error LIst :--Error 2 Argument 1: cannot convert from 'Mvc4CRUD.MyDBlinqclassDataContext' to 'Mvc4CRUD.UserTable' c:\users\webcore\documents\visual studio 2012\Projects\Mvc4CRUD\Mvc4CRUD\Controllers\MyController.cs 63 53 Mvc4CRUD Error 1 The best overloaded method match for 'System.Data.Linq.Table<Mvc4CRUD.UserTable>.InsertOnSubmit(Mvc4CRUD.UserTable)' has some invalid arguments c:\users\webcore\documents\visual studio 2012\Projects\Mvc4CRUD\Mvc4CRUD\Controllers\MyController.cs 63 17 Mvc4CRUD
vivek JohariPosted Aug 22, 2013, 5:55 AM
Good One keep it up
Anurag SarkarPosted Jul 30, 2013, 7:26 AM
Thanks for providing such a nice information.
Mahesh AllePosted Jul 19, 2013, 3:27 AM
This article is very use full for beginners. Grate work.
Sandeep Singh ShekhawatPosted Jul 19, 2013, 1:35 AM
nice one article sir!
Pramod LawatePosted Jul 18, 2013, 12:48 PM
Its Very nice article Explain each and every thing very well
Amalendu DeyPosted Jul 16, 2013, 11:56 PM
Its really superb presentation.
Abhinav GolwalkarPosted Jul 12, 2013, 11:44 AM
Perfect delivery Akhil. Effort appreciated.
kumar Kashyap PandeyPosted Jul 12, 2013, 3:33 AM
Great Article Akhil, Wants some more from you
Rohatash KumarPosted Jul 12, 2013, 12:09 AM
Nice article. Akhil.
Mahesh ChandPosted Jul 11, 2013, 10:49 AM
Nicely done Akhil. Love your approach with images and expressions.