

This article will give you extensive information about Reactive Forms and Model-Driven Forms, and how to create the form using the Reactive Forms approach and implement the validation with Angular 6 and TypeScript.
In the previous article, "Template Driven Forms and Validation in Angular with Typescript", we have learned what Template-Driven Forms are, how to create these, and implement validations. If you don't know about Template-Driven Forms, I recommend you read the previous article as well. Now, let's move to Reactive Forms and understand what they are and how to create Reactive Forms in Angular and how to implement the validation with Reactive Forms or Model-Driven Forms.
Model-Driven Forms and Reactive Forms
As the name suggests, in this approach, to create forms, we focus on the component code more than the template code. It means to say that while creating the forms and validation, everything is written inside the component so that the logic will be inside the component class which makes the templates easy to understand. The Reactive Forms approach basically avoids the directives like ngModel and Required. Here, it doesn't focus on Template to make forms and validations but instead of that, we use the power of Angular. As we have available everything on the code, it means in the component class. So, it becomes very easy to test your forms without any complexity.
After the end of this demonstration, you will get the application like below, with implementation of Reactive Forms and Validations.
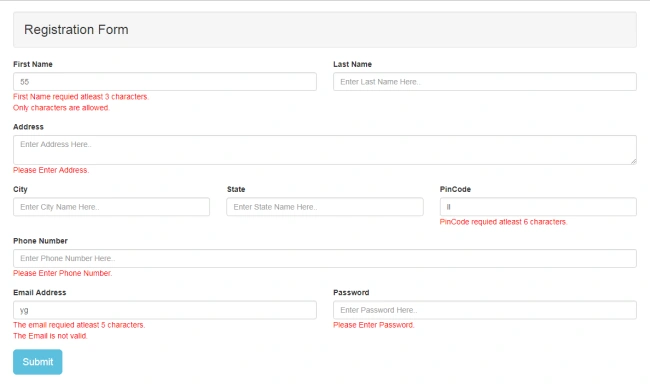
IMPLEMENTATION OF REACTIVE FORMS
So, let's understand the Reactive Forms in more detailed ways. For understanding it, first, we will create an Angular 6 project. If you don't have an idea of how to create an Angular project, just read the above articles. For this demonstration, we are using the same Angular CLI project which we have already created for our previous article of Template Driven Forms. So, let us open the project and go to app.module.ts file and add ReactiveFormsModule which is imported from @angular/forms. It will provide all the required components for the Reactive Forms.
- import { FormsModule, ReactiveFormsModule } from '@angular/forms';
After adding the ReactiveFormsModule in AppModule, it's time to add a new component class as 'ReactiveFormComponent' using the command 'ng g c TemplateDrivenForm'. We are working on the project which we have created in the previous article for Template Driven Forms. So, you will find both the components available in AppModule as below.
- import { BrowserModule } from '@angular/platform-browser';
- import { NgModule } from '@angular/core';
- import { FormsModule, ReactiveFormsModule } from '@angular/forms';
- import { AppRoutingModule } from './app-routing.module';
- import { AppComponent } from './app.component';
- import { TemplateDrivenFormComponent } from './template-driven-form/template-driven-form.component';
- import { ReactiveFormComponent } from './reactive-form/reactive-form.component';
- @NgModule({
- declarations: [
- AppComponent,
- TemplateDrivenFormComponent,
- ReactiveFormComponent
- ],
- imports: [
- BrowserModule,
- FormsModule,
- ReactiveFormsModule,
- AppRoutingModule
- ],
- providers: [],
- bootstrap: [AppComponent]
- })
- export class AppModule { }
Now, we will create a route for a new component 'ReactiveFormComponent'. So, let us add one path inside the Routes.
- import { NgModule } from '@angular/core';
- import { Routes, RouterModule } from '@angular/router';
- import { ReactiveFormComponent } from 'src/app/reactive-form/reactive-form.component';
- import { TemplateDrivenFormComponent } from 'src/app/template-driven-form/template-driven-form.component';
- const routes: Routes = [
- {
- path: 'reactiveform',
- pathMatch: 'full',
- component: ReactiveFormComponent
- },
- {
- path: 'templateform',
- pathMatch: 'full',
- component: TemplateDrivenFormComponent
- }
- ];
- @NgModule({
- imports: [RouterModule.forRoot(routes)],
- exports: [RouterModule]
- })
- export class AppRoutingModule { }
Above, we have configured our AppModule and AppRoutingModule for a newly added component 'ReactiveFormComponent'. Now onwards, we will write the actual code for implementing the Reactive Forms. Before moving to the actual implementation, we should be aware of a few keywords, which will frequently be used in the coming code.
- FormBuilder
It helps us to create extensive and complex forms using FormGroup, FormControl, FormArrary etc in an easy way. - FormGroup
It creates the group of form's elements using the list of controls and tracks the values for these controls. - FormControl
It is a class for creating and tracking the values and validations for individual control. - FormControlName
It is a directive which is used to map the model's control name to the template. - FormGroupName
It's a nested FormGroup. If you are willing to create the form group inside the form group then you can use FormGroupName. - Validators
It is a function that validates the data for the form control or list of form controls and returns the error or null.
After understanding the above keywords and their uses, we will move next to a demonstration of Reactive Forms. So, let's import these inside the ReactiveFormsComponent.
- import { FormGroup, FormBuilder, Validators, FormControl, NgForm } from '@angular/forms';
FormControl is used to create a form of control from the component class and Validators is used to validate that control using different types of validations attributes. You can see with the following code, how we create a control as 'email' and add the four different types of validations like required validation, minlength validation, maxlength validation and pattern matching validation. So, this way, you can create the control for the form group and add the validation.
- email: new FormControl('', [
- Validators.required,
- Validators.minLength(5),
- Validators.maxLength(80),
- Validators.pattern("^[a-zA-Z0-9_.+-]+@[a-zA-Z0-9-]+.[a-zA-Z0-9-.]+$")
- ]),
Now, let's move to actual code implementation inside the ReactiveFormComponent. So, first let's get the instance of FormBuilder using Constructor Dependency Injection and create a reference of FormGroup. After that, you can create multiple controls for the form group 'registrationForm' similar to how we have given a sample control creation technique above. For getting the form's controls value on submitting the form, we have created on method as 'onRegistrationFormSubmit()'. In this method, first, we will check if our form is valid or not. Once the form will be valid then we can get the value of the control. You can see with the below code how we have created ReactiveFormComponent.
- import { Component, OnInit } from '@angular/core';
- import { FormGroup, FormBuilder, Validators, FormControl, NgForm } from '@angular/forms';
- import { FormArray } from '@angular/forms/src/model';
- @Component({
- selector: 'app-reactive-form',
- templateUrl: './reactive-form.component.html',
- styleUrls: ['./reactive-form.component.css']
- })
- export class ReactiveFormComponent implements OnInit {
- registrationForm: FormGroup;
- isSubmitted: boolean = false;
- constructor(private formBuilder: FormBuilder) {
- this.registrationForm = this.formBuilder.group({
- firstName: new FormControl('', [
- Validators.required,
- Validators.minLength(3),
- Validators.maxLength(30),
- Validators.pattern('^[a-zA-Z ]*$')]),
- lastName: new FormControl('', []),
- addressGroup: this.formBuilder.group({
- address: new FormControl('', [
- Validators.required,
- Validators.maxLength(255)
- ]),
- city: new FormControl('', []),
- state: new FormControl('', []),
- pincode: new FormControl('', [
- Validators.required,
- Validators.minLength(6),
- Validators.maxLength(8),
- Validators.pattern('^[a-zA-Z0-9]*$')])
- }),
- phoneNumber: new FormControl('', [
- Validators.required,
- Validators.minLength(8),
- Validators.maxLength(12),
- Validators.pattern('^[0-9]*$')]),
- email: new FormControl('', [
- Validators.required,
- Validators.minLength(5),
- Validators.maxLength(80),
- Validators.pattern("^[a-zA-Z0-9_.+-]+@[a-zA-Z0-9-]+.[a-zA-Z0-9-.]+$")
- ]),
- password: new FormControl('', [
- Validators.required,
- Validators.minLength(5),
- Validators.maxLength(12)
- ])
- });
- }
- ngOnInit() {
- }
- onRegistrationFormSubmit() {
- this.isSubmitted = true;
- if(this.registrationForm.valid){
- console.log("User Registration Form Submit", this.registrationForm.value);
- }
- }
- }
Now, it's time to create the DOM element in the template for the model. So, first let's understand how we will create the form control inside the template which maps with model control. So, for using the control, which we have already created in Component class, we will use formControlName directive along with the control name as follows.
- <input type="text" placeholder="Enter First Name Here.." formControlName="firstName" class="form-control" />
And for creating the different types of the error messages for different types of validation failure, we will create a template similar to the below one. This is just a sample. Here, you can see, before any validation message is going to show, we are checking two things, first "Is there any error with particular control" and second "Is form submitted". If both return true then we will move to the inner template where we have defined different template codes for different types of errors.
- <div *ngIf="registrationForm.get('firstName').errors && isSubmitted">
- <div *ngIf="registrationForm.get('firstName').hasError('required')">
- <span style="color: red;">Please Enter First Name.</span>
- </div>
- <div *ngIf="registrationForm.get('firstName').hasError('minlength')">
- <span style="color: red;">First Name requied atleast 3 characters.</span>
- </div>
- <div *ngIf="registrationForm.get('firstName').hasError('maxlength')">
- <span style="color: red;">First Name requied only 30 characters.</span>
- </div>
- <div *ngIf="registrationForm.get('firstName').hasError('pattern')">
- <span style="color: red;">Only characters are allowed.</span>
- </div>
- </div>
Here is the full code for reactive-form.component.html. Here, we are going to implement a registration form with different types of controls and their validations.
- <div class="container">
- <h3 class="well">Registration Form</h3>
- <div class="row">
- <form [formGroup]="registrationForm" (ngSubmit)="onRegistrationFormSubmit()">
- <div class="col-sm-12">
- <div class="row">
- <div class="col-sm-6 form-group">
- <label>First Name</label>
- <input type="text" placeholder="Enter First Name Here.." formControlName="firstName" class="form-control" />
- <div *ngIf="registrationForm.get('firstName').errors && isSubmitted">
- <div *ngIf="registrationForm.get('firstName').hasError('required')">
- <span style="color: red;">Please Enter First Name.</span>
- </div>
- <div *ngIf="registrationForm.get('firstName').hasError('minlength')">
- <span style="color: red;">First Name requied atleast 3 characters.</span>
- </div>
- <div *ngIf="registrationForm.get('firstName').hasError('maxlength')">
- <span style="color: red;">First Name requied only 30 characters.</span>
- </div>
- <div *ngIf="registrationForm.get('firstName').hasError('pattern')">
- <span style="color: red;">Only characters are allowed.</span>
- </div>
- </div>
- </div>
- <div class="col-sm-6 form-group">
- <label>Last Name</label>
- <input type="text" placeholder="Enter Last Name Here.." formControlName="lastName" class="form-control" />
- </div>
- </div>
- <div formGroupName="addressGroup" class="form-group">
- <label>Address</label>
- <textarea placeholder="Enter Address Here.." rows="2" formControlName="address" class="form-control"></textarea>
- <div *ngIf="registrationForm.get('addressGroup.address').errors && isSubmitted">
- <div *ngIf="registrationForm.get('addressGroup.address').hasError('required')">
- <span style="color: red;">Please Enter Address.</span>
- </div>
- <div *ngIf="registrationForm.get('addressGroup.address').hasError('maxlength')">
- <span style="color: red;">Only 255 characters are allowed.</span>
- </div>
- </div>
- </div>
- <div formGroupName="addressGroup" class="row">
- <div class="col-sm-4 form-group">
- <label>City</label>
- <input type="text" placeholder="Enter City Name Here.." formControlName="city" class="form-control" />
- </div>
- <div class="col-sm-4 form-group">
- <label>State</label>
- <input type="text" placeholder="Enter State Name Here.." formControlName="state" class="form-control" />
- </div>
- <div class="col-sm-4 form-group">
- <label>PinCode</label>
- <input type="text" placeholder="Enter Zip Code Here.." formControlName="pincode" class="form-control" />
- <div *ngIf="registrationForm.get('addressGroup.pincode') && isSubmitted">
- <div *ngIf="registrationForm.get('addressGroup.pincode').hasError('required')">
- <span style="color: red;">Please Enter PinCode.</span>
- </div>
- <div *ngIf="registrationForm.get('addressGroup.pincode').hasError('minlength')">
- <span style="color: red;">PinCode requied atleast 6 characters.</span>
- </div>
- <div *ngIf="registrationForm.get('addressGroup.pincode').hasError('maxlength')">
- <span style="color: red;">PinCode requied only 8 characters.</span>
- </div>
- <div *ngIf="registrationForm.get('addressGroup.pincode').hasError('pattern')">
- <span style="color: red;">Only alph-numerics are allowed.</span>
- </div>
- </div>
- </div>
- </div>
- <div class="form-group">
- <label>Phone Number</label>
- <input type="text" placeholder="Enter Phone Number Here.." formControlName="phoneNumber" class="form-control" />
- <div *ngIf="registrationForm.get('phoneNumber').errors && isSubmitted">
- <div *ngIf="registrationForm.get('phoneNumber').hasError('required')">
- <span style="color: red;">Please Enter Phone Number.</span>
- </div>
- <div *ngIf="registrationForm.get('phoneNumber').hasError('minlength')">
- <span style="color: red;">Phone Number requied atleast 8 characters.</span>
- </div>
- <div *ngIf="registrationForm.get('phoneNumber').hasError('maxlength')">
- <span style="color: red;">Phone Number requied only 12 characters.</span>
- </div>
- <div *ngIf="registrationForm.get('phoneNumber').hasError('pattern')">
- <span style="color: red;">Only Numbers are allowed.</span>
- </div>
- </div>
- </div>
- <div class="row">
- <div class="col-sm-6 form-group">
- <label>Email Address</label>
- <input type="text" placeholder="Enter Email Address Here.." formControlName="email" class="form-control" />
- <div *ngIf="registrationForm.get('email').errors && isSubmitted">
- <div *ngIf="registrationForm.get('email').hasError('required')">
- <span style="color: red;">Please Enter Email.</span>
- </div>
- <div *ngIf="registrationForm.get('email').hasError('minlength')">
- <span style="color: red;">The email requied atleast 5 characters.</span>
- </div>
- <div *ngIf="registrationForm.get('email').hasError('maxlength')">
- <span style="color: red;">The email requied only 80 characters.</span>
- </div>
- <div *ngIf="registrationForm.get('email').hasError('pattern')">
- <span style="color: red;">The Email is not valid.</span>
- </div>
- </div>
- </div>
- <div class="col-sm-6 form-group">
- <label>Password</label>
- <input type="password" placeholder="Enter Password Here.." formControlName="password" class="form-control" />
- <div *ngIf="registrationForm.get('password').errors && isSubmitted">
- <div *ngIf="registrationForm.get('password').hasError('required')">
- <span style="color: red;">Please Enter Password.</span>
- </div>
- <div *ngIf="registrationForm.get('password').hasError('minlength')">
- <span style="color: red;">The password requied atleast 5 characters.</span>
- </div>
- <div *ngIf="registrationForm.get('password').hasError('maxlength')">
- <span style="color: red;">The password requied only 12 characters.</span>
- </div>
- </div>
- </div>
- </div>
- <button type="submit" class="btn btn-lg btn-info">Submit</button>
- </div>
- </form>
- </div>
- </div>
Now, let us run the application using the command 'ng serve --open'.
Conclusion
So, today we have learned about Reactive Forms in Angular and how to create them and add validations.
I hope this post will help you. Please put your feedback using comments which help me to improve myself for the next post. If you have any doubts, please ask your doubts or query in the comment section. If you like this post, please share it with your friends.
JosephsPosted Aug 29, 2018, 8:41 PM
Can you share step by step with snapshots and source code