Introduction
This article explains how to read a XML file using the Web API. Here we need to create a XML file and save it in a folder from where the Web API reads the XML and displays the record in the browser. In this tutorial I will create an "Employee.XML" file.
The data of this XML file, when displayed, appears like this:
- <?xml version="1.0" ?>
- -<documentelement>-
- <employee>
- <id>1</id>
- <cmp_name>MCN Solutions Pvt Ltd</cmp_name>
- <address>Noida</address>
- </employee>-
- <employee>
- <id>2</id>
- <cmp_name>NIIT Limited</cmp_name>
- <address>Gurgao</address>
- </employee>-<employee>
- <id>3</id>
- <cmp_name>Cipla</cmp_name>
- <address>Delhi</address>
- </employee>-<employee>
- <id>4</id>
- <cmp_name>Tech Mahindra</cmp_name>
- <address>Noida</address>
- </employee>
- </documentelement>
Step 1
Create the Web API application as in the following:
- Start Visual Studio 2013.
- From the Start Window Select "New Project".
- Select "Installed" -> "Template" -> "Visual C#" -> "Web" -> "Visual Studio 2012" and then select "ASP.NET MVC4 Web Application".
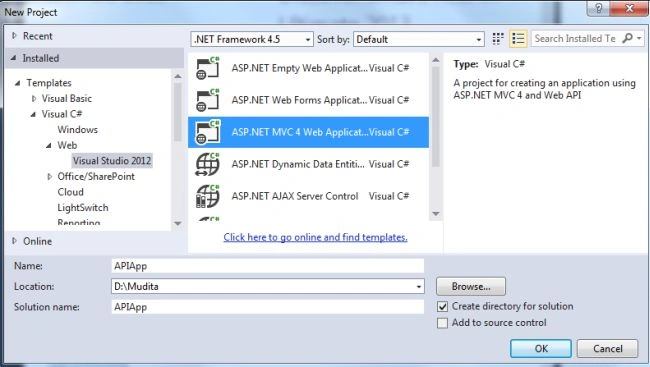
- Click on the "OK" button.
- From the MVC4 project window select "Web API".
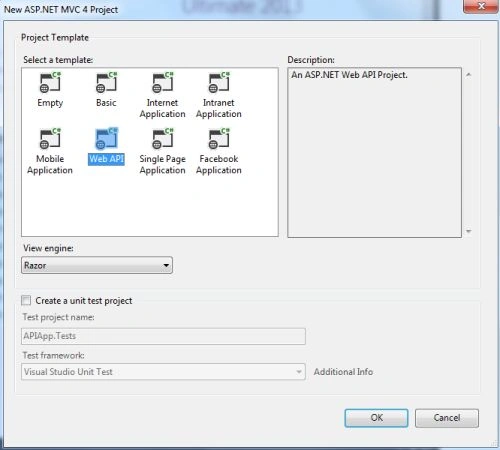
- Click on the "OK" button.
Step 2
Create a model class:
- In the Solution Explorer.
- Right-click on the Model Folder.
- Select "Add" -> "Class".
- Select "Installed" -> "Visual C#"-> and select "Class".
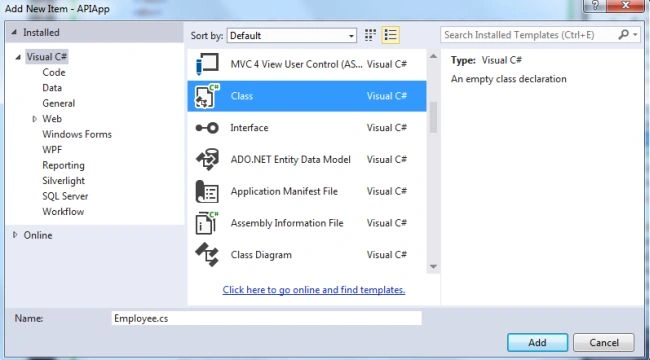
- Click on the "OK" button.
Add the following code:
- using System;
- using System.Collections.Generic;
- using System.Linq;
- using System.Web;
- namespace APIApp.Models
- {
- public class Employee
- {
- public string ID { get; set; }
- public string Cmp_Name { get; set; }
- public string Address { get; set; }
- }
- }
Step 3
Create an API controller:
- In the "Solution Explorer".
- Right-click on the "Controller folder".
- Select "Add" -> "Controller".
- Select "API Controller" from the template.
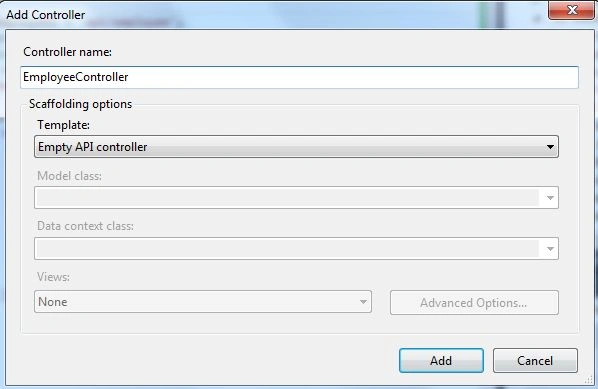
- Click on the "Add" button.
Add the following code:
- using System;
- using System.Collections.Generic;
- using System.Linq;
- using System.Net;
- using System.Net.Http;
- using System.Web.Http;
- using APIApp.Models;
- using System.Xml.Linq;
- namespace APIApp.Controllers
- {
- public class EmployeeController : ApiController
- {
- public List<Employee> GetAllEmpoyees()
- {
- List<Employee> employees = new List<Employee>();
- XDocument doc = XDocument.Load("D:\\Mudita\\Employee.xml");
- foreach (XElement element in doc.Descendants("DocumentElement")
- .Descendants("Employee"))
- {
- Employee employee = new Employee();
- employee.ID = element.Element("ID").Value;
- employee.Cmp_Name = element.Element("Cmp_Name").Value;
- employee.Address = element.Element ("Address").Value;
- employees.Add(employee);
- }
- return employees;
- }
- public Employee GetEmployee(int id)
- {
- Employee employee = new Employee();
- XDocument doc = XDocument.Load("D:\\Mudita\\Employee.xml");
- XElement element = doc.Element("DocumentElement")
- .Elements("Employee").Elements("ID").
- SingleOrDefault(x => x.Value == id.ToString());
- if (element != null)
- {
- XElement parent = element.Parent;
- employee.ID =
- parent.Element("ID").Value;
- employee.Cmp_Name =
- parent.Element("Cmp_Name").Value;
- employee.Address =
- parent.Element("Address").Value;
- return employee;
- }
- else
- {
- throw new HttpResponseException
- (new HttpResponseMessage(HttpStatusCode.NotFound));
- }
- }
- }
- }
Step 4
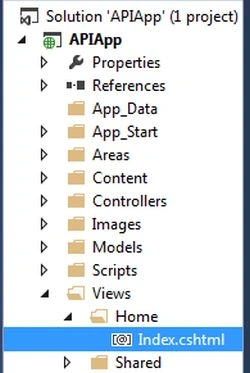
Add an Index.cshtml file using the following:
Add the following code to it:
- <div id="body">
- <section class="content-wrapper main-content clear-fix">
- <div>
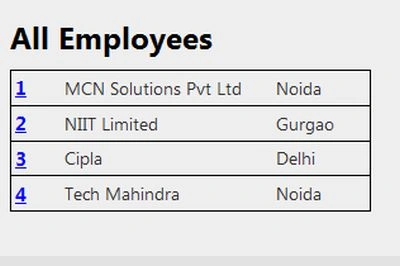
- <h2>All Employees</h2>
- </div>
- <div>
- <table id="employees" style="border: 1px solid black;"></table>
- </div>
- </section>
- </div>
- @section scripts {
- <script>
- var apiEmployees = 'api/employee';
- $(document).ready(function () {
-
- var rows = '';
- $('#employees').empty();
- $.getJSON(apiEmployees,
- function (data) {
- $.each(data, function (key, val) {
- var employeeURL = apiEmployees + '/' + val.EmployeeID;
- rows = rows + '<tr style="border: 1px solid black;"><td> ' +
- '<a style="color: Blue; font-weight:bold; font-size:15px"'
- + 'href="' + employeeURL + '">' + val.ID + '</a>' +
- '</td><td>' + val.Cmp_Name +
- '</td><td>' + val.Address + '</td></tr>';
- });
- $('#employees').html(rows);
- });
- });
- </script>
- }
Step 5
Execute the application:
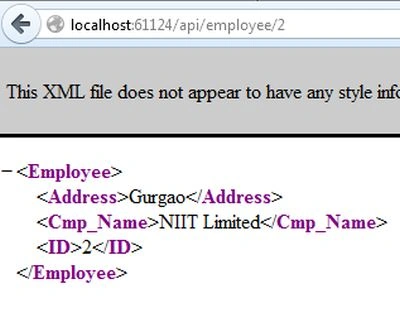
Now see the record in XML form.


Join the conversation! Your thoughts help the community grow.