

Introduction
SignalR is a library for ASP.NET developers to simplify the process of adding real-time web functionality to applications. Real-time web functionality is the ability to have server code push content to connected clients instantly as it becomes available, rather than having the server wait for a client to request new data. Chat application is often used as SignalR example, but here, we will create an employee application in Angular 11 along with .NET 5 backend to describe real-time features. We will create a .NET 5 application with SQL server database to insert, edit and delete employee data. We will also create an Angular 11 application as front-end. When we add a new employee data or update or delete the data, we will get broadcasted message from SignalR hub in the Angular application and immediately show the modified data in all connected client browsers. We will also display the notification instantly, as a bell icon in the menu bar. User can click in the notification bell icon and see all the notification history. We will also provide the option to delete all notification history from database.
Create .NET 5 Web API application in Visual Studio 2019
We can create a new Web API with .NET 5 SDK in Visual Studio 2019. We will choose the ASP.NET Core Web API template. We will also choose the default “Enable Open API support” option. This feature will help us to enable swagger API documentation in our application.

We can create a “Models” folder and create two classes “Employee” and “Notification”.
Employee.cs
- namespace NET5SignalR.Models
- {
- public class Employee
- {
- public string Id { get; set; }
- public string Name { get; set; }
- public string Designation { get; set; }
- public string Company { get; set; }
- public string Cityname { get; set; }
- public string Address { get; set; }
- public string Gender { get; set; }
- }
- }
Notification.cs
- using System.ComponentModel.DataAnnotations.Schema;
- namespace NET5SignalR.Models
- {
- public class Notification
- {
- [DatabaseGenerated(DatabaseGeneratedOption.Identity)]
- public int Id { get; set; }
- public string EmployeeName { get; set; }
- public string TranType { get; set; }
- }
- }
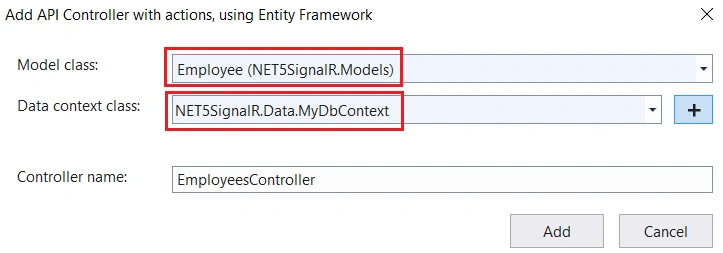
We have chosen Employee model from the class list and chose a new name for Db context class.
Scaffolding feature will add the required NuGet packages to the application and will create an API controller with all CRUD default methods.
We can see that a new class “MyDbContext” is created inside the “Data” folder automatically. This class is created with DbSet property of Employee class. This will be used to create an Employee table while Db migration time. We can add one more DbSet property for Notification table.
MyDbContext.cs
- using Microsoft.EntityFrameworkCore;
- using NET5SignalR.Models;
- namespace NET5SignalR.Data
- {
- public class MyDbContext : DbContext
- {
- public MyDbContext (DbContextOptions<MyDbContext> options)
- : base(options)
- {
- }
- public DbSet<Employee> Employee { get; set; }
- public DbSet<Notification> Notification { get; set; }
- }
- }
Scaffolding has also created a connection string in appsettings.json file for database connectivity. Now we can use “Package Manager Console” to create database and tables.

Above migration command will create a migration script inside the “Migrations” folder. We can use below command to create database and tables using above script.

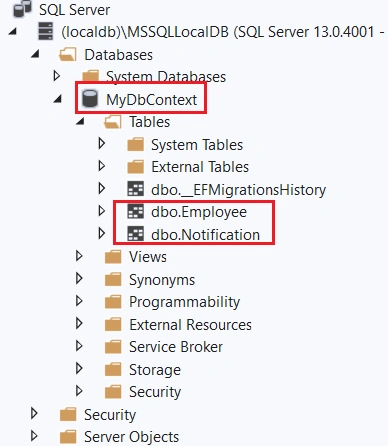
If you look at the SQL server object explorer in Visual Studio, you can see that the new database is created with two tables.
We can install the NuGet package “Microsoft.AspNet.SignalR” now.
We will create an interface “IHubClient” followed by a class “BroadcastHub” inside the “Models” folder.
IHubClient.cs
- using System.Threading.Tasks;
- namespace NET5SignalR.Models
- {
- public interface IHubClient
- {
- Task BroadcastMessage();
- }
- }
BroadcastHub.cs
- using Microsoft.AspNetCore.SignalR;
- namespace NET5SignalR.Models
- {
- public class BroadcastHub : Hub<IHubClient>
- {
- }
- }
Both interface and class will be used to broadcast real-time messages to Angular application.
We must add below changes in the Startup class to broadcast messages from SignalR to Angular client.
Startup.cs
- using Microsoft.AspNetCore.Builder;
- using Microsoft.AspNetCore.Hosting;
- using Microsoft.EntityFrameworkCore;
- using Microsoft.Extensions.Configuration;
- using Microsoft.Extensions.DependencyInjection;
- using Microsoft.Extensions.Hosting;
- using Microsoft.OpenApi.Models;
- using NET5SignalR.Data;
- using NET5SignalR.Models;
- namespace NET5SignalR
- {
- public class Startup
- {
- public Startup(IConfiguration configuration)
- {
- Configuration = configuration;
- }
- public IConfiguration Configuration { get; }
- public void ConfigureServices(IServiceCollection services)
- {
- services.AddControllers();
- services.AddSwaggerGen(c =>
- {
- c.SwaggerDoc("v1", new OpenApiInfo { Title = "NET5SignalR", Version = "v1" });
- });
- services.AddCors(o => o.AddPolicy("CorsPolicy", builder => {
- builder
- .AllowAnyMethod()
- .AllowAnyHeader()
- .AllowCredentials()
- .WithOrigins("http://localhost:4200");
- }));
- services.AddSignalR();
- services.AddDbContext<MyDbContext>(options =>
- options.UseSqlServer(Configuration.GetConnectionString("MyDbContext")));
- }
- public void Configure(IApplicationBuilder app, IWebHostEnvironment env)
- {
- if (env.IsDevelopment())
- {
- app.UseDeveloperExceptionPage();
- app.UseSwagger();
- app.UseSwaggerUI(c => c.SwaggerEndpoint("/swagger/v1/swagger.json", "NET5SignalR v1"));
- }
- app.UseRouting();
- app.UseAuthorization();
- app.UseCors("CorsPolicy");
- app.UseEndpoints(endpoints =>
- {
- endpoints.MapHub<BroadcastHub>("/notify");
- });
- app.UseEndpoints(endpoints =>
- {
- endpoints.MapControllers();
- });
- }
- }
- }

We must modify the default Employee controller with below code changes.
EmployeesController.cs
- using Microsoft.AspNetCore.Mvc;
- using Microsoft.AspNetCore.SignalR;
- using Microsoft.EntityFrameworkCore;
- using NET5SignalR.Data;
- using NET5SignalR.Models;
- using System;
- using System.Collections.Generic;
- using System.Linq;
- using System.Threading.Tasks;
- namespace NET5SignalR.Controllers
- {
- [Route("api/[controller]")]
- [ApiController]
- public class EmployeesController : ControllerBase
- {
- private readonly MyDbContext _context;
- private readonly IHubContext<BroadcastHub, IHubClient> _hubContext;
- public EmployeesController(MyDbContext context, IHubContext<BroadcastHub, IHubClient> hubContext)
- {
- _context = context;
- _hubContext = hubContext;
- }
- // GET: api/Employees
- [HttpGet]
- public async Task<ActionResult<IEnumerable<Employee>>> GetEmployee()
- {
- return await _context.Employee.ToListAsync();
- }
- // GET: api/Employees/5
- [HttpGet("{id}")]
- public async Task<ActionResult<Employee>> GetEmployee(string id)
- {
- var employee = await _context.Employee.FindAsync(id);
- if (employee == null)
- {
- return NotFound();
- }
- return employee;
- }
- // PUT: api/Employees/5
- // To protect from overposting attacks, see https://go.microsoft.com/fwlink/?linkid=2123754
- [HttpPut("{id}")]
- public async Task<IActionResult> PutEmployee(string id, Employee employee)
- {
- if (id != employee.Id)
- {
- return BadRequest();
- }
- _context.Entry(employee).State = EntityState.Modified;
- Notification notification = new Notification()
- {
- EmployeeName = employee.Name,
- TranType = "Edit"
- };
- _context.Notification.Add(notification);
- try
- {
- await _context.SaveChangesAsync();
- await _hubContext.Clients.All.BroadcastMessage();
- }
- catch (DbUpdateConcurrencyException)
- {
- if (!EmployeeExists(id))
- {
- return NotFound();
- }
- else
- {
- throw;
- }
- }
- return NoContent();
- }
- // POST: api/Employees
- // To protect from overposting attacks, see https://go.microsoft.com/fwlink/?linkid=2123754
- [HttpPost]
- public async Task<ActionResult<Employee>> PostEmployee(Employee employee)
- {
- employee.Id = Guid.NewGuid().ToString();
- _context.Employee.Add(employee);
- Notification notification = new Notification()
- {
- EmployeeName = employee.Name,
- TranType = "Add"
- };
- _context.Notification.Add(notification);
- try
- {
- await _context.SaveChangesAsync();
- await _hubContext.Clients.All.BroadcastMessage();
- }
- catch (DbUpdateException)
- {
- if (EmployeeExists(employee.Id))
- {
- return Conflict();
- }
- else
- {
- throw;
- }
- }
- return CreatedAtAction("GetEmployee", new { id = employee.Id }, employee);
- }
- // DELETE: api/Employees/5
- [HttpDelete("{id}")]
- public async Task<IActionResult> DeleteEmployee(string id)
- {
- var employee = await _context.Employee.FindAsync(id);
- if (employee == null)
- {
- return NotFound();
- }
- Notification notification = new Notification()
- {
- EmployeeName = employee.Name,
- TranType = "Delete"
- };
- _context.Employee.Remove(employee);
- _context.Notification.Add(notification);
- await _context.SaveChangesAsync();
- await _hubContext.Clients.All.BroadcastMessage();
- return NoContent();
- }
- private bool EmployeeExists(string id)
- {
- return _context.Employee.Any(e => e.Id == id);
- }
- }
- }

We will be adding a new record to Notification table after adding, editing or deleting a record in the Employee table inside the respective web methods. Also notice that, we have broadcasted the message to all connected clients inside these web methods.
We must create below models for notification count and notification result.
NotificationCountResult.cs
- namespace NET5SignalR.Models
- {
- public class NotificationCountResult
- {
- public int Count { get; set; }
- }
- }
NotificationResult.cs
- namespace NET5SignalR.Models
- {
- public class NotificationResult
- {
- public string EmployeeName { get; set; }
- public string TranType { get; set; }
- }
- }
We can create new API class “NotificationsController” to get details from Notification table. This controller will also use to delete entire records from Notification table.
NotificationsController.cs
- using Microsoft.AspNetCore.Mvc;
- using Microsoft.AspNetCore.SignalR;
- using Microsoft.EntityFrameworkCore;
- using NET5SignalR.Data;
- using NET5SignalR.Models;
- using System.Collections.Generic;
- using System.Linq;
- using System.Threading.Tasks;
- namespace NET5SignalR.Controllers
- {
- [Route("api/[controller]")]
- [ApiController]
- public class NotificationsController : ControllerBase
- {
- private readonly MyDbContext _context;
- private readonly IHubContext<BroadcastHub, IHubClient> _hubContext;
- public NotificationsController(MyDbContext context, IHubContext<BroadcastHub, IHubClient> hubContext)
- {
- _context = context;
- _hubContext = hubContext;
- }
- // GET: api/Notifications/notificationcount
- [Route("notificationcount")]
- [HttpGet]
- public async Task<ActionResult<NotificationCountResult>> GetNotificationCount()
- {
- var count = (from not in _context.Notification
- select not).CountAsync();
- NotificationCountResult result = new NotificationCountResult
- {
- Count = await count
- };
- return result;
- }
- // GET: api/Notifications/notificationresult
- [Route("notificationresult")]
- [HttpGet]
- public async Task<ActionResult<List<NotificationResult>>> GetNotificationMessage()
- {
- var results = from message in _context.Notification
- orderby message.Id descending
- select new NotificationResult
- {
- EmployeeName = message.EmployeeName,
- TranType = message.TranType
- };
- return await results.ToListAsync();
- }
- // DELETE: api/Notifications/deletenotifications
- [HttpDelete]
- [Route("deletenotifications")]
- public async Task<IActionResult> DeleteNotifications()
- {
- await _context.Database.ExecuteSqlRawAsync("TRUNCATE TABLE Notification");
- await _context.SaveChangesAsync();
- await _hubContext.Clients.All.BroadcastMessage();
- return NoContent();
- }
- }
- }
Above controller has three web methods. “GetNotificationCount” is used to get total notification count and “GetNotificationMessage” is used to get all notification details (Employee name and Transaction type). “DeleteNotifications” is used to delete entire records from Notification table.
We have completed all API side code. If needed, you can check all the web methods using Swagger or Postman tool.
Create Angular 11 application using CLI
We can create the Angular 11 application using Angular CLI. We will create all the services and components step by step.
Create a new Angular application using below command.
ng new AngularSignalR
We can choose the option to create Routing. (Be default, it is false)
It will take some time to install all the node packages. We can install below three packages using npm command.
npm install @microsoft/signalr
npm install bootstrap
npm install font-awesome
We have now installed the SignalR client, bootstrap and font-awesome packages in our Angular application. We must modify “styles.css” file in the root folder with below changes to access these packages globally in the application without further references.
styles.css
- @import "~bootstrap/dist/css/bootstrap.css";
- @import "~font-awesome/css/font-awesome.css";
Create an environment variable inside environment class for baseUrl. This will be used across the application.
environment.ts
- // This file can be replaced during build by using the `fileReplacements` array.
- // `ng build --prod` replaces `environment.ts` with `environment.prod.ts`.
- // The list of file replacements can be found in `angular.json`.
- export const environment = {
- production: false,
- baseUrl: 'http://localhost:62769/'
- };
- /*
- * For easier debugging in development mode, you can import the following file
- * to ignore zone related error stack frames such as `zone.run`, `zoneDelegate.invokeTask`.
- *
- * This import should be commented out in production mode because it will have a negative impact
- * on performance if an error is thrown.
- */
- // import 'zone.js/dist/zone-error'; // Included with Angular CLI.
Please replace the API end point with your API end point port number.
We can create an employee class now.
ng g class employee\employee
employee.ts
- export interface Employee {
- id: string,
- name: string,
- address: string,
- gender: string,
- company: string,
- designation: string,
- cityname: string
- }
We can create an employee service now.
ng g service employee\employee
employee.service.ts
- import { Injectable } from '@angular/core';
- import { HttpClient, HttpHeaders } from '@angular/common/http';
- import { Observable, throwError, of } from 'rxjs';
- import { catchError, map } from 'rxjs/operators';
- import { Employee } from './employee';
- import { environment } from 'src/environments/environment';
- @Injectable({
- providedIn: 'root'
- })
- export class EmployeeService {
- private employeesUrl = environment.baseUrl + 'api/employees';
- constructor(private http: HttpClient) { }
- getEmployees(): Observable<Employee[]> {
- return this.http.get<Employee[]>(this.employeesUrl)
- .pipe(
- catchError(this.handleError)
- );
- }
- getEmployee(id: string): Observable<Employee> {
- if (id === '') {
- return of(this.initializeEmployee());
- }
- const url = `${this.employeesUrl}/${id}`;
- return this.http.get<Employee>(url)
- .pipe(
- catchError(this.handleError)
- );
- }
- createEmployee(employee: Employee): Observable<Employee> {
- const headers = new HttpHeaders({ 'Content-Type': 'application/json' });
- return this.http.post<Employee>(this.employeesUrl, employee, { headers: headers })
- .pipe(
- catchError(this.handleError)
- );
- }
- deleteEmployee(id: string): Observable<{}> {
- const headers = new HttpHeaders({ 'Content-Type': 'application/json' });
- const url = `${this.employeesUrl}/${id}`;
- return this.http.delete<Employee>(url, { headers: headers })
- .pipe(
- catchError(this.handleError)
- );
- }
- updateEmployee(employee: Employee): Observable<Employee> {
- debugger
- const headers = new HttpHeaders({ 'Content-Type': 'application/json' });
- const url = `${this.employeesUrl}/${employee.id}`;
- return this.http.put<Employee>(url, employee, { headers: headers })
- .pipe(
- map(() => employee),
- catchError(this.handleError)
- );
- }
- private handleError(err) {
- let errorMessage: string;
- if (err.error instanceof ErrorEvent) {
- errorMessage = `An error occurred: ${err.error.message}`;
- } else {
- errorMessage = `Backend returned code ${err.status}: ${err.body.error}`;
- }
- console.error(err);
- return throwError(errorMessage);
- }
- private initializeEmployee(): Employee {
- return {
- id: null,
- name: null,
- address: null,
- gender: null,
- company: null,
- designation: null,
- cityname: null
- };
- }
- }
We can create employee list component. This component will be used to display all the employee information. This component also uses to edit and delete employee data.
ng g component employee\EmployeeList
We can modify the class file with below code.
employee-list.component.ts
- import { Component, OnInit } from '@angular/core';
- import { Employee } from '../employee';
- import { EmployeeService } from '../employee.service';
- import * as signalR from '@microsoft/signalr';
- import { environment } from 'src/environments/environment';
- @Component({
- selector: 'app-employee-list',
- templateUrl: './employee-list.component.html',
- styleUrls: ['./employee-list.component.css']
- })
- export class EmployeeListComponent implements OnInit {
- pageTitle = 'Employee List';
- filteredEmployees: Employee[] = [];
- employees: Employee[] = [];
- errorMessage = '';
- _listFilter = '';
- get listFilter(): string {
- return this._listFilter;
- }
- set listFilter(value: string) {
- this._listFilter = value;
- this.filteredEmployees = this.listFilter ? this.performFilter(this.listFilter) : this.employees;
- }
- constructor(private employeeService: EmployeeService) { }
- performFilter(filterBy: string): Employee[] {
- filterBy = filterBy.toLocaleLowerCase();
- return this.employees.filter((employee: Employee) =>
- employee.name.toLocaleLowerCase().indexOf(filterBy) !== -1);
- }
- ngOnInit(): void {
- this.getEmployeeData();
- const connection = new signalR.HubConnectionBuilder()
- .configureLogging(signalR.LogLevel.Information)
- .withUrl(environment.baseUrl + 'notify')
- .build();
- connection.start().then(function () {
- console.log('SignalR Connected!');
- }).catch(function (err) {
- return console.error(err.toString());
- });
- connection.on("BroadcastMessage", () => {
- this.getEmployeeData();
- });
- }
- getEmployeeData() {
- this.employeeService.getEmployees().subscribe(
- employees => {
- this.employees = employees;
- this.filteredEmployees = this.employees;
- },
- error => this.errorMessage = <any>error
- );
- }
- deleteEmployee(id: string, name: string): void {
- if (id === '') {
- this.onSaveComplete();
- } else {
- if (confirm(`Are you sure want to delete this Employee: ${name}?`)) {
- this.employeeService.deleteEmployee(id)
- .subscribe(
- () => this.onSaveComplete(),
- (error: any) => this.errorMessage = <any>error
- );
- }
- }
- }
- onSaveComplete(): void {
- this.employeeService.getEmployees().subscribe(
- employees => {
- this.employees = employees;
- this.filteredEmployees = this.employees;
- },
- error => this.errorMessage = <any>error
- );
- }
- }
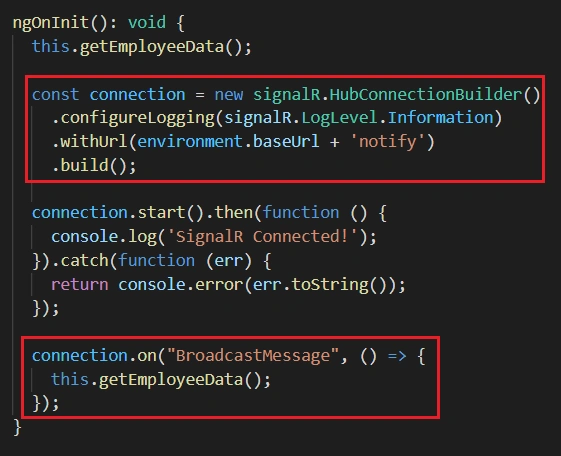
If you look at the code, you can see that inside ngOnInit method, I have created a constant variable with signalR hub connection builder and also started the connection. This connection will be listening to the messages from SignlarR hub from backend Web API. Whenever, backend sends a message, getEmployeeData method will be triggered automatically.
We can modify the template and style files also.
employee-list.component.html
- <div class="card">
- <div class="card-header">
- {{pageTitle}}
- </div>
- <div class="card-body">
- <div class="row" style="margin-bottom:15px;">
- <div class="col-md-2">Filter by:</div>
- <div class="col-md-4">
- <input type="text" [(ngModel)]="listFilter" />
- </div>
- <div class="col-md-2"></div>
- <div class="col-md-4">
- <button class="btn btn-primary mr-3" [routerLink]="['/employees/0/edit']">
- New Employee
- </button>
- </div>
- </div>
- <div class="row" *ngIf="listFilter">
- <div class="col-md-6">
- <h4>Filtered by: {{listFilter}}</h4>
- </div>
- </div>
- <div class="table-responsive">
- <table class="table mb-0" *ngIf="employees && employees.length">
- <thead>
- <tr>
- <th>Name</th>
- <th>Address</th>
- <th>Gender</th>
- <th>Company</th>
- <th>Designation</th>
- <th></th>
- <th></th>
- </tr>
- </thead>
- <tbody>
- <tr *ngFor="let employee of filteredEmployees">
- <td>
- <a [routerLink]="['/employees', employee.id]">
- {{ employee.name }}
- </a>
- </td>
- <td>{{ employee.address }}</td>
- <td>{{ employee.gender }}</td>
- <td>{{ employee.company }}</td>
- <td>{{ employee.designation}} </td>
- <td>
- <button class="btn btn-outline-primary btn-sm"
- [routerLink]="['/employees', employee.id, 'edit']">
- Edit
- </button>
- </td>
- <td>
- <button class="btn btn-outline-warning btn-sm"
- (click)="deleteEmployee(employee.id,employee.name);">
- Delete
- </button>
- </td>
- </tr>
- </tbody>
- </table>
- </div>
- </div>
- </div>
- <div *ngIf="errorMessage" class="alert alert-danger">
- Error: {{ errorMessage }}
- </div>
employee-list.component.css
- thead {
- color: #337AB7;
- }
We can create employee edit component with below command
ng g component employee\EmployeeEdit
Modify the class file with below code.
employee-edit.component.ts
- import { Component, OnInit, OnDestroy, ElementRef, ViewChildren } from '@angular/core';
- import { FormControlName, FormGroup, FormBuilder, Validators } from '@angular/forms';
- import { Subscription } from 'rxjs';
- import { ActivatedRoute, Router } from '@angular/router';
- import { Employee } from '../employee';
- import { EmployeeService } from '../employee.service';
- @Component({
- selector: 'app-employee-edit',
- templateUrl: './employee-edit.component.html',
- styleUrls: ['./employee-edit.component.css']
- })
- export class EmployeeEditComponent implements OnInit, OnDestroy {
- @ViewChildren(FormControlName, { read: ElementRef }) formInputElements: ElementRef[];
- pageTitle = 'Employee Edit';
- errorMessage: string;
- employeeForm: FormGroup;
- tranMode: string;
- employee: Employee;
- private sub: Subscription;
- displayMessage: { [key: string]: string } = {};
- private validationMessages: { [key: string]: { [key: string]: string } };
- constructor(private fb: FormBuilder,
- private route: ActivatedRoute,
- private router: Router,
- private employeeService: EmployeeService) {
- this.validationMessages = {
- name: {
- required: 'Employee name is required.',
- minlength: 'Employee name must be at least three characters.',
- maxlength: 'Employee name cannot exceed 50 characters.'
- },
- cityname: {
- required: 'Employee city name is required.',
- }
- };
- }
- ngOnInit() {
- this.tranMode = "new";
- this.employeeForm = this.fb.group({
- name: ['', [Validators.required,
- Validators.minLength(3),
- Validators.maxLength(50)
- ]],
- address: '',
- cityname: ['', [Validators.required]],
- gender: '',
- company: '',
- designation: '',
- });
- this.sub = this.route.paramMap.subscribe(
- params => {
- const id = params.get('id');
- const cityname = params.get('cityname');
- if (id == '0') {
- const employee: Employee = { id: "0", name: "", address: "", gender: "", company: "", designation: "", cityname: "" };
- this.displayEmployee(employee);
- }
- else {
- this.getEmployee(id);
- }
- }
- );
- }
- ngOnDestroy(): void {
- this.sub.unsubscribe();
- }
- getEmployee(id: string): void {
- this.employeeService.getEmployee(id)
- .subscribe(
- (employee: Employee) => this.displayEmployee(employee),
- (error: any) => this.errorMessage = <any>error
- );
- }
- displayEmployee(employee: Employee): void {
- if (this.employeeForm) {
- this.employeeForm.reset();
- }
- this.employee = employee;
- if (this.employee.id == '0') {
- this.pageTitle = 'Add Employee';
- } else {
- this.pageTitle = `Edit Employee: ${this.employee.name}`;
- }
- this.employeeForm.patchValue({
- name: this.employee.name,
- address: this.employee.address,
- gender: this.employee.gender,
- company: this.employee.company,
- designation: this.employee.designation,
- cityname: this.employee.cityname
- });
- }
- deleteEmployee(): void {
- if (this.employee.id == '0') {
- this.onSaveComplete();
- } else {
- if (confirm(`Are you sure want to delete this Employee: ${this.employee.name}?`)) {
- this.employeeService.deleteEmployee(this.employee.id)
- .subscribe(
- () => this.onSaveComplete(),
- (error: any) => this.errorMessage = <any>error
- );
- }
- }
- }
- saveEmployee(): void {
- if (this.employeeForm.valid) {
- if (this.employeeForm.dirty) {
- const p = { ...this.employee, ...this.employeeForm.value };
- if (p.id === '0') {
- this.employeeService.createEmployee(p)
- .subscribe(
- () => this.onSaveComplete(),
- (error: any) => this.errorMessage = <any>error
- );
- } else {
- this.employeeService.updateEmployee(p)
- .subscribe(
- () => this.onSaveComplete(),
- (error: any) => this.errorMessage = <any>error
- );
- }
- } else {
- this.onSaveComplete();
- }
- } else {
- this.errorMessage = 'Please correct the validation errors.';
- }
- }
- onSaveComplete(): void {
- this.employeeForm.reset();
- this.router.navigate(['/employees']);
- }
- }
We can modify the template file also.
employee-edit.component.html
- <div class="card">
- <div class="card-header">
- {{pageTitle}}
- </div>
- <div class="card-body">
- <form novalidate
- (ngSubmit)="saveEmployee()"
- [formGroup]="employeeForm">
- <div class="form-group row mb-2">
- <label class="col-md-3 col-form-label"
- for="employeeNameId">Employee Name</label>
- <div class="col-md-7">
- <input class="form-control"
- id="employeeNameId"
- type="text"
- placeholder="Name (required)"
- formControlName="name"
- [ngClass]="{'is-invalid': displayMessage.name }" />
- <span class="invalid-feedback">
- {{displayMessage.name}}
- </span>
- </div>
- </div>
- <div class="form-group row mb-2">
- <label class="col-md-3 col-form-label"
- for="citynameId">City</label>
- <div class="col-md-7">
- <input class="form-control"
- id="citynameid"
- type="text"
- placeholder="Cityname (required)"
- formControlName="cityname"
- [ngClass]="{'is-invalid': displayMessage.cityname}" />
- <span class="invalid-feedback">
- {{displayMessage.cityname}}
- </span>
- </div>
- </div>
- <div class="form-group row mb-2">
- <label class="col-md-3 col-form-label"
- for="addressId">Address</label>
- <div class="col-md-7">
- <input class="form-control"
- id="addressId"
- type="text"
- placeholder="Address"
- formControlName="address" />
- </div>
- </div>
- <div class="form-group row mb-2">
- <label class="col-md-3 col-form-label"
- for="genderId">Gender</label>
- <div class="col-md-7">
- <select id="genderId" formControlName="gender" class="form-control">
- <option value="" disabled selected>Select an Option</option>
- <option value="Male">Male</option>
- <option value="Female">Female</option>
- </select>
- </div>
- </div>
- <div class="form-group row mb-2">
- <label class="col-md-3 col-form-label"
- for="companyId">Company</label>
- <div class="col-md-7">
- <input class="form-control"
- id="companyId"
- type="text"
- placeholder="Company"
- formControlName="company" />
- </div>
- </div>
- <div class="form-group row mb-2">
- <label class="col-md-3 col-form-label"
- for="designationId">Designation</label>
- <div class="col-md-7">
- <input class="form-control"
- id="designationId"
- type="text"
- placeholder="Designation"
- formControlName="designation" />
- </div>
- </div>
- <div class="form-group row mb-2">
- <div class="offset-md-2 col-md-6">
- <button class="btn btn-primary mr-3"
- style="width:80px;"
- type="submit"
- [title]="employeeForm.valid ? 'Save your entered data' : 'Disabled until the form data is valid'"
- [disabled]="!employeeForm.valid">
- Save
- </button>
- <button class="btn btn-outline-secondary mr-3"
- style="width:80px;"
- type="button"
- title="Cancel your edits"
- [routerLink]="['/employees']">
- Cancel
- </button>
- <button class="btn btn-outline-warning" *ngIf="pageTitle != 'Add Employee'"
- style="width:80px"
- type="button"
- title="Delete this product"
- (click)="deleteEmployee()">
- Delete
- </button>
- </div>
- </div>
- </form>
- </div>
- <div class="alert alert-danger"
- *ngIf="errorMessage">{{errorMessage}}
- </div>
- </div>
We need one more component to display the employee details in a separate window. We can create now.
ng g component employee\EmployeeDetail
We can modify the class file with below code.
employee-detail.component.ts
- import { Component, OnInit } from '@angular/core';
- import { ActivatedRoute, Router } from '@angular/router';
- import { Employee } from '../employee';
- import { EmployeeService } from '../employee.service';
- @Component({
- selector: 'app-employee-detail',
- templateUrl: './employee-detail.component.html',
- styleUrls: ['./employee-detail.component.css']
- })
- export class EmployeeDetailComponent implements OnInit {
- pageTitle = 'Employee Detail';
- errorMessage = '';
- employee: Employee | undefined;
- constructor(private route: ActivatedRoute,
- private router: Router,
- private employeeService: EmployeeService) { }
- ngOnInit() {
- const id = this.route.snapshot.paramMap.get('id');
- if (id) {
- this.getEmployee(id);
- }
- }
- getEmployee(id: string) {
- this.employeeService.getEmployee(id).subscribe(
- employee => this.employee = employee,
- error => this.errorMessage = <any>error);
- }
- onBack(): void {
- this.router.navigate(['/employees']);
- }
- }
Modify the template file with below code.
employee-detail.component.html
- <div class="card">
- <div class="card-header"
- *ngIf="employee">
- {{pageTitle + ": " + employee.name}}
- </div>
- <div class="card-body"
- *ngIf="employee">
- <div class="row">
- <div class="col-md-8">
- <div class="row">
- <div class="col-md-3">Name:</div>
- <div class="col-md-6">{{employee.name}}</div>
- </div>
- <div class="row">
- <div class="col-md-3">City:</div>
- <div class="col-md-6">{{employee.cityname}}</div>
- </div>
- <div class="row">
- <div class="col-md-3">Address:</div>
- <div class="col-md-6">{{employee.address}}</div>
- </div>
- <div class="row">
- <div class="col-md-3">Gender:</div>
- <div class="col-md-6">{{employee.gender}}</div>
- </div>
- <div class="row">
- <div class="col-md-3">Company:</div>
- <div class="col-md-6">{{employee.company}}</div>
- </div>
- <div class="row">
- <div class="col-md-3">Designation:</div>
- <div class="col-md-6">{{employee.designation}}</div>
- </div>
- </div>
- </div>
- <div class="row mt-4">
- <div class="col-md-4">
- <button class="btn btn-outline-secondary mr-3"
- style="width:80px"
- (click)="onBack()">
- <i class="fa fa-chevron-left"></i> Back
- </button>
- <button class="btn btn-outline-primary"
- style="width:80px"
- [routerLink]="['/employees', employee.id,'edit']">
- Edit
- </button>
- </div>
- </div>
- </div>
- <div class="alert alert-danger"
- *ngIf="errorMessage">
- {{errorMessage}}
- </div>
- </div>
We need a modal popup window to display the notification messages. As I mentioned earlier, application will create new record into notification table for each transaction like Add/Edit/Delete.
We can create modal service first.
ng g service modal\modal
Modify the service class with below code.
modal.service.ts
- import { Injectable } from '@angular/core';
- @Injectable({
- providedIn: 'root'
- })
- export class ModalService {
- constructor() { }
- private modals: any[] = [];
- add(modal: any) {
- this.modals.push(modal);
- }
- remove(id: string) {
- this.modals = this.modals.filter(x => x.id !== id);
- }
- open(id: string) {
- const modal = this.modals.find(x => x.id === id);
- modal.open();
- }
- close(id: string) {
- const modal = this.modals.find(x => x.id === id);
- modal.close();
- }
- }
Now, we can create the component using below command.
ng g component modal
Modify the class file with below code.
modal.component.ts
- import { Component, ElementRef, Input, OnDestroy, OnInit, ViewEncapsulation } from '@angular/core';
- import { ModalService } from './modal.service';
- @Component({
- selector: 'app-modal',
- templateUrl: './modal.component.html',
- styleUrls: ['./modal.component.less'],
- encapsulation: ViewEncapsulation.None
- })
- export class ModalComponent implements OnInit, OnDestroy {
- @Input() id: string;
- private element: any;
- constructor(private modalService: ModalService, private el: ElementRef) {
- this.element = el.nativeElement;
- }
- ngOnInit() {
- if (!this.id) {
- console.error('modal must have an id');
- return;
- }
- document.body.appendChild(this.element);
- this.element.addEventListener('click', el => {
- if (el.target.className === 'app-modal') {
- this.close();
- }
- });
- this.modalService.add(this);
- }
- ngOnDestroy(): void {
- this.modalService.remove(this.id);
- this.element.remove();
- }
- open(): void {
- this.element.style.display = 'block';
- document.body.classList.add('app-modal-open');
- }
- close(): void {
- this.element.style.display = 'none';
- document.body.classList.remove('app-modal-open');
- }
- }

Please note that, we are using the “less” stylesheet instead of default “css” for this component.
modal.component.less
- app-modal {
- display: none;
- .app-modal {
- position: fixed;
- top: 1%;
- right: 0;
- bottom: 0;
- left: 25%;
- z-index: 1000;
- overflow: auto;
- .app-modal-body {
- padding: 10px;
- background: #fff;
- overflow-y: auto;
- margin-top: 40px;
- width: 700px;
- height: 450px;
- }
- }
- .app-modal-background {
- position: fixed;
- top: 0;
- right: 0;
- bottom: 0;
- left: 0;
- background-color: #000;
- opacity: 0.75;
- z-index: 900;
- }
- }
- body.app-modal-open {
- overflow: hidden;
- }
“less” stylesheet files allow us the flexibility to add some logical coding inside the stylesheet.
We can modify the html template with below code.
modal.component.html
- <div class="app-modal">
- <div class="app-modal-body">
- <ng-content></ng-content>
- </div>
- </div>
- <div class="app-modal-background"></div>
We can create a notification class file and add two models “NotificationCountResult” and “NotificationResult” inside it.
ng g class notification\notification
notification.ts
- export class NotificationCountResult {
- count: number;
- }
- export class NotificationResult {
- employeeName: string;
- tranType: string;
- }
We can create the notification service now.
ng g service notification\notification
Replace service with below code.
notification.service.ts
- import { HttpClient, HttpHeaders } from '@angular/common/http';
- import { Injectable } from '@angular/core';
- import { Observable, throwError } from 'rxjs';
- import { catchError } from 'rxjs/operators';
- import { environment } from 'src/environments/environment';
- import { NotificationCountResult, NotificationResult } from './notification';
- @Injectable({
- providedIn: 'root'
- })
- export class NotificationService {
- private notificationsUrl = environment.baseUrl +'api/notifications';
- constructor(private http: HttpClient) { }
- getNotificationCount(): Observable<NotificationCountResult> {
- const url = `${this.notificationsUrl}/notificationcount`;
- return this.http.get<NotificationCountResult>(url)
- .pipe(
- catchError(this.handleError)
- );
- }
- getNotificationMessage(): Observable<Array<NotificationResult>> {
- const url = `${this.notificationsUrl}/notificationresult`;
- return this.http.get<Array<NotificationResult>>(url)
- .pipe(
- catchError(this.handleError)
- );
- }
- deleteNotifications(): Observable<{}> {
- const headers = new HttpHeaders({ 'Content-Type': 'application/json' });
- const url = `${this.notificationsUrl}/deletenotifications`;
- return this.http.delete(url, { headers: headers })
- .pipe(
- catchError(this.handleError)
- );
- }
- private handleError(err) {
- let errorMessage: string;
- if (err.error instanceof ErrorEvent) {
- errorMessage = `An error occurred: ${err.error.message}`;
- } else {
- errorMessage = `Backend returned code ${err.status}: ${err.body.error}`;
- }
- console.error(err);
- return throwError(errorMessage);
- }
- }
Create the navigation menu component now.
ng g component NavMenu
Modify the class file with below code.
nav-menu.component.ts
- import { Component, OnInit } from '@angular/core';
- import { ModalService } from '../modal/modal.service';
- import * as signalR from '@microsoft/signalr';
- import { NotificationCountResult, NotificationResult } from '../Notification/notification';
- import { NotificationService } from '../Notification/notification.service';
- import { environment } from 'src/environments/environment';
- @Component({
- selector: 'app-nav-menu',
- templateUrl: './nav-menu.component.html',
- styleUrls: ['./nav-menu.component.css']
- })
- export class NavMenuComponent implements OnInit {
- notification: NotificationCountResult;
- messages: Array<NotificationResult>;
- errorMessage = '';
- constructor(private notificationService: NotificationService, private modalService: ModalService) { }
- isExpanded = false;
- ngOnInit() {
- this.getNotificationCount();
- const connection = new signalR.HubConnectionBuilder()
- .configureLogging(signalR.LogLevel.Information)
- .withUrl(environment.baseUrl + 'notify')
- .build();
- connection.start().then(function () {
- console.log('SignalR Connected!');
- }).catch(function (err) {
- return console.error(err.toString());
- });
- connection.on("BroadcastMessage", () => {
- this.getNotificationCount();
- });
- }
- collapse() {
- this.isExpanded = false;
- }
- toggle() {
- this.isExpanded = !this.isExpanded;
- }
- getNotificationCount() {
- this.notificationService.getNotificationCount().subscribe(
- notification => {
- this.notification = notification;
- },
- error => this.errorMessage = <any>error
- );
- }
- getNotificationMessage() {
- this.notificationService.getNotificationMessage().subscribe(
- messages => {
- this.messages = messages;
- },
- error => this.errorMessage = <any>error
- );
- }
- deleteNotifications(): void {
- if (confirm(`Are you sure want to delete all notifications?`)) {
- this.notificationService.deleteNotifications()
- .subscribe(
- () => {
- this.closeModal();
- },
- (error: any) => this.errorMessage = <any>error
- );
- }
- }
- openModal() {
- this.getNotificationMessage();
- this.modalService.open('custom-modal');
- }
- closeModal() {
- this.modalService.close('custom-modal');
- }
- }
Like the employee list component, we will add the singalR connection here as well.

Whenever, user adds a new employee or edit or delete data, notification will be shown in the connected client browsers immediately.
We can modify the template file with below code.
nav-menu.component.html
- <header>
- <nav class='navbar navbar-expand-sm navbar-toggleable-sm navbar-light bg-white border-bottom box-shadow mb-3'>
- <div class="container">
- <a class="navbar-brand" [routerLink]='["/"]'>Employee App</a>
- <button class="navbar-toggler" type="button" data-toggle="collapse" data-target=".navbar-collapse"
- aria-label="Toggle navigation" [attr.aria-expanded]="isExpanded" (click)="toggle()">
- <span class="navbar-toggler-icon"></span>
- </button>
- <div class="navbar-collapse collapse d-sm-inline-flex flex-sm-row-reverse" [ngClass]='{"show": isExpanded}'>
- <ul class="navbar-nav flex-grow">
- <li class="nav-item" [routerLinkActive]='["link-active"]' [routerLinkActiveOptions]='{ exact: true }'>
- <a class="nav-link text-dark" [routerLink]='["/"]'>Home</a>
- </li>
- <li class="nav-item" [routerLinkActive]='["link-active"]'>
- <a class="nav-link text-dark" [routerLink]='["/employees"]'>Employees</a>
- </li>
- <i class="fa fa-bell has-badge" style="cursor: pointer;" (click)="openModal()"></i>
- <div class="numberCircle" *ngIf="notification && notification?.count>0" style="cursor: pointer;"
- (click)="openModal()">
- {{notification?.count}}</div>
- </ul>
- </div>
- </div>
- </nav>
- </header>
- <footer>
- <nav class="navbar navbar-light bg-white mt-5 fixed-bottom">
- <div class="navbar-expand m-auto navbar-text">
- Developed with <i class="fa fa-heart"></i> by <b>Sarathlal
- Saseendran</b>
- </div>
- </nav>
- </footer>
- <app-modal id="custom-modal">
- <button class="btn btn-primary" (click)="deleteNotifications();" style="margin-right: 10px;" [disabled]="notification?.count==0">Delete all Notifications</button>
- <button class="btn btn-secondary" (click)="closeModal();">Close</button>
- <div style="margin-bottom: 10px;"></div>
- <div *ngFor="let msg of messages" [ngSwitch]="msg.tranType">
- <h6 *ngSwitchCase="'Add'"><span class="badge badge-success">New employee '{{msg.employeeName}}' added</span></h6>
- <h6 *ngSwitchCase="'Edit'"><span class="badge badge-info">Employee '{{msg.employeeName}}' edited</span></h6>
- <h6 *ngSwitchCase="'Delete'"><span class="badge badge-warning">Employee '{{msg.employeeName}}' deleted</span></h6>
- </div>
- </app-modal>
We can also modify the stylesheet file with below code.
nav-menu.component.css
- a.navbar-brand {
- white-space: normal;
- text-align: center;
- word-break: break-all;
- }
- html {
- font-size: 14px;
- }
- @media (min-width: 768px) {
- html {
- font-size: 16px;
- }
- }
- .box-shadow {
- box-shadow: 0 .25rem .75rem rgba(0, 0, 0, .05);
- }
- .fa-heart {
- color: hotpink;
- }
- .fa-bell {
- padding-top: 10px;
- color: red;
- }
- .numberCircle {
- border-radius: 50%;
- width: 21px;
- height: 21px;
- padding: 4px;
- background: #fff;
- border: 1px solid darkgrey;
- color:red;
- text-align: center;
- margin-left: -7px;
- font: 10px Arial, sans-serif;
- }
Create the final home component now.
ng g component home
There is no code change for the class file. We can modify the html template file with below code.
home.component.html
- <div style="text-align:center;">
- <h3>Real-time Angular 11 Application with SignalR and .NET 5</h3>
- <p>Welcome to our new single-page Employee application, built with below technologies:</p>
- <img src="../../assets/AngularSignalR.png" width="700px">
- </div>
We must add reference for below modules in app.module class.

app.module.ts
- import { BrowserModule } from '@angular/platform-browser';
- import { NgModule } from '@angular/core';
- import { AppRoutingModule } from './app-routing.module';
- import { FormsModule, ReactiveFormsModule } from '@angular/forms';
- import { HttpClientModule } from '@angular/common/http';
- import { AppComponent } from './app.component';
- import { EmployeeListComponent } from './employee/employee-list/employee-list.component';
- import { EmployeeEditComponent } from './employee/employee-edit/employee-edit.component';
- import { EmployeeDetailComponent } from './employee/employee-detail/employee-detail.component';
- import { ModalComponent } from './modal/modal.component';
- import { NavMenuComponent } from './nav-menu/nav-menu.component';
- import { HomeComponent } from './home/home.component';
- @NgModule({
- declarations: [
- AppComponent,
- EmployeeListComponent,
- EmployeeEditComponent,
- EmployeeDetailComponent,
- ModalComponent,
- NavMenuComponent,
- HomeComponent
- ],
- imports: [
- BrowserModule,
- AppRoutingModule,
- ReactiveFormsModule,
- FormsModule,
- HttpClientModule,
- ],
- providers: [],
- bootstrap: [AppComponent]
- })
- export class AppModule { }
We must add below route values in the app-routing.module class as well.
app-routing.module.ts
- import { NgModule } from '@angular/core';
- import { Routes, RouterModule } from '@angular/router';
- import { EmployeeDetailComponent } from './employee/employee-detail/employee-detail.component';
- import { EmployeeEditComponent } from './employee/employee-edit/employee-edit.component';
- import { EmployeeListComponent } from './employee/employee-list/employee-list.component';
- import { HomeComponent } from './home/home.component';
- const routes: Routes = [
- { path: '', component: HomeComponent, pathMatch: 'full' },
- {
- path: 'employees',
- component: EmployeeListComponent
- },
- {
- path: 'employees/:id',
- component: EmployeeDetailComponent
- },
- {
- path: 'employees/:id/edit',
- component: EmployeeEditComponent
- },
- ]
- @NgModule({
- imports: [RouterModule.forRoot(routes)],
- exports: [RouterModule]
- })
- export class AppRoutingModule { }
We can modify the app.component.html with below code.
app.component.html
- <body>
- <app-nav-menu></app-nav-menu>
- <div class="container">
- <router-outlet></router-outlet>
- </div>
- </body>
We have completed entire coding part. We are ready to run our application. We can run both API and Angular app together.
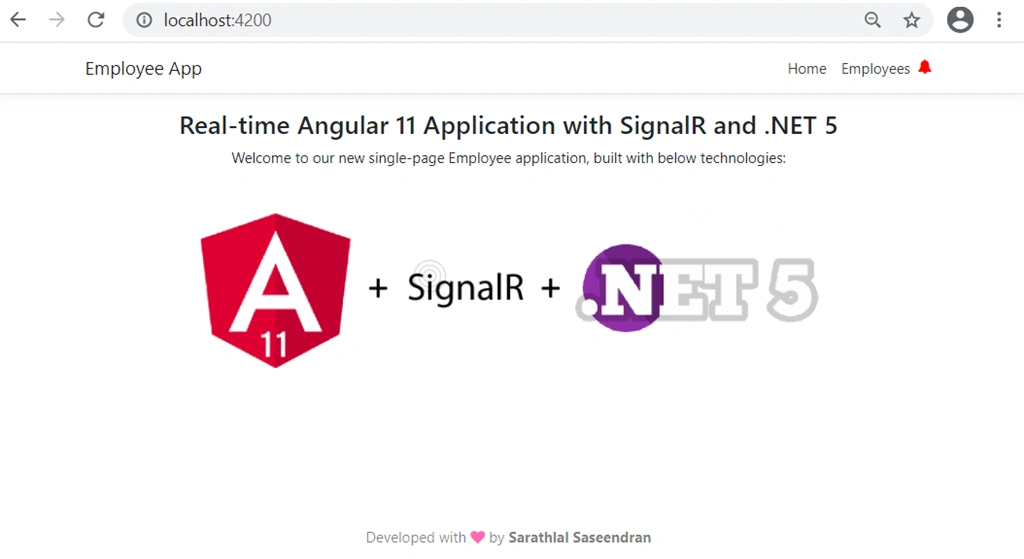
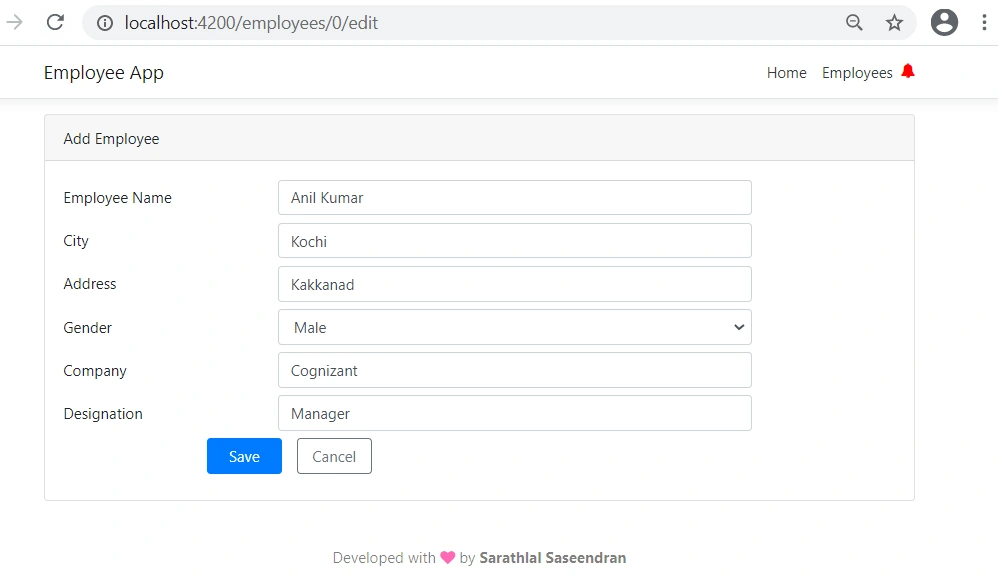
Currently, we have no employee data in database. There is no notification also. We can create new employee record. At the same, we can open the application in another Edge browser as well.
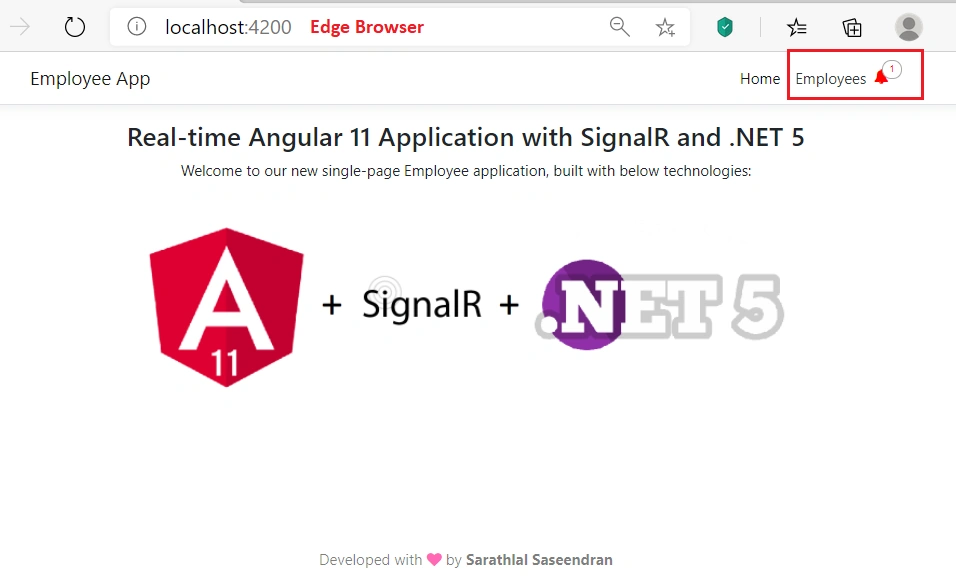
After clicking the Save button, you can notice that one notification is displayed in the bell icon on the menu bar. This notification is not only displayed in this browser, it is also displayed instantaneously in the other Edge browser also.
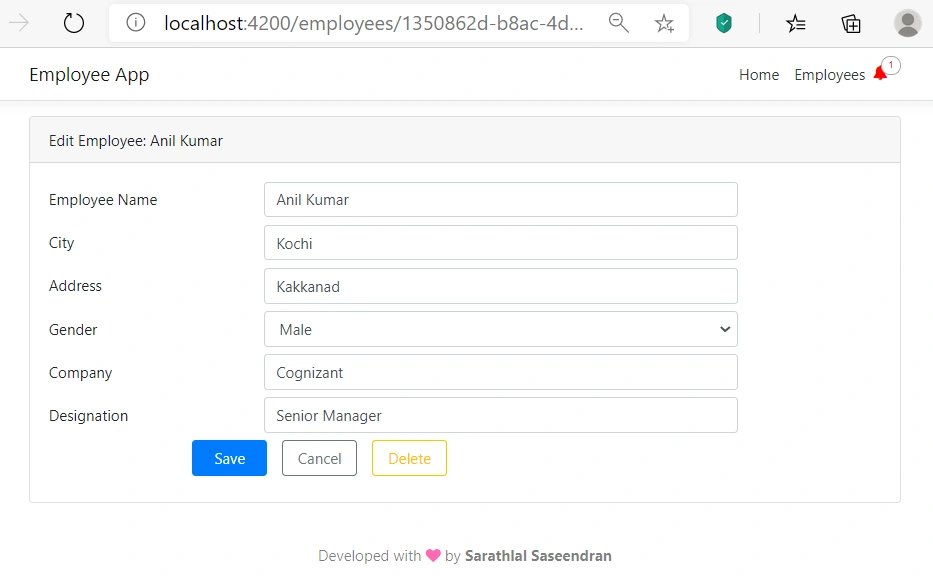
Now, we can edit the employee record from Edge browser.
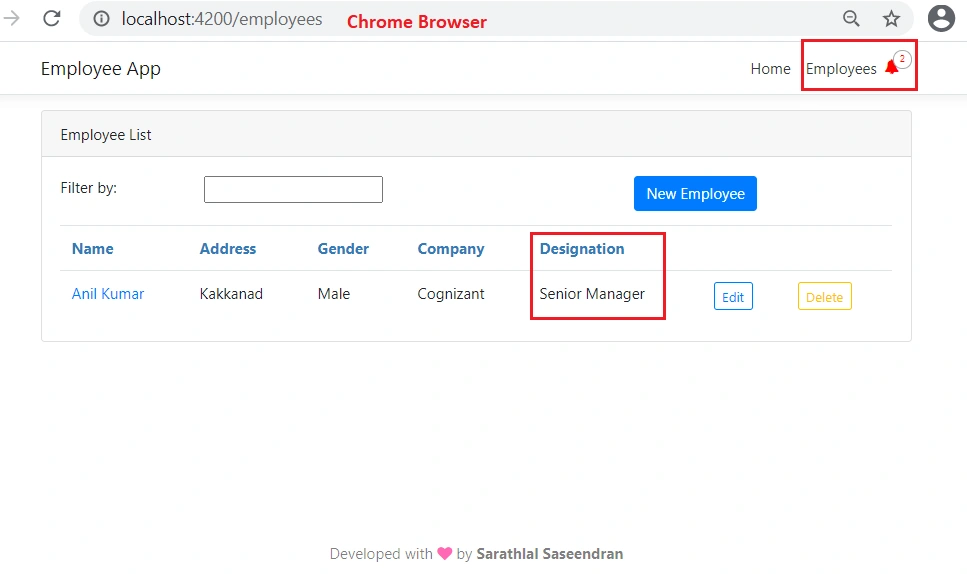
If you check the other Chrome browser, you can see that the employee data is updated instantly along with notification on bell icon.
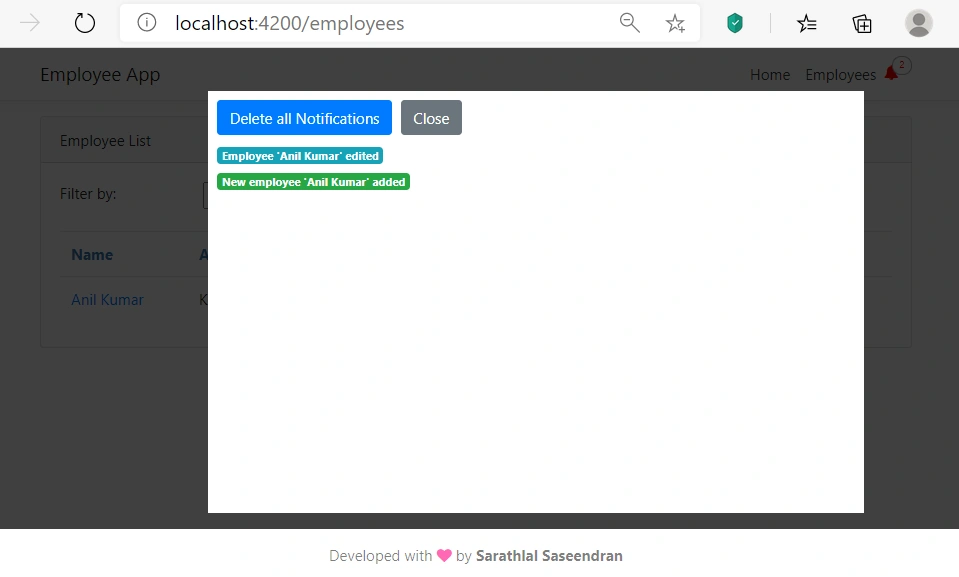
You can click the bell icon, and see the entire notifications inside a popup window.
Conclusion
In this post, we have seen how to create a real-time application with Angular 11, SignalR and .NET 5. We have created an employee app which allow us to add, edit and delete employee data. We have seen how the data is displayed in other connected client browsers instantly. You can download entire source and check it from your end. I have used entity framework for database connectivity. I have already added the migration script along with source code. You can simply create the database using migration command. Please feel free to give your valuable comments after checking the application.
Jawahar RajanPosted Jul 17, 2022, 1:28 PM
Hi Thanks for this good article. Is there a way I can monitor the connection for SignalR say every minute. Once the connection is started. Can I have ping service or similar. Is it possible to monitor the ConnectionState ?
Hamid KhanPosted Apr 16, 2022, 8:07 PM
Thanks for sharing
Praveen KumarPosted Apr 14, 2022, 12:03 PM
In this article, your using signalR but it is ot working. without signalR also we can send notification, are you missing any thing
Chalew TesfayePosted Sep 2, 2021, 3:28 PM
Just thank you
bishoe nbPosted Aug 14, 2021, 3:29 PM
Thanks for this great lesson
fintifati sintiPosted Aug 4, 2021, 12:36 PM
Very Helpful, thank you
Help TeamzPosted Jun 17, 2021, 4:52 AM
Access to fetch at 'http://localhost:62769/notify/negotiate?negotiateVersion=1' from origin 'http://localhost:57444' has been blocked by CORS policy: Response to preflight request doesn't pass access control check: The value of the 'Access-Control-Allow-Credentials' header in the response is '' which must be 'true' when the request's credentials mode is 'include'. Error Showing Like this
Help TeamzPosted Jun 17, 2021, 4:52 AM
Access to fetch at 'http://localhost:62769/notify/negotiate?negotiateVersion=1' from origin 'http://localhost:57444' has been blocked by CORS policy: Response to preflight request doesn't pass access control check: The value of the 'Access-Control-Allow-Credentials' header in the response is '' which must be 'true' when the request's credentials mode is 'include'.
John ChandlerPosted Jun 14, 2021, 8:38 PM
Awesome! Thanks for the full detailed example!
Nedim KeskinPosted Mar 30, 2021, 5:51 PM
How can sending messages to some clients, according to the conditions ( parameters) ?
Nedim KeskinPosted Mar 30, 2021, 3:54 PM
Good explanation. :-) :-)
Jahan AlemPosted Mar 13, 2021, 11:50 PM
Hi!, Please tell me, why didn't you implement BroadcastMessage() method in the backend? You just defined an Interface?
Jahan AlemPosted Mar 13, 2021, 11:47 PM
That's great!
Hamid KhanPosted Feb 17, 2021, 3:18 PM
Very well explain
Ajith VsPosted Feb 1, 2021, 11:20 PM
Well explained sarath
Humayun Kabir MamunPosted Jan 24, 2021, 9:27 AM
Well explained ...
Kishan ZalariyaPosted Jan 23, 2021, 7:13 PM
Good explanation.
Rijwan AnsariPosted Jan 23, 2021, 12:40 PM
Good one .....
Arun Kumar SinghPosted Jan 23, 2021, 9:25 AM
Great keep it up