

For this here's the figure:
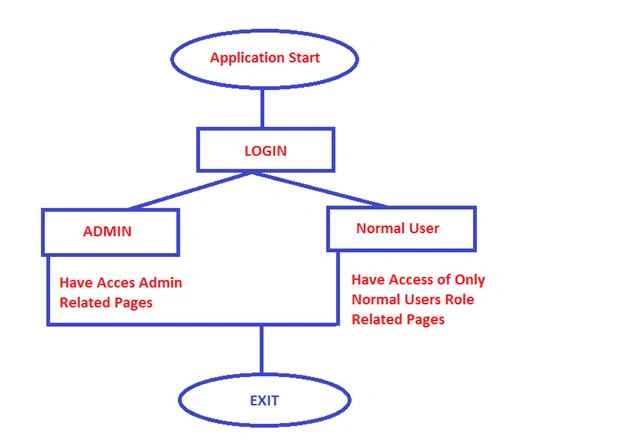
Figure 1
Now open Visual Studio, then New Project.
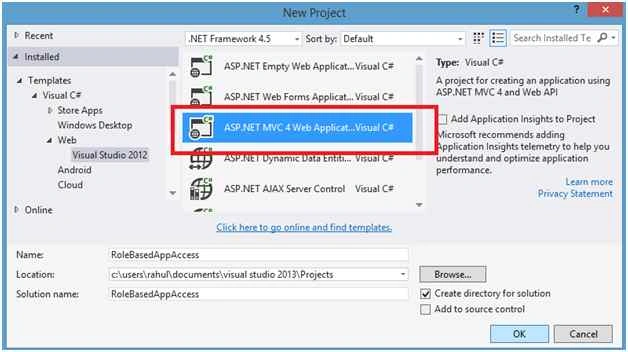
Figure 2
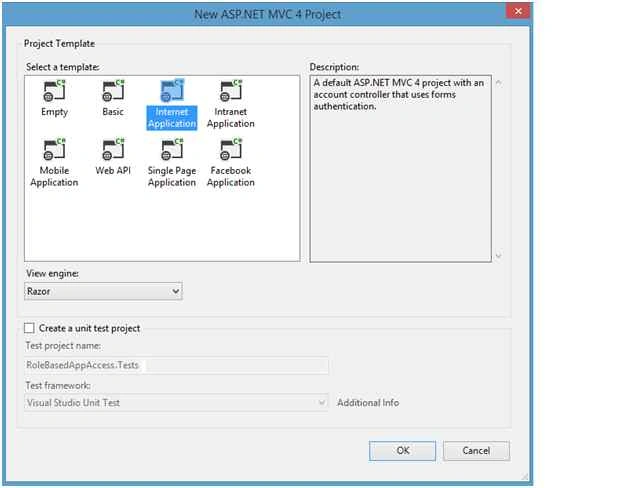
Figure 3
For User and Role I am going to use Application default database as in the following screenshot:
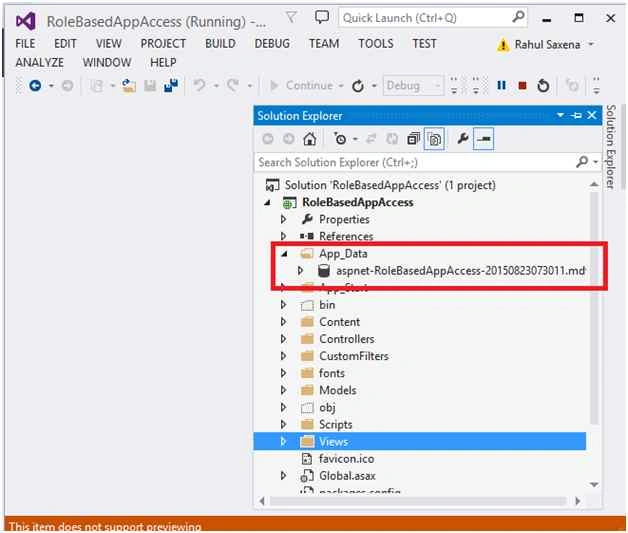
Figure 4
Now we will write code to manage role mean, Add new role, View All Role. Right click on Controllers folder and Add New Controller.
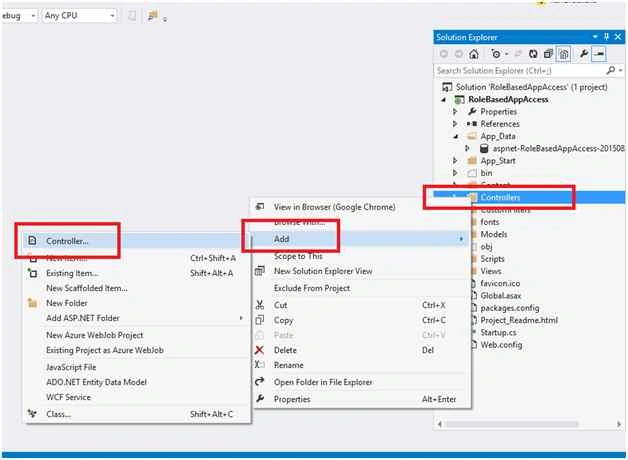
Figure 5
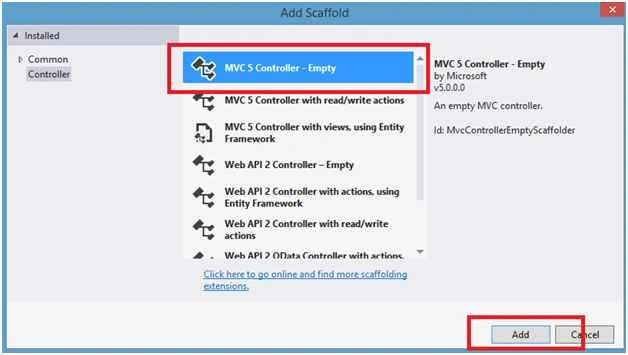
Figure 6
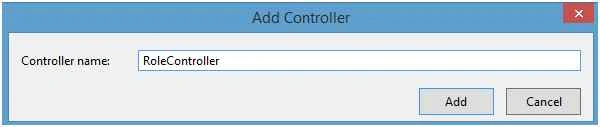
Figure 7
Now here in this RoleController write code to view and add new role. Here I will use ApplicationDbContext as in the following figure 4.
RoleController
- using System;
- using System.Collections.Generic;
- using System.Linq;
- using System.Web;
- using System.Web.Mvc;
- using RoleBasedAppAccess.Models;
- using Microsoft.AspNet.Identity.EntityFramework;
- namespace RoleBasedAppAccess.Controllers
- {
- public class RoleController : Controller
- {
- ApplicationDbContext context;
- public RoleController()
- {
- context = new ApplicationDbContext();
- }
- /// <summary>
- /// Get All Roles
- /// </summary>
- /// <returns></returns>
- public ActionResult Index()
- {
- var Roles = context.Roles.ToList();
- return View(Roles);
- }
- /// <summary>
- /// Create a New role
- /// </summary>
- /// <returns></returns>
- public ActionResult Create()
- {
- var Role = new IdentityRole();
- return View(Role);
- }
- /// <summary>
- /// Create a New Role
- /// </summary>
- /// <param name="Role"></param>
- /// <returns></returns>
- [HttpPost]
- public ActionResult Create(IdentityRole Role)
- {
- context.Roles.Add(Role);
- context.SaveChanges();
- return RedirectToAction("Index");
- }
- }
- }
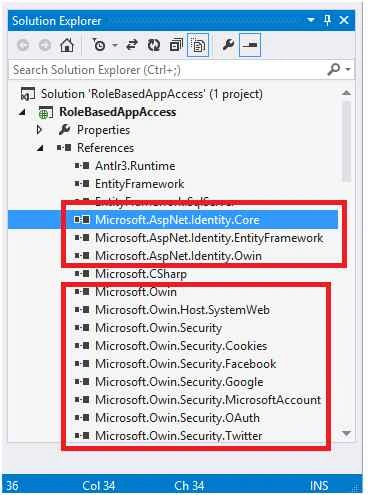
Figure 8
Now Add View on Index ActionMethod of RoleController:
Go to Views, then Role and Index.cshtml.
- @model IEnumerable<Microsoft.AspNet.Identity.EntityFramework.IdentityRole>
- @{
- ViewBag.Title = "Manage Role";
- }
- <h2>Manage Role</h2>
- <table><tr><td style="height:20px;"></td></tr></table>
- <table id="tbrole" style="width:30%; border:solid 4px red; background-color:skyblue; padding-left:10px;">
- <tr>
- <td style="background:green; color:white; padding:10px;">
- Role Name
- </td>
- </tr>
- @foreach (var item in Model)
- {
- <tr>
- <td style="padding:10px; border-bottom:1px solid #ff006e;">
- @item.Name
- </td>
- </tr>
- }
- </table>
- <table>
- <tr><td style="height:20px;"></td></tr>
- <tr>
- <td style="height:20px; text-align:right;">
- @Html.ActionLink("Add New Role", "Create", "Role")
- </td>
- </tr>
- </table>
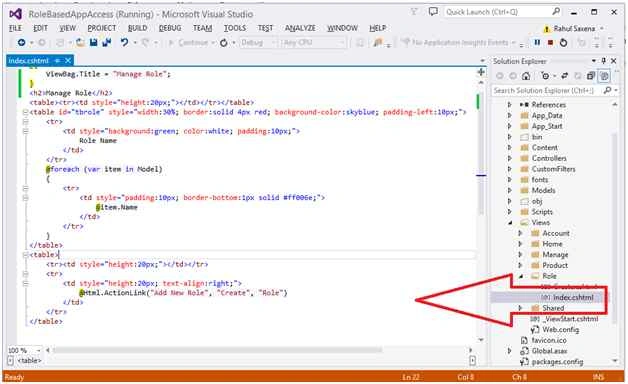
Figure 9
Now again right click on Create ActionMethod in RoleController, then click Add View.
Go to Views, then Role and Create.cshtml.
- @model Microsoft.AspNet.Identity.EntityFramework.IdentityRole
- @{
- ViewBag.Title = "Add New Role";
- }
- <h2>Add New Role:</h2>
- <style type="text/css">
- #tbrole, .c {
- border: double;
- }
- </style>
- @using (Html.BeginForm())
- {
- <table style="width:40%; border:solid 4px red; background-color:skyblue; padding:10px;">
- <tr>
- <td style="background:green; color:white; padding:10px;">Role Name:</td>
- <td style="background:green; color:white; padding:10px;">
- @Html.EditorFor(m => m.Name)
- </td>
- </tr>
- <tr><td style="height:20px;" colspan="2"></td></tr>
- <tr><td></td><td><input type="submit" value="Create Role" /></td></tr>
- <tr><td style="height:20px;" colspan="2"></td></tr>
- </table>
- }
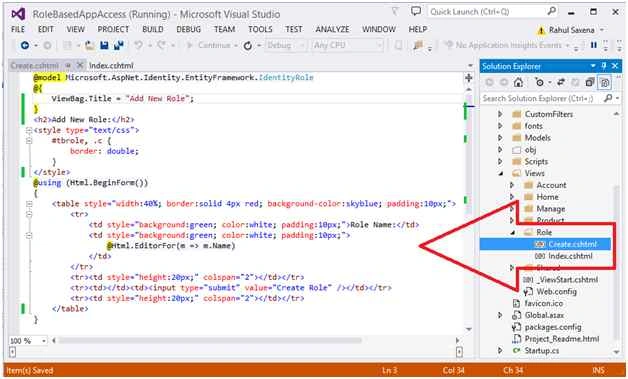
Figure 10
- <div class="navbar-collapse collapse">
- <ul class="nav navbar-nav">
- <li>@Html.ActionLink("Manage Role", "Index", "Role")</li>
- </ul>
- @Html.Partial("_LoginPartial")
- </div>
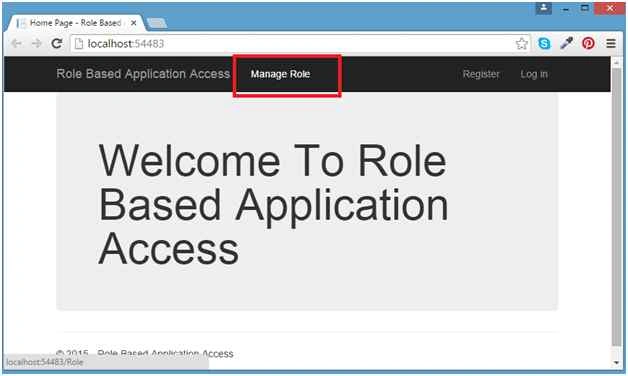
Figure 11
See Manage Role Menu and Click.
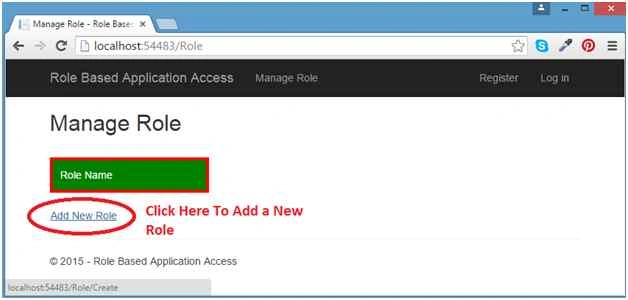
Figure 12
Click Add New Role
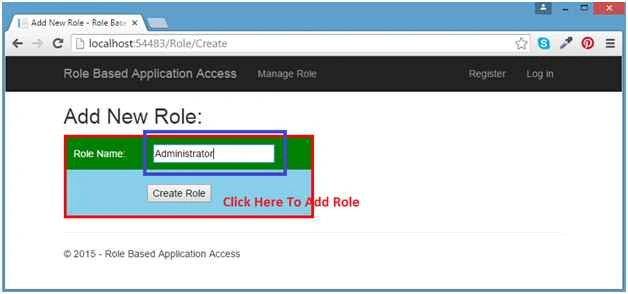
Figure 13
Enter your Role Name and click Create Role Button.
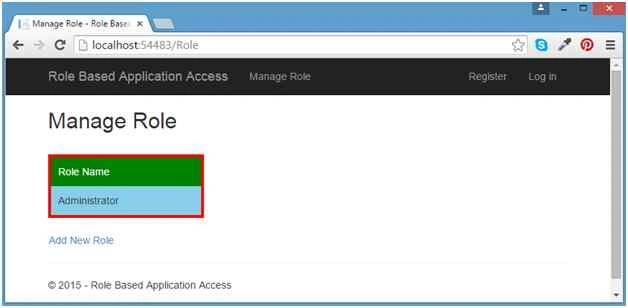
Figure 14
See your available roles. Now I added one more role i.e.: User.
Now see these roles in your ASP.NET database.
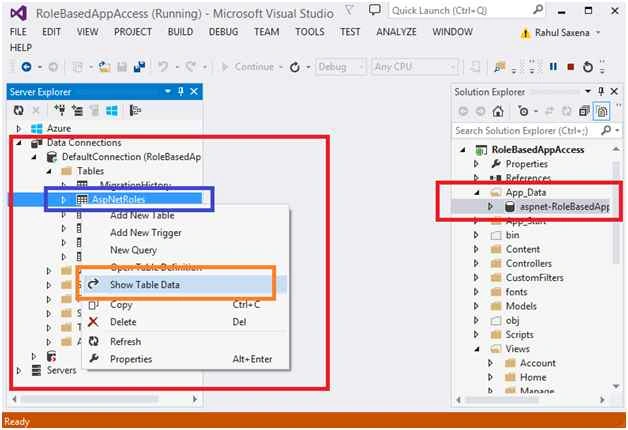
Figure 15
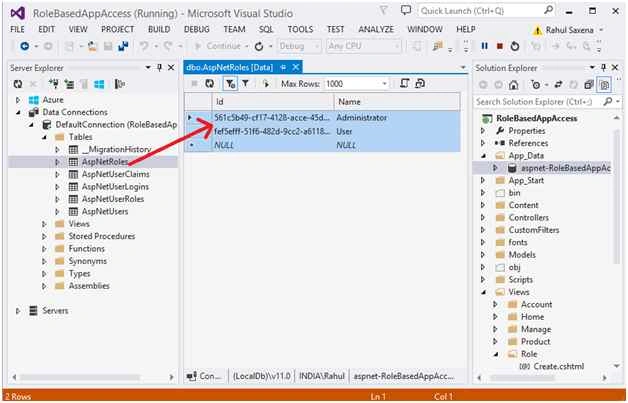
Figure 16
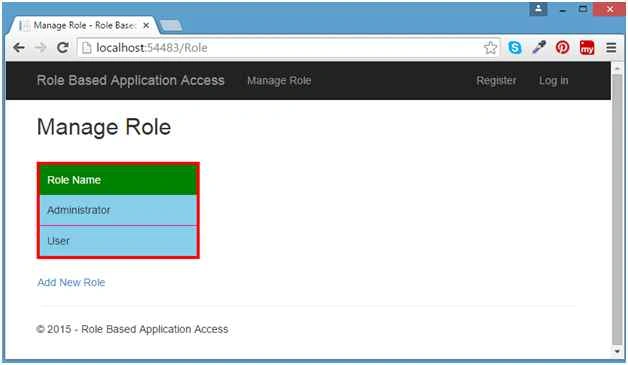
Figure 17
Now add users to your application, so now open Controller and go to AccountController.
Create an instance of ApplicationDbContext as in the following code snippet:
- ApplicationDbContext context;
- public AccountController()
- {
- context = new ApplicationDbContext();
- }
- // GET: /Account/Register
- [AllowAnonymous]
- public ActionResult Register()
- {
- ViewBag.Name = new SelectList(context.Roles.ToList(), "Name", "Name");
- return View();
- }
Go to My Views, then Account and Register.cshtml:
- @model RoleBasedAppAccess.Models.RegisterViewModel
- @{
- ViewBag.Title = "Register";
- }
- <h2>@ViewBag.Title.</h2>
- @using (Html.BeginForm("Register", "Account", FormMethod.Post, new { @class = "form-horizontal", role = "form" }))
- {
- @Html.AntiForgeryToken()
- <h4>Create a new account.</h4>
- <hr />
- @Html.ValidationSummary("", new { @class = "text-danger" })
- <div class="form-group">
- @Html.LabelFor(m => m.Email, new { @class = "col-md-2 control-label" })
- <div class="col-md-10">
- @Html.TextBoxFor(m => m.Email, new { @class = "form-control" })
- </div>
- </div>
- <div class="form-group">
- @Html.LabelFor(m => m.Password, new { @class = "col-md-2 control-label" })
- <div class="col-md-10">
- @Html.PasswordFor(m => m.Password, new { @class = "form-control" })
- </div>
- </div>
- <div class="form-group">
- @Html.LabelFor(m => m.ConfirmPassword, new { @class = "col-md-2 control-label" })
- <div class="col-md-10">
- @Html.PasswordFor(m => m.ConfirmPassword, new { @class = "form-control" })
- </div>
- </div>
- <!--Select the Role Type for the User-->
- <div class="form-group">
- @Html.Label("Select Your User Type", new { @class = "col-md-2 control-label" })
- <div class="col-md-10">
- @*@Html.DropDownList("Name")*@
- @Html.DropDownList("Name", (SelectList)ViewBag.Name, "--Choose Role--")
- </div>
- </div>
- <!--Ends Here-->
- <div class="form-group">
- <div class="col-md-offset-2 col-md-10">
- <input type="submit" class="btn btn-default" value="Register" />
- </div>
- </div>
- }
- @section Scripts {
- @Scripts.Render("~/bundles/jqueryval")
- }
- [HttpPost]
- [AllowAnonymous]
- [ValidateAntiForgeryToken]
- public async Task<ActionResult> Register(RegisterViewModel model)
- {
- if (ModelState.IsValid)
- {
- var user = new ApplicationUser { UserName = model.Email, Email = model.Email };
- var result = await UserManager.CreateAsync(user, model.Password);
- if (result.Succeeded)
- {
- //Assign Role to user Here
- await this.UserManager.AddToRoleAsync(user.Id, model.Name);
- //Ends Here
- await SignInManager.SignInAsync(user, isPersistent: false, rememberBrowser: false);
- return RedirectToAction("Index", "Home");
- }
- AddErrors(result);
- }
- // If we got this far, something failed, redisplay form
- return View(model);
- }
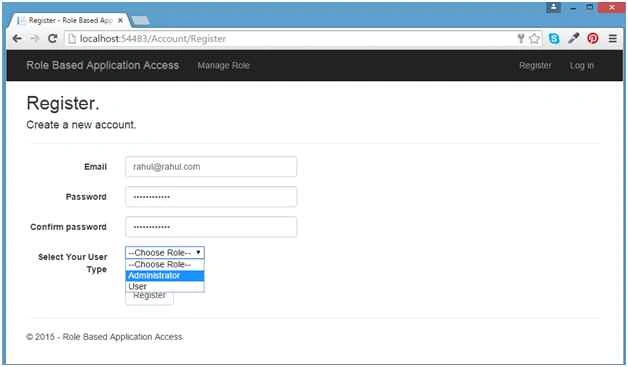
Figure 18
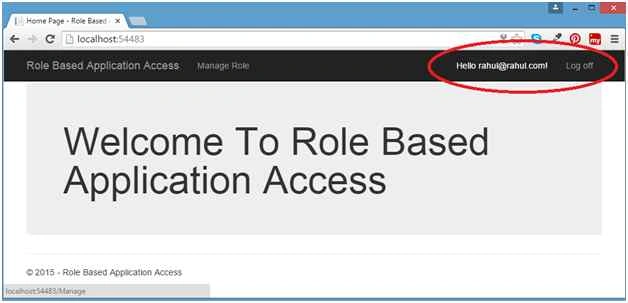
Figure 19
Now again make a registration.
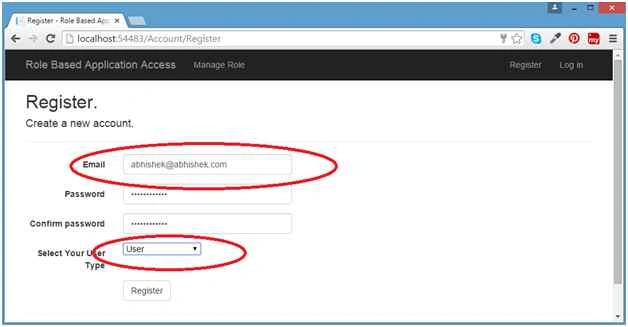
Figure 20
Now see your data in your Server Explorer:
AspNetUsers
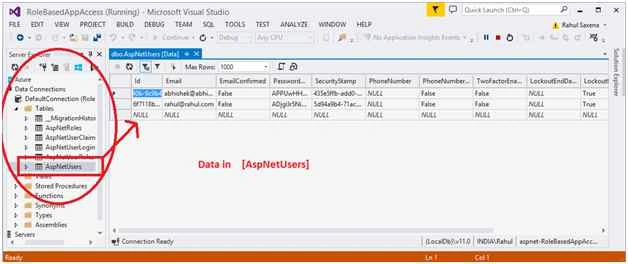
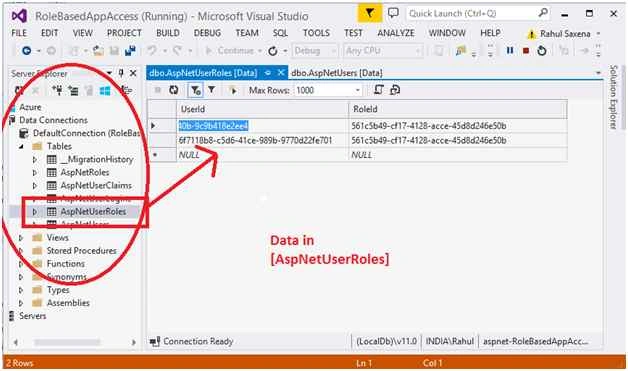
Figure 22
Now suppose we have 2 pages in my application. I want the Admin to access only Admin page and normal user can access User page. I am going to give link on header for these 2 pages.
So for this I am going to add a Folder, then CustomFilters and Add here a class-> AuthLogAttribute.cs and write the following code:
- using System;
- using System.Collections.Generic;
- using System.Linq;
- using System.Web;
- using System.Web.Mvc;
- namespace RoleBasedAppAccess.CustomFilters
- {
- public class AuthLogAttribute : AuthorizeAttribute
- {
- public AuthLogAttribute()
- {
- View = "AuthorizeFailed";
- }
- public string View { get; set; }
- /// <summary>
- /// Check for Authorization
- /// </summary>
- /// <param name="filterContext"></param>
- public override void OnAuthorization(AuthorizationContext filterContext)
- {
- base.OnAuthorization(filterContext);
- IsUserAuthorized(filterContext);
- }
- /// <summary>
- /// Method to check if the user is Authorized or not
- /// if yes continue to perform the action else redirect to error page
- /// </summary>
- /// <param name="filterContext"></param>
- private void IsUserAuthorized(AuthorizationContext filterContext)
- {
- // If the Result returns null then the user is Authorized
- if (filterContext.Result == null)
- return;
- //If the user is Un-Authorized then Navigate to Auth Failed View
- if (filterContext.HttpContext.User.Identity.IsAuthenticated)
- {
- // var result = new ViewResult { ViewName = View };
- var vr = new ViewResult();
- vr.ViewName = View;
- ViewDataDictionary dict = new ViewDataDictionary();
- dict.Add("Message", "Sorry you are not Authorized to View this Page");
- vr.ViewData = dict;
- var result = vr;
- filterContext.Result = result;
- }
- }
- }
- }
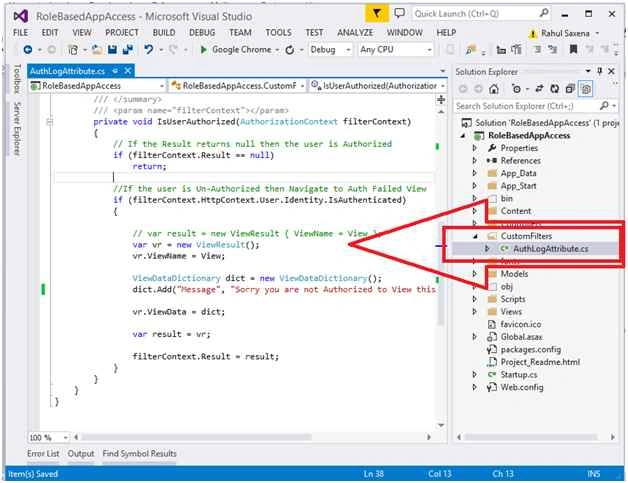
Figure 23
Now Add 2 Controllers: 1. Admin 2. Users.
Add view for both controller as in the following screenshot:
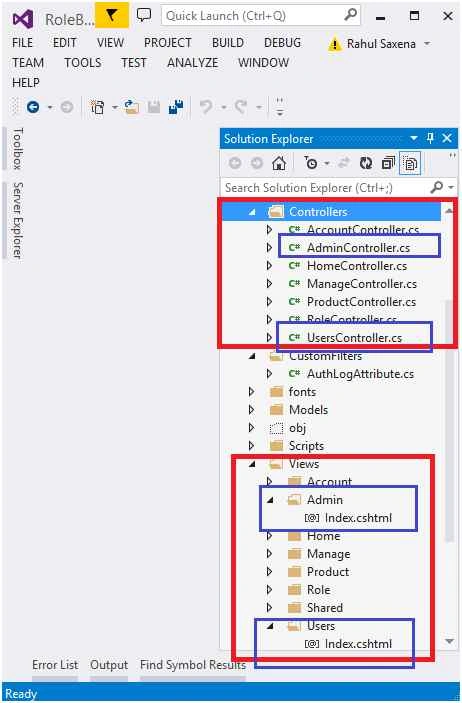
Figure 24
Now Set Access permission. Open Admin Controller and write the following code above your index action method:
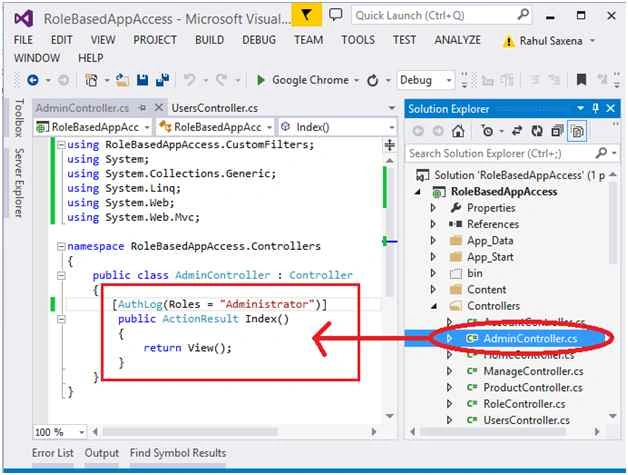
Figure 25
Controller-> Users:
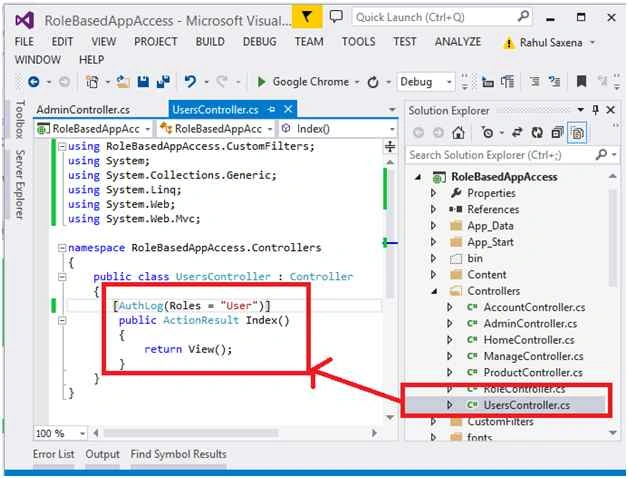
Figure 26
Now open Views, then Shared and click _Layout.cshtml. After that add link button to add Access to these 2 pages:
- <div class="navbar-collapse collapse">
- <ul class="nav navbar-nav">
- <li>@Html.ActionLink("Manage Role", "Index", "Role")</li>
- <li>@Html.ActionLink("ADMIN PAGE", "Index", "Admin")</li>
- <li>@Html.ActionLink("USER PAGE", "Index", "Users")</li>
- </ul>
- @Html.Partial("_LoginPartial")
- </div>
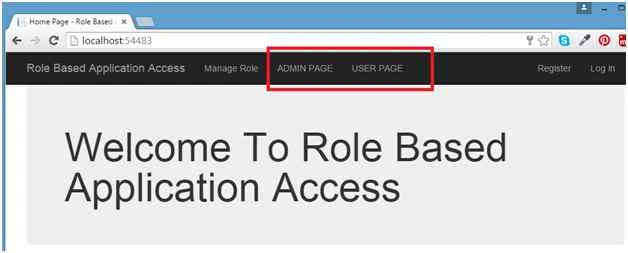
Figure 27
Click on ADMIN PAGE Link:
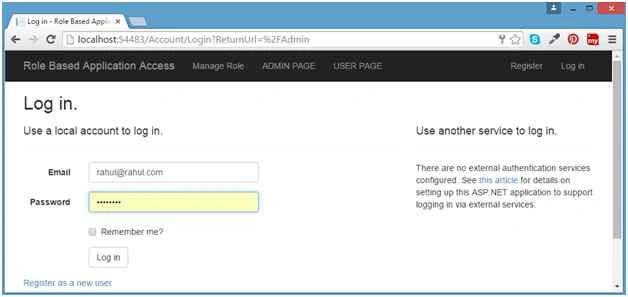
Figure 28
You will redirect to login page. Now login with [email protected] which is in Admin Role.
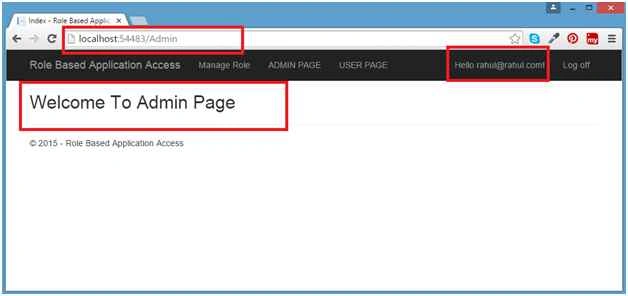
Figure 29
Now click on USER PAGE as [email protected] is an ADMIN user and can’t access others Role page:
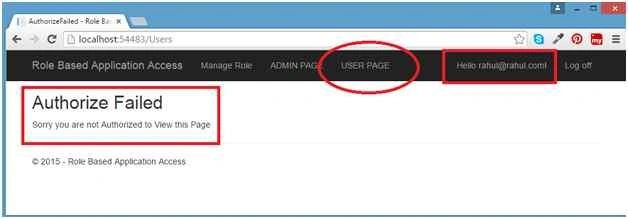
Figure 30
Now Login as [email protected] which is in User Role:
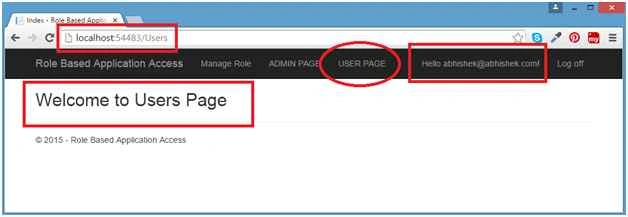
Figure 31
If you try to access ADMIN PAGE, the following error message will be visible:
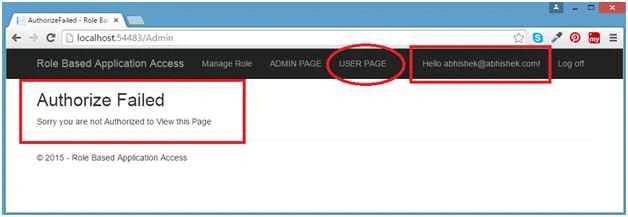
Figure 32
skyline lePosted Aug 21, 2018, 3:07 PM
I am facing error on role controller, code: var Roles = context.Roles.Tolist(); it saying error on .Roles error message: you are missing using directives or an assembly reference?
Bhaskar ReddyPosted Mar 21, 2018, 11:30 PM
The ViewData item that has the key 'Name' is of type 'System.String' but must be of type 'IEnumerable<SelectListItem> here the error is
Bhaskar ReddyPosted Mar 21, 2018, 11:30 PM
Getting the error it is related to dropdown list error try to explain in brif
Bhaskar ReddyPosted Mar 21, 2018, 11:29 PM
The ViewData item that has the key 'Name' is of type 'System.String' but must be of type 'IEnumerable<SelectListItem>
Ramendra kumar vermaPosted Feb 23, 2018, 4:24 AM
Can you provide db script
bishoe nbPosted Jan 27, 2018, 6:02 AM
The ViewData item that has the key 'Name' is of type 'System.String' but must be of type 'IEnumerable<SelectListItem>
Aieza KhanPosted Jan 18, 2018, 1:16 AM
I got this error The ViewData item that has the key 'Name' is of type 'System.String' but must be of type 'IEnumerable<SelectListItem>'.
suraj mandalPosted Nov 2, 2017, 3:12 AM
Thank you so much sir for ur code it helped me a lot
lee scPosted Mar 31, 2017, 7:51 AM
Sorry for interruptionI get this error while register The ViewData item that has the key 'Name' is of type 'System.String' but must be of type 'IEnumerable<SelectListItem>'. Source Error: Line 35: <div class="col-md-10"> Line 36: @*@Html.DropDownList("Name")*@ Line 37: @Html.DropDownList("Name", (SelectList) ViewBag.Name, "--Choose Role--") Line 38: </div> Line 39: </div>
Delpin Susai RajPosted Aug 28, 2016, 6:44 AM
Nice
Rahul Kumar SaxenaPosted Sep 24, 2015, 3:17 AM
Welcome Kinshuk goel
Kapil GoelPosted Sep 24, 2015, 2:46 AM
thanx sir
Rahul Kumar SaxenaPosted Sep 23, 2015, 3:39 AM
Kinshuk goel Check you Role Drop Down here.. in Register.cshtml...
Rahul Kumar SaxenaPosted Sep 20, 2015, 4:36 AM
Thanks. Saineshwar Bageri
Saineshwar BageriPosted Sep 20, 2015, 1:06 AM
nice one
Rahul Kumar SaxenaPosted Sep 17, 2015, 10:55 PM
Thank u Ankit Bansal
Ankit BansalPosted Sep 17, 2015, 9:32 PM
Great one..
Rahul Kumar SaxenaPosted Sep 17, 2015, 12:02 PM
Thanks Santhakumar Munuswamy
Santhakumar MunuswamyPosted Sep 17, 2015, 10:36 AM
Thanks for nice article:)
Rahul Kumar SaxenaPosted Sep 14, 2015, 11:21 PM
Thank u Pankaj Kumar Choudhary
Rahul Kumar SaxenaPosted Sep 14, 2015, 11:21 PM
Thank u Akash Malhotra
Rahul Kumar SaxenaPosted Sep 14, 2015, 11:21 PM
Thank u Mohammed Ibrahim
Pankaj Kumar ChoudharyPosted Sep 14, 2015, 9:44 PM
Nice Article Sir..........
Akash MalhotraPosted Sep 14, 2015, 2:28 PM
Nice article
Mohammed IbrahimPosted Sep 14, 2015, 1:07 PM
nice..
Rahul Kumar SaxenaPosted Sep 14, 2015, 12:00 PM
Thanks Rajeesh Menoth
Rahul Kumar SaxenaPosted Sep 14, 2015, 12:00 PM
Thanks Humayun Kabir Mamun
Rahul Kumar SaxenaPosted Sep 14, 2015, 12:00 PM
Thanks Ujjval shukla
Rahul Kumar SaxenaPosted Sep 14, 2015, 11:59 AM
Thanks Ratnesh Singh
Rahul Kumar SaxenaPosted Sep 14, 2015, 11:59 AM
Thanks Karthikeyan K
Rahul Kumar SaxenaPosted Sep 14, 2015, 11:58 AM
Thanks Harshad Pansuriya
Rahul Kumar SaxenaPosted Sep 14, 2015, 11:58 AM
Thank u Upendra Pratap Shahi
Rajeesh MenothPosted Sep 14, 2015, 11:57 AM
Good One,Thanks for sharing...
Humayun Kabir MamunPosted Sep 14, 2015, 6:54 AM
Nice...
Ujjval ShuklaPosted Sep 14, 2015, 6:12 AM
Useful article sir..
Ratnesh SinghPosted Sep 14, 2015, 6:07 AM
Good one..
Karthikeyan KPosted Sep 14, 2015, 6:03 AM
Good one sir...Thanks for sharing
Harshad PansuriyaPosted Sep 14, 2015, 5:38 AM
Nice One
Upendra Pratap ShahiPosted Sep 14, 2015, 5:30 AM
nice share sir