

In this article, we are going to learn how to implement routing in Angular 2 with example.
Routing is a concept which helps users to navigate from one view to another view of the application. Similarly, routing in Angular 2 helps users to navigate from one view to another view depending upon the URL which user enters in the browser. In component based architecture of Angular 2, Angular looks into the routes array, match the path as per the route requested and loads the component relevant to the requested route as well as makes available the relevant data for that particular route.
So, let’s look into some core concepts of Angular 2 routing step by step implementation below. Here I am using the same “StudentList” example which I have used in my previous articles so far. You can download the latest code from here.
Step 1. Route Configurations
Base RefFirst thing we need to add the base tag to the index.html file in the root folder src/index.html.
- <base href="/src/">
Import Modules
We need to import two modules from ‘@angular/router’ library package for implementing the routing -
- import { Routes, RouterModule } from '@angular/router';
Routes
The Routes is an array of routes objects defined for the Angular application. We need to make an array of Routes type and add the route objects inside the array. As route object, we set up the path and the components which we want to use for that particular path.
- export const routes: Routes = [
- { path: '', redirectTo: 'list-student', pathMatch: 'full' },
- { path: 'list-student', component: StudentListComponent },
- { path: 'course-list', component: CourseComponent }
- ];
Each route has many properties. Some of those properties are –
- Path – URL to be shown in the browser.
- Component – Component to be load when the application is on specific route.
- RedirectTo – Configure the route redirect to another route
- PathMatch – PathMatch property tells Angular how it should match the URL provided in order to redirect to specific route.
- Children – Tell the Angular about the child route objects on that particular route.
To implement the routing in Angular 2, we need to import the router’s module into our application module to register the route objects. That is called RouterModule. To provide information about our routes or components or we can say like to define our route config, Angular RouteModule provides us two static methods –
- forRoot
This is used when defining the route config for our application in our main module.- export const routing = RouterModule.forRoot(routes);
- forChild
This is used for our featured/child modules rather than our main module and very similar to forRoot method. This is mainly used when we don’t allow to configure our all routes in only main (root) module. Instead, we allow our other modules to configure routes for themselves, which will be import into our main module if needed.- export const routingCourses = RouterModule.forRoot(courseRoutes);
Let’s take a look at code configuration together, and how we’d use this,
app.routes.ts
In src/app/app.routes.ts file, we imported routing modules for implementing routing, imported “StudentList” component as well as “CourseComponent”, created routes config with path and component properties and register it with forRoot method of RouterModule. Look at the highlighted lines below,
- import { Routes, RouterModule } from '@angular/router';
- import { StudentListComponent } from './student/student.component';
- import { CourseComponent } from './course/course.component';
- export const routes: Routes = [
- { path: '', redirectTo: 'list-student', pathMatch: 'full' },
- { path: 'list-student', component: StudentListComponent },
- { path: 'course-list', component: CourseComponent }
- ];
- export const routing = RouterModule.forRoot(routes);
Note
When our application will start, it will navigate to the empty route by default. We configured the router to redirect to a “list-student” route by default using “redirectTo” property.
app.component.ts
In src/app/app.component.ts file, we imported our routing module (which we created above) inside our main application module. Look at the highlighted lines below,
- import { NgModule } from '@angular/core';
- import { BrowserModule } from '@angular/platform-browser';
- import { routing } from './app.routes';
- import { AppComponent } from './app.component';
- import { StudentListComponent } from './student/student.component';
- import { courseCategoryPipe } from './student/student.coursepipe';
- import { SearchBarComponent } from './Shared/SearchBar/searchbar.component';
- import { CourseComponent } from './course/course.component';
- @NgModule({
- imports: [BrowserModule, routing],
- declarations: [AppComponent, StudentListComponent, courseCategoryPipe, SearchBarComponent, CourseComponent],
- bootstrap: [ AppComponent ]
- })
- export class AppModule { }
Step 2. Displaying Routes
Router-OutletOnce routes configuration is done, now we need to tell Angular where the components will be loaded. This is done by using a directive “router-outlet”. When the router matches the route and found the component to be load, it will dynamically inject the component inside the router-outlet directive.
- <router-outlet></router-outlet>
RouterLink
To create links to the routes, we use “routerLink” directive in Angular 2 routing like below,
- <a routerLink="/list-student">Student List</a>
Navigating Programmatically
To navigate programmatically to a route, we use navigate function in Angular 2 like below –
- this.router.navigate(['/course-list']);
In app.component.html file, we have added the “router-outlet” directive as shown below –
app.component.html
- <ul class="nav nav-pills">
- <li class="active"><a routerLink="/list-student">Student List</a></li>
- <li><a routerLink="/course-list">Course List</a></li>
- </ul>
- <br/>
- <router-outlet></router-outlet>
Step 3. Components and Templates
As of now we have established the routes, registered them with “RouterModule” and imported them into our main application module. Now, we will take a quick look at components code and their functionalities and will run the project to get the expected output –
- student.component.ts
- import { Component, OnInit} from '@angular/core'
- @Component({
- selector: 'list-student',
- templateUrl: 'app/student/student.component.html'
- })
- export class StudentListComponent implements OnInit {
- students: any[];
- public LoadStudents(filterText: string): void {
- this.students = [
- { studentID: 1, studentName: 'Steve', gender: 'Male', age: 35, course: 'MCA', DOB: '10/12/1982', grade:0.7500,rating:7.5123 },
- { studentID: 2, studentName: 'Bobby', gender: 'Male', age: 32, course: 'MBA', DOB: '12/1/1985', grade: 0.7850, rating: 7.8223 },
- { studentID: 3, studentName: 'Rina', gender: 'Female', age: 45, course: 'B.Tech', DOB: '9/11/1972', grade: 0.8525, rating: 8.5263 },
- { studentID: 4, studentName: 'Alex', gender: 'Female', age: 24, course: 'M.Tech', DOB: '1/1/1993', grade: 0.5540, rating: 5.5123 },
- { studentID: 5, studentName: 'Rahul', gender: 'Male', age: 26, course: 'MCA', DOB: '1/21/1991', grade: 0.9550, rating: 9.5534 },
- ];
- if (filterText != "") {
- var filterStudentList: any[] = [];
- this.students.forEach(stu => {
- if (stu.studentName.toLowerCase().includes(filterText)) {
- filterStudentList.push(stu);
- }
- })
- this.students = filterStudentList;
- }
- }
- ngOnInit() {
- this.LoadStudents("");
- }
- OnStudentSearch(searchTerm: string): void {
- this.LoadStudents(searchTerm);
- }
- }
- student.component.html
- <search-bar (Search)="OnStudentSearch($event)"></search-bar>
- <table class="table table-responsive table-bordered table-striped">
- <thead>
- <tr>
- <th>Student ID</th>
- <th>Name</th>
- <th>Gender</th>
- <th>Age</th>
- <th>Course</th>
- <th>DOB</th>
- <th>Grade</th>
- <th>Rating</th>
- </tr>
- </thead>
- <tbody>
- <tr *ngFor="let s of students;">
- <td>{{s.studentID}}</td>
- <td>{{s.studentName | uppercase}}</td>
- <td>{{s.gender | lowercase}}</td>
- <td>{{s.age}}</td>
- <td>{{s.course | courseCategory}}</td>
- <td>{{s.DOB | date:'yMMMMd' | uppercase }}</td>
- <td>{{s.grade | percent:'.2'}}</td>
- <td>{{s.rating | number:'2.1-2'}}</td>
- </tr>
- </tbody>
- </table>
- course.component.ts
- import { Component, OnInit } from '@angular/core'
- @Component({
- selector: 'course-list',
- templateUrl:'app/course/course.component.html'
- })
- export class CourseComponent implements OnInit {
- courseList: any[];
- getCourses(): void {
- this.courseList = [
- { courseID: 101, courseName: 'BCA', category: 'IT' },
- { courseID: 102, courseName: 'MCA', category: 'IT' },
- { courseID: 103, courseName: 'MBA', category: 'MANAGEMENT' },
- { courseID: 104, courseName: 'B.TECH', category: 'CS' },
- { courseID: 105, courseName: 'B.ARCH', category: 'ARCHITECTURE' },
- { courseID: 106, courseName: 'BBA', category: 'MANAGEMENT' },
- ];
- }
- ngOnInit() {
- this.getCourses();
- }
- }
- course.component.html
- <table class="table table-responsive table-bordered table-striped">
- <thead>
- <tr>
- <th>Course ID</th>
- <th>Name</th>
- <th>Category</th>
- </tr>
- </thead>
- <tbody>
- <tr *ngFor="let s of courseList;">
- <td>{{s.courseID}}</td>
- <td>{{s.courseName | uppercase}}</td>
- <td>{{s.category}}</td>
- </tr>
- </tbody>
- </table>
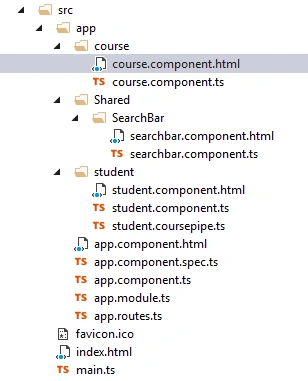
Step 4. Run the project

Build the project and run by pressing Ctrl + F5. And now you will see the output as below,
Summary
In this article, we covered the following topics -
- What is Routing in Angular 2 and what are the main building block of Angular 2 routing?
- How routes are configured in Angular 2 routing?
- What are router-outlet and rouerLink in Angular 2 routing?
- Step by step routing configuration in student application
To read more articles on Angular 2, please check out the below links -
- Learn Angular 2 *ngFor Directive
- trackBy with *ngFor Directive in Angular 2 and other local variables
- Component and nested component in Angular 2
Write to me in the comment box in case you need any help or you have any questions or concerns. Have a good day!
vish GPosted Apr 3, 2018, 8:49 AM
Hello Rahul, Your blog on Angular2 is very insightful and knowledge gaining. Here, I would like to take this moment to check on how can I develop button functionality in angular(scenario is I want to display a button upon radio button selection) Could you please guide me in achieving this scenario.