

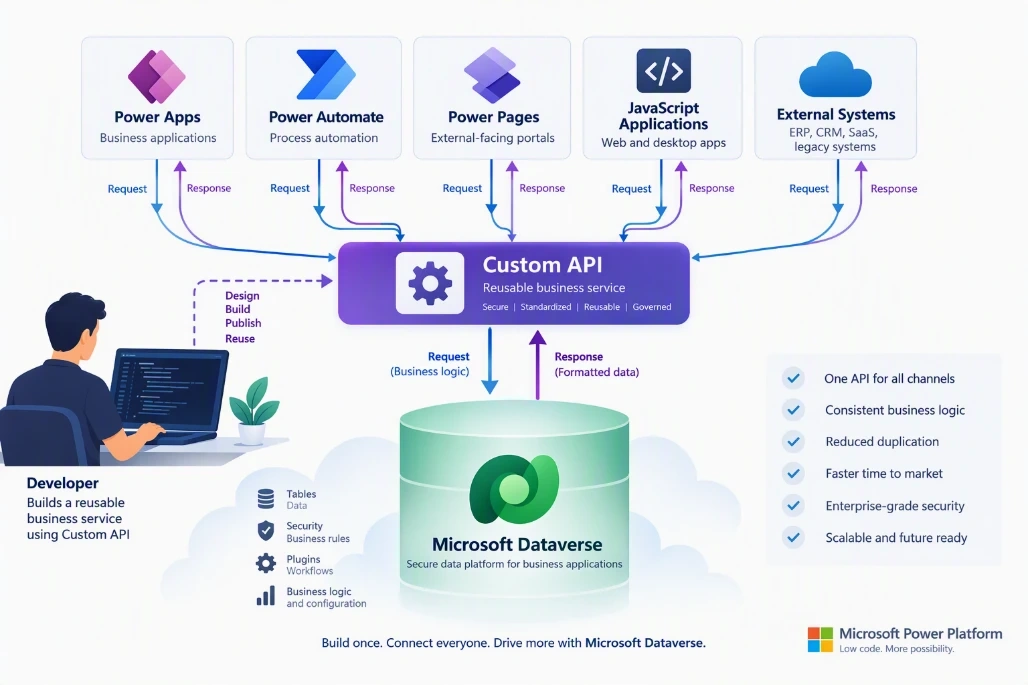
Dataverse Custom APIs are the preferred approach for exposing reusable business logic in Microsoft Dataverse.
In this article, we'll build our first Dataverse Custom API from scratch.
By the end of this guide, you will learn how to:
- Create a Custom API
- Configure Request Parameters
- Configure Response Parameters
- Develop a Plug-in
- Register the Assembly
- Test the Custom API
Business Scenario
Let's assume we need an API that returns customer (contact) details based on a Contact ID.
Input:
ContactId
Output:
FullName
Phone
Prerequisites:
• Visual Studio 2022
• .NET Framework 4.6.2 Class Library
• Microsoft.CrmSdk.CoreAssemblies NuGet Package
• Dataverse Environment
• System Administrator or System Customizer Role
• Plugin Registration Tool
Follow the below steps after the Prerequisites to create your first Dataverse Custom API.
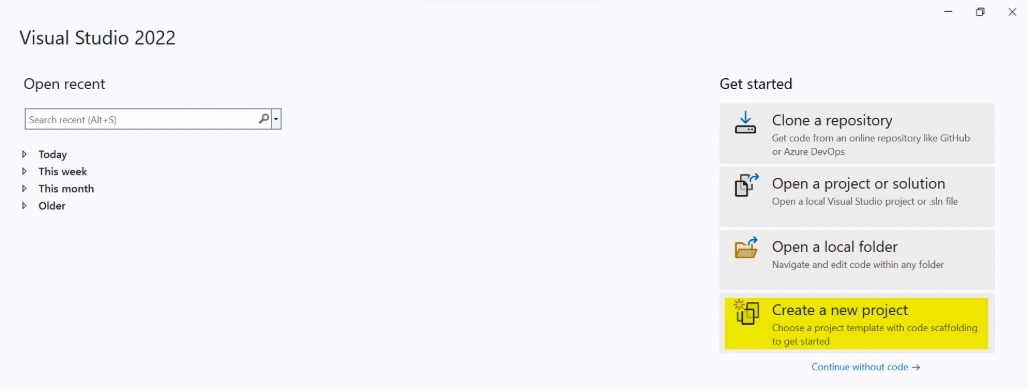
Step 1: Open Visual Studio 2022.

Step 2: Click on Create a new project.
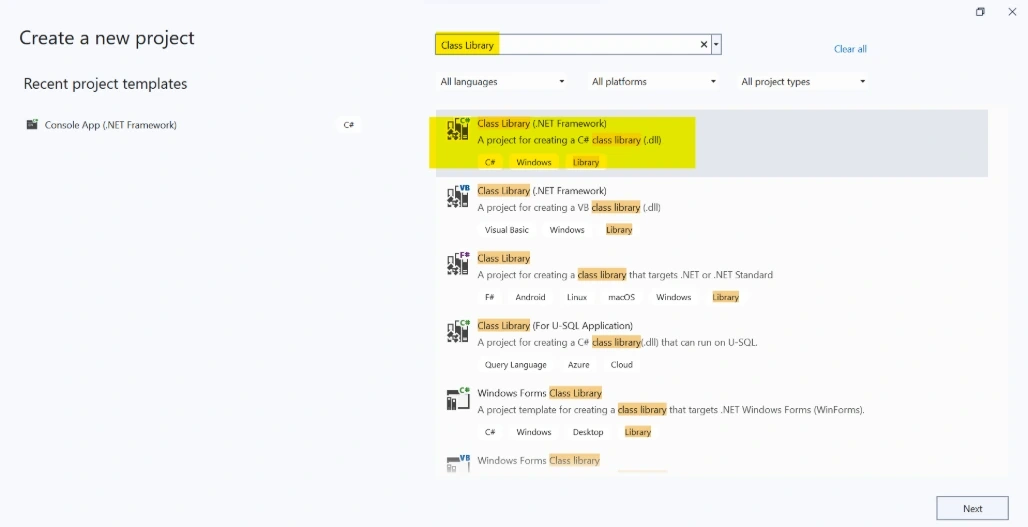
Step 3: Search for Class Library.
Select Class Library (.NET Framework) and Click on Next.
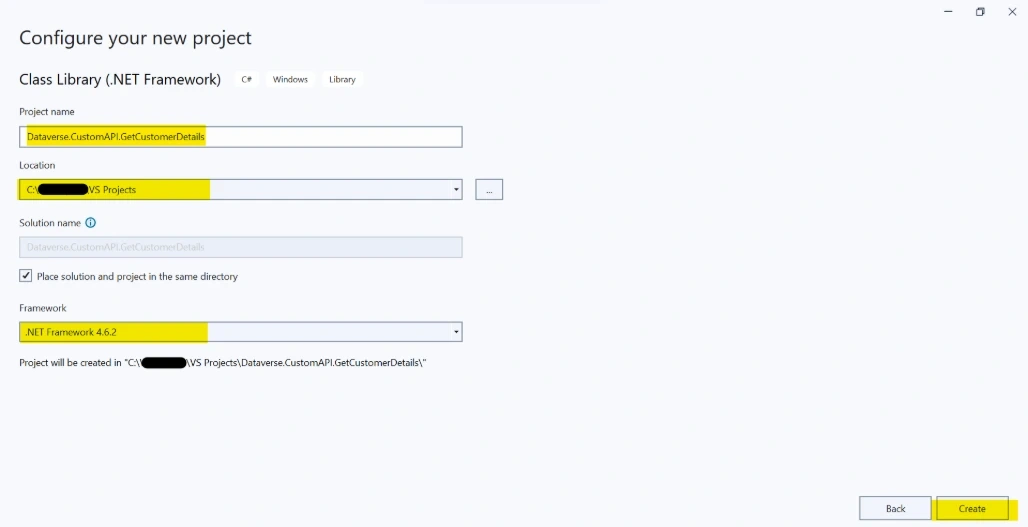
Step 4: Provide the below details and click on Create.
Project name |
Provide the name for the Project (Example: Dataverse.CustomAPI.GetCustomerDetails) |
Location |
Choose the required Location |
Framework |
Choose .NET Framework 4.6.2 |
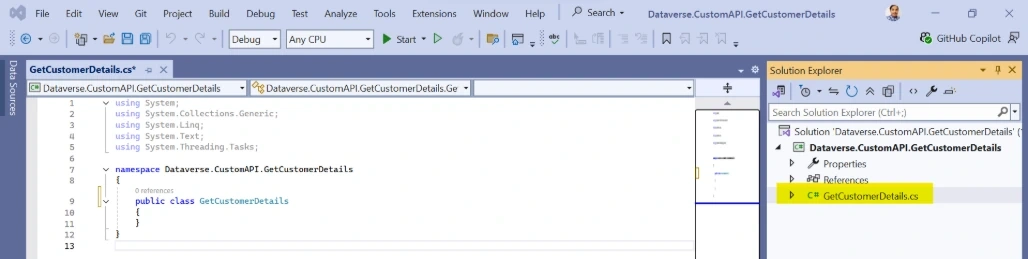
Step 5: Change the Class name form Class1.cs to GetCustomerDetails.cs.
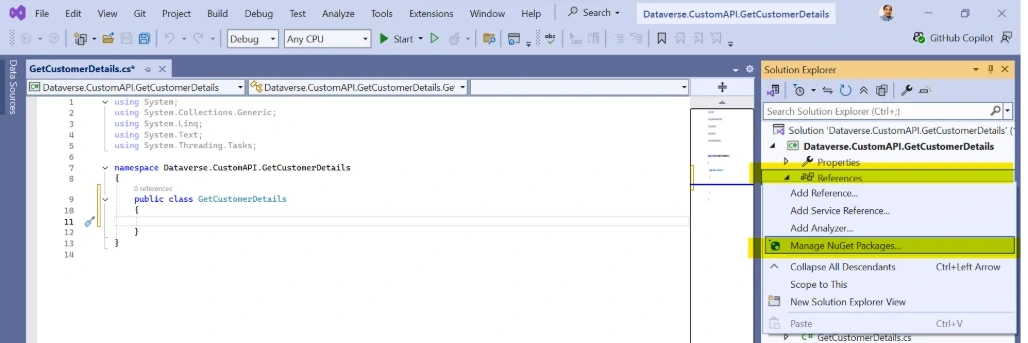
Step 6: Right click on References and Click on Manage NuGet Packages.
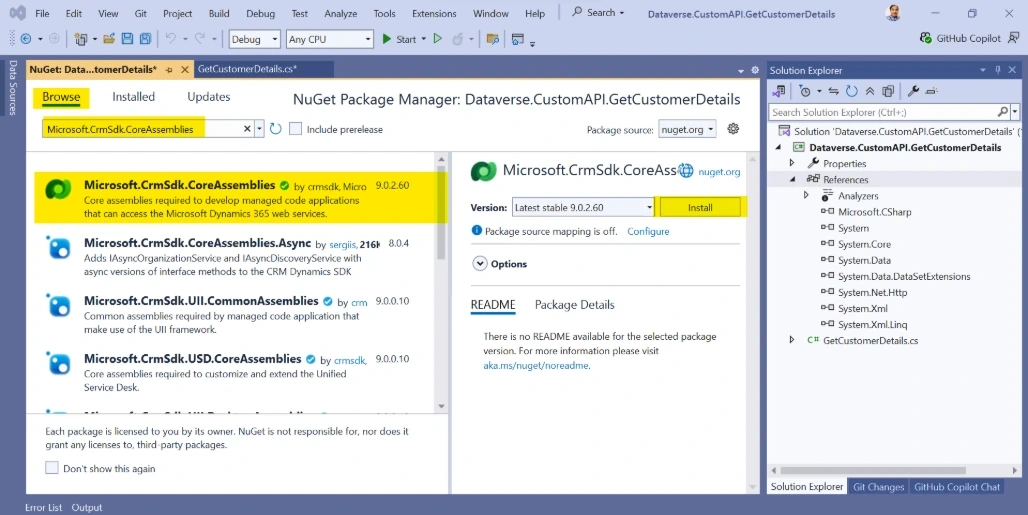
Step 7: Click on Browse and Search for Microsoft.CrmSdk.CoreAssemblies.
Click on Install.
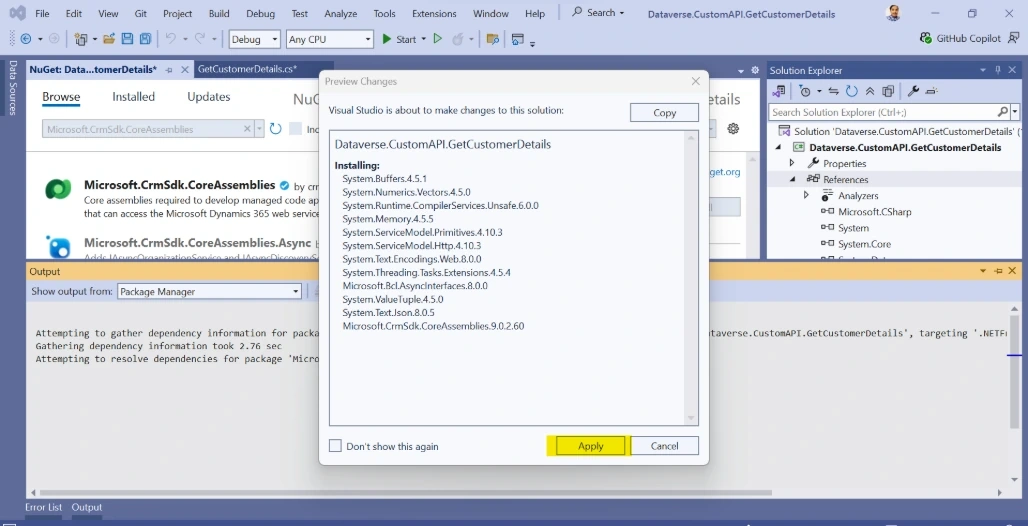
Step 8: Click on Apply.
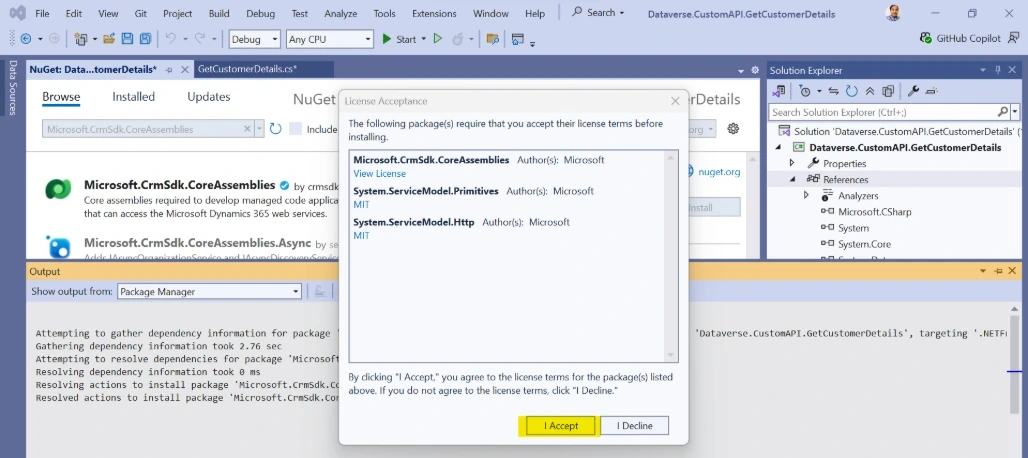
Step 9: Click on I Accept.
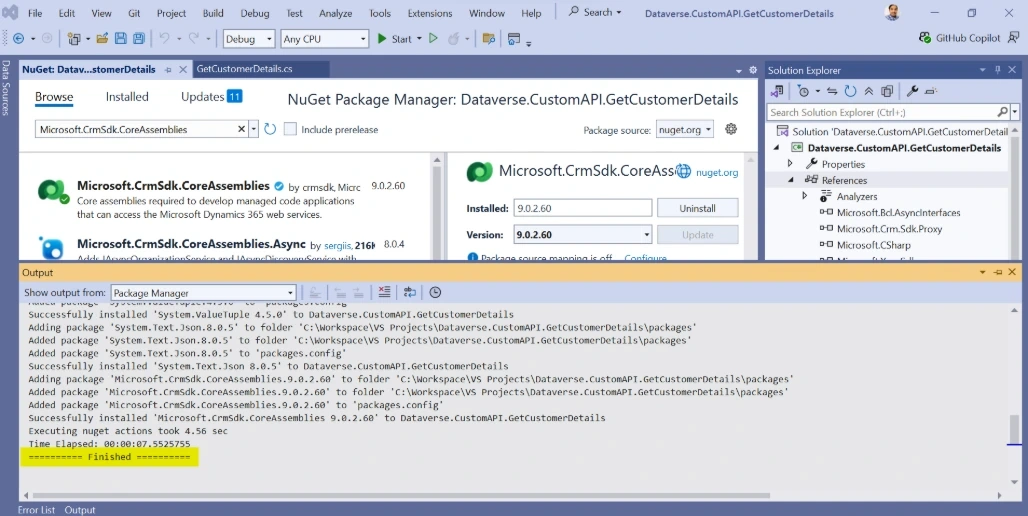
Once successfully package is installed, you can see the below message.
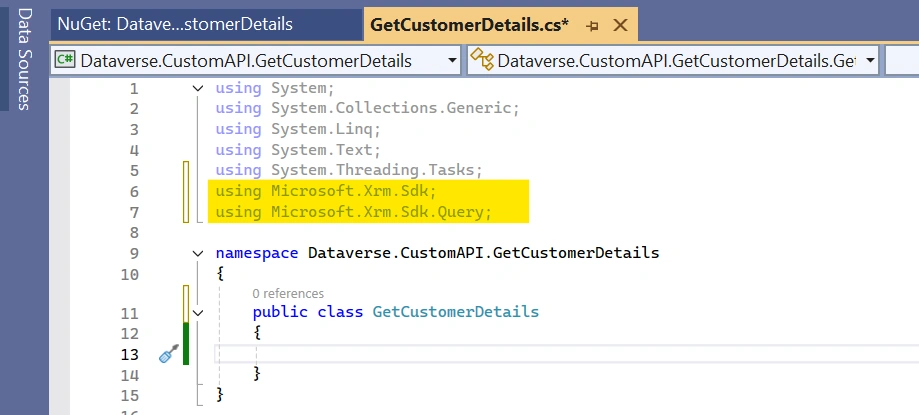
Step 10: Add the below to the namespace references.
using Microsoft.Xrm.Sdk;
using Microsoft.Xrm.Sdk.Query;
Step 11: Copy and Paste the below code.
using Microsoft.Xrm.Sdk;
using Microsoft.Xrm.Sdk.Query;
using System;
namespace Dataverse.CustomAPI.GetCustomerDetails
{
public class GetCustomerDetails : IPlugin
{
public void Execute(IServiceProvider serviceProvider)
{
IPluginExecutionContext context = (IPluginExecutionContext)serviceProvider.GetService(typeof(IPluginExecutionContext));
IOrganizationServiceFactory serviceFactory = (IOrganizationServiceFactory)serviceProvider.GetService(typeof(IOrganizationServiceFactory));
IOrganizationService service = serviceFactory.CreateOrganizationService(context.UserId);
// Get the ContactId from the input parameters
Guid contactId = (Guid)context.InputParameters["ContactId"];
// Retrieve the contact record from Dataverse based on the provided ContactId
Entity contact = service.Retrieve(
"contact",
contactId,
new ColumnSet("fullname", "emailaddress1", "telephone1"));
// Set the output parameters
context.OutputParameters["FullName"] =
contact.GetAttributeValue<string>("fullname");
context.OutputParameters["Email"] =
contact.GetAttributeValue<string>("emailaddress1");
context.OutputParameters["Phone"] =
contact.GetAttributeValue<string>("telephone1");
}
}
}
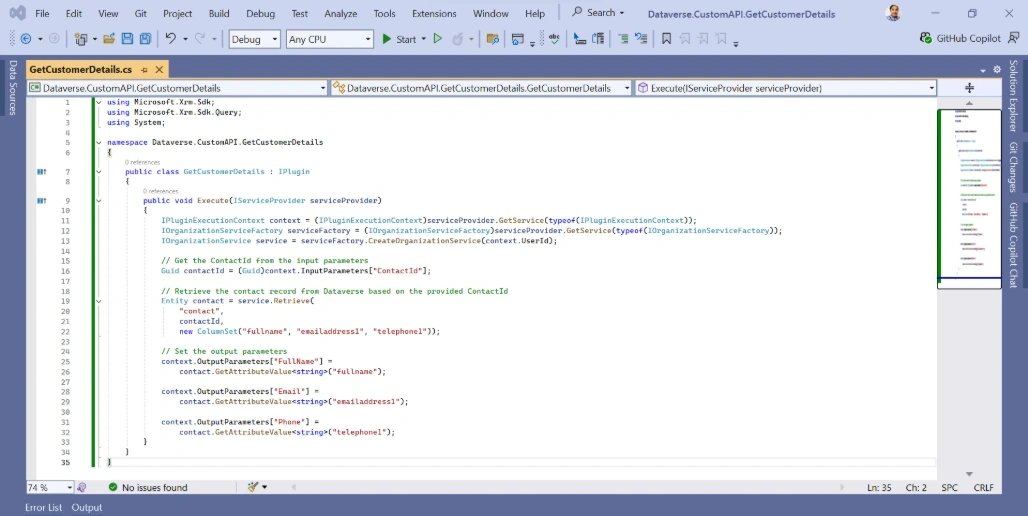
Final code looks like the below,
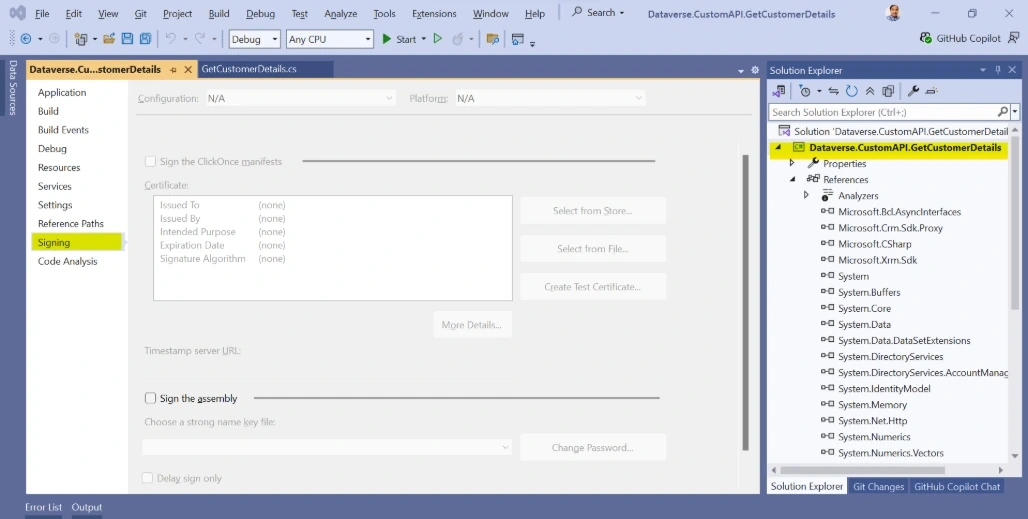
Step 12: Click on the project and press Alt + Enter. Click on Signing.
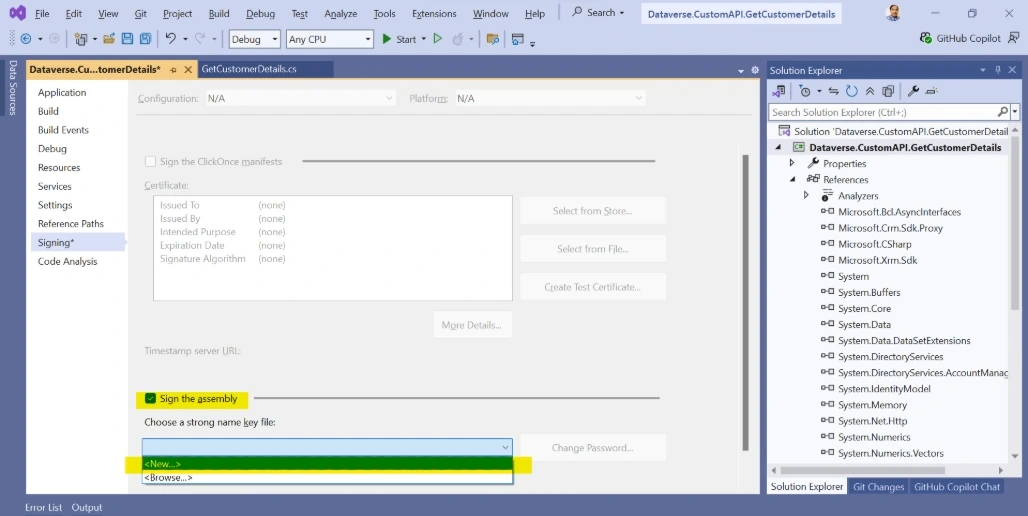
Step13: Select the Sign the assembly and Choose New.
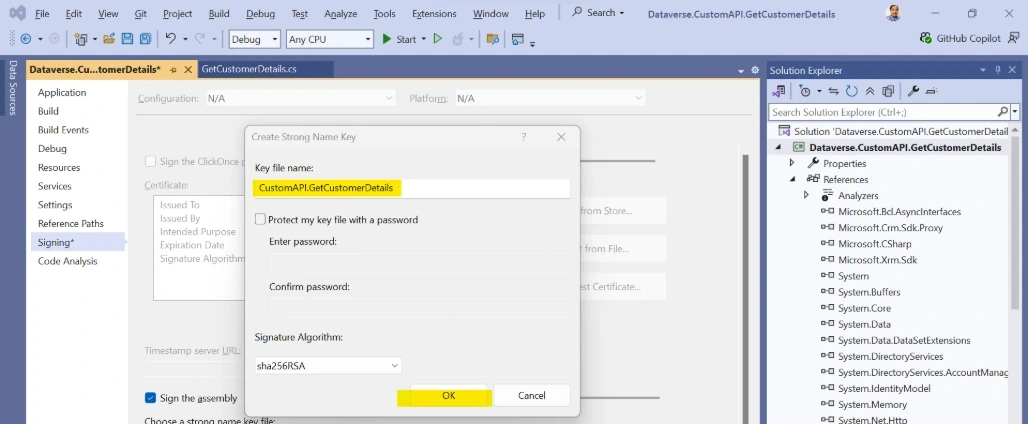
Step 14: Provide the Key file name and click on OK.
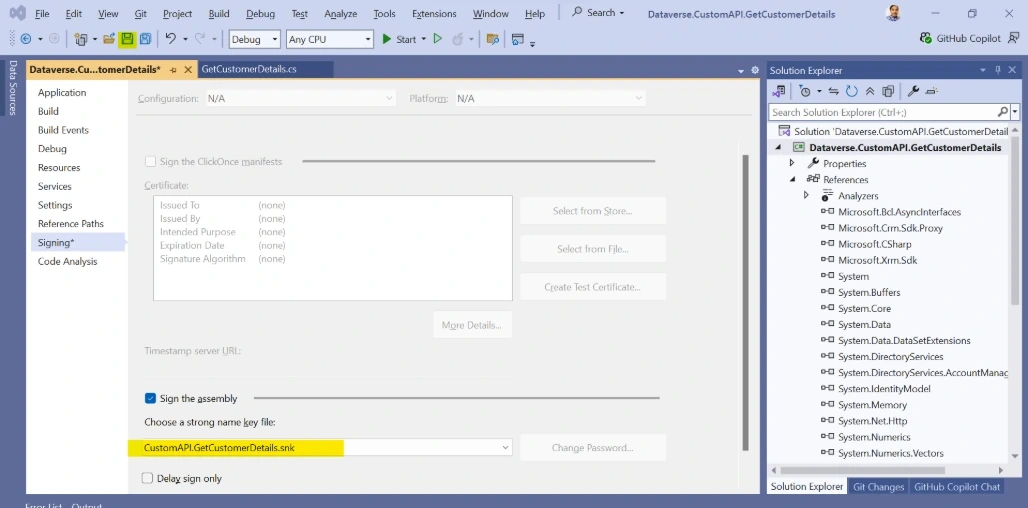
Step 15: Strong name has been set now. Click on Save.
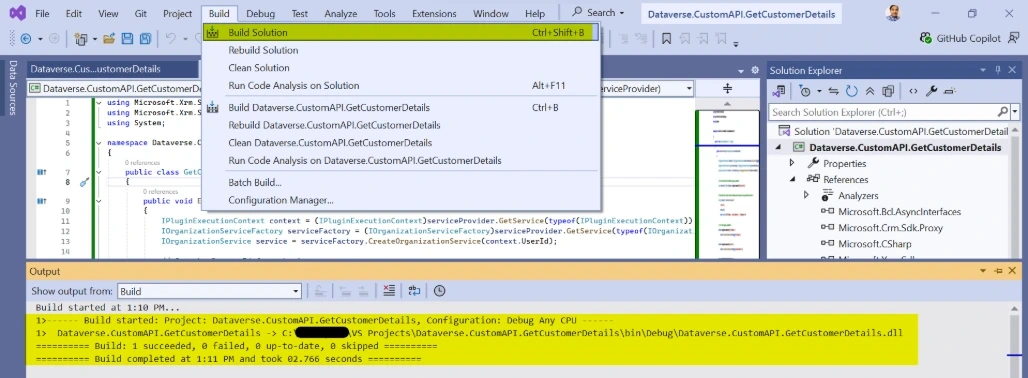
Step 16: Click on Build Solution. Build will be completed successfully.
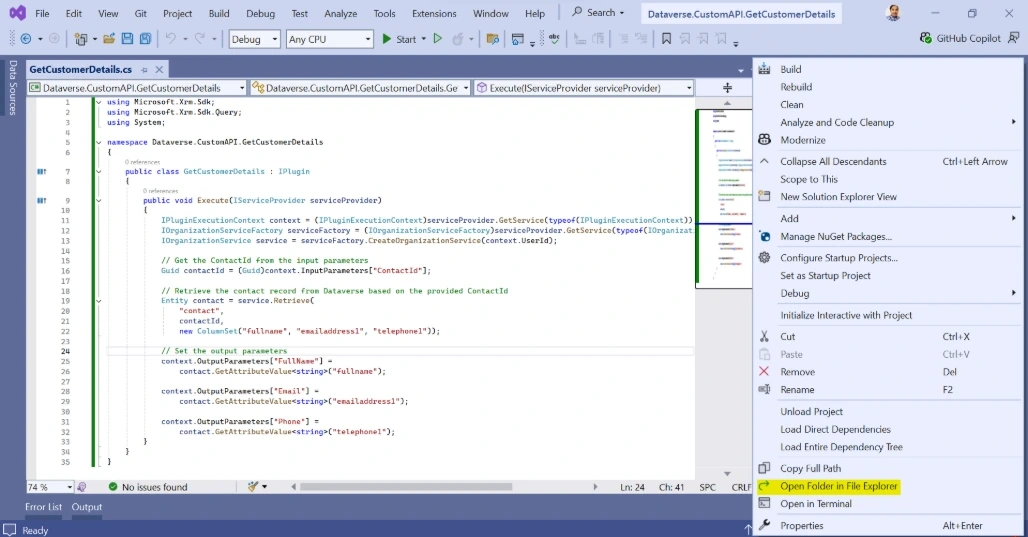
Step 17: Locate the dll to register in the Plugin Registration Tool.
Click on the Project and Click on Open Folder in File Explorer in Solution Explorer.
Step 18: Copy the folder path to use it in next step.

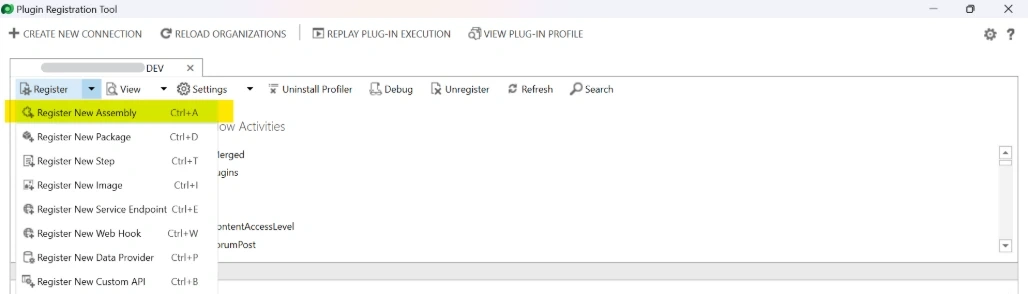
Step 19: Open Plugin Registration Tool and connect to the required environment.
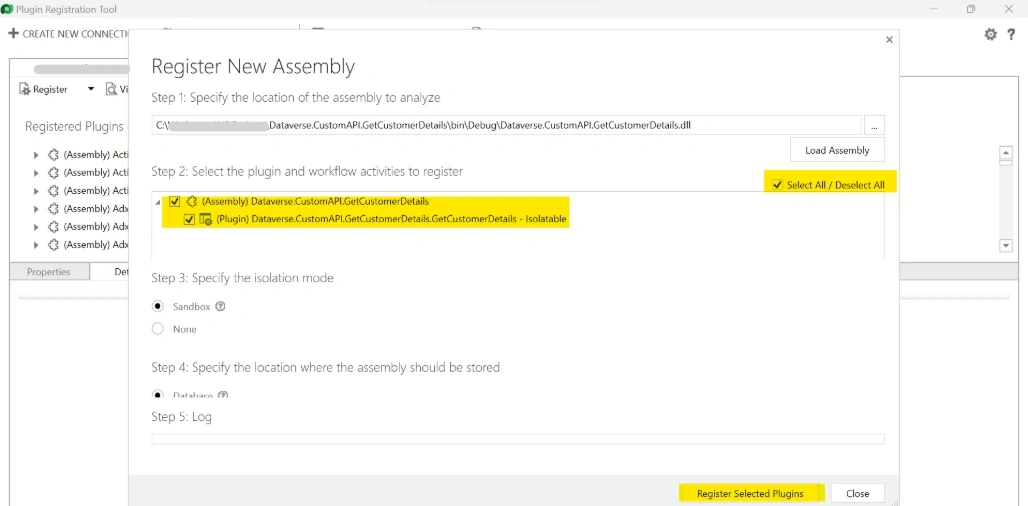
Click on Register New Assembly.
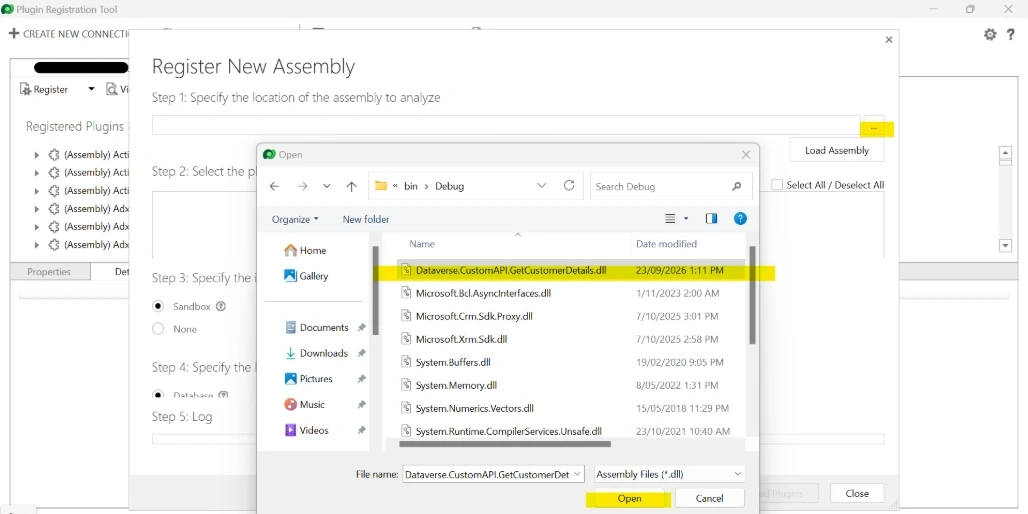
Step 20: Click on Location ... and select the dll (Path from the previous Step 18).
Click on Open.
Step 21: Click on Select All (if not selected) and then click on Register Selected Plugins.
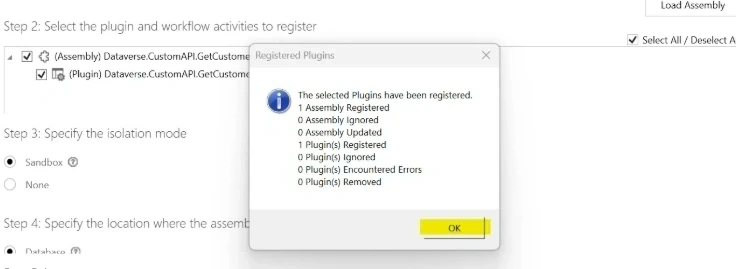
Step 22: Click on OK.
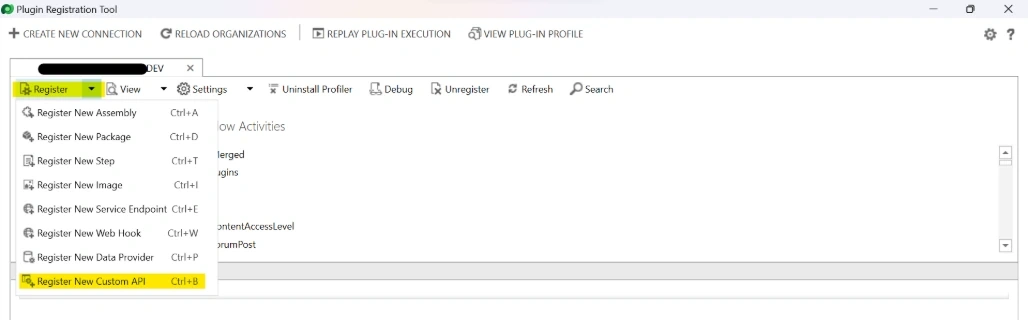
Step 23: Click on Register -> Register New Custom API.
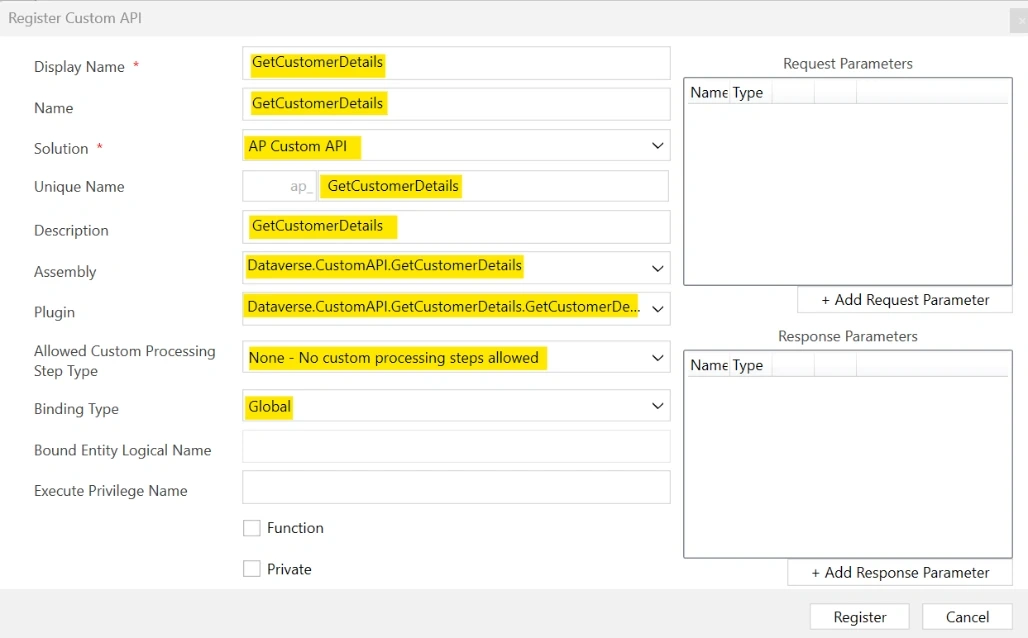
Step 24: Provide all the required details, along with Assembly and Plugin.
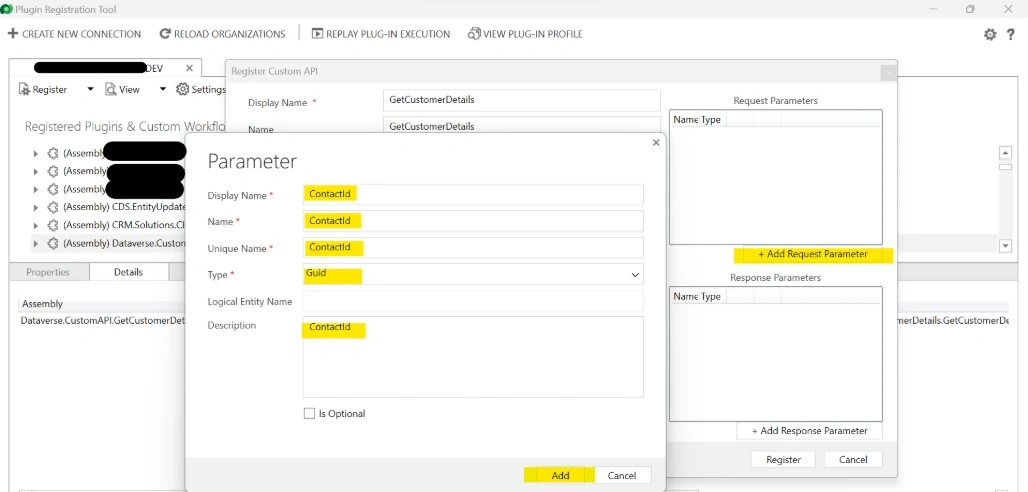
Step 25: Now, will create the Request Parameter. Click on the Add Request Parameter.
Provide all the details in the Request Parameter and Click on Add.
Display Name |
ContactId |
Name |
ContactId |
Unique Name |
ContactId |
Type |
Guid |
Description |
Provide some description |
Step 26: Now, will create the Response Parameters.
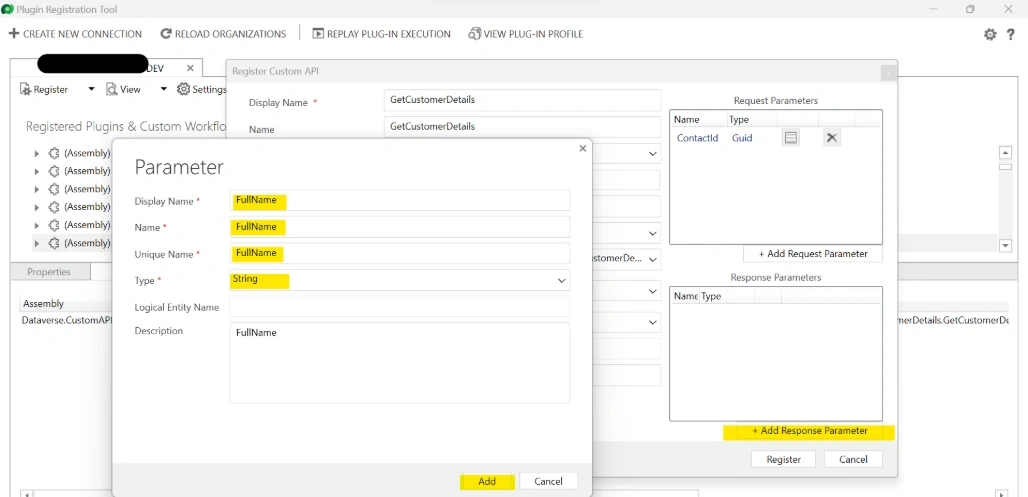
Click on Add Response Parameter. Provide all the below details and click on Add.
Display Name |
FullName |
Name |
FullName |
Unique Name |
FullName |
Type |
String |
Description |
Provide some description |
Step 27: Repeat the steps for Email and Phone as well.
Request and Response parameters will look like the below. Click on Register.
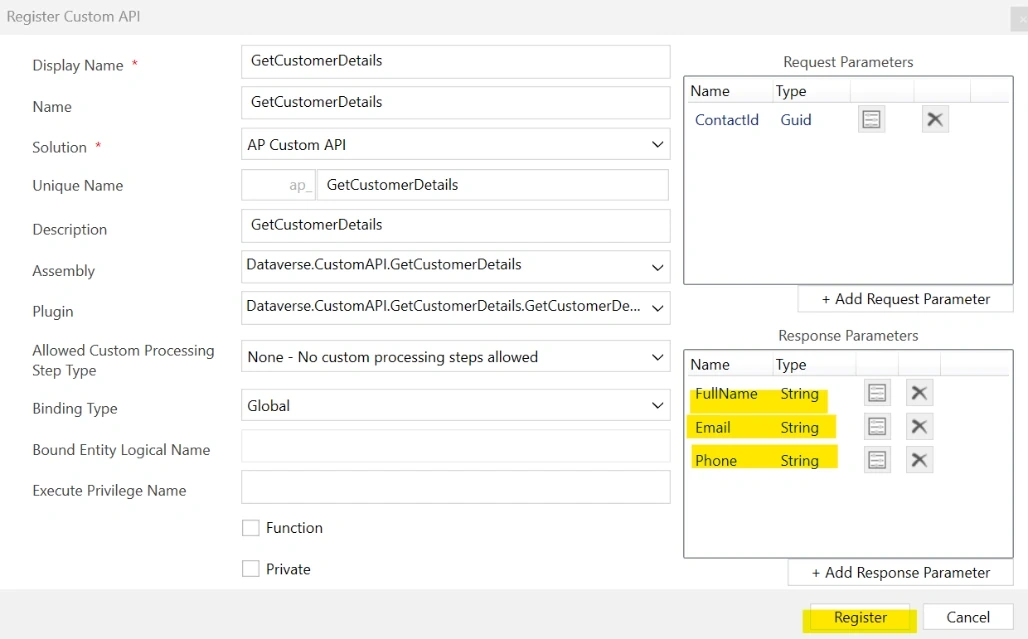
Finally, Assembly, Plugin and Step can be seen for the Custom API like the below.

Step 28: Now, will test this Custom API.
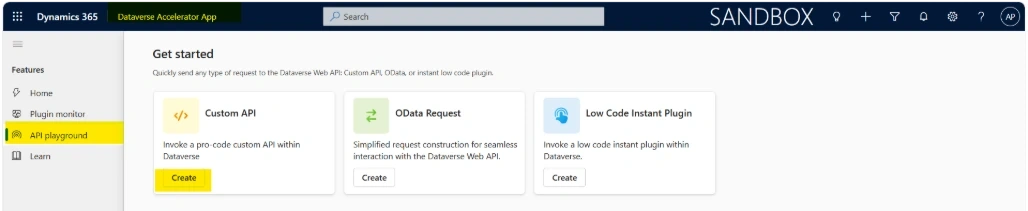
Open Dataverse Accelerator App in the same Dataverse Environment, where the plugin is registered.
Click on API playground and click on Custom API Create.
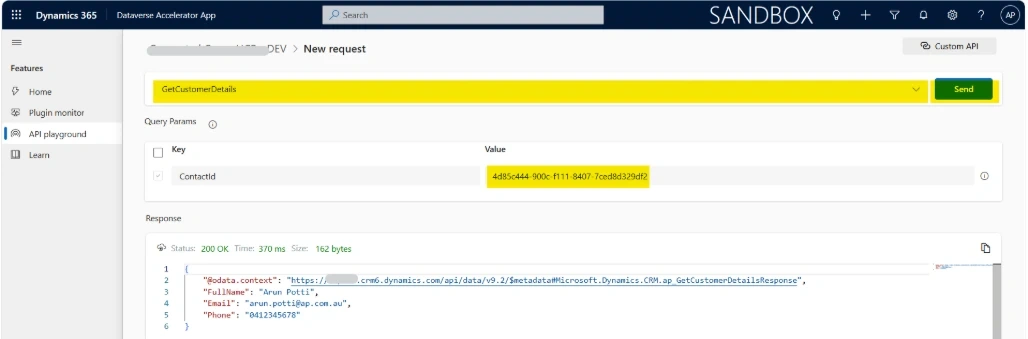
Step 29: Choose GetCustomerDetails from the dropdown and provide the ContactId input parameter to retrieve the corresponding contact's data.
Click on Send.
You can see the data related to the ContactId provided in the Input parameter.
Best Practices
- Keep APIs focused on one business capability
- Validate all inputs
- Return only required outputs
- Use tracing
- Follow naming standards
- Keep business logic in service classes
- Avoid large monolithic plugins
- Make APIs reusable across multiple applications
Conclusion
In this article, we created our first Dataverse Custom API from start to finish. We configured request and response parameters, built a plug-in, registered the assembly, and tested the API using Dataverse Accelerator.
You now have a fully functioning reusable business service that can be consumed by Power Apps, Power Automate, JavaScript, Power Pages, and external applications.
Join the conversation! Your thoughts help the community grow.