

Introduction
In this article, I am going to explain to you about model validation using data annotation property with model binding from scratch. Here, I am going to use Entity Framework database first approach to do all operations for login app.
If you are a beginner or new to MVC, I must recommend you please read the article; it will be worth your time.
- Understanding Model validation in MVC
- Different data annotation property in MVC
- Understanding of Entity frameworkd atabase first approach.
- Understanding model and binding to view.
- Understanding each data annotation property.
- Login app validating using model and using entity frame work register new user.
Before we start, download the complete project from here.
To begin with, unzip the zipped file, open the Solution using Visual Studio. After completely loading the project inside VS, first thing you need to do is to open web.config.cs file and change the connection string as follows.
- <add name="SuryaTechDBEntities" connectionString="metadata=res://*/Models.LoginDemo.csdl|res://*/Models.LoginDemo.ssdl|res://*/Models.LoginDemo.msl;provider=System.Data.SqlClient;provider connection string="data source=OMM-PC;initial catalog=SuryaTechDB;user id=sa;password=123;MultipleActiveResultSets=True;App=EntityFramework"" providerName="System.Data.EntityClient" />
From above, you need to change the following things.
- Data source name with your Sql server data source name.
- Initial catalog field.
- User id and Password field.
After that, run this below SQL Query to create new database.
- CREATE TABLE [dbo].[tbl_RegisterUser] (
- [iId] INT IDENTITY (1, 1) NOT NULL,
- [sUserName] VARCHAR (50) NULL,
- [sEmail] VARCHAR (100) NULL,
- [sPassword] VARCHAR (20) NULL,
- [sPhoneNumber] VARCHAR (10) NULL,
- PRIMARY KEY CLUSTERED ([iId] ASC),
- CONSTRAINT [CK_PhoneNumber] CHECK ([sPhoneNumber] like '[0-9][0-9][0-9][0-9][0-9][0-9][0-9][0-9][0-9][0-9]')
- );
Let’s begin.
Background
Model validation in MVC
Before proceeding to talk about model validation, let me first tell you what is a model. In simple terms, model is a class which provides input to the View.
Model validation is directly indicating that we are going to validate all the data members of that particular model/class.
In ASP.NET MVC, we can achieve this by using data-annotation attributes.
Now, we need to understand what data-annotation attributes are.
Data-annotation attributes are the predefined class through which we can validate model class. These data-annotation classes are present under System.ComponentModel.DataAnnotations namespace.
The purpose of validating model is; as I said above, that model provides input to the view so before doing any action using model our first goal is to check whether the data is correct or not.
Inside model we defined different properties which can bind through view. Before binding the property to view we first need to check whether the data is correct or not.
This can be done in two ways;
- You can check all the input data manually using java script.
- You can use model binding.
In our discussion, I will tell you about the second approach. Let’s understand this with a demo.
In this demo, am going to create a simple login app using database first approach.
Database Part
Run the bellow SQL query.
- --******************************************--
- --Author : Suryakant
- --Created Date : 4-03-2017
- --Description : Creating Database
- --******************************************--
- --Create Datbase
- Create Database DemoWebAppDB
- Use DemoWebAppDB
- --Create Table
- CREATE TABLE [dbo].[tbl_RegisterUser] (
- [iId] INT IDENTITY (1, 1) NOT NULL,
- [sUserName] VARCHAR (50) NULL,
- [sEmail] VARCHAR (100) NULL,
- [sPassword] VARCHAR (20) NULL,
- [sPhoneNumber] VARCHAR (10) NULL,
- PRIMARY KEY CLUSTERED ([iId] ASC),
- CONSTRAINT [CK_PhoneNumber] CHECK ([sPhoneNumber] like '[0-9][0-9][0-9][0-9][0-9][0-9][0-9][0-9][0-9][0-9]')
- );
Let’s jump to Visual Studio and start creating new project.
Step 1
Click on New Project from the File menu.
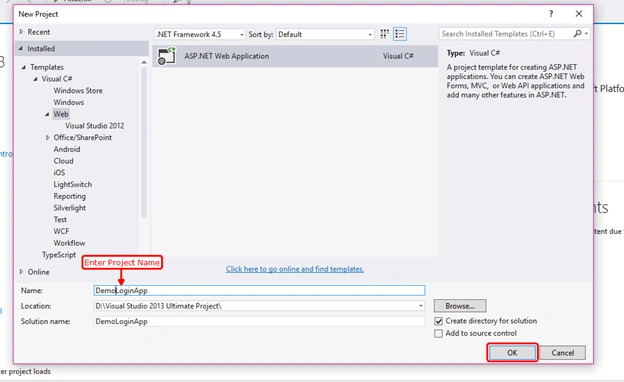
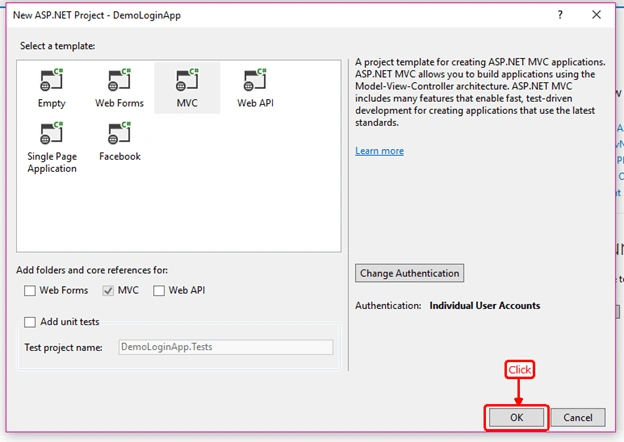
We have created a project successfully.
Step-2
In this step, we are going to add ADO.NET Entity. Here, we are using database first approach. Before going to create Entity Model, let me first tell you what database first approach is.
Database first approach is a process through which Visual Studio can generate models by using database table.
Learn more details about this from here.
Remember, here in entity framework, all tables are treated as Classes and all columns of the table treated as properties.
Let’s proceed to step-2 and add ASO.NET Entity data model.
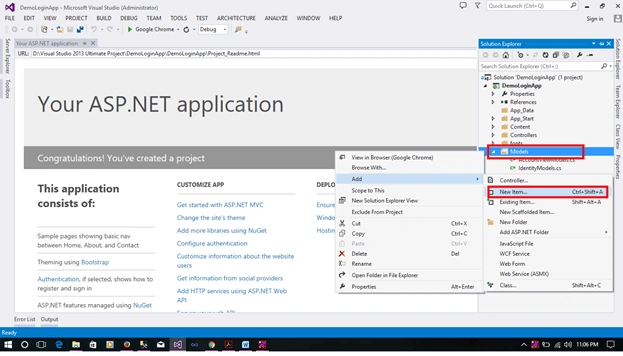
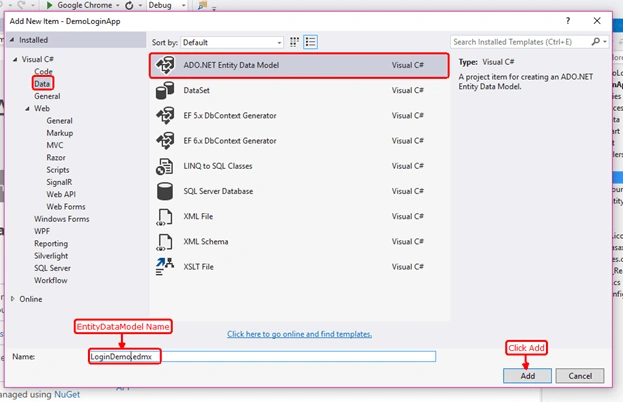
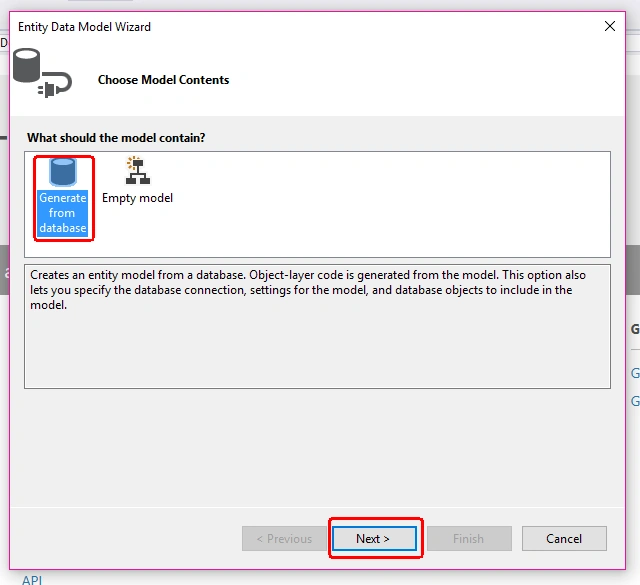
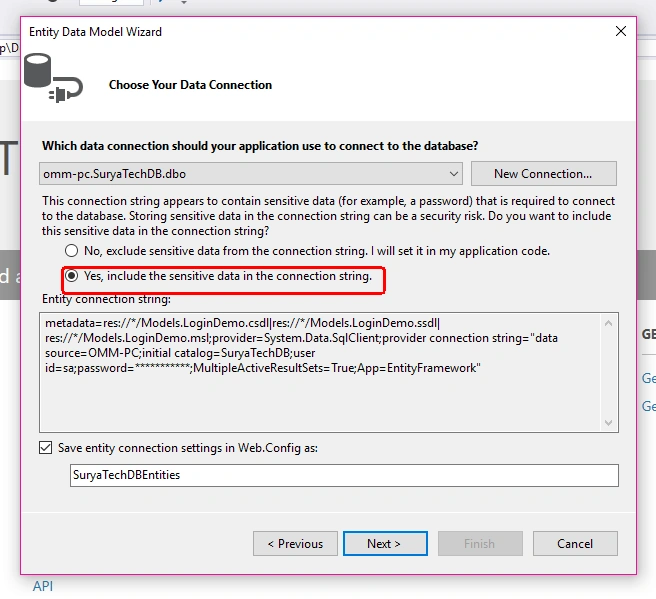
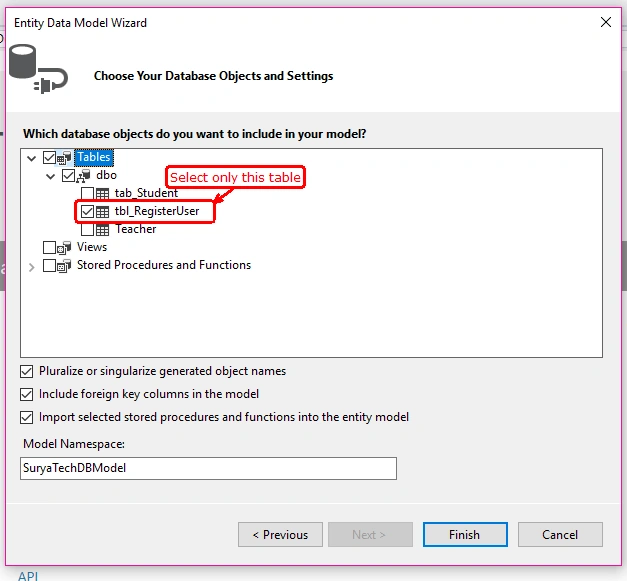
Now, click on Finish button.
Now, you get pictorial representation of our table as below.
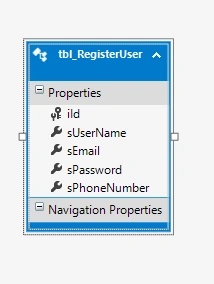
Now, click on the Solution Explorer and see the new file called edmx file is added under Models folder.
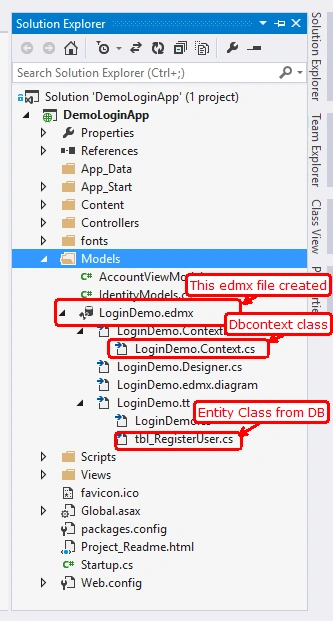
Now, we have successfully created Model class for our application, that is tbl_RegsisterUser.cs class.
With this Model class, we have one important class called ad LoginDemo.Context.cs class.
This class plays an important roles while working with database operations.
Step 3
In this step we are going to add data-annotation property to our tbl_RegisterUser.cs class.
Add the below code,
- namespace DemoLoginApp.Models
- {
- using System;
- using System.Collections.Generic;
- using System.ComponentModel.DataAnnotations;
- using System.ComponentModel.DataAnnotations.Schema; //Not Mapped
- using System.Web.Mvc;
- [Bind(Exclude="iId")]
- public partial class tbl_RegisterUser
- {
- [ScaffoldColumn(false)]
- [Key]
- public int iId { get; set; }
- [Required(ErrorMessage="Please enter User Name !!!")]
- [Display(Name="User Name :")]
- [StringLength(30,ErrorMessage="User name must be thirty charter long.")]
- public string sUserName { get; set; }
- [Required(ErrorMessage="Pleae Enter Email Adress !!!")]
- [EmailAddress(ErrorMessage="Please Enter valid Email Id !!!")]
- [Display(Name="Email Adress :")]
- [DataType(DataType.EmailAddress)]
- public string sEmail { get; set; }
- [Required(ErrorMessage="Please Enter Password !!!")]
- [Display(Name="Password :")]
- [StringLength(9,ErrorMessage="Password must be nine character long.")]
- public string sPassword { get; set; }
- [NotMapped]
- [Required(ErrorMessage = "Please Enter Confirm Password !!!")]
- [Display(Name = "Confirm Password :")]
- [System.ComponentModel.DataAnnotations.Compare("sPassword",ErrorMessage="Confirm Password must match with Password !!!")]
- public string sCnfPassword { get; set; }
- [Required(ErrorMessage="Please Enter Phone Number !!!")]
- [Display(Name="Phone Number :")]
- [DataType(DataType.PhoneNumber)]
- [StringLength(10,ErrorMessage="Phone number must be 10 digit.",MinimumLength=10)]
- public string sPhoneNumber { get; set; }
- }
- }
In the above class we saw that the property has been represented by data annotation attributes.
Let’s talk about some important concepts behind data annotation attributes;
In MVC all the data annotation attributes are present under “System.ComponentModel.DataAnnotations”.
Why Use This?
The purpose of using Data annotation attribute is validating model in server through Model State property of ModelStateDictionary Class.
Model State
This property plays an important role while doing model validation using data annotation property. ModelStateDictionary class contains the following important property and method which helps us validate the model .
- Count
It counts all the key value pairs present .Returns integer value. - IsValid
This property tells whether the ModelState has an error or not; if no error exist sinside ModelState then it returns true other wise it returns false. - Clear()
It help us to clear the state of model. It means it will clear all the errors present inside the model. - Values
This property holds all the errors which comes from data annotation attributes.ModelStae.Values is type of ModelState list. In side ModelState class it contains a property called Errors and Values.
So by using ModelState.Values we can access all the errors present inside our model; we will see this later in our code.
Let’s understand how model binding works;
We always directly pass the model to view and access the model by directly using model property. That model property is defind under ViewDataDictionary class. The ViewDataDictionary class has a property called as View data; so by using ViewData property we can access the model property.
We can also accesss other important property of model from ViewDataDictionary class; some of the important properties of model are;
- Model State
- Model Meta Data
- SetModel(object value) //Method.
Let’s proceed to our demo Login App;
We already created data-context class using database first approach; and we customized our data context class using various data-annotation attributes.
Let’s add a controller,
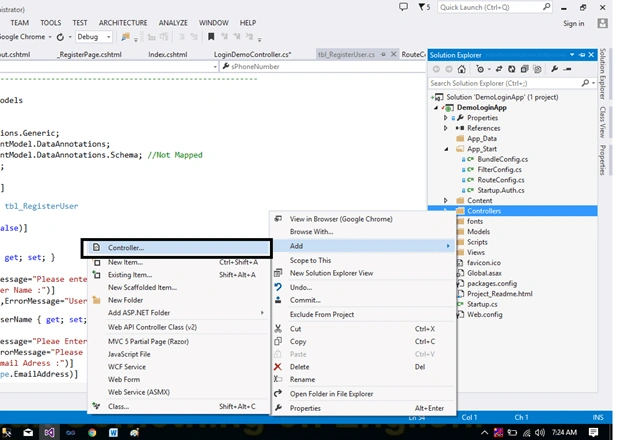
Click on add;
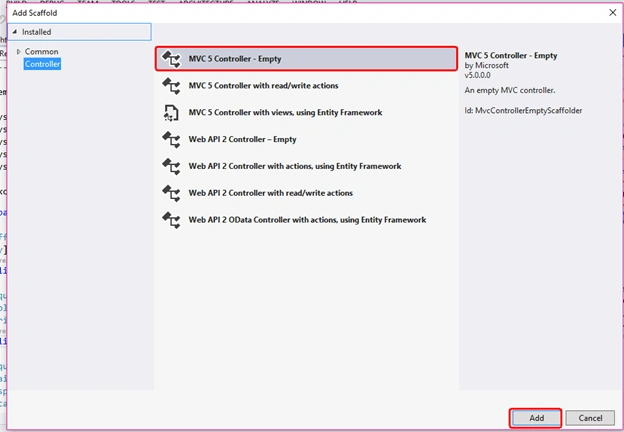
Next click on Add.
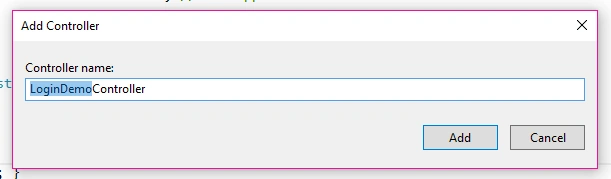
Give the controller name as Login Demo.
After creation of controller add the bellow code inside LoginDemo controller.
- using DemoLoginApp.Models;
- using System;
- using System.Collections.Generic;
- using System.Linq;
- using System.Web;
- using System.Web.Mvc;
- namespace DemoLoginApp.Controllers
- {
- public class LoginDemoController : Controller
- {
- SuryaTechDBEntities _dbEntites = new SuryaTechDBEntities();
- // GET: /LoginDemo/
- public ActionResult Index()
- {
- return View();
- }
- [HttpPost]
- public ActionResult Index([Bind(Exclude="iId")]tbl_RegisterUser model)
- {
- var type = Request.RequestType;
- if (ModelState.Values.ToArray()[0].Errors.Count==0 && ModelState.Values.ToArray()[1].Errors.Count==0)
- {
- if (CheckUser(model.sUserName,model.sPassword))
- {
- return RedirectToAction("Home", new { username=model.sUserName});
- }
- else
- {
- ModelState.Clear();
- ModelState.AddModelError("", "User Id or Password not exist; try again !!!");
- return View(model);
- }
- }
- else
- {
- return View(model);
- }
- }
- private bool CheckUser(string UserId, string Password)
- {
- var User = _dbEntites.tbl_RegisterUser.FirstOrDefault(m => m.sUserName == UserId);
- if (User!=null)
- {
- if (User.sPassword == Password)
- {
- return true;
- }
- else
- return false;
- }
- else
- {
- return false;
- }
- }
- [HttpPost]
- public ActionResult Register(tbl_RegisterUser model)
- {
- List<string> errorMessage = new List<string>();
- if (ModelState.IsValid)
- {
- _dbEntites.tbl_RegisterUser.Add(model);
- _dbEntites.SaveChanges();
- return Json("", JsonRequestBehavior.AllowGet);
- }
- else
- {
- for (int i = 0; i < ModelState.Values.Count; i++)
- {
- if (ModelState.Values.ToArray()[i].Errors.Count>0)
- {
- errorMessage.Add(ModelState.Values.ToArray()[i].Errors[0].ErrorMessage);
- }
- else
- {
- errorMessage.Add("");
- }
- }
- return Json(new {keys= ModelState.Keys,ErrorMessage=errorMessage }, JsonRequestBehavior.AllowGet);
- }
- }
- public ActionResult Home(string username)
- {
- ViewData.Model = username;
- return View();
- }
- public ActionResult Logout()
- {
- return RedirectToAction("Index");
- }
- }
- }
Let’s talk about our LoginDemo Controller which we defined above;
The purpose of this controller is to create the Login page as well as Register page with full functionally for both login and register using entity framework.
So in this above controller class ;
- Index Action Method represents both Login View and Register view.
- In this example I have taken Register view page as partial view and rendering this inside index view.
- CheckUser method is used to check whether the user exit or not.
- Register method is used to register the user.
Let’s create the view page for Index action method.
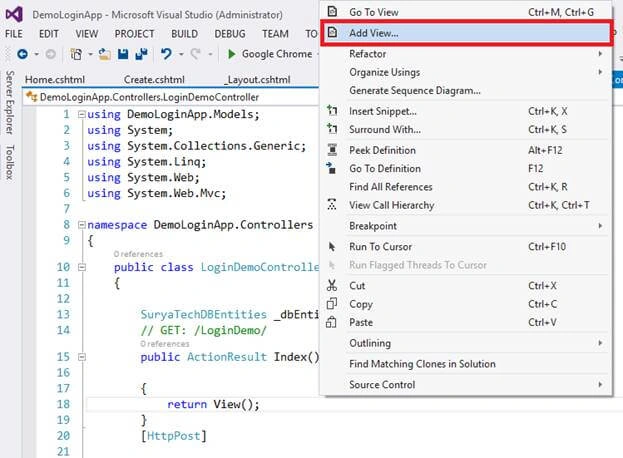
Add the index view page by right click on index action method.
After that add the below code inside index View;
- @model DemoLoginApp.Models.tbl_RegisterUser
- @{
- ViewBag.Title = "Index";
- var model = Model;
- }
- <h2>Welcome To Login Page</h2>
- <html>
- <body>
- <div class="container">
- <div class="row">
- <div class="col-md-6 col-md-offset-3">
- <div class="panel panel-login">
- <div class="panel-heading">
- <div class="row">
- <div class="col-xs-6">
- <a href="#" class="active" id="login-form-link">Login</a>
- </div>
- <div class="col-xs-6">
- <a href="#" id="register-form-link">Register</a>
- </div>
- </div>
- <hr>
- </div>
- <div class="panel-body">
- <div class="row">
- <div class="col-lg-12">
- @using (Html.BeginForm("Index", "LoginDemo", FormMethod.Post, new { id = "login-form", style = "display:block" }))
- {
- @Html.AntiForgeryToken()
- <div class="form-group">
- @Html.TextBoxFor(m => m.sUserName, new { @class = "form-control", id = "UserName", placeholder = "Enter User Name/EmailId", tabindex = "1" })
- @Html.ValidationMessageFor(m => m.sUserName)
- </div>
- <div class="form-group">
- @Html.PasswordFor(m => m.sPassword, new { @class = "form-control", id = "password", placeholder = "Enter Password", tabindex = "2" })
- @Html.ValidationMessageFor(m => m.sPassword)
- </div>
- <div class="form-group col-lg-offset-4">
- <input type="checkbox" tabindex="3" class="" name="remember" id="remember">
- <label for="remember"> Remember Me</label>
- </div>
- <div class="form-group">
- <div class="row">
- <div class="col-sm-4 col-lg-offset-3">
- <input type="submit" name="command" id="login-submit" tabindex="4" class="form-control btn btn-default" value="Log In">
- </div>
- </div>
- </div>
- <div class="form-group">
- <div class="row">
- <div class="col-lg-12" style="margin-left:30%">
- <a href="#" tabindex="5" class="forgot-password">Forgot Password?</a>
- </div>
- </div>
- </div>
- @Html.ValidationSummary("");
- }
- @using (Ajax .BeginForm("Register", "LoginDemo", new AjaxOptions { OnSuccess = "RegisterSuccess", HttpMethod = "POST", UpdateTargetId = "Message" }, new { id = "register-form", style = "display:none" }))
- {
- @Html.AntiForgeryToken()
- @Html.ValidationSummary(true, "", new { @class = "text-danger" })
- @Html.Partial("_RegisterPage")
- }
- </div>
- </div>
- <label style="color:green" id="Message"></label>
- </div>
- </div>
- </div>
- </div>
- </div>
- </body>
- </html>
- <script>
- $(function () {
- debugger;
- $("#register-form-link").click(function () {
- debugger;
- $("#register-form").css('display', 'block');
- $("#login-form").css('display', 'none');
- $("#register-form-link").addClass('active');
- $("#login-form-link").removeClass('active');
- $(".field-validation-error").css('display', "none");
- $(".input-validation-error").css("border", "1px solid #cccccc");
- });
- $("#login-form-link").click(function () {
- $("#register-form").css('display', 'none');
- $("#login-form").css('display', 'block');
- $("#register-form-link").removeClass('active');
- $("#login-form-link").addClass('active');
- $("#Message").hide();
- });
- });
- function RegisterSuccess(data) {
- debugger;
- if (data!="") {
- for (var i = 0; i < data.keys.length; i++) {
- if (data.ErrorMessage[i]!="") {
- document.getElementById(data.keys[i]).nextElementSibling.style.display = "block";
- document.getElementById(data.keys[i]).nextElementSibling.textContent = data.ErrorMessage[i];
- document.getElementById(data.keys[i]).nextElementSibling.className = "field-validation-error" //field-validation-valid
- }
- else
- {
- document.getElementById(data.keys[i]).nextElementSibling.style.display = "none";
- }
- }
- }
- else
- {
- $("#Message").text("Registration successful !!!");
- }
- }
- </script>
After adding this let’s create our partial _Register.cshtml page.
Right click on LoginDemo folder then add partial page;
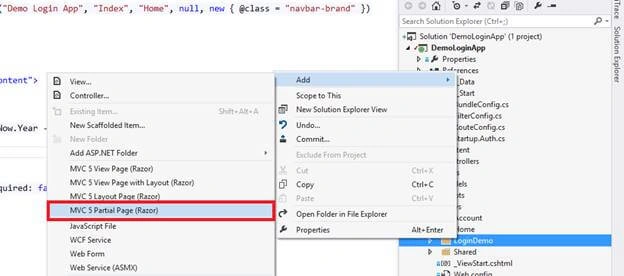
Give the name as _RegisterPage.
Add the below code inside Register.cshtml;
- @model DemoLoginApp.Models.tbl_RegisterUser
- <div class="form-group">
- @Html.TextBoxFor(m => m.sUserName, new { @class = "form-control", id = "sUserName", placeholder = "Enter User Name", tabindex = "1" })
- @Html.ValidationMessageFor(m => m.sUserName)
- </div>
- <div class="form-group">
- @Html.TextBoxFor(m => m.sEmail, new { @class = "form-control", id = "sEmail", placeholder = "Email Address", tabindex = "2" })
- @Html.ValidationMessageFor(m => m.sEmail)
- </div>
- <div class="form-group">
- @Html.PasswordFor(m => m.sPassword, new { @class = "form-control", id = "sPassword", placeholder = "Password", tabindex = "3" })
- @Html.ValidationMessageFor(m => m.sPassword)
- </div>
- <div class="form-group">
- @Html.PasswordFor(m => m.sCnfPassword, new { @class = "form-control", id = "sCnfPassword", placeholder = "Confirm Password", tabindex = "4" })
- @Html.ValidationMessageFor(m => m.sCnfPassword)
- </div>
- <div class="form-group">
- @Html.TextBoxFor(m => m.sPhoneNumber, new { @class = "form-control", id = "sPhoneNumber", placeholder = "Enter Phone Number", tabindex = "5" })
- @Html.ValidationMessageFor(m => m.sPhoneNumber)
- </div>
- <div class="form-group">
- <div class="row">
- <div class="col-sm-4">
- <input type="submit" name="register-submit" id="register-submit" tabindex="5" class="form-control btn btn-default" value="Register Now">
- </div>
- </div>
- </div>
After this replace _Layout.cshtml page by using the below code;
You can find the layout page inside view folder see below;
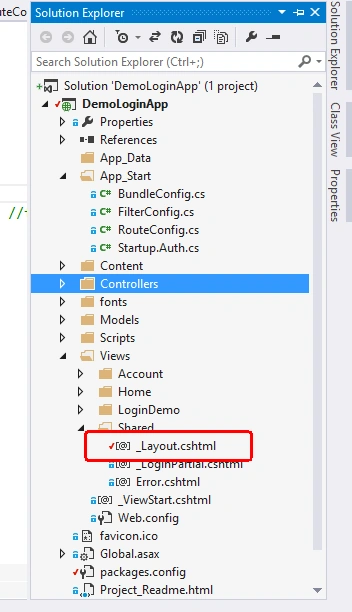
Replace the _Layout.cshtml page code,
- <!DOCTYPE html>
- <html>
- <head>
- <meta charset="utf-8" />
- <meta name="viewport" content="width=device-width, initial-scale=1.0">
- <title>@ViewBag.Title - My ASP.NET Application</title>
- <script src="~/Scripts/jquery-1.10.2.js"></script>
- @Styles.Render("~/Content/css")
- @Scripts.Render("~/bundles/modernizr")
- @Scripts.Render("~/bundles/jquery")
- @Scripts.Render("~/bundles/bootstrap")
- <script src="~/Scripts/jquery.unobtrusive-ajax.js"></script>
- <style>
- .active {
- font-weight: bold;
- text-decoration: underline;
- }
- .navbar-brand {
- color: white !important;
- }
- </style>
- </head>
- <body>
- <div class="navbar navbar-inverse navbar-fixed-top" style="background-image:linear-gradient(#54b4eb, #2fa4e7 60%, #1d9ce5)">
- <div class="container">
- <div class="navbar-header">
- <button type="button" class="navbar-toggle" data-toggle="collapse" data-target=".navbar-collapse">
- <span class="icon-bar"></span>
- <span class="icon-bar"></span>
- <span class="icon-bar"></span>
- </button>
- @Html.ActionLink("Demo Login App", "Index", "Home", null, new { @class = "navbar-brand" })
- </div>
- </div>
- </div>
- <div class="container body-content">
- @RenderBody()
- <hr />
- <footer>
- <p>© @DateTime.Now.Year - My ASP.NET Application</p>
- </footer>
- </div>
- @RenderSection("scripts", required: false)
- </body>
- </html>
Now add Home page which you will get after successful l login.
We already have a Home Action method inside our controller class.
Navigate to that action method and right click and add the Home page.
After that replace the below code of Home page;
- @{
- ViewBag.Title = "Home";
- }
- <h2>Home</h2>
- <h3>Welcome @Model</h3>
Now run your application and you get login page.
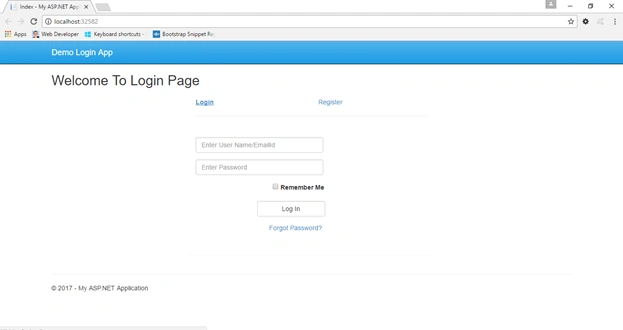
Click on register tab you get Register page;
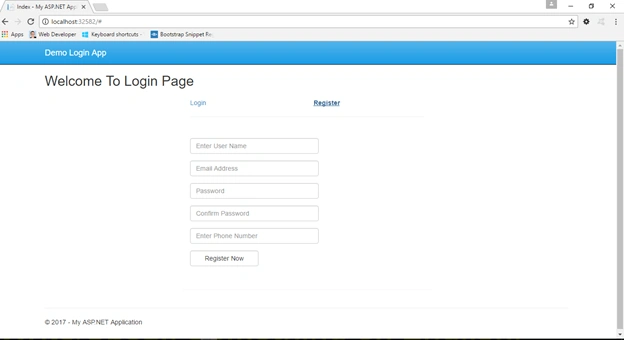
Now register a user by providing details.
Give some wrong information you can get the model error message as shown below;
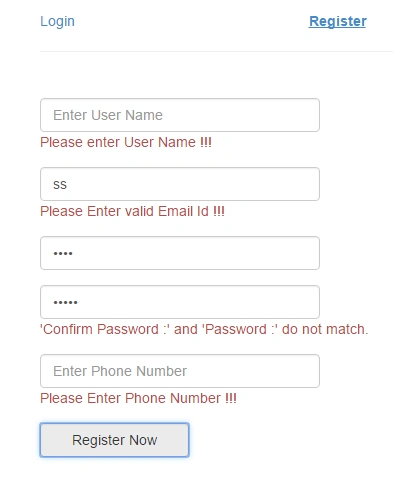
If you successfully register a user and login through that user then you get anwelcome message as below;
Here my UserId:- Surya and Password:- 1234.
Let’s login;
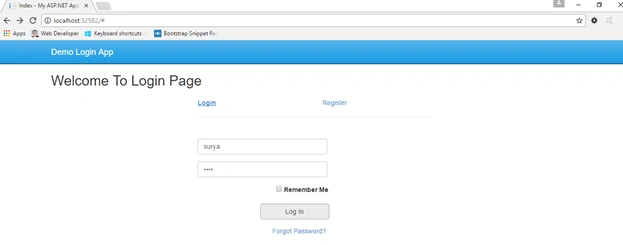
After login you get an welcome page showing as below:-
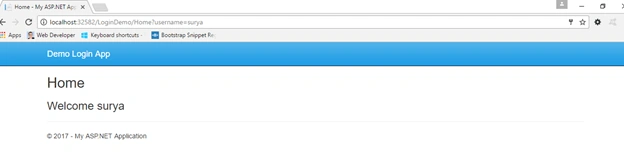
You have successfully logged in. Cheers!!! J
Conclusion
In this Demo login app, we saw various data annotation attributes with model validations. So far, we discussed database first approach with inserting record and authenticating user.
Hope the above demo gives you a clear idea how to work with data base first approach with pure model validation. In this demo you can not find any single line of JavaScript code for checking the validation -- I did all the validation by using model . Try this demo once; hope you definitely learn something new.
If anything is not working for you or if you found mistakes then please let me know.
That’s all; please share your valuable feedback about this article.
Thanks and happy Coding.
Balasubramanian RPosted Aug 21, 2018, 5:32 AM
I have doubt like this : In this example we decorate data anotation to the EF generated model . What happens if in future need to update the table structure in database and update the edmx model. Does the data annotations go away, because it is autogenerated and need to again write annotations. If that is case can we have one model with data annotation to bind to view and model created by EF is used for CRUD. Is this approach correct. Please suggest
Vignesh ManiPosted Mar 29, 2017, 8:29 AM
Nice one. thanks for sharing
Manav PandyaPosted Mar 27, 2017, 12:56 AM
Thanks for sharing sir ....