

Introduction
In new update of Universal Windows Platform, there are significant APIs changed from previous Windows Phone 8.0 & 8.1. A lots of great features added like Geofencing. So let’s get crack in a whole new Universal Windows Platform Map Control.
Creating a New Project and Add a Map Control
Take a new project and give it a name simply “Map” or whatever you want. Now, we’ll add our map control from the “Toolbox”. Drag the “MapContol” tool from the “Toolbox” and place it in the main Grid.
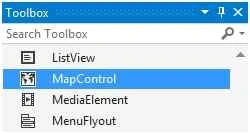
Figure 1
Making Grids
Now, we’ll modify our main Grid to re-size the “MapControl” and to show some other stuffs. Firstly, we’ll make some rows to put other control.
- <Grid.RowDefinitions>
- <RowDefinition Height="50"/>
- <RowDefinition Height="*"/>
- </Grid.RowDefinitions>
There are two “RowDefinitions”. First one is 50px in height, other is “*” which will cover the rest of the grid space.
Adding Controls
Here are the controls we’ve used in our “MainPage.xaml”.
- <TextBlock TextWrapping="NoWrap" Grid.Row="0"
- Text="Map control"
- FontSize="36" />
- <Maps:MapControl Grid.Row="1"
- x:Name="MyMap"
- HorizontalAlignment="Stretch"
- VerticalAlignment="Stretch"
- Width="360"
- Height="590" ZoomLevelChanged="MyMap_ZoomLevelChanged"/>
- <Border CornerRadius="10" x:Name="border" Grid.Row="1"
- Height="70"
- Width="70"
- Canvas.Left="150"
- Canvas.Top="270"
- Background="{ThemeResource AppBarItemPointerOverBackgroundThemeBrush}">
- <ProgressRing x:Name="progressRing"
- IsActive="True"
- Background="Transparent"
- Height="40"
- Width="40"/>
- </Border>
- <Slider Grid.Row="1" x:Name="mySlider" Orientation="Vertical" HorizontalAlignment="Right" Height="211" Width="45" Margin="0,0,10,0" Minimum="10" Maximum="20" Value="0" ValueChanged="ZoomValueChanged" Foreground="SteelBlue"/>
We’ve used a “ProgressBar” control, to indicate while Map is loading, a “TextBlock” to show the title, a “MapControl” to show the Bing Map and a “Slider” to zoom in and zoom out.
Adding AppBar
We’ve also used a “BottomAppBar” to locate your current position.
- <Page.BottomAppBar>
- <CommandBar ClosedDisplayMode="Minimal" Opacity="0.5">
- <AppBarButton Label="locate me" Icon="Target" Click="LocateMe_Click" />
- </CommandBar>
- </Page.BottomAppBar>
I’m not going through the details of adding controls and how they work, if you don’t know please feel free to take a look at my previous articles.
So, finally our design will look like the following screenshot:
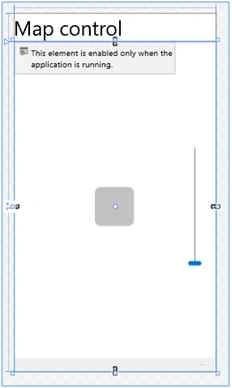
Figure 2
Code Behind
Now, time to code behind in C#. Let’s open “MainPage.xaml.cs” and find “OnNavigatedTo” method. Modify it like the following:
- public sealed partial class MainPage : Page
- {
- Geolocator geolocator;
- public MainPage()
- {
- this.InitializeComponent();
- this.Loaded += MainPage_Loaded;
- }
- private async void MainPage_Loaded(object sender, RoutedEventArgs e)
- {
- // Map Token for testing purpose,
- // otherwise you'll get an alart message in Map Control
- MyMap.MapServiceToken = "abcdef-abcdefghijklmno";
- geolocator = new Geolocator();
- geolocator.DesiredAccuracyInMeters = 50;
- try
- {
- // Getting Current Location
- Geoposition geoposition = await geolocator.GetGeopositionAsync(
- maximumAge: TimeSpan.FromMinutes(5),
- timeout: TimeSpan.FromSeconds(10));
- MapIcon mapIcon = new MapIcon();
- // Locate your MapIcon
- mapIcon.Image = RandomAccessStreamReference.CreateFromUri(new Uri("ms-appx:///Assets/my-position.png"));
- // Show above the MapIcon
- mapIcon.Title = "Current Location";
- // Setting up MapIcon location
- mapIcon.Location = new Geopoint(new BasicGeoposition()
- {
- //Latitude = geoposition.Coordinate.Latitude, [Don't use]
- //Longitude = geoposition.Coordinate.Longitude [Don't use]
- Latitude = geoposition.Coordinate.Point.Position.Latitude,
- Longitude = geoposition.Coordinate.Point.Position.Longitude
- });
- // Positon of the MapIcon
- mapIcon.NormalizedAnchorPoint = new Point(0.5, 0.5);
- MyMap.MapElements.Add(mapIcon);
- // Showing in the Map
- await MyMap.TrySetViewAsync(mapIcon.Location, 18D, 0, 0, MapAnimationKind.Bow);
- // Disable the ProgreesBar
- progressBar.Visibility = Windows.UI.Xaml.Visibility.Collapsed;
- // Set the Zoom Level of the Slider Control
- mySlider.Value = MyMap.ZoomLevel;
- }
- catch (UnauthorizedAccessException)
- {
- MessageBox("Location service is turned off!");
- }
- base.OnNavigatedTo(e);
- }
- ...
- }
Our main work is done, now we’ve to write the other methods to work it perfectly.
- // Slider Control
- private void ZoomValueChanged(object sender, RangeBaseValueChangedEventArgs e)
- {
- if (MyMap != null)
- MyMap.ZoomLevel = e.NewValue;
- }
- private void MyMap_ZoomLevelChanged(MapControl sender, object args)
- {
- if (MyMap != null)
- mySlider.Value = sender.ZoomLevel;
- }
- // Locate Me Bottom App Bar
- private async void LocateMe_Click(object sender, RoutedEventArgs e)
- {
- progressBar.Visibility = Windows.UI.Xaml.Visibility.Visible;
- geolocator = new Geolocator();
- geolocator.DesiredAccuracyInMeters = 50;
- try
- {
- Geoposition geoposition = await geolocator.GetGeopositionAsync(
- maximumAge: TimeSpan.FromMinutes(5),
- timeout: TimeSpan.FromSeconds(10));
- await MyMap.TrySetViewAsync(geoposition.Coordinate.Point, 18D);
- mySlider.Value = MyMap.ZoomLevel;
- progressBar.Visibility = Windows.UI.Xaml.Visibility.Collapsed;
- }
- catch (UnauthorizedAccessException)
- {
- MessageBox("Location service is turned off!");
- }
- }
- // Custom Message Dialog Box
- private async void MessageBox(string message)
- {
- var dialog = new MessageDialog(message.ToString());
- await Dispatcher.RunAsync(CoreDispatcherPriority.Normal, async () => await dialog.ShowAsync());
- }
Adding Tap Event
One more thing, I’d like to add is Map Tapped functionality, we’ll add another method which will give us a cool feature when we tap somewhere and in the Map Icon. It’ll show the location details in the Message Dialog Box.
To add this method, go to “MainPage.xaml”, select “MapControl” in the main grid. If you don’t see “Properties” tab, then hit F4 and you’ll find it on the left side of the Visual Studio.
Now double click on the “MapTapped” section and it’ll automatically generate the method stub for you.
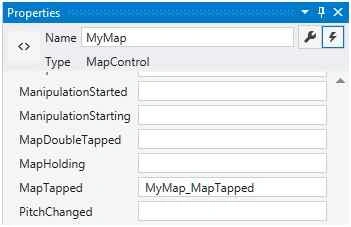
Figure 3
Now, complete the “MyMap_MapTapped” method in the “MainPage.xaml.cs”.
- private async void MyMap_MapTapped(MapControl sender, MapInputEventArgs args)
- {
- Geopoint pointToReverseGeocode = new Geopoint(args.Location.Position);
- // Reverse geocode the specified geographic location.
- MapLocationFinderResult result = await MapLocationFinder.FindLocationsAtAsync(pointToReverseGeocode);
- var resultText = new StringBuilder();
- if (result.Status == MapLocationFinderStatus.Success)
- {
- resultText.AppendLine(result.Locations[0].Address.District + ", " + result.Locations[0].Address.Town + ", " + result.Locations[0].Address.Country);
- }
- MessageBox(resultText.ToString());
- }
Adding Location Capability
Now, our work is done, but if you run the application in your device or emulator, you’ll get an error definitely. Because we’ve given permission to track our current position to our application. To do this, go to “Package.appxmanifest” and find “Capabilities” section and tick the “Location” service and save it.
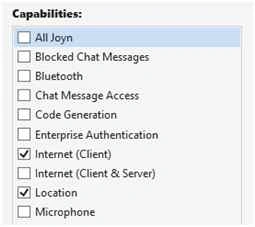
Figure 4
Running the Application
Now if you run the application it’ll look exactly like the following screenshot:
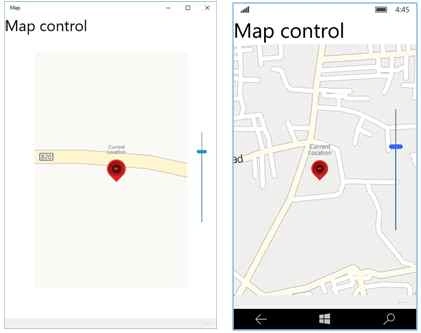
Figure 5
If you tap on the “MapIcon” it’ll show the location details on the Message Dialog Box.
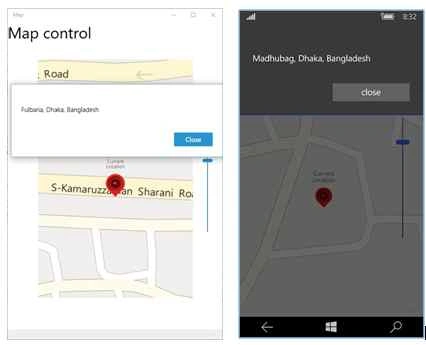
Figure 6
Using Polygon for Pushpin
Another thing, if don’t want to use external image as a “MapIcon”, you can use custom “Pushpin” like “Polygon” control. Then you’ve to modify the “OnNavigatedTo” method like the following code snippet:
- private async void MainPage_Loaded(object sender, RoutedEventArgs e)
- {
- // Map Token for testing purpose,
- // otherwise you'll get an alart message in Map Control
- MyMap.MapServiceToken = "abcdef-abcdefghijklmno";
- geolocator = new Geolocator();
- geolocator.DesiredAccuracyInMeters = 50;
- try
- {
- // Getting Current Location
- Geoposition geoposition = await geolocator.GetGeopositionAsync(maximumAge: TimeSpan.FromMinutes(5), timeout: TimeSpan.FromSeconds(10));
- // Create a New Pushpin
- var pushpin = CreatePushPin();
- MyMap.Children.Add(pushpin);
- // Setting up Pushpin location
- var location = new Geopoint(new BasicGeoposition()
- {
- Latitude = geoposition.Coordinate.Latitude,
- Longitude = geoposition.Coordinate.Longitude
- });
- MapControl.SetLocation(pushpin, location);
- // Position of the Pushpin
- MapControl.SetNormalizedAnchorPoint(pushpin, new Point(0.0, 1.0));
- // Showing in the Map
- await MyMap.TrySetViewAsync(location, 18 D, 0, 0, MapAnimationKind.Bow);
- // Disable the ProgressBar
- progressBar.Visibility = Windows.UI.Xaml.Visibility.Collapsed;
- // Set the Zoom Level of the Slider Control
- mySlider.Value = MyMap.ZoomLevel;
- }
- catch (UnauthorizedAccessException)
- {
- MessageBox("Location service is turned off!");
- }
- base.OnNavigatedTo(e);
- }
And “CreatePushPin” method is given below.
- private DependencyObject CreatePushPin()
- {
- // Creating a Polygon Marker
- Polygon polygon = new Polygon();
- polygon.Points.Add(new Point(0, 0));
- polygon.Points.Add(new Point(0, 50));
- polygon.Points.Add(new Point(25, 0));
- polygon.Fill = new SolidColorBrush(Colors.Red);
- // Return the Polygon Marker
- return polygon;
- }
Running the Application
Now, if you run the application, the marker will look like this.
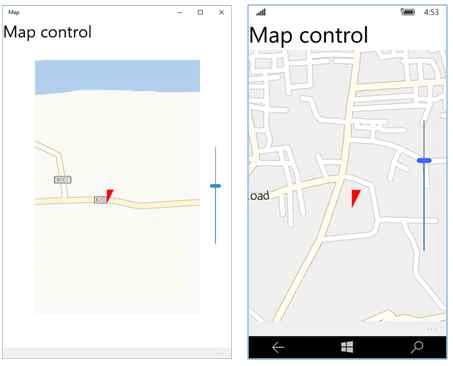
Figure 7
Peach Heading
One more thing I’d like to add is Pitch heading. To do this, you need to simply paste the following code in MainPage_Loaded method, under the try-catch block.
- private async void MainPage_Loaded(object sender, RoutedEventArgs e)
- {...
- MapScene spaceNeedleScene = MapScene.CreateFromLocationAndRadius(mapIcon.Location, 400, /* show this many meters around */ 135, /* looking at it to the south east*/ 60 /* degrees pitch */ );
- }
- catch ()
- {}
- }
And if your run the application, it will give you much different view from angle of sixty degrees.
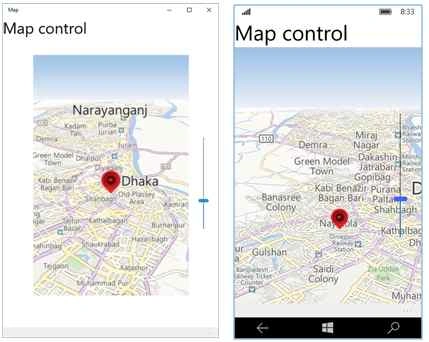
Figure 8
Map Overlaying
One more thing I’d like to add is overlaying tiled images on a map. If you want to overlay third-party or custom tiled images on the map and make it customized, then you simply need to use the following lines of code in the “MainPage_Loaded” method at the top.
- private async void MainPage_Loaded(object sender, RoutedEventArgs e)
- {
- ...
- var httpsource = new HttpMapTileDataSource("http://a.tile.openstreetmap.org/{zoomlevel}/{x}/{y}.png");
- var ts = new MapTileSource(httpsource);
- MyMap.TileSources.Add(ts);...
- }
And if your run the application, it will provide you a much more graphical view than before with some details.
Figure 9
Summary
And that’s it! Hope you understood, how to use “MapControl” in Universal Windows Platform. Have fun with Map Control and make some cool applications with it. Read more about Maps and directions at – GitHub.
Happy Coding!
You can download the full source code, here.
Banketeshvar NarayanPosted Nov 18, 2015, 4:28 AM
Nice
James CroftPosted Nov 17, 2015, 4:35 AM
A great tutorial on getting started with the Map control!
Santhakumar MunuswamyPosted Nov 16, 2015, 4:43 AM
Good one
Harshad PansuriyaPosted Nov 16, 2015, 1:25 AM
Nice one
Ankit BansalPosted Nov 16, 2015, 1:07 AM
Nice...thanks for sharing
Anish AnsariPosted Nov 16, 2015, 12:35 AM
Nice