

Background
In earlier ASP.NET file upload control we needed to write lots of code to upload files, validate file extension and get files from upload control. Also lots of server resources were involved due to server control. Now in ASP.NET MVC we don't need to write lots of code. You can validate file extension and create html input file upload control using Data Annotation class without writing much code. So let us learn about the ASP.NET MVC strongly typed File Upload control step-by-step.
What is strongly typed control in ASP.NET MVC
The control which is created using model class property is called strongly typed control. Now let us demonstrate the preceding explanation by creating a sample ASP.NET MVC application as follows:
Step 1: Create an MVC Application.
In earlier ASP.NET file upload control we needed to write lots of code to upload files, validate file extension and get files from upload control. Also lots of server resources were involved due to server control. Now in ASP.NET MVC we don't need to write lots of code. You can validate file extension and create html input file upload control using Data Annotation class without writing much code. So let us learn about the ASP.NET MVC strongly typed File Upload control step-by-step.
What is strongly typed control in ASP.NET MVC
The control which is created using model class property is called strongly typed control. Now let us demonstrate the preceding explanation by creating a sample ASP.NET MVC application as follows:
Step 1: Create an MVC Application.
Now let us start with a step by step approach from the creation of a simple MVC application as in the following:
- "Start", then "All Programs" and select "Microsoft Visual Studio 2015".
- Click "File", then "New" and click "Project", then select "ASP.NET Web Application Template", then provide the Project a name as you wish and click OK. After clicking, the following window will appear:

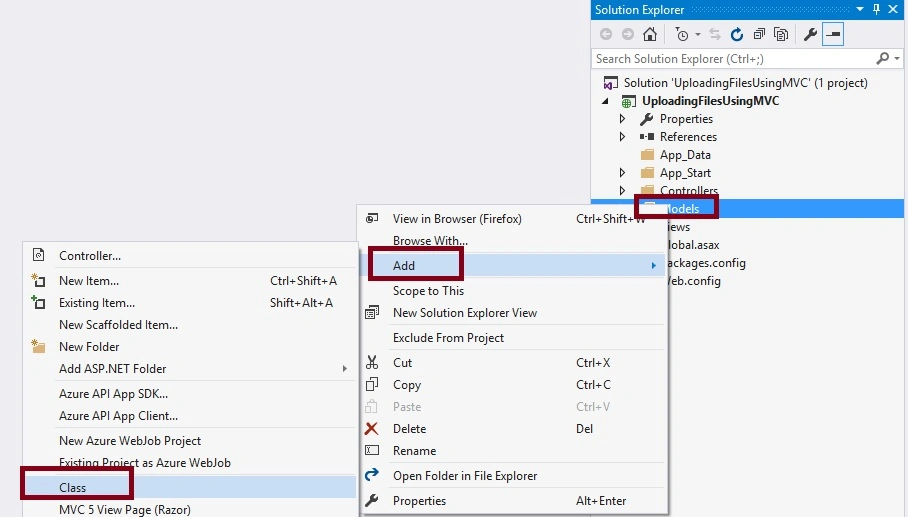
Now let us create the model class named FileUploadModel.cs by right clicking on Models folder as in the following screenshot:
Note:
It is not mandatory that Model class should be in Model folder, it is just for better readability. You can create this class anywhere in the solution explorer. This can be done by creating different folder name or without folder name or in a separate class library.
FileUploadModel.cs class code snippet:
- public class FileUploadModel
- {
- [DataType(DataType.Upload)]
- [Display(Name = "Upload File")]
- [Required(ErrorMessage = "Please choose file to upload.")]
- public string file { get; set; }
- }
Step 3 : Add Controller Class.
Now let us add the MVC 5 controller as in the following screenshot:

After clicking on Add button it will show the window. Specify the Controller name as FileUpload with suffix Controller.
Note:
Now let us add the MVC 5 controller as in the following screenshot:
After clicking on Add button it will show the window. Specify the Controller name as FileUpload with suffix Controller.
Note:
The controller name must be having suffix as 'Controller' after specifying the name of controller. Now lets modify the default code in FileUploadController.cs to read uploaded files .
There are many ways to read the uploaded files in controller but in this article we will learn two ways to read the uploaded files into the controller which are listed below,
There are many ways to read the uploaded files in controller but in this article we will learn two ways to read the uploaded files into the controller which are listed below,
- HttpRequestBase: We can use HttpRequestBase class property named Request to get collection of files or single file.
- HttpPostedFileBase: This is the easiest way to read the uploaded files into the controller .
Now let's open the FileUploadController.cs class file and write the following code to read file using HttpRequestBase class.
Method 1 : Code snippet to read files using HttpRequestBase class as,
Method 1 : Code snippet to read files using HttpRequestBase class as,
- [HttpPost]
- public ActionResult UploadFiles(HttpPostedFileBase file)
- {
- if (ModelState.IsValid)
- {
- try
- {
- //Method 1 Get file details from current request
- if (Request.Files.Count > 0)
- {
- var Inputfile = Request.Files[0];
- if (Inputfile != null && Inputfile.ContentLength > 0)
- {
- var filename = Path.GetFileName(Inputfile.FileName);
- var path = Path.Combine(Server.MapPath("~/uploadedfile/"), filename);
- Inputfile.SaveAs(path);
- }
- }
- ViewBag.FileStatus = "File uploaded successfully.";
- }
- catch (Exception)
- {
- ViewBag.FileStatus = "Error while file uploading."; ;
- }
- }
- return View("Index");
- }
Method 2 : Code snippet to read files using HttpPostedFileBase class as,
- [HttpPost]
- public ActionResult UploadFiles(HttpPostedFileBase file)
- {
- if (ModelState.IsValid)
- {
- try
- {
- //Method 2 Get file details from HttpPostedFileBase class
- if (file != null)
- {
- string path = Path.Combine(Server.MapPath("~/UploadedFiles"), Path.GetFileName(file.FileName));
- file.SaveAs(path);
- }
- ViewBag.FileStatus = "File uploaded successfully.";
- }
- catch (Exception)
- {
- ViewBag.FileStatus = "Error while file uploading."; ;
- }
- }
- return View("Index");
- }
Let's combine the code of both the methods in FileUploadController.cs file then the code will look like as follows,
- using System;
- using System.IO;
- using System.Web;
- using System.Web.Mvc;
- namespace UploadingFilesUsingMVC.Controllers
- {
- public class FileUploadController : Controller
- {
- // GET: FileUpload
- public ActionResult Index()
- {
- return View();
- }
- [HttpPost]
- public ActionResult UploadFiles(HttpPostedFileBase file)
- {
- if (ModelState.IsValid)
- {
- try
- {
- //Method 1 Get file details from current request
- //Uncomment following code if you wants to use method 1
- //if (Request.Files.Count > 0)
- // {
- // var Inputfile = Request.Files[0];
- // if (Inputfile != null && Inputfile.ContentLength > 0)
- // {
- // var filename = Path.GetFileName(Inputfile.FileName);
- // var path = Path.Combine(Server.MapPath("~/uploadedfile/"), filename);
- // Inputfile.SaveAs(path);
- // }
- // }
- //Method 2 Get file details from HttpPostedFileBase class
- if (file != null)
- {
- string path = Path.Combine(Server.MapPath("~/UploadedFiles"), Path.GetFileName(file.FileName));
- file.SaveAs(path);
- }
- ViewBag.FileStatus = "File uploaded successfully.";
- }
- catch (Exception)
- {
- ViewBag.FileStatus = "Error while file uploading.";
- }
- }
- return View("Index");
- }
- }
- }
Step 4 : Creating strongly typed view named Index using FileUploadModel class .
Right click on View folder of created application and choose add view, select FileUploadModel class and create scaffolding template to create view to upload files as,

Click on Add button, then it will create the view named index. Now open the Index.cshtml view, then the following default code you will see which is generated by MVC scaffolding template as,
Index.cshtml
Right click on View folder of created application and choose add view, select FileUploadModel class and create scaffolding template to create view to upload files as,
Click on Add button, then it will create the view named index. Now open the Index.cshtml view, then the following default code you will see which is generated by MVC scaffolding template as,
Index.cshtml
- @model UploadingFilesUsingMVC.Models.FileUploadModel
- @{
- ViewBag.Title = "www.compilemode.com";
- }
- @using (Html.BeginForm("UploadFiles", "FileUpload", FormMethod.Post,new { enctype = "multipart/form-data" }))
- {
- @Html.AntiForgeryToken()
- <div class="form-horizontal">
- <hr />
- @Html.ValidationSummary(true, "", new { @class = "text-danger" })
- <div class="form-group">
- @Html.LabelFor(model => model.file, htmlAttributes: new { @class = "control-label col-md-2" })
- <div class="col-md-10">
- @Html.EditorFor(model => model.file, new { htmlAttributes = new { @class = "form-control", @type="file"} })
- @Html.ValidationMessageFor(model => model.file, "", new { @class = "text-danger" })
- </div>
- </div>
- <div class="form-group">
- <div class="col-md-offset-2 col-md-10">
- <input type="submit" value="Upload" class="btn btn-primary" />
- </div>
- </div>
- <div class="form-group">
- <div class="col-md-offset-2 col-md-10 text-success">
- @ViewBag.FileStatus
- </div>
- </div>
- </div>
- }
- <script src="~/Scripts/jquery-1.10.2.min.js"></script>
- <script src="~/Scripts/jquery.validate.min.js"></script>
- <script src="~/Scripts/jquery.validate.unobtrusive.min.js"></script>
Step 4 : Create a folder named UploadedFiles or as you wish to save uploaded files,
Right click on created ASP.NET MVC application, solution explorer and choose add new item, then Add New Folder. After adding the model, view, controller and UploadedFiles folder to save the file. Solution explorer will look like as follows,
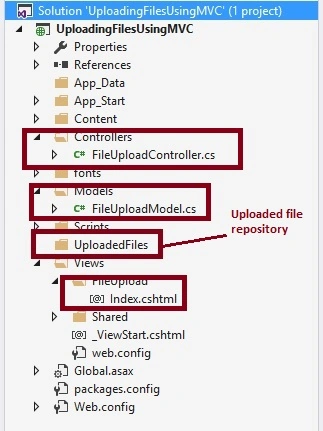
Right click on created ASP.NET MVC application, solution explorer and choose add new item, then Add New Folder. After adding the model, view, controller and UploadedFiles folder to save the file. Solution explorer will look like as follows,
Now we have done all coding to upload files.
Step 5: Now run the application. After running the application initial screen will look as follows,

Now click on Upload button without selecting file then the following error message is visible which we have defined in model class as,

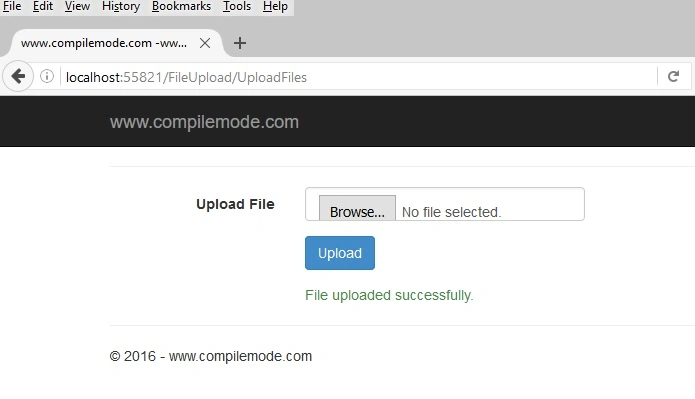
Now browse the file and click on upload button, It will show the following message after successfully uploading the file as,
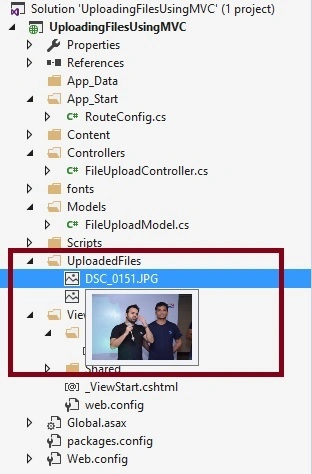
Now lets see the UploadedFiles folder where our uploaded files are saved, Browse the folder or move the mouse cursor or image then uploaded image will look like as follows,
I hope from allthe preceding examples we have learned how to upload files using strongly typed file uploader in ASP.NET MVC .
Note:
- HttpPostedFileBase instance name must be a file.
- Model class property name must be file so it can generate the input type file .
- Its important to define enctype = "multipart/form-data" in form action otherwise file value will be null in controller .
- Download the Zip file of the sample application for a better understanding.
- Since this is a demo, it might not be using proper standards, so improve it depending on your skills.
- This application is created completely focusing on beginners.
I hope this article is useful for all readers. If you have any suggestions please contact me.
Read more articles on ASP.NET:
Chad AdventuresPosted Dec 3, 2018, 12:09 AM
I keep getting an error in view, It says model.file does not contain an extension and that file upload has no definition.
TonyPosted Sep 14, 2017, 3:31 PM
Hello, Can you tell me, what is it that causes the view to pass the "file" to the controller? I am having a terrible time trying to get this to work. The "file" is always null. There are no errors. Thanks, Tony
Kirankumar ShindePosted Jun 17, 2017, 3:26 AM
Nice But how can i upload files on basic of their name to the specific folders according to their file name and download the same
Kirankumar ShindePosted Jun 17, 2017, 3:25 AM
Nice Ek Numbar ................................................................................................................................................................................................
anuja jainPosted Apr 24, 2017, 2:28 PM
Cannot create view as it also wants db context after model name but there is no db ..only model.how to create the view now? it doesn't show in your screenshot as it may not have asked you to enter db context but it asks in mvc 5.
Vithal WadjePosted Apr 12, 2016, 5:24 AM
Thanks
Jaipal ReddyPosted Apr 12, 2016, 4:48 AM
Nice one sir. .
Vithal WadjePosted Apr 12, 2016, 1:56 AM
Thanks Pradeep Sahoo , Please check note section
Pradeep SahooPosted Apr 11, 2016, 11:50 PM
Nice info ..Thanks for sharing . It would be much better to check File size , file extension check and in case multiple file handling ....
Mohammed IbrahimPosted Apr 11, 2016, 1:47 PM
nice
Vithal WadjePosted Apr 11, 2016, 1:35 PM
Thanks
Kuppurasu NagarajPosted Apr 11, 2016, 1:15 PM
Nice Sharing
Vithal WadjePosted Apr 11, 2016, 11:24 AM
Thanks
NitinPosted Apr 11, 2016, 11:24 AM
Good one. Thanks for sharing.
Debasis SahaPosted Apr 11, 2016, 10:33 AM
Nice One...
Vithal WadjePosted Apr 11, 2016, 7:21 AM
Thanks to all . Let me know if you wants to add something
Upendra Pratap ShahiPosted Apr 11, 2016, 7:13 AM
Nice article Vithal Wadje Sir....thanks for sharing...
Vignesh ManiPosted Apr 11, 2016, 6:53 AM
Good
Humayun Kabir MamunPosted Apr 11, 2016, 3:58 AM
Nice...
Vithal WadjePosted Apr 11, 2016, 2:06 AM
Thanks Manoj sir , Let me know any feedback on improvements.
Manoj KulkarniPosted Apr 11, 2016, 2:05 AM
Nice article. Thank you for sharing