

Here are the steps,
- Create an Empty Web Form Application with C#.
- Switch ON server explorer: By default Its ON and Visible at toolbox side on, if not then CTRL+W, L.
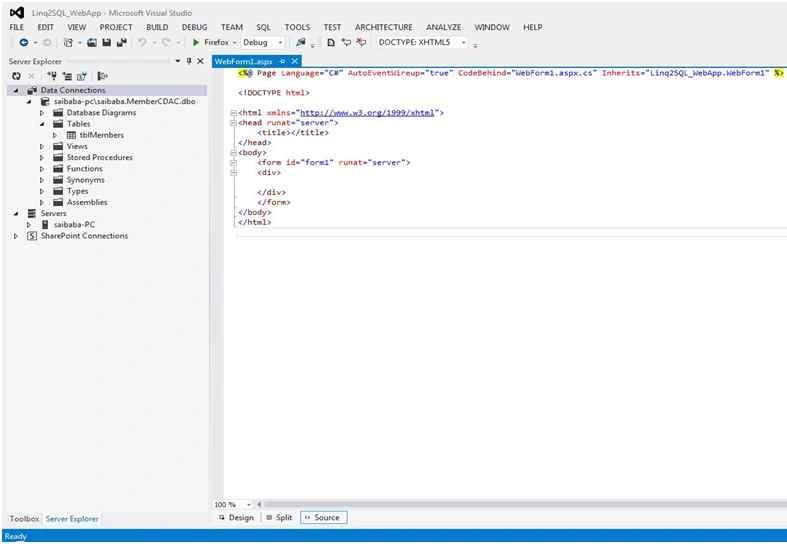
- Select Add connection to database or create a new SQL Server database from Server Explorer.
- Create a DBML file that is LINQ to SQL File.

- Double click on DBML. I have given the following file name: MemberCDAC_DataClasses.DBML
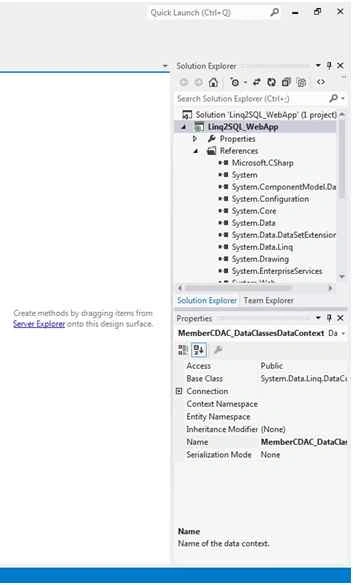
- Drag and Drop tblMembers on MemberCDAC_Database.DBML from Server Explorer
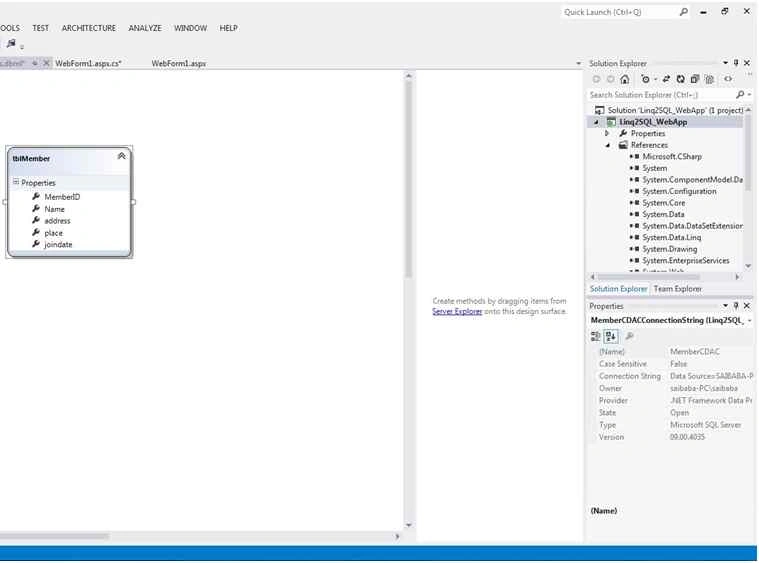
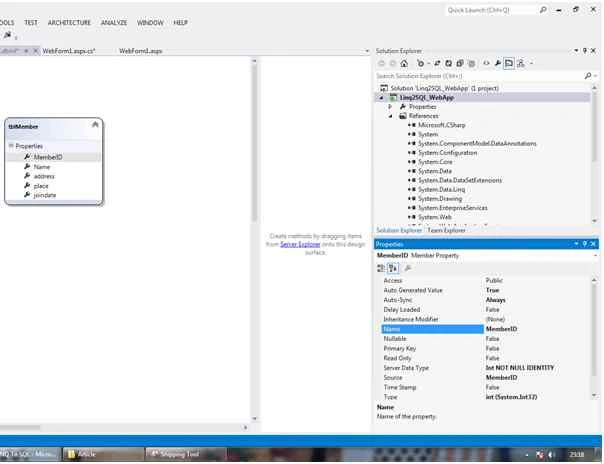
- Click on MemberID column of tblMember and check property window for detail.
Access: Public and Auto Generated Value : True.
You can set setting in property window. If any changes in table, then again drag n drop or update manually. Personally, I suggest delete table link from DBML and again drag and drop.
- When you configure server connection, drag and drop table into DBML canvas then system will automatically add connection string in WEB.CONFIG file.
- Web.Config file contains the following: I have used WINDOWS authentication connectionstrings.
<configuration>
    <connectionStrings>
        <add name="MemberCDACConnectionString" connectionString="Data Source=SAIBABA-PC\SAIBABA;Initial Catalog=MemberCDAC;Integrated Security=True" providerName="System.Data.SqlClient" /> </connectionStrings>
    <system.web>
        <compilation debug="true" targetFramework="4.5" />
        <httpRuntime targetFramework="4.5" /> </system.web>
</configuration>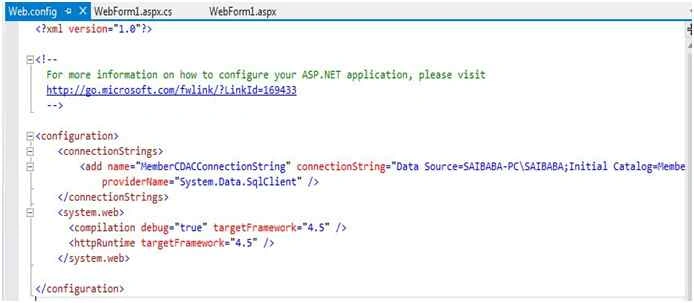
- For explaining LINQ 2 SQL, I have used a webform with the following controls as in the following:
Here's the aspx page.
Controls I have used:<%@ Page Language="C#" AutoEventWireup="true" CodeBehind="WebForm1.aspx.cs" Inherits="Linq2SQL_WebApp.WebForm1" %> <!DOCTYPE html> <html xmlns="http://www.w3.org/1999/xhtml"> <head runat="server"> <title>Member Entry</title> <style type="text/css"> .auto-style1 {} .auto-style2 { width: 141px; height: 23px; } .auto-style3 { height: 23px; } </style> </head> <body> <form id="form1" runat="server"> <div> <table style="width: 100%;"> <tr> <td class="auto-style1">Member ID</td> <td> <asp:Label ID="lblMemberID" runat="server" Text="[MemberID]"></asp:Label> </td> <td> </td> </tr> <tr> <td class="auto-style1">Name</td> <td> <asp:TextBox ID="txtName" runat="server" Width="265px"></asp:TextBox> </td> <td> </td> </tr> <tr> <td class="auto-style1">Address</td> <td> <asp:TextBox ID="txtAddress" runat="server" Height="167px" TextMode="MultiLine" Width="265px"></asp:TextBox> </td> <td> </td> </tr> <tr> <td class="auto-style1">Place</td> <td> <asp:TextBox ID="txtPlace" runat="server"></asp:TextBox> </td> <td> </td> </tr> <tr> <td class="auto-style1">Join Date</td> <td> <asp:TextBox ID="txtJoinDate" runat="server"></asp:TextBox> [Format : dd/mm/yyyy] </td> <td> </td> </tr> <tr> <td class="auto-style2"></td> <td class="auto-style3"></td> <td class="auto-style3"></td> </tr> <tr> <td class="auto-style1" colspan="3" style="text-align: left; padding-left: 150px"> <asp:Button ID="btnSave" runat="server" Text="Save" OnClick="btnSave_Click" Width="150px" /> </td> </tr> <tr> <td class="auto-style1"> </td> <td> </td> <td> </td> </tr> <tr> <td class="auto-style1"> </td> <td> </td> <td> </td> </tr> <tr> <td class="auto-style1" colspan="3"> <asp:GridView ID="GridView1" runat="server" Width="100%" AutoGenerateSelectButton="False" BackColor="#DEBA84" BorderColor="#DEBA84" BorderStyle="None" BorderWidth="1px" CellPadding="3" CellSpacing="2" AutoGenerateColumns="False" OnRowCommand="GridView1_RowCommand" OnRowDataBound="GridView1_RowDataBound" OnSelectedIndexChanged="GridView1_SelectedIndexChanged"> <FooterStyle BackColor="#F7DFB5" ForeColor="#8C4510" /> <HeaderStyle BackColor="#A55129" Font-Bold="True" ForeColor="White" /> <PagerStyle ForeColor="#8C4510" HorizontalAlign="Center" /> <RowStyle BackColor="#FFF7E7" ForeColor="#8C4510" /> <SelectedRowStyle BackColor="#738A9C" Font-Bold="True" ForeColor="White" /> <SortedAscendingCellStyle BackColor="#FFF1D4" /> <SortedAscendingHeaderStyle BackColor="#B95C30" /> <SortedDescendingCellStyle BackColor="#F1E5CE" /> <SortedDescendingHeaderStyle BackColor="#93451F" /> <Columns> <asp:TemplateField ShowHeader="False" ItemStyle-Width="50px"> <ItemTemplate> <asp:LinkButton ID="btnSelect" runat="server" CausesValidation="false" CommandName="Select" Text="Select" /> </ItemTemplate> </asp:TemplateField> <asp:BoundField DataField="MemberID" HeaderText="Member ID" ItemStyle-Width="20px"> <ItemStyle Width="20px"></ItemStyle> </asp:BoundField> <asp:BoundField DataField="Name" HeaderText="Member Name" ItemStyle-Width="300px"> <ItemStyle Width="200px"></ItemStyle> </asp:BoundField> <asp:BoundField DataField="Address" HeaderText="Address" ItemStyle-Width="500px"> <ItemStyle Width="350px"></ItemStyle> </asp:BoundField> <asp:BoundField DataField="Place" HeaderText="Place" ItemStyle-Width="100px"> <ItemStyle Width="100px"></ItemStyle> </asp:BoundField> <asp:BoundField DataField="JoinDate" DataFormatString="{0:dd/MM/yyyy}" HeaderText="Join Date" ItemStyle-Width="100px"> <ItemStyle Width="100px"></ItemStyle> </asp:BoundField> <asp:TemplateField ShowHeader="False" ItemStyle-Width="50px"> <ItemTemplate> <asp:LinkButton ID="btnNew" runat="server" CausesValidation="false" CommandName="NewMember" Text="New" /> </ItemTemplate> </asp:TemplateField> <asp:TemplateField ShowHeader="False" ItemStyle-Width="50px"> <ItemTemplate> <asp:LinkButton ID="btnDelete" runat="server" CausesValidation="false" CommandName="DeleteMember" Text="Delete" CommandArgument='<%# Container.DataItemIndex %>' /> </ItemTemplate> </asp:TemplateField> </Columns> </asp:GridView> </td> </tr> </table> </div> </form> </body> </html>Control Type Control Used Description Label lblMemberID Member ID display from table. TextBox txtName Get and Set Member Name. TextBox txtAddress Get and Set Member Address.
Change Following Property:
TextMode : MultiLineTextBox txtPlace Get and Set Member Place. TextBox txtJoinDate Get and Set Member Join Date. Button btnSave Dynamically used and rename this button for
Save : An new entry saved in table.
Update : For update existing entry.GridView GridView1 GridView to display records and functional button for Select, New and Delete activities. - The following LINQ 2 SQL queries used:
db is instance created of MemberCDAC_DataClassesDataContext.var db = new MemberCDAC_DataClassesDataContext();
db take care of Select, Insert and Update and Delete activities.
TYPE OF QUERY Query Text USED IN EVENT DESCRIPTION Select Query – Style 1 from a in db.tblMembers select a).ToList(); ( Created a BindGridView()
method, which used for loand and refresh data from table.GridView1.DataSource = (from a in db.tblMembers select a).ToList();
GridView1.DataBind();
GridView used this query directly as datasource.Select Query – Style 2 db.tblMembers.ToList(); Created a BindGridView()
method, which used for loand and refresh data from table.GridView1.DataSource = db.tblMembers.ToList();
GridView1.DataBind();Save Query //Insert new record in tblmembers
db.tblMembers.InsertOnSubmit(NewMember);
//Update table
db.SubmitChanges();btnSave_Click Syntax:
db.TableName.InsertOnSubmit(Class Object)
Example:
db.tblMembers.InsertOnSubmit(NewMember);
above command insert a new row in table.
db.SubmitChanges();
This will save and update table.Update Query int SelectMemberID = Convert.ToInt16(lblMemberID.Text);
var NewMember = (from a in db.tblMembers where a.MemberID == Convert.ToInt16(lblMemberID.Text) select a ).FirstOrDefault();
NewMember.Name = txtName.Text;
NewMember.address =txtAddress.Text;
NewMember.place = txtPlace.Text;
NewMember.joindate = DateTime.ParseExact(txtJoinDate.Text, "dd/MM/yyyy", CultureInfo.InvariantCulture);
//Update table
db.SubmitChanges();btnSave_Click Syntax:
For update command , first we have to create filled instance of Member object , then update current value from control like TextBox etc...
var NewMember = (from a in db.tblMembers where a.MemberID == Convert.ToInt16(lblMemberID.Text) select a ).FirstOrDefault();
NewMember.Name = txtName.Text;
db.SubmitChanges();
This will delete record from table.Delete Query db.tblMembers.DeleteOnSubmit(MemberDetail);
db.SubmitChanges();GridView1_RowCommand Syntax:
db.TableName.DeleteOnSubmit(Class Object)
Example:
db.tblMembers.DeleteOnSubmit(NewMember);
above command will mark a delete row in table.
db.SubmitChanges();
This will delete record from table.db.SubmitChanges(): This command required to execute on after activity like Insert, Update, Delete.
Recap Linq To SQL queries:
- Fetching All Members Records
(from a in db.tblMembers select a).ToList(); - Fetching a Particular Member Record
(from a in db.tblMembers where a.MemberID == TMemberID select a).FirstOrDefault(); - Insert Query
//Insert Blank Row in Table
db.tblMembers.InsertOnSubmit(NewMember);

//Update table
db.SubmitChanges();
Note: NewMember : Filled Class object with Datas. - Update Query
Firstly, you have to create object of member.Var NewMember =(from a in db.tblMembers where a.MemberID == TMemberID select a).FirstOrDefault(); NewMember.Name = txtName.Text; NewMember.address = txtAddress.Text; NewMember.place = txtPlace.Text; NewMember.joindate = DateTime.ParseExact(txtJoinDate.Text, "dd/MM/yyyy", CultureInfo.InvariantCulture); //Update table db.SubmitChanges(); - Delete Query
db.tblMembers.DeleteOnSubmit(MemberDetail);
db.SubmitChanges();
Code Behind File for Your Reference
using System;
using System.Collections.Generic;
using System.Globalization;
using System.Linq;
using System.Web;
using System.Web.UI;
using System.Web.UI.WebControls;
namespace Linq2SQL_WebApp
{
    public partial class WebForm1: System.Web.UI.Page
    {
        protected void Page_Load(object sender, EventArgs e)
        {
            BindGridView();
        }
        protected void BindGridView()
        {
            var db = new MemberCDAC_DataClassesDataContext();
            //Using Linq query
            GridView1.DataSource = (from a in db.tblMembers select a).ToList();
            GridView1.DataBind();
            // OR
            //Direct Using ToList
            GridView1.DataSource = db.tblMembers.ToList();
            GridView1.DataBind();
        }
        protected void btnSave_Click(object sender, EventArgs e)
        {
            var db = new MemberCDAC_DataClassesDataContext();
            //Save for add new member record in table.
            if (btnSave.Text == "Save")
            {
                //create tblmember instance.
                tblMember NewMember = new tblMember();
                NewMember.Name = txtName.Text;
                NewMember.address = txtAddress.Text;
                NewMember.place = txtPlace.Text;
                NewMember.joindate = DateTime.ParseExact(txtJoinDate.Text, "dd/MM/yyyy", CultureInfo.InvariantCulture);
                //Insert new record in tblmembers
                db.tblMembers.InsertOnSubmit(NewMember);
                //Update table
                db.SubmitChanges();
                //empty text box value.
                ClearTextBoxValue();
            }
            //Update for update existing member record in table.
            if (btnSave.Text == "Update")
            {
                int SelectMemberID = Convert.ToInt16(lblMemberID.Text);
                var NewMember = (from a in db.tblMembers where a.MemberID == Convert.ToInt16(lblMemberID.Text) select a).FirstOrDefault();
                NewMember.Name = txtName.Text;
                NewMember.address = txtAddress.Text;
                NewMember.place = txtPlace.Text;
                NewMember.joindate = DateTime.ParseExact(txtJoinDate.Text, "dd/MM/yyyy", CultureInfo.InvariantCulture);
                //Update table
                db.SubmitChanges();
                btnSave.Text = "Save";
                ClearTextBoxValue();
            }
            //Refresh gridview after new or update member.
            BindGridView();
        }
        private void ClearTextBoxValue()
        {
            lblMemberID.Text = "[MemberID]";
            txtName.Text = string.Empty;
            txtAddress.Text = string.Empty;
            txtPlace.Text = string.Empty;
            txtJoinDate.Text = string.Empty;
        }
        protected void GridView1_RowDataBound(object sender, GridViewRowEventArgs e)
        {}
        protected void GridView1_SelectedIndexChanged(object sender, EventArgs e)
        {
            btnSave.Text = "Update";
            var db = new MemberCDAC_DataClassesDataContext();
            //Get MemberID from gridview
            int TMemberID = Convert.ToInt32(GridView1.SelectedRow.Cells[1].Text);
            //Fetch particular member record from table directly with MemberID.
            var MemberDetail = (from a in db.tblMembers where a.MemberID == TMemberID select a).FirstOrDefault();
            lblMemberID.Text = Convert.ToString(MemberDetail.MemberID);
            txtName.Text = MemberDetail.Name;
            txtAddress.Text = MemberDetail.address;
            txtPlace.Text = MemberDetail.place;
            txtJoinDate.Text = Convert.ToDateTime(MemberDetail.joindate).ToString("dd/MM/yyyy");
        }
        protected void GridView1_RowCommand(object sender, GridViewCommandEventArgs e)
        {
            ClearTextBoxValue();
            if (e.CommandName == "NewMember")
            {
                btnSave.Text = "Save";
                ClearTextBoxValue();
                txtName.Focus();
            }
            if (e.CommandName == "DeleteMember")
            {
                int CurrentRowIndex = Convert.ToInt32(e.CommandArgument);
                GridViewRow gvRow = GridView1.Rows[CurrentRowIndex];
                var db = new MemberCDAC_DataClassesDataContext();
                //Get MemberID from gridview
                int TMemberID = Convert.ToInt32(gvRow.Cells[1].Text);
                //Fetch particular member record from table directly with MemberID.
                var MemberDetail = (from a in db.tblMembers where a.MemberID == TMemberID select a).FirstOrDefault();
                db.tblMembers.DeleteOnSubmit(MemberDetail);
                db.SubmitChanges();
                txtName.Focus();
                BindGridView();
            }
        }
    }
}
SQL Table Script for Your Reference
USE [MemberCDAC]
GO
/****** Object:  Table [dbo].[tblMembers]    Script Date: 11/29/2015 20:38:53 ******/
SET ANSI_NULLS ON
GO
SET QUOTED_IDENTIFIER ON
GO
CREATE TABLE [dbo].[tblMembers](
    [MemberID] [int] IDENTITY(1,1) NOT NULL,
    [Name] [nvarchar](50) NULL,
    [address] [nvarchar](500) NULL,
    [place] [nvarchar](50) NULL,
    [joindate] [datetime] NULL,
 CONSTRAINT [PK_tblMembers] PRIMARY KEY CLUSTERED
(
    [MemberID] ASC
)WITH (PAD_INDEX  = OFF, STATISTICS_NORECOMPUTE  = OFF, IGNORE_DUP_KEY = OFF, ALLOW_ROW_LOCKS  = ON, ALLOW_PAGE_LOCKS  = ON) ON [PRIMARY]
) ON [PRIMARY]
WebApplication View

Upendra Pratap ShahiPosted Nov 30, 2015, 4:38 AM
nice one sir..
Santhakumar MunuswamyPosted Nov 29, 2015, 11:44 PM
Good one
Ankur MistryPosted Nov 29, 2015, 11:25 PM
Nice
Banketeshvar NarayanPosted Nov 29, 2015, 11:22 PM
Nice Share... Very Helpful
Ajay GandhiPosted Nov 29, 2015, 11:10 PM
Good
Jaipal ReddyPosted Nov 29, 2015, 11:07 PM
Nice
Raja TPosted Nov 29, 2015, 10:38 PM
Nice Sir, thanks for sharing
Sourabh SomaniPosted Nov 29, 2015, 10:06 PM
Good one :)
Mukesh KumarPosted Nov 29, 2015, 1:25 PM
Good Start
Manoj KallaPosted Nov 29, 2015, 1:08 PM
Before running WebForm1.aspx make it as [SET AS START PAGE] by right click on webform1.aspx.