

Using SQLite in Xamarin.Forms is easy. In this blog post let’s see how to use SQLite in Xamarin.Forms
First let’s talk about few things that we should know while implementing SQLite.
The approach for incorporating SQLite.NET differs depending on the project template you select:
- PCL Solutions: PCL solutions can take advantage of the SQLite.NET PCL NuGet packages to easily incorporate database operations into the shared code by referencing the SQLite classes that ship in the NuGet. The Xamarin.Forms DependencyService is used to create the platform-specific SQLite connection that is required in this implementation.
- Shared Projects: Shared Projects can directly incorporate the Net source from GitHub and reference those SQLite classes. Compiler directives are used when platform-specific code is required (such as determining the location of the SQLite data file).
Most SQLite.NET code is shareable across all the platforms; only configuring the database connection and location of the SQLite database file requires platform-specific functionality. This is explained below for each solution type.
In this post I will use SQLite with Xamarin.Forms PCL template.
Create new project and add SQLite support
Let’s create new project and I named it “XamarinSqliteSample”.
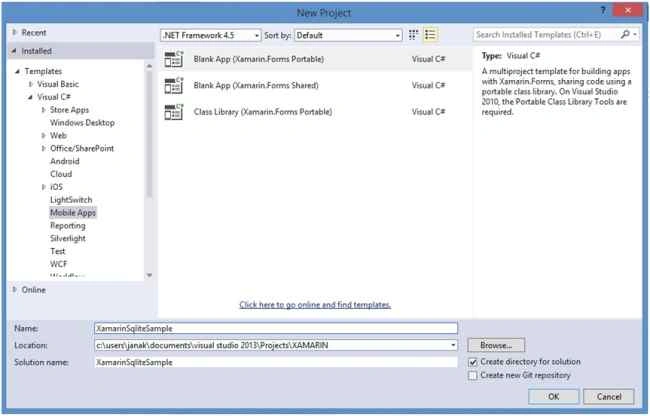
Now we need to install a new package into our project named SQLite.Net. This is a .NET wrapper around SQLite that will allow us to access the native SQLite functionality from a Xamarin.Forms PCL or shared project. To add SQLite support to a Xamarin.Forms PCL template solution, start with the shared PCL library. Right-click and choose Manage NuGet Packages to add SQLite.Net support.
Search SQLite.Net PCL and install the package as in the following screenshot:
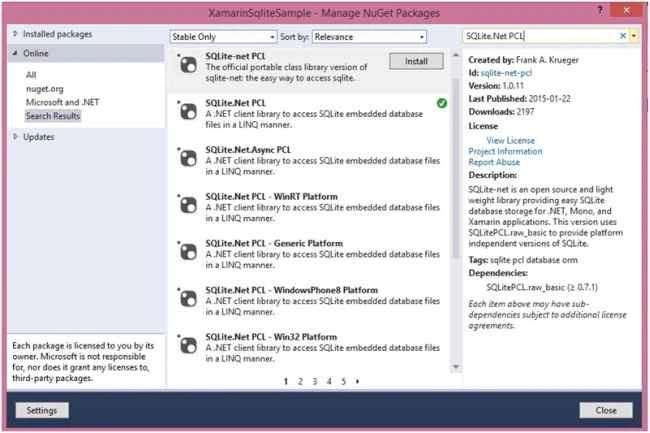
Once the reference has been added, write an Interface to abstract any platform-specific functionality. For SQLite.Net the only platform-specific work required is to determine the location of the database file and create a connection. Within your PCL project, create a new interface named ISQLite and replace the definition with the following:
- using SQLite.Net;
- namespace XamarinSqliteSample
- {
- public interface ISQLite
- {
- SQLiteConnection GetConnection();
- }
- }
Let’s create a Database
We now have access to the SQLite functionality and let’s define our database. In this simple application we are just keeping student records. Let’s call this class Student.
- using System;
- using SQLite.Net.Attributes;
- namespace XamarinSqliteSample
- {
- public class Student
- {
- [PrimaryKey, AutoIncrement]
- public int Id { get; set; }
- public string Name { get; set; }
- public string Address { get; set; }
- public string Phone { get; set; }
- public Student()
- {
- }
- }
- }
Now for simplicity let’s create a class that represents my database and keep all the logic to access the database and its tables within this class. I will call it StudentDB.
- using System.Collections.Generic;
- using System.Linq;
- using SQLite.Net;
- using Xamarin.Forms;
- namespace XamarinSqliteSample
- {
- public class StudentDB
- {
- private SQLiteConnection _sqlconnection;
- public StudentDB()
- {
- //Getting conection and Creating table
- _sqlconnection = DependencyService.Get<ISQLite>().GetConnection();
- _sqlconnection.CreateTable<Student>();
- }
- //Get all students
- public IEnumerable<Student> GetStudents()
- {
- return (from t in _sqlconnection.Table<Student>() select t).ToList();
- }
- //Get specific student
- public Student GetStudent(int id)
- {
- return _sqlconnection.Table<Student>().FirstOrDefault(t => t.Id == id);
- }
- //Delete specific student
- public void DeleteStudent(int id)
- {
- _sqlconnection.Delete<Student>(id);
- }
- //Add new student to DB
- public void AddStusent(Student student)
- {
- _sqlconnection.Insert(student);
- }
- }
- }
Secondly, we use the CreateTable method on the SQLiteConnection class to create a table called Student. This method will create the table, if it doesn’t already exist, and exit if it already exists.
iOS implementation
The main obstacle that we need to work around on the native side when using SQLite is where we are going to store the actual database file. This differs from platform to platform.
Before we can actually add any sort of SQLite functionality to the iOS project, we need to add the SQLite.Net PCL as well as the SQLite.NET PCL – XamarinIOS Platform packages to this project from Nuget as earlier. Once you have added these packages, you can start to write some SQLite code within the iOS project.
Let’s create class SQLite_iOS class and implement ISQLite interface.
- using System;
- using Xamarin.Forms;
- using XamarinSqliteSample.iOS;
- using System.IO;
- [assembly:Dependency(typeof(SQLite_iOS))]
- namespace XamarinSqliteSample.iOS
- {
- public class SQLite_iOS: ISQLite
- {
- public SQLite.Net.SQLiteConnection GetConnection ()
- {
- var fileName = "Student.db3";
- var documentsPath = Environment.GetFolderPath (Environment.SpecialFolder.Personal);
- var libraryPath = Path.Combine (documentsPath, "..", "Library");
- var path = Path.Combine (libraryPath, fileName);
- var platform = new SQLite.Net.Platform.XamarinIOS.SQLitePlatformIOS ();
- var connection = new SQLite.Net.SQLiteConnection (platform, path);
- return connection;
- }
- }
- }
Android implementation
Android implementation is also very similar to the iOS implementation only, the difference will be that the location of the database file will be different. Here also you need to add packages (SQLite.Net PCL and SQLite.NET PCL – XamarinAndroid) from Nuget. Now let’s create SQLite_Android class and implement ISQLite interface.
- using System;
- using System.IO;
- using Xamarin.Forms;
- using XamarinSqliteSample.Droid;
- [assembly: Dependency(typeof(SQLite_Android))]
- namespace XamarinSqliteSample.Droid
- {
- public class SQLite_Android: ISQLite
- {
- public SQLite.Net.SQLiteConnection GetConnection()
- {
- var filename = "Student.db3";
- var documentspath = Environment.GetFolderPath(Environment.SpecialFolder.Personal);
- var path = Path.Combine(documentspath, filename);
- var platform = new SQLite.Net.Platform.XamarinAndroid.SQLitePlatformAndroid();
- var connection = new SQLite.Net.SQLiteConnection(platform, path);
- return connection;
- }
- }
- }
Windows Phone Implementation
For Windows phone you should have to do a little more work. The SQLite database engine is built-in to the iOS and Android operating systems. To add SQLite support to Windows Phone projects follow this instruction.
After installing SQLite, lets add the packages from Nuget to our project SQLite.NetPCL and SQLite.Net PCL – WindowsPhone 8 Platform. With these packages installed, you can create the Windows Phone implementation of the ISQLite interface.
- using Xamarin.Forms;
- using XamarinSqliteSample.WinPhone;
- using System.IO;
- using Windows.Storage;
- [assembly: Dependency(typeof(SQLite_WinPhone))]
- namespace XamarinSqliteSample.WinPhone
- {
- public class SQLite_WinPhone: ISQLite
- {
- public SQLite_WinPhone()
- {
- }
- public SQLite.Net.SQLiteConnection GetConnection()
- {
- var filename = "Student.db3";
- var path = Path.Combine(ApplicationData.Current.LocalFolder.Path, filename);
- var platfrom = new SQLite.Net.Platform.WindowsPhone8.SQLitePlatformWP8();
- var connection = new SQLite.Net.SQLiteConnection(platfrom, path);
- return connection;
- }
- }
- }
Adding User Interface
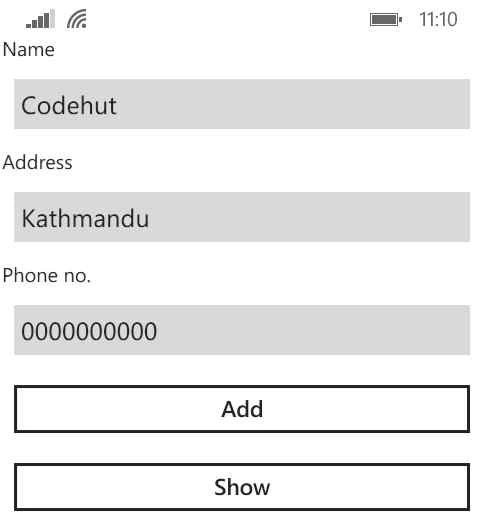
For this sample application I will make our interface simple. I have created two pages wherein first page (Register.Xaml) user can register student details and in second page (StudentList.Xaml) the list of added students is displayed.
Here is the code view of Register.xaml and Register.xaml.cs.
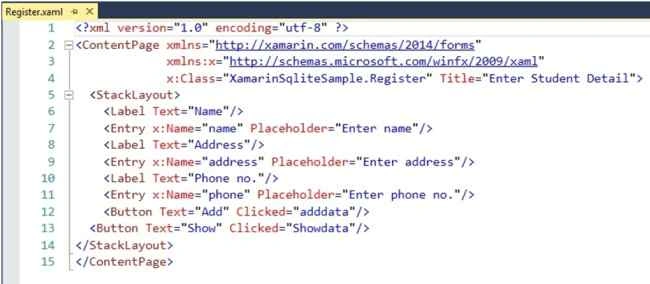
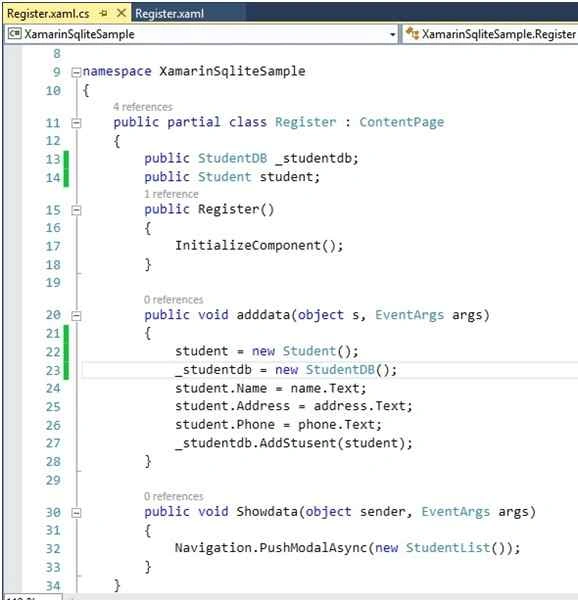
And here is the code view of StudentList.xaml and StudentList.xaml.cs.
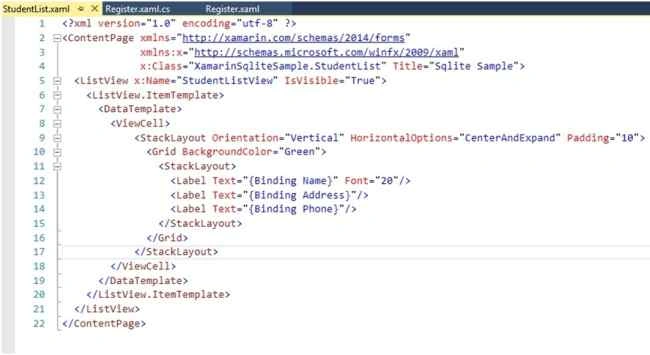
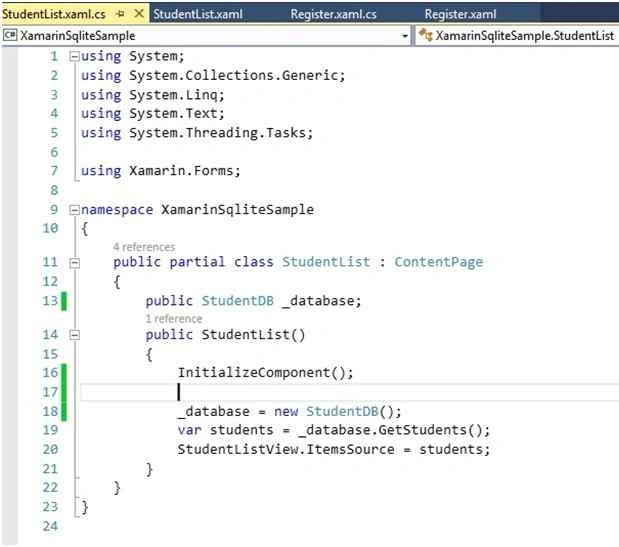
In my case I run this app in Windows Phone and it works fine. Here are the screenshots:

That’s it. Now you can add database functionality on your Xamarin.Forms app.
You can download complete code from here.
Happy Coding.
Sarthak ChauhanPosted Jan 29, 2018, 7:05 AM
What about updating Existing Row ,Really needed that
howard himpunPosted Oct 20, 2017, 10:17 PM
So, everytime we want make table, we have to create class and database class?
Luis LópezPosted Oct 23, 2016, 1:35 AM
Thanks for sharing us!
Asfend YarPosted Jul 19, 2016, 5:02 AM
Update is missing ? Try to complete all the functions .Otherwise it's a nice article ...
Harshad PansuriyaPosted Sep 11, 2015, 6:23 AM
Nice One
RakeshPosted Sep 9, 2015, 4:59 AM
Good work
Ankit BansalPosted Sep 9, 2015, 4:32 AM
thanks for sharing..
Karthikeyan KPosted Sep 8, 2015, 11:33 PM
Good one sir..Thanks for sharing us
Pankaj Kumar ChoudharyPosted Sep 8, 2015, 7:58 PM
Nice Explain..........
Santhakumar MunuswamyPosted Sep 8, 2015, 3:13 PM
Good One. Thanks for sharing
Mohammed IbrahimPosted Sep 8, 2015, 3:11 PM
nice share