

Introduction
In this article, we are going to discuss forms and their types in Angular with step-by-step practical implementation.
Prerequisites
- Basic understanding of typescript
- NodeJS
- Angular CLI
- Vs Code
What is Angular?
Angular is a popular open-source JavaScript framework for building web applications. It was developed by Google and is currently maintained by the Angular Team at Google. Angular allows developers to create dynamic, single-page applications (SPAs) and provides a structured approach to building complex web applications.
Forms in Angular
In Angular, Forms provides a set of features that help us handle and manage user input in a structured and efficient manner. Forms are the main part of web applications that allow users to interact with the application and submit data to the application.
Types of Forms in Angular
Angular provides the following two types of forms:
1. Template-Driven Forms
Template-driven forms are the basic forms that are suitable for the development of a limited number of fields and with simpler validation. In this form, each field is represented as a property in the component class. You Need to import FormsModule from the ‘@angular/forms’ package.
Following are the key concepts related to validation objects and properties that we used while creating the template-driven forms in Angular.
- ngForm Directive: This directive represents an angular form and exposes methods and properties related to it for validation and data manipulation purposes.
- ngModel Directive: This directive is used to achieve two-way data bindings between different form control elements.
- Validation Properties: Angular provides different validator properties that can be applied to form controls to indicate their validation state.
- Touched: A boolean indicating whether the control has been touched.
- Untouched: The opposite of touched
- Valid: A boolean indicating whether the control’s value is valid.
- Invalid: The opposite of valid
- Validation Directives: Angular provides several built-in validation directives that can be used with ngModel to perform validation. Some common ones include:
- Required: Ensures the control has a non-empty value.
- min length and max length: Specifies the minimum and maximum length for the value.
- Pattern: Validates the value against a regular expression.
- Email: Validates that the value is a valid email address.
2. Reactive Forms
Reactive forms, or model-driven forms, are the types of forms in Angular that are suitable for creating a large form with different form fields and complex validation. In the reactive form, each form field is considered a Form Control, and a set of form controls is called a Form Group.The validation rules are defined in the component with the Validators object, and validation messages can be displayed in the template with the help of the validation property. ReactiveFormModule needs to be imported from the ‘@angular/forms’ package.
Following are the key concepts related to validation objects and properties that we used while creating the reactive forms in Angular.
- FormControl - In Angular, form control represents individual form elements in the reactive form in angular. It also manages the different states and values of input form elements. It has different properties using which we can define validation rules.
- Value: It helps us to check the current value of form control.
- Status: Status represents the state of the form control.
- Valid: It is the boolean validation property that checks whether the control is valid.
- Invalid: It is the boolean validation property that checks whether the control is invalid.
- Errors: It’s the object that holds validation errors for the form control.
- Validators - Validators are functions that you can use to define validation rules for form controls.
- Required: Validates that the control has a non-empty value.
- Min and max: Validate that the control value is within a specified numeric range.
- Pattern: Validates the control value against a regular expression.
- Email: Validates that the control value is a valid email address.
- minLength and maxLength: Validate the length of the control value.
- FormGroup - A form group is a container for multiple form controls. It allows you to group related form controls together and manage their validation as a single unit.
- FormBuilder - The FormBuilder service is used for creating instances of FormGroup and FormControl while providing a convenient way to define validation rules.
Practical Implementation
Step 1 - Create a new Angular application.
ng new angular-forms
Step 2 - Install the bootstrap module with the help of the following command:
npm install bootstrap
Configure bootstrap in an Angular JSON file.
 "styles": [
              "src/styles.css",
              "./node_modules/bootstrap/dist/css/bootstrap.min.css"
            ],
            "scripts": [
              "./node_modules/bootstrap/dist/js/bootstrap.min.js"
            ]
Step 3 - Next, add two components to the newly created project.
ng g c components/template-driven-form
template-driven-form.component.html
<div class="container">
    <h2 class="heading">Template Driven Form</h2>
    <form #userForm="ngForm" (ngSubmit)="submitForm(userForm)">

      <div class="form-group">
        <label for="name">Name</label>
        <input type="text" class="form-control" id="name" name="name" [(ngModel)]="userDetails.name" required>
        <div *ngIf="userForm.controls.name?.touched && userForm.controls.name?.invalid" class="text-danger">
          Name is required.
        </div>
      </div>

      <div class="form-group">
        <label for="email">Email</label>
        <input type="email" class="form-control" id="email" name="email" [(ngModel)]="userDetails.email" required email>
        <div *ngIf="userForm.controls.email?.touched && userForm.controls.email?.invalid" class="text-danger">
          Please enter a valid email address.
        </div>
      </div>

      <div class="form-group">
        <label for="address">Address</label>
        <input type="text" class="form-control" id="address" name="address" [(ngModel)]="userDetails.address" required>
        <div *ngIf="userForm.controls.address?.touched && userForm.controls.address?.invalid" class="text-danger">
          Address is required.
        </div>
      </div>

      <div class="form-group">
        <label for="mobile">Mobile Number</label>
        <input type="tel" class="form-control" id="mobile" name="mobile" [(ngModel)]="userDetails.mobile" required pattern="[0-9]{10}">
        <div *ngIf="userForm.controls.mobile?.touched && userForm.controls.mobile?.invalid" class="text-danger">
          Please enter a valid mobile number.
        </div>
      </div>

      <div class="form-group">
        <label for="age">Age</label>
        <input type="number" class="form-control" id="age" name="age" [(ngModel)]="userDetails.age" required min="20" max="60">
        <div *ngIf="userForm.controls.age?.touched && userForm.controls.age?.invalid" class="text-danger">
          Please enter a valid age.
        </div>
      </div>

      <div class="form-group">
        <label for="gender">Gender</label>
        <select class="form-control" id="gender" name="gender" [(ngModel)]="userDetails.gender" required>
          <option value="" disabled>Select Gender</option>
          <option value="male">Male</option>
          <option value="female">Female</option>
          <option value="other">Other</option>
        </select>
        <div *ngIf="userForm.controls.gender?.touched && userForm.controls.gender?.invalid" class="text-danger">
          Please select a gender.
        </div>
      </div>

      <button type="submit" class="btn btn-primary">Submit</button>
    </form>
  </div>
template-driven-form.component.ts
import { Component } from '@angular/core';

@Component({
  selector: 'app-template-driven-form',
  templateUrl: './template-driven-form.component.html',
  styleUrls: ['./template-driven-form.component.css']
})
export class TemplateDrivenFormComponent {
  userDetails = {
    name: '',
    email: '',
    address: '',
    mobile: '',
    age: null,
    gender: ''
  };

  submitForm(form: any): void {
    if (form.valid) {
      console.log('Form data:', this.userDetails);
    }
  }
}
In this example, #userForm=”ngForm” creates a form reference that you can use to access the form controls. The [(ngModel)] directive establishes a two-way data binding between the input elements and properties of the user object in the component.
The validation directives (required and email) are applied to the form controls, and error messages are displayed conditionally based on the control’s state.
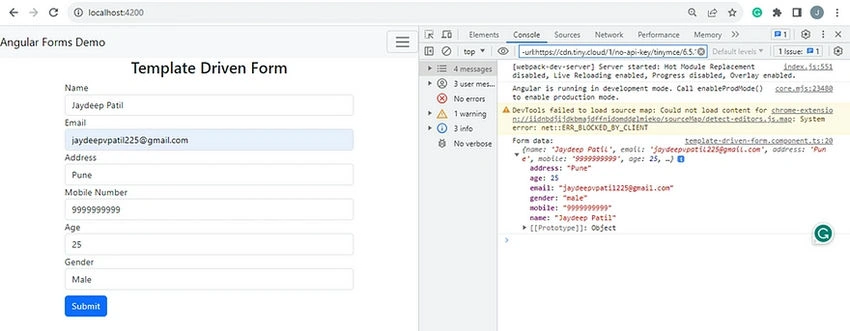
Next, create a reactive form, as shown below.
Create a new component using the following command.
ng g c components/reactive-form
reactive-form.component.html
<div class="container">
    <h2 class="heading">Reactive Form</h2>
    <form [formGroup]="userForm" (ngSubmit)="submitForm()">

        <div class="form-group">
        <label for="name">Name</label>
        <input type="text" class="form-control" id="name" formControlName="name">
        <div *ngIf="userForm?.get('name')?.invalid && userForm?.get('name')?.touched" class="text-danger">
          Name is required.
        </div>
      </div>

      <div class="form-group">
        <label for="email">Email</label>
        <input type="email" class="form-control" id="email" formControlName="email">
        <div *ngIf="userForm?.get('email')?.invalid && userForm?.get('email')?.touched" class="text-danger">
          Please enter a valid email.
        </div>
      </div>

      <div class="form-group">
        <label for="address">Address</label>
        <input type="text" class="form-control" id="address" formControlName="address">
        <div *ngIf="userForm?.get('address')?.invalid && userForm?.get('address')?.touched" class="text-danger">
          Address is required.
        </div>
      </div>

      <div class="form-group">
        <label for="mobile">Mobile Number</label>
        <input type="tel" class="form-control" id="mobile" formControlName="mobile">
        <div *ngIf="userForm?.get('mobile')?.invalid && userForm?.get('mobile')?.touched" class="text-danger">
          Please enter a valid mobile number.
        </div>
      </div>

      <div class="form-group">
        <label for="age">Age</label>
        <input type="number" class="form-control" id="age" formControlName="age">
        <div *ngIf="userForm?.get('age')?.invalid && userForm?.get('age')?.touched" class="text-danger">
          Please enter a valid age (between 1 and 120).
        </div>
      </div>

      <div class="form-group">
        <label for="gender">Gender</label>
        <select class="form-control" id="gender" formControlName="gender">
          <option value="" disabled>Select Gender</option>
          <option value="male">Male</option>
          <option value="female">Female</option>
          <option value="other">Other</option>
        </select>
        <div *ngIf="userForm?.get('gender')?.invalid && userForm?.get('gender')?.touched" class="text-danger">
          Please select a gender.
        </div>
      </div>

      <button type="submit" class="btn btn-primary">Submit</button>
    </form>
  </div>
reactive-form.component.ts
import { Component } from '@angular/core';
import { FormBuilder, FormGroup, Validators } from '@angular/forms';

@Component({
  selector: 'app-reactive-form',
  templateUrl: './reactive-form.component.html',
  styleUrls: ['./reactive-form.component.css']
})
export class ReactiveFormComponent {
  userForm: any;

  constructor(private formBuilder: FormBuilder) {}

  ngOnInit(): void {
    this.userForm = this.formBuilder.group({
      name: ['', Validators.required],
      email: ['', [Validators.required, Validators.email]],
      address: ['', Validators.required],
      mobile: ['', [Validators.required, Validators.pattern('[0-9]{10}')]],
      age: ['', [Validators.required, Validators.min(20), Validators.max(50)]],
      gender: ['', Validators.required]
    });
  }

  submitForm(): void {
    if (this.userForm?.valid) {
      console.log('Form data:', this.userForm.value);
    }
  }
}
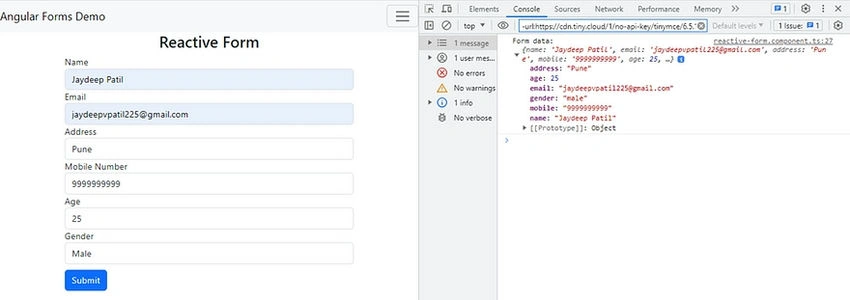
Conclusion
In this article, we discussed the basics of forms, which are available in angular, and their different types with step-by-step implantation with different validators and their properties.
Join the conversation! Your thoughts help the community grow.