

Introduction
In this article, we use the ListView control in WinJS. Here we bind the name and some images of the actors in a ListView. First of all, we create a data source and item template and bind a data source for elements which are name and photo.
So, we have to follow the steps given below.
Step 1
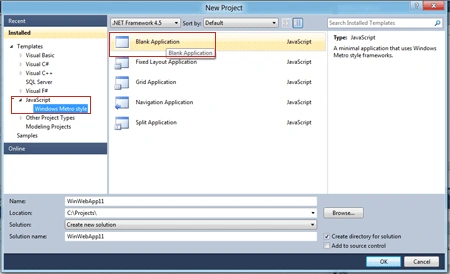
First of all, you have to create a new Metro Style Application; let us see the description with images of how to create it.
- Open Visual Studio 2011
- File>New>Project
- Choose Template>JavaScript> Blank Application
- Rename this Application
Step 2
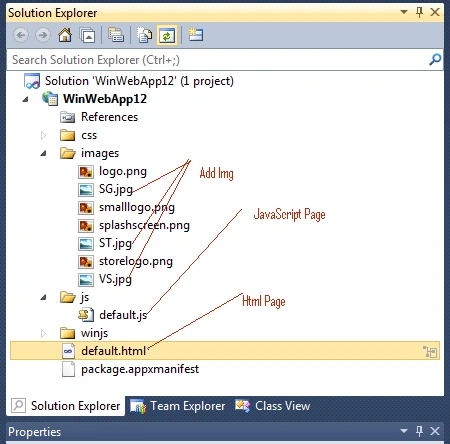
In the Solution Explorer, there are two files that we will primarily work with, default.js and default.html.
Step 3
Open the default.html page and add a ListView. The values of the data should be set to the id of the div. In the following code, we have to create a ListView.
Code
- <div id="ActorListView"
- data-win-control="WinJS.UI.ListView" style="height:185px;"
- data-win-options="{itemRenderer:Actoritemtemplate,layout:{type:WinJS.UI.GridLayout,maxRows:1}}" >
- </div>
Step 4
Here we bind the data source to the ListView. By fetching the ListView div and set the data source values by the created data source.
Code
- var ActorList = document.getElementById('ActorListView').winControl;
- ActorList.dataSource = ActorData;
Step 5
Putting it all together, the js file will have the code as shown below.
Code
Code
- (function () {
- 'use strict';
- // Uncomment the following line to enable first chance exceptions.
- // Debug.enableFirstChanceException(true);
- var ActorData = [
- { Name: 'Sharukh Khan', Photo: 'images/ST.jpg' },
- { Name: 'Salman Khan', Photo: 'images/SG.jpg' },
- { Name: 'Amir khan', Photo: 'images/VS.jpg' },
- { Name: 'Sharukh Khanr', Photo: 'images/ST.jpg' },
- { Name: 'Salman Khan', Photo: 'images/SG.jpg' },
- { Name: 'Amir khan', Photo: 'images/VS.jpg' }
- ];
- WinJS.Application.onmainwindowactivated = function (e) {
- if (e.detail.kind === Windows.ApplicationModel.Activation.ActivationKind.launch) {
- WinJS.UI.processAll().then(function () {
- var ActorList = document.getElementById('ActorListView').winControl;
- ActorList.dataSource = ActorData;
- ActorList.addEventListener('iteminvoked', SelectItem);
- });
- }
- }
- function SelectItem(e) {
- var selectedItem = ActorData[e.detail.itemIndex];
- var selecteActor = document.getElementById('selectedActor');
- selecteActor.innerText = selectedItem.Name;
- var selecteActorImg = document.getElementById('selectedActorImg');
- selecteActorImg.src = selectedItem.Photo;
- }
- WinJS.Application.start();
- })();
Step 6
In the default.html page, the code looks as given below.
Code
- <!DOCTYPE html>
- <html>
- <head>
- <meta charset="utf-8" />
- <title>DataBindingActors</title>
- <!-- WinJS references -->
- <link rel="stylesheet" href="/winjs/css/ui-dark.css" />
- <script src="/winjs/js/base.js"></script>
- <script src="/winjs/js/ui.js"></script>
- <script src="/winjs/js/binding.js"></script>
- <script src="/winjs/js/controls.js"></script>
- <script src="/winjs/js/animations.js"></script>
- <script src="/winjs/js/uicollections.js"></script>
- <script src="/winjs/js/wwaapp.js"></script>
- <!-- DataBindingActor references -->
- <link rel="stylesheet" href="/css/default.css" />
- <script src="/js/default.js"></script>
- </head>
- <body>
- <h2>Actors</h2>
- <br />
- <div id="Actoritemtemplate"
- data-win-control="WinJS.Binding.Template">
- <div data-win-bind="innerText:Name"
- style="height:20px;">
- </div>
- <img data-win-bind="src:Photo"
- style="width:200px;height:150px;" />
- </div>
- <div id="ActorListView"
- data-win-control="WinJS.UI.ListView" style="height:185px;"
- data-win-options="{itemRenderer:Actoritemtemplate,layout:{type:WinJS.UI.GridLayout,maxRows:1}}" >
- </div>
- <br />
- <div id="ouputDiv" >
- <span> </span>
- <span id="selectedActor" style="height:20px;" ></span> <br />
- <img id="selectedActorImg" style="width:200px;height:150px;"/>
- </div>
- </body>
- </html>
Step 7
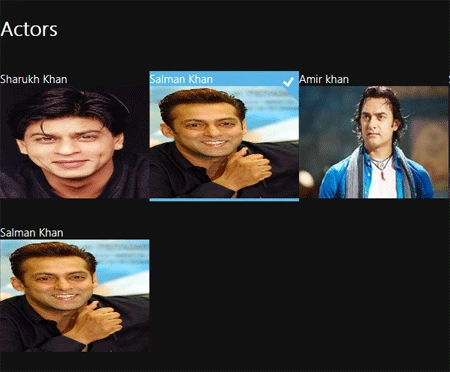
After applying this code, run this application and then we get the following output.
Resources
Summary
In this article, we learned about Building Windows 8 Metro Style JavaScript / HTML5 / CSS3 Applications Using ListView.
Join the conversation! Your thoughts help the community grow.