

A RadioButton and DropDownList plays a vital role in any project development and provide very essential function to work on. Hence here I am explaining how can we use radio buttons and dropdown list in ASP.NET MVC application.
Steps to use RadioButton and DropDownList
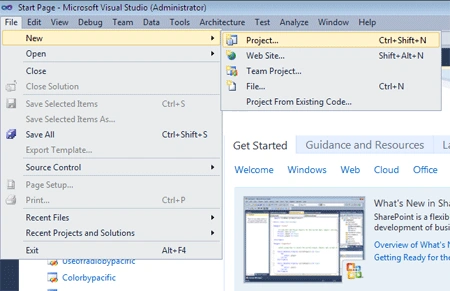
Step 1: Open Visual Studio 2010 and chose new>project
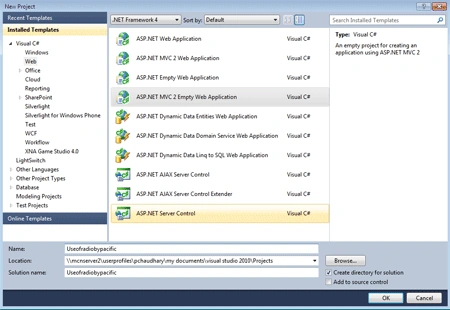
Step 2: Now select an empty asp.net mvc web application>Give name to the
application and click on add.
Step 3: Now firstly route the path in global.asax.cs by manipulating the
code as follows:
using
System;
using
System.Collections.Generic;
using
System.Linq;
using
System.Web;
using
System.Web.Mvc;
using
System.Web.Routing;
namespace
Useofradiobypacific
{
// Note: For instructions on enabling IIS6 or IIS7
classic mode,
// visit
http://go.microsoft.com/?LinkId=9394801
public class
MvcApplication : System.Web.HttpApplication
{
public static
void RegisterRoutes(RouteCollection
routes)
{
routes.IgnoreRoute("{resource}.axd/{*pathInfo}");
routes.MapRoute(
"Default",
// Route name
"{controller}/{action}/{id}",
// URL with parameters
new { controller =
"PC", action =
"Index", id = UrlParameter.Optional }
// Parameter defaults
);
}
protected void
Application_Start()
{
AreaRegistration.RegisterAllAreas();
RegisterRoutes(RouteTable.Routes);
}
}
}
Step 4:
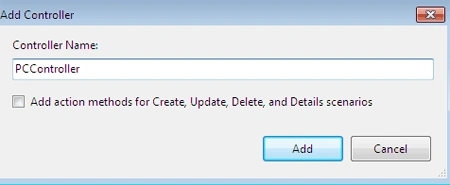
Now add a new controller by following these steps:
- Right click on the controller folder in solution explorer.
- Chose add>controller and name the controller as show.
Step 5: Code the controller as per user requirement as in this example we
want to use a radio button to chose the favorite technology and for the different
employee of an organization:
using
System;
using
System.Collections.Generic;
using
System.Linq;
using System.Web;
using
System.Web.Mvc;
namespace
Useofradiobypacific.Controllers
{
[HandleError]
public class
PCController :
Controller
{
public
ActionResult Index()
{
ViewData["Message"] =
"Welcome to MCN SOLUTION PVT LTD";
List<string>
NameList = new List<string>();
NameList.Add("Prashant");
NameList.Add("Akash");
NameList.Add("Arjun");
NameList.Add("Darwin");
ViewData["name"] =
new SelectList(NameList);
return View();
}
public
ActionResult HandleForm(string name,
string preferredtechnology)
{
ViewData["name"] = name;
ViewData["preferredtechnology"] =
preferredtechnology;
return View("FormResults");
}
}
}
Step 5: After adding a controller, now add a view for the actionresult for which there will be two different views:
- For Index
- For Handleform
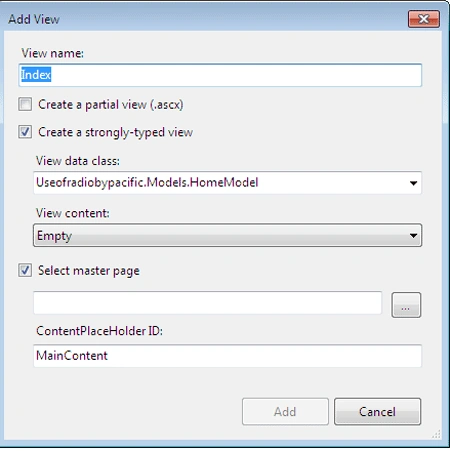
Step 6: Manipulate the Code of Index view as per user requirements
using HTML:
<%@
Control Language="C#"
Inherits="System.Web.Mvc.ViewUserControl<Useofradiobypacific.Models.HomeModel>"
%>
<h2><%=
Html.Encode(ViewData["Message"])
%></h2>
<br
/><br
/>
<%
using(Html.BeginForm("HandleForm",
"PC"))
%>
<%
{ %>
Enter your name: <%=
Html.DropDownList("name")%>
<br
/><br
/>
Select your favorite color:<br />
<%=
Html.RadioButton("preferredtechnology",
"DOTNET", true)
%>DOTNET <br
/>
<%=
Html.RadioButton("preferredtechnology",
"JAVA", false)%>
JAVA <br
/>
<%=
Html.RadioButton("preferredtechnology",
"PHP", false)%>
PHP <br
/>
<%=
Html.RadioButton("preferredtechnology",
"ORACLE", false)%>
ORACLE <br
/>
<br
/><br
/>
<input
type="submit"
value="Submit"
/>
<%
} %>
Step 7: Now change the code of Handleform view:
<%@
Control
Language="C#"
Inherits="System.Web.Mvc.ViewUserControl<Useofradiobypacific.Models.HomeModel>"
%>
<h2>FormResults</h2>
<p>
Your name:
<b><%=
Html.Encode(ViewData["name"])%></b>
</p>
<p>
Your favorite color:
<b><%=
Html.Encode(ViewData["favColor"])
%></b>
</p>
Now run the application to see
the effect and we can use the RadioButton and DropDownList:
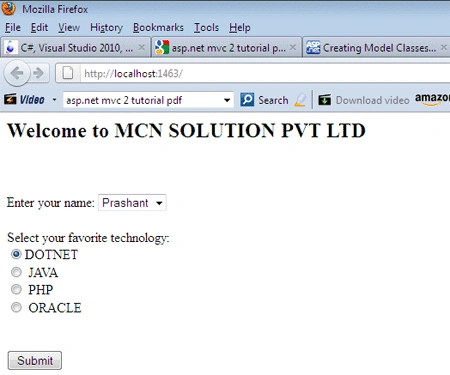
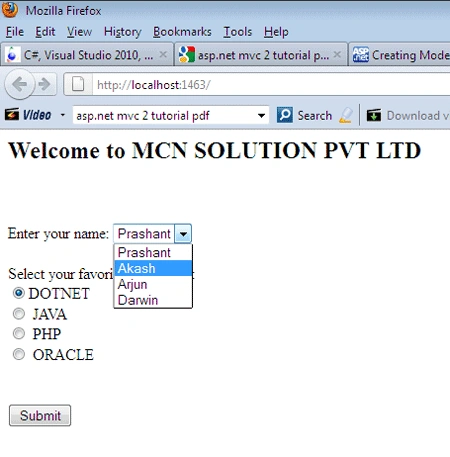
Image 2 showing dropdown list:
Conclusion : You can use these two tools any where in the application to make
your application more effective.
samhtc htcPosted Jun 18, 2013, 9:53 AM
You have not told how HomeModel looks like. The example you have provided does not make sense.
Kai AbatPosted Feb 1, 2013, 2:02 AM
Tnx for this.. :) but do you know how to add for loop in your radio button? so that if I will add a new record in the database it will automatically display the data in radio button?
Anekant KamatePosted Oct 8, 2012, 6:15 AM
How could i set image for radio button click event?????????
Anekant KamatePosted Oct 8, 2012, 6:15 AM
How could i set image for radio button click event?????????
amlucky amluckyPosted Apr 19, 2012, 10:30 AM
Hi, Could you please include Models.HomeModel code in the atricle. It would be very helpful for beginners lke me. Thanks.