1. Introduction

WPF seems to be a hot topic in the windows developer community these days, so I wanted to explore and learn it by writing an application and it is a TileGame
(See Figure.1) which I used to play as a child.  It seemed like a perfect fit for this because software provides much more flexibility than a plastic case, we can make
playing this game a much better experience and I thought following requirements would help in it.
-
Tiles should look like rounded squares rather than regular squares
-
When we place the mosue on a Tile square, it should change into a circle with rainbow colors
-
When we click on the Tile, It should move to an empty square via an animation
-
When all the Tiles are in order, the computer should congratulate us
-
It should be possible to know the number of moves.
-
It should be possible to undo
-
If we win, It should be possible to Replay from beginning.
So with these goals in mind, I wrote the game and used the following concepts in WPF.
-
Layouts in WPF
-
Attached properties
-
Styles
-
Control Templates.
-
Gradient Brushes
-
Dispatch Timer
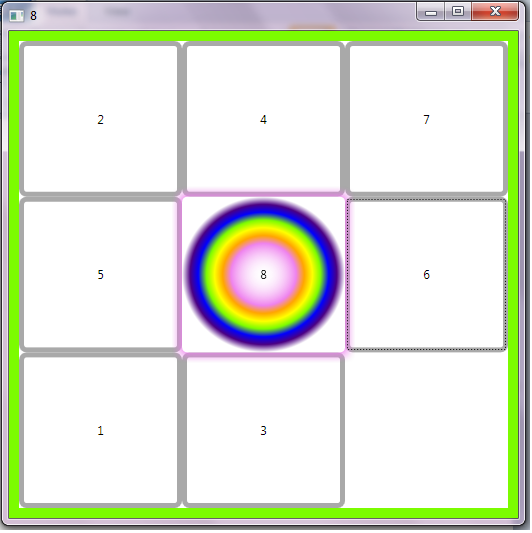
Figure 1

The following sections will explain the concepts in relation to the requirements for the Game.

2. GameBoard and Layouts in WPF

Designing the UI in WPF is quite different from earlier Dialog or Form based applications with the introduction of layout panels.  In the past, if we wanted to
create a layout as shown in Fig.(1) we would have created a dialog and dragged buttons on it, however we would have to of made code to make sure that
the layout looks good when the dialog resized or maximized, etc. But in WPF all these problems can be solved using panels. Panels let you define how you
want things are to be arranged, so you start adding |contents here buttons) to the layout and the layout automatically handles the measuring, sizing and
positioning of the contents in an appropriate way.

WPF provides us with several built-in panels, some of them are:
-
Canvas
-
StackPanel
-
DockPanel
-
WrapPanel
-
GridPanel
And a Custom panel can be written by deriving from a panel class and overriding/implementing the MeasureOverride() and ArrangeOverride() functions,
However GridPanel arranges contents into a Grid, so this would be perfectly suited for this game and we need not write custom panel.

3.Tiles with Numbers and Buttons in WPF

Now that the Gameboard layout is designed, it is time to think about the contents of the Grid. For conent we need something looking like squares and when
we click on it, it should move to the empty square. Click is natural on a button, so we will make the contents of the Grid buttons with Numbers.
(GridContent=>Buttons, ButtonContent=>Number).

4. Customizing Tiles (Buttons) with Control Templates

4.1.Tiles should look like rounded squares than regular squares

So we have a requirement that the buttons should appear as white rounded rectangles than the normal look and feel. Here again WPF is at its best; it
clearly separates the control's behavior from the control's look and feel. All the look and feel of a control is separated into a "ControlTemplate" and every
control comes with a default one and the most fascinating part is we can easily override it.

So we want to define a button which looks like a white rounded rectangle, so first we will have to define a style which applies to all buttons and define a
control template.

<Style  TargetType="local:GameButton">
   <Setter Property="Template">
       <Setter.Value>
             <ControlTemplate TargetType="Button">
	           <Rectangle x:Name="mainButton" Fill="White">
              </ControlTemplate>
       </Setter.Value>
    </Setter>
</Style>

This will affect all buttons and they look like WhiteRectangles, but they will neither have content nor behave like button (when we click, they remain the
same, no normal visual effects). To put the content back on the buttons, we need to use a special framework element called content presenter.  WPF
renders content when it encounters content presenter element, but templates can hold only one object, so we need to select element which has children,
here I have used Grid and it looks like below:

<Style  TargetType="local:GameButton">
   <Setter Property="Template">
       <Setter.Value>
             <ControlTemplate TargetType="Button">
		<Grid>
	           <Rectangle x:Name="mainButton" Fill="White" Stroke="DarkGray" StrokeThickness="5" RadiusX="5" RadiusY="5">
		   <ContentPresenter Margin="2" HorizontalAlignment="Center" VerticalAlignment="Center" />
		</Grid>
              </ControlTemplate>
       </Setter.Value>
    </Setter>
</Style>

4.2 2. When we place the mosue on a Tile square should change into circle with rainbow colors

The Control Template provides "Triggers" which allows controls to react to user events such as mouse move, mouse click, etc. So we want the button to
change into a circle with rainbow colors, so we need to define a rectangle and use radialgradientbrush with various gradient stops to render such a
rectangle. The code I used is shown below:

<Rectangle x:Name="buttonHoverButton" Opacity="0" RadiusX="5" RadiusY="5">
<Rectangle.Fill>
<RadialGradientBrush>
<GradientStop Color="White" Offset="1"/>
<GradientStop Color="Indigo" Offset="0.9"/>
<GradientStop Color="Blue" Offset="0.8"/>
<GradientStop Color="LawnGreen" Offset="0.7"/>
<GradientStop Color="Yellow" Offset="0.6"/>
<GradientStop Color="Orange" Offset="0.5"/>
<GradientStop Color="Violet" Offset="0.4"/>
<GradientStop Color="Transparent" Offset="0"/>
</RadialGradientBrush>
</Rectangle.Fill>

These are not exactly rainbow colors exculding red but not in order, but it looked good enough, that last brush "<GradientStop Color="Transparent"
Offset="0"/>" is necessary so that content shows up.

Now that we have a look for each button, we need to associate this with the "MouseEnter" event and we do it this way in WPF, for this we need to use
WPF triggers:

<ControlTemplate.Triggers>
<EventTrigger RoutedEvent="Button.MouseEnter">
<EventTrigger.Actions>
<BeginStoryboard>
<Storyboard>
<DoubleAnimation Storyboard.TargetName="buttonHoverButton" Storyboard.TargetProperty="Opacity" To="1" Duration="0:0:0.25" />
</Storyboard>
</BeginStoryboard>
</EventTrigger.Actions>
</EventTrigger>

The Storyboard is for the animating effect when mouse enters the square, the rectangle will be invisible and will become in the duration specified.

Similarly other effects "Button.MouseLeave", "Button.IsPressed" are implemented.

5. Creating Tiles and Placing in Random Positions

Once the buttons are created, random numbers are generated and Tiles are randomly placed into positions generated by random numbers.

The functions
GenerateRandomNumbersList()
RandomizeTiles()

Have the necessary code, which use attached properties explained in the next section.

The number of tiles can be changed in the MainWindow class, changing nRows, nCols to 4 will generate 16 squares (15 tiles) Game.

6. Moving the Tiles and attached properties

Effectively Moving Buttons from one sqaure to an empty square is effectively changing the row and column of the grid and it would be nice if these thing
came as a method on each button, so we derive a class called GameButton and implement a Move() Method as follows.

public void Move()
{

   if (Math.Abs(emptysquare - position) == diff| Math.Abs(emptysquare - position) == 1)
    {
        lastemptysquare = emptysquare;
         //valid move //place from position to empty square
         int emptysquarerow = emptysquare / diff;
         int emptysquarecolumn = emptysquare % diff;

         SetValue(Grid.RowProperty, emptysquarerow);
         SetValue(Grid.ColumnProperty, emptysquarecolumn);

          //swap empty square and position
	  int temp = emptysquare;
          emptysquare = position; //new emptysquere
          position = temp;

	   PropertyChanged(this, new PropertyChangedEventArgs("MoveComplete"));
    }
}

If we want to place a button in Row "0" and Column "1", we would write it in XAML as

<Button Grid.Row="0" Grid.Column="1">

But as you see the position(row,col) of Button is not the member of Button, instead layout properties (in this case "Grid") are used and these are called
attached properties, because they are associated or attached to the child (here button) though they belong to another control (Grid).

The code equivalent
 button.SetValue(Grid.RowProperty, 0)
 button.SetValue(Grid.ColumnProperty, 1)
makes it more clear (notice that it is "Grid.RowProperty" rather than "Grid.Row").

Similar concepts are used in Placing Tiles in Random Positions.

7. Detecting the winning condition

The GameButton has the following functionality. It assigns an Id to each button and also tracks the position (Row and Column) of each button. The Game
will be complete if the id and position of the button match (i.e button 0 should be in location 0, button 1 should be in location 1, etc...).

checkforwinner() has the necessaru code.

8. Undo and Replay

a.) Undo:

Undo is fairly simple becuase of the symmetric nature of movement in buttons, forward move is button move is the button moving to the empty square, and
to undo it we simply need to click the same button again and it moves to old the position. so we just need to keep track of the button objects and call the
move() method.

b.) Replay:

However for replay we need to know which buttons are pressed and in what order to replay it, so we need to know the id and position of each button and
we need to keep track of this state as game progresses, so the GameStateButton class and the list of states are used to replay. (however for replay we
need to use DispatchTimer, so that user sees replay gradually than in an instant)

You will use a ContextMenu (RightClick) to use these features.

9. Conclusion

The concepts explained above clearly show how WPF makes UI programming an easy job and makes a programmer productive even with minimum knowledge.
(writing the same game in MFC would have been rather tedious). The program was developed in my spare time and I am still learning WPF, so if you find
bugs are better implementation , do not blame me :)