|
|
|
|
|
Similar ArticlesMost ReadTop RatedLatest
|
|
|
|
|
|

|
|
|

|
|
|
|
|
|
|
|
|
|
|

|
|
|

|
|
This article has been excerpted from book "Graphics Programming with GDI+".
We just saw how the printing process works in the .NET Framework. Now let's talk about how to write your first simple printing application. In this application we will send the text "Hello Printer!" to the printer from a Windows application. To create this application, follow the simple steps described here.
Using Visual Studio .NET, create a Windows application project names HelloPrinterSamp, as shown in Figure 11.6.
After we create the project, we add the following line to it:
using System.Drawing.Printing;
Then we add controls for a label, a combo box, and a button to the form. We change the Text and Name properties of the form and these controls. (See the online source code for more details.) The final form should look like Figure 11.7.
When you run this application, the combo box will display the available printer on your machine. You can select any printer from this list, and when you click the Hello Printer button, it will print "Hello Printer!" on your printer.
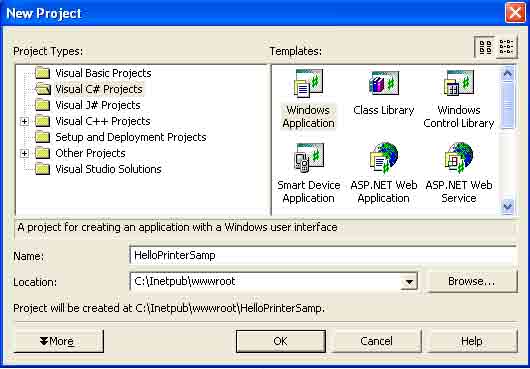
FIGURE 11.6: Creating a Windows application
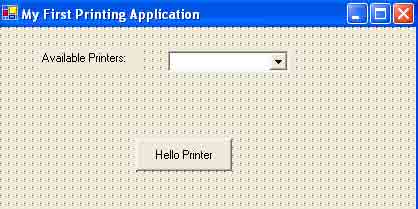
FIGURE 11.7: Your first printing application
We load the available printers on the form's load event handler. The PrinterSetting.InstalledPrinter property returns the installed printers on a machine. PrinterSettings.InstalledPrinters.Count returns the total number of printers. In Listing 11.2 we check if printers are installed on the machine, read them, and add them to the printer list combo box.
LISTING 11.2: Getting all installed printers
private void Form1_Load(object sender, System.EventArgs e)
{
//See if any printers are installed
if (PrinterSettings.InstalledPrinters.Count <= 0)
{
MessageBox.Show("Printer not found!");
return;
}
//Get all available printers and add them to the combo box
foreach (String printer in PrinterSettings.InstalledPrinters)
{
printersList.Itmes.Add(printer.ToString());
}
}
The next step is to add code to the Hello Printer button click event handler (see Listing 11.3). This code is responsible for printing. We create a PrintDocument object and set the PrintDocument.PrinterSettings.PrinterName property to the printer selected from the printer list combo box. Then we add print-page event handler and call the PrintDocument.Print method, which prints the document.
LISTING 11.3: The Hello printer button click event handler
private void HelloPrinterBtn_Click(object sender, System.EventArgs e)
{
//Create a PrintDocument object
PrintDocument pd = new PrintDocument();
//Set PrinterName as the selected printer in the printers list
pd. PrinterSetting.PrinterName =
printersList.SelectedItem.ToString();
//Add PrintPage event handler
pd.PrintPage + = new PrintPageEventHandler (pd_PrintPage);
//Print the document
pd.Print();
}
The last step is to add the print-page event handler code (see Listing 11.4). This code is responsible for creating a Graphics object for the printer. It calls the DrawString method, which is responsible for drawing text. First we create a Graphics object from PrintPageEventArgs.Graphics. Then we create Font and SolidBrush objects and call DrawString to draw some text on the printer. The DrawString method takes a string that represents the text to be drawn; the font; a brush; and a layout rectangle that represents the starting point, width, and height of a rectangle for the text.
LISTING 11.4: The print-page event handler
//The PrintPage event handler
public void pd_PrintPage(object sender, PrintPageEventArgs ev)
{
//Get the Graphics object
Graphics g = ev.Graphics;
//Create a font Arial with size 16
Font font = new Font("Arial", 16);
//Create a solid brush with black color
SolidBrush brush = new SolidBrush(Color.Black);
//Draw "Hello Printer!";
g.DrawString("Hello Printer!",
font, brush,
new Rectangle(20, 20, 200, 100));
}
Now you can run the application, select a printer from the list, and click the Hello Printer button. You should see "Hello Printer!" on you printed page.
Conclusion
Hope the article would have helped you in understanding Printing Application in GDI+. Read other articles on GDI+ on the website.
 |
This book teaches .NET developers how to work with GDI+ as they develop applications that include graphics, or that interact with monitors or printers. It begins by explaining the difference between GDI and GDI+, and covering the basic concepts of graphics programming in Windows. |
|