
Introduction
In this article, we will learn how we can export view page to PDF using Rotativa framework.
Rotativa is an open source framework created by Giorgio Bazio in order to export view page to PDF. This framework is based on wkhtmltoPDF tool which is used to generate PDF from HTML view page.
To build our application, we are using ASP.NET MVC 5. I hope it will be helpful for you.
Prerequisites
Make sure you have installed Visual Studio 2017 (.NET Framework 4.6.1) and SQL Server.
In this post, we are going to -
- Create Database.
- Create MVC application.
- Configuring Entity framework ORM to connect to the database.
- Installing Rotativa.
- Create Customer controller.
- Create HTML page for demo.
SQL Database part
Here, you find the scripts to create a database and its table.
Create Database
- USE [master]
- GO
- /****** Object: Database [DbPrintPDF] Script Date: 1/30/2018 8:56:29 PM ******/
- CREATE DATABASE [DbPrintPDF]
- CONTAINMENT = NONE
- ON PRIMARY
- ( NAME = N'DbPrintPDF', FILENAME = N'c:\Program Files (x86)\Microsoft SQL Server\MSSQL11.MSSQLSERVER\MSSQL\DATA\DbPrintPDF.mdf' , SIZE = 4096KB , MAXSIZE = UNLIMITED, FILEGROWTH = 1024KB )
- LOG ON
- ( NAME = N'DbPrintPDF_log', FILENAME = N'c:\Program Files (x86)\Microsoft SQL Server\MSSQL11.MSSQLSERVER\MSSQL\DATA\DbPrintPDF_log.ldf' , SIZE = 1024KB , MAXSIZE = 2048GB , FILEGROWTH = 10%)
- GO
- ALTER DATABASE [DbPrintPDF] SET COMPATIBILITY_LEVEL = 110
- GO
- IF (1 = FULLTEXTSERVICEPROPERTY('IsFullTextInstalled'))
- begin
- EXEC [DbPrintPDF].[dbo].[sp_fulltext_database] @action = 'enable'
- end
- GO
- ALTER DATABASE [DbPrintPDF] SET ANSI_NULL_DEFAULT OFF
- GO
- ALTER DATABASE [DbPrintPDF] SET ANSI_NULLS OFF
- GO
- ALTER DATABASE [DbPrintPDF] SET ANSI_PADDING OFF
- GO
- ALTER DATABASE [DbPrintPDF] SET ANSI_WARNINGS OFF
- GO
- ALTER DATABASE [DbPrintPDF] SET ARITHABORT OFF
- GO
- ALTER DATABASE [DbPrintPDF] SET AUTO_CLOSE OFF
- GO
- ALTER DATABASE [DbPrintPDF] SET AUTO_CREATE_STATISTICS ON
- GO
- ALTER DATABASE [DbPrintPDF] SET AUTO_SHRINK OFF
- GO
- ALTER DATABASE [DbPrintPDF] SET AUTO_UPDATE_STATISTICS ON
- GO
- ALTER DATABASE [DbPrintPDF] SET CURSOR_CLOSE_ON_COMMIT OFF
- GO
- ALTER DATABASE [DbPrintPDF] SET CURSOR_DEFAULT GLOBAL
- GO
- ALTER DATABASE [DbPrintPDF] SET CONCAT_NULL_YIELDS_NULL OFF
- GO
- ALTER DATABASE [DbPrintPDF] SET NUMERIC_ROUNDABORT OFF
- GO
- ALTER DATABASE [DbPrintPDF] SET QUOTED_IDENTIFIER OFF
- GO
- ALTER DATABASE [DbPrintPDF] SET RECURSIVE_TRIGGERS OFF
- GO
- ALTER DATABASE [DbPrintPDF] SET DISABLE_BROKER
- GO
- ALTER DATABASE [DbPrintPDF] SET AUTO_UPDATE_STATISTICS_ASYNC OFF
- GO
- ALTER DATABASE [DbPrintPDF] SET DATE_CORRELATION_OPTIMIZATION OFF
- GO
- ALTER DATABASE [DbPrintPDF] SET TRUSTWORTHY OFF
- GO
- ALTER DATABASE [DbPrintPDF] SET ALLOW_SNAPSHOT_ISOLATION OFF
- GO
- ALTER DATABASE [DbPrintPDF] SET PARAMETERIZATION SIMPLE
- GO
- ALTER DATABASE [DbPrintPDF] SET READ_COMMITTED_SNAPSHOT OFF
- GO
- ALTER DATABASE [DbPrintPDF] SET HONOR_BROKER_PRIORITY OFF
- GO
- ALTER DATABASE [DbPrintPDF] SET RECOVERY SIMPLE
- GO
- ALTER DATABASE [DbPrintPDF] SET MULTI_USER
- GO
- ALTER DATABASE [DbPrintPDF] SET PAGE_VERIFY CHECKSUM
- GO
- ALTER DATABASE [DbPrintPDF] SET DB_CHAINING OFF
- GO
- ALTER DATABASE [DbPrintPDF] SET FILESTREAM( NON_TRANSACTED_ACCESS = OFF )
- GO
- ALTER DATABASE [DbPrintPDF] SET TARGET_RECOVERY_TIME = 0 SECONDS
- GO
- ALTER DATABASE [DbPrintPDF] SET READ_WRITE
- GO
Create Table
After creating the database, we will move to create the customers table.
Customers Table
- USE [DbPrintPDF]
- GO
- /****** Object: Table [dbo].[Customers] Script Date: 1/30/2018 8:56:59 PM ******/
- SET ANSI_NULLS ON
- GO
- SET QUOTED_IDENTIFIER ON
- GO
- SET ANSI_PADDING ON
- GO
- CREATE TABLE [dbo].[Customers](
- [CustomerId] [int] IDENTITY(1,1) NOT NULL,
- [CustomerName] [varchar](50) NULL,
- [CustomerEmail] [varchar](50) NULL,
- [CustomerPhone] [varchar](50) NULL,
- [CustomerCountry] [varchar](50) NULL,
- CONSTRAINT [PK_Customers] PRIMARY KEY CLUSTERED
- (
- [CustomerId] ASC
- )WITH (PAD_INDEX = OFF, STATISTICS_NORECOMPUTE = OFF, IGNORE_DUP_KEY = OFF, ALLOW_ROW_LOCKS = ON, ALLOW_PAGE_LOCKS = ON) ON [PRIMARY]
- ) ON [PRIMARY]
- GO
- SET ANSI_PADDING OFF
- GO
Create your MVC application
Open Visual Studio and select File >> New Project.
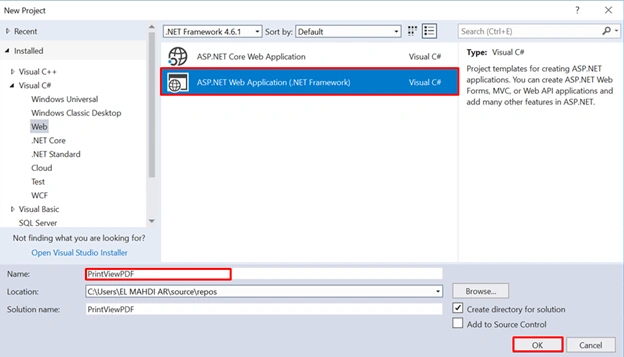
The "New Project" window will pop up. Select ASP.NET Web Application (.NET Framework), name your project, and click OK.
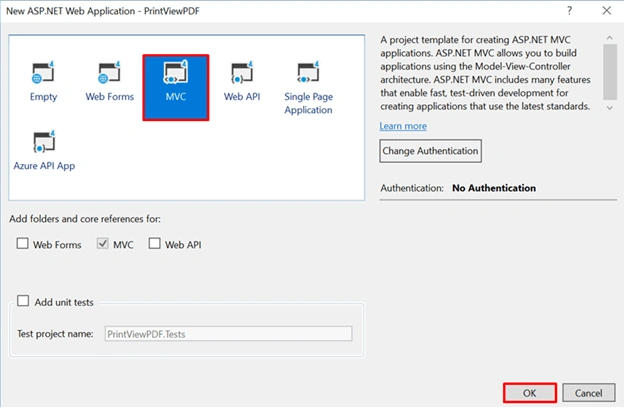
Next, a new dialog will pop up for selecting the template. We are going to choose MVC template and click OK.
Once our project is created, we will add ADO.NET Entity Data Model.
Adding ADO.NET Entity Data Model
In Solution Explorer, right-click on the project name, click Add >> Add New Item.
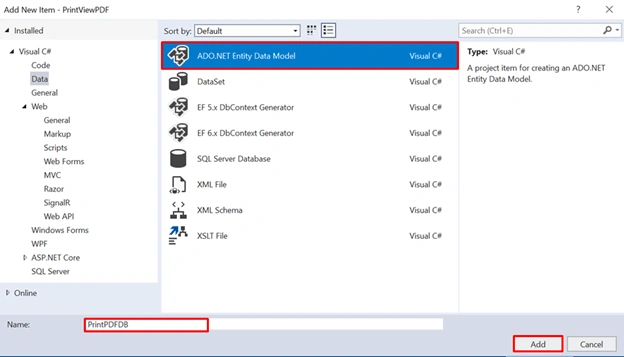
A dialog box will pop up. Inside Visual C#, select Data >> ADO.NET Entity Data Model, and enter the name for your DbContext model as PrintPDFDB, then click Add.
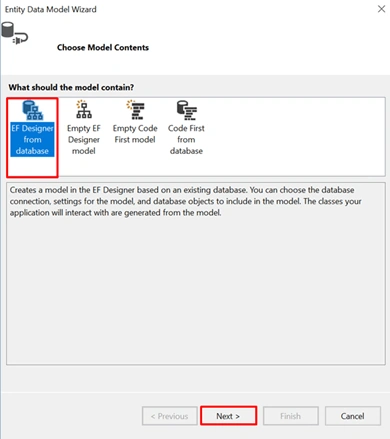
As you can see, we have 4 model contents. We are selecting the first approach (EF Designer from database).
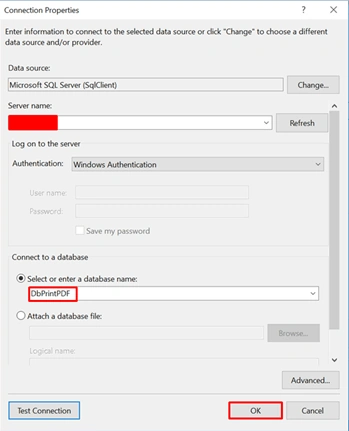
Next step, we need to select the server name, then via drop down list, connect to a database section. You must choose your database name and finally click OK.
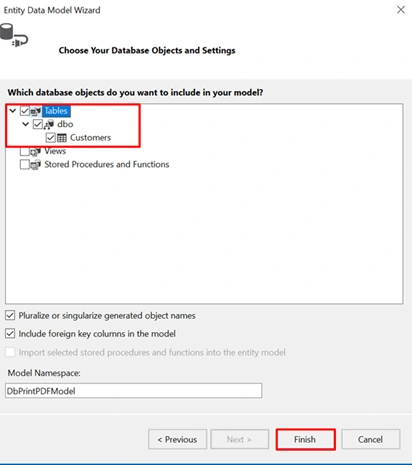
After that, the dialog Entity Data Model Wizard will pop up for choosing the objects which will be used in our application. We are selecting the customers table then click Finish.
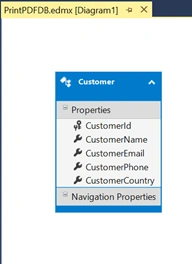
Finally, we see that EDMX model generates customers table as object, as shown below.
Install Rotativa
In Solution Explorer, right-click on References >> Manage NuGet Packages.
Now, in search input, type Rotativa, select the first line as shown below, and then click "Install".
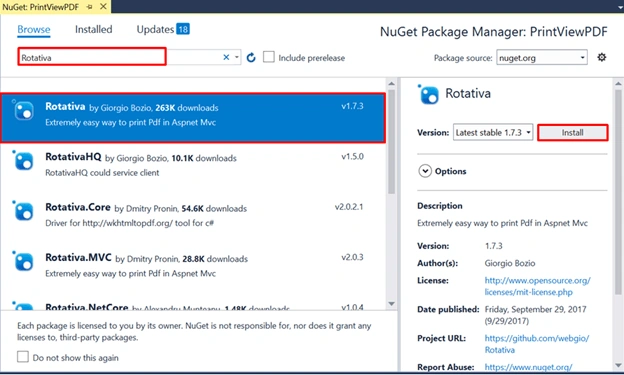
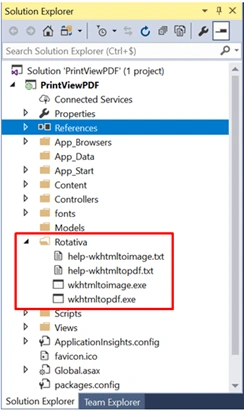
After installing Rotativa successfully, notice that Rotaiva folder has been added in Solution Explorer.
Create a controller
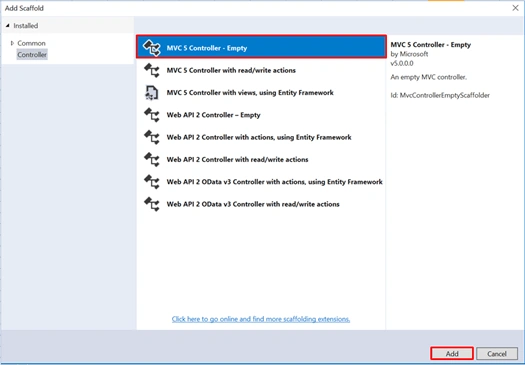
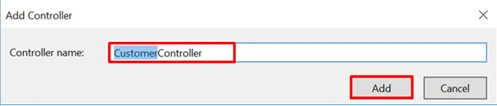
Now, we are going to create a Controller. Right-click on the Controllers folder> > Add >> Controller>> selecting MVC 5 Controller – Empty >> click Add. In the next dialog, name the controller as CustomerController and then click Add.
CustomerController.cs
- using Rotativa;
- using System;
- using System.Collections.Generic;
- using System.Linq;
- using System.Web;
- using System.Web.Mvc;
- namespace PrintViewPDF.Controllers
- {
- public class CustomerController : Controller
- {
- //DbPrintPDFEntities
- // GET: Customer
- public ActionResult Index()
- {
- using (DbPrintPDFEntities db = new DbPrintPDFEntities())
- {
- var customerList = db.Customers.ToList();
- return View(customerList);
- }
- }
- public ActionResult PrintViewToPdf()
- {
- var report = new ActionAsPdf("Index");
- return report;
- }
- public ActionResult PrintPartialViewToPdf(int id)
- {
- using (DbPrintPDFEntities db = new DbPrintPDFEntities())
- {
- Customer customer = db.Customers.FirstOrDefault(c => c.CustomerId == id);
- var report = new PartialViewAsPdf("~/Views/Shared/DetailCustomer.cshtml", customer);
- return report;
- }
- }
- }
- }
Now, let’s explain all the actions implemented within customer controller
- Index action is used to get customers list from database.
- PrintViewToPdf action is responsible to convert index action to PDF document. Note here, we have used ActionAsPdf class that accepts a string parameter. This string parameter represents action that we would convert to PDF.
- Finally, we have added PrintPartialViewToPdf which is responsible to convert DetailCustomer.cshtml partial view to PDF document by using PartialViewAsPdf class that accepts as parameters partial view name and an object which contains data to display within a partial view.
Adding Views
Right click on Index action >> Add view.
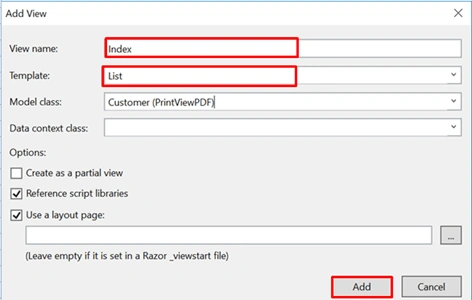
Then, add view dialog will be shown as below. Name your view as you like, and select List as template, finally click Add.
Index.cshtml
- @model IEnumerable<PrintViewPDF.Customer>
- @{
- ViewBag.Title = "Index";
- }
- <h2>Customer List</h2>
- <p>
- @Html.ActionLink("Convert View To PDF", "PrintViewToPdf")
- </p>
- <table class="table">
- <tr>
- <th>
- @Html.DisplayNameFor(model => model.CustomerName)
- </th>
- <th>
- @Html.DisplayNameFor(model => model.CustomerEmail)
- </th>
- <th>
- @Html.DisplayNameFor(model => model.CustomerPhone)
- </th>
- <th>
- @Html.DisplayNameFor(model => model.CustomerCountry)
- </th>
- <th></th>
- </tr>
- @foreach (var item in Model) {
- <tr>
- <td>
- @Html.DisplayFor(modelItem => item.CustomerName)
- </td>
- <td>
- @Html.DisplayFor(modelItem => item.CustomerEmail)
- </td>
- <td>
- @Html.DisplayFor(modelItem => item.CustomerPhone)
- </td>
- <td>
- @Html.DisplayFor(modelItem => item.CustomerCountry)
- </td>
- <td>
- @Html.ActionLink("Edit", "Edit", new { id=item.CustomerId }) |
- @Html.ActionLink("Print Details View To PDF", "PrintPartialViewToPdf", new { id=item.CustomerId }) |
- @Html.ActionLink("Delete", "Delete", new { id=item.CustomerId })
- </td>
- </tr>
- }
- </table>
DetailCustomer.cshtml
- @model PrintViewPDF.Customer
- <div>
- <h4>Customer</h4>
- <hr />
- <dl class="dl-horizontal">
- <dt>
- @Html.DisplayNameFor(model => model.CustomerName)
- </dt>
- <dd>
- @Html.DisplayFor(model => model.CustomerName)
- </dd>
- <dt>
- @Html.DisplayNameFor(model => model.CustomerEmail)
- </dt>
- <dd>
- @Html.DisplayFor(model => model.CustomerEmail)
- </dd>
- <dt>
- @Html.DisplayNameFor(model => model.CustomerPhone)
- </dt>
- <dd>
- @Html.DisplayFor(model => model.CustomerPhone)
- </dd>
- <dt>
- @Html.DisplayNameFor(model => model.CustomerCountry)
- </dt>
- <dd>
- @Html.DisplayFor(model => model.CustomerCountry)
- </dd>
- </dl>
- </div>
Output
Now, our application is ready. We can run and see the output in the browser.
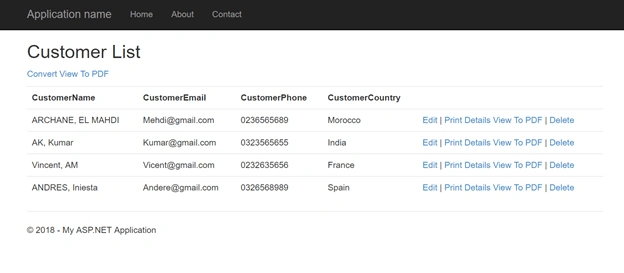
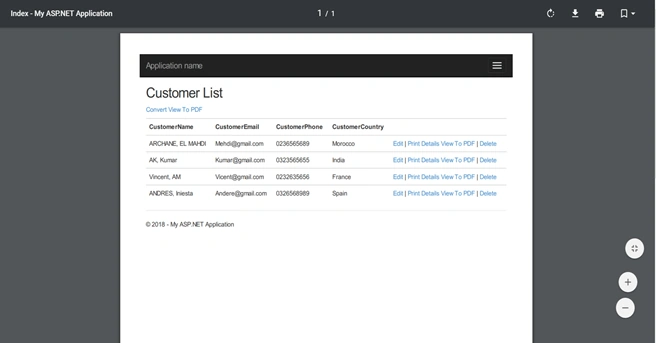
When we click on Convert View To PDF link, we will convert index view to PDF as shown below.
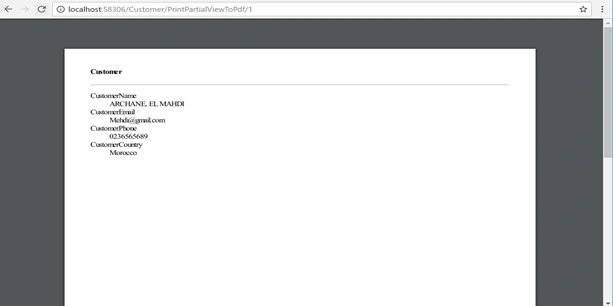
When we click on Print Details View To PDF link, we will convert DetailCustomer partial view to PDF.
That’s all. Please send your feedback and queries in comments box.
ZIAD ABUQASEMPosted Oct 9, 2022, 8:49 PM
I installed rotativa 1.7.3 but in controller when type using Rotativa; it show error the type or namespace Rotativa could not be found why ?
Rakesh SadhulaPosted Feb 20, 2022, 6:51 PM
This will not work if you have custom authorize attribute with SSO.
sourav mahajanPosted Apr 30, 2021, 10:48 AM
How to do this in dot net Core MVC,Please explain or give some hints ?
Bhautik GondaliyaPosted Sep 27, 2019, 10:01 AM
PDF is missing all images and CSS formatting. However, I installed Rotativa package and that creates pdf file as well but it looks like plain html only. Please help ASAP.
Kainat JanPosted Jul 12, 2019, 5:27 AM
Can you please show ActionAsPdf class and PrintPartialViewToPdf class working
meir rotfleischPosted Jun 21, 2019, 1:51 AM
Look like a great option. I tried to install the nuget but I get an error Could not install package 'Microsoft.AspNet.Mvc 6.0.0-beta1'. You are trying to install this package into a project that targets '.NETFramework,Version=v4.6.2', but the package does not contain any assembly references or content files that are compatible with that framework. For more information, contact the package author.
Ana HPosted May 22, 2019, 10:54 PM
Hi its not passing Google charts on the View page to PDF. Can you please help. Charts area is coming out as blank space in pdf. other things are fine.
vishnupriya ravichandranPosted Apr 11, 2019, 12:45 AM
I want the PDF to be viewed in another tab
Youssef KhatiriPosted Feb 6, 2019, 7:41 AM
Comment vous avez cr?er la vue DetailCustomer.cshtml , car je n'arrive pas a afficher la vue partiel ? ( les donn?es de la vue partiels )
Gaurav VirmaniPosted Jun 5, 2018, 9:06 PM
Not working. Type or namespace Rotativa could not be found. Using .Net Framework 4.5
hash sbPosted May 19, 2018, 7:25 AM
I am getting this error even after install Rotativa ,Type or namespace name 'Rotativa' could not be found
sai saiPosted Feb 27, 2018, 5:35 PM
Nice tutorial, but i have one issue when i host it in my iis server file downloads after one minute its taking lot of time to process but on local it runs fine. do you know anything about this. Thank you.
ojabo emmanuelPosted Feb 16, 2018, 1:17 PM
Nice tutorial sir, am convinced to follow you please , if am connected but i just discovered red line in my code. was this method define else where before implementation?
ojabo emmanuelPosted Feb 16, 2018, 1:10 PM
Nice tutorial sir, am convinced to follow you please , if am connected
Hiten PandyaPosted Feb 14, 2018, 1:12 AM
Good share............
Sagar Pandurang KapPosted Feb 13, 2018, 11:15 PM
Great explaination. Keep sharing.....