This article is a part of a series of articles related to one of the Azure Compute options “Cloud Services”.
- Azure Cloud Service Introduction
- Azure Cloud Services - Create Hello World Cloud Service Using Visual Studio
- Azure Cloud Service Examine Files
- Azure Cloud Service – Add existing Web Application to Cloud Service
- Azure Cloud Service – Compute Emulator
- Azure Cloud Service - Create Package using Visual Studio
- Azure Cloud Service – Create a new Cloud Service using Azure Management Portal
- Azure Cloud Service – Deploy Cloud Service using Azure Management Portal
- Azure Cloud Service – Create Staging Slot using Azure Management Portal
- Azure Cloud Service – VIP Swap using Azure Management Portal
- Azure Cloud Service – Delete Slot using Azure Management Portal.
- Azure Cloud Service – Scale up Instance Size
- Azure Cloud Service – Scale Out Instances using Visual Studio
- Azure Cloud Service – Enable Remote Desktop using Visual Studio
In one of our previous articles, Azure HelloWorld Cloud Service, we learned how Visual Studio creates Microsoft Azure Debugging Environment. This environment consists of multiple emulators for executing the roles of the Azure Cloud Services. In this article, we will learn how Compute Emulator could be used for Azure Cloud Service applications.
The Azure Compute Emulator enables us to test and debug the Azure Cloud Services in our local environment without deploying the Cloud Service to Azure.
As soon as you run the Web Roles (or Worker Roles), one of the components of the Azure SDK gets triggered. In order to view this, you need to expand the arrow at the right corner of your Windows Machine, as shown below.

Clicking on this small arrow mark, you can see another icon related to the Emulator Express.

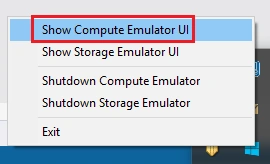
Right click on the Emulator Express icon to view a contextual menu, as shown below.

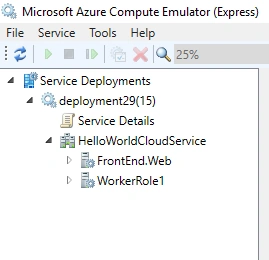
Clicking on the “Show Compute Emulator UI” opens the “Compute Emulator”.

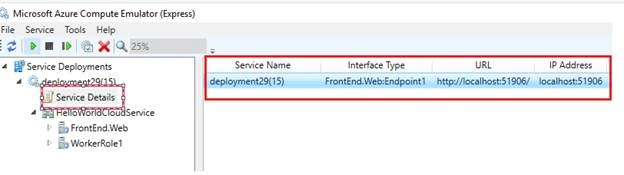
Clicking on the Service details, it displays the End Point details, like URL and Port numbers.

In order to view the life cycle events of the roles, click on any of the roles available in Cloud Service.

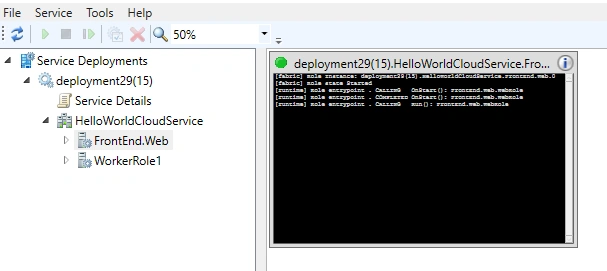
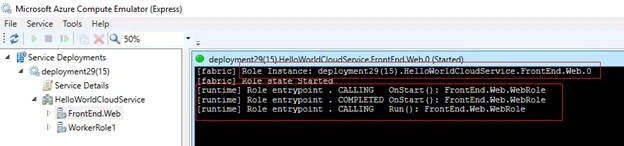
In this example, I have just two roles. You might have multiple roles in your application. You need to click on the role which you are interested in. I clicked on the Web Role at left pane under “Service Deployment”. In the right pane, I got a console like box.
Clicking on the information icon, displaying at the top right corner of console box, will maximize the box, as shown below.

In the above screen, notice the name of the instance in which your Cloud service is running along with the life cycle events of the role. We will learn more about Compute Emulator in our upcoming articles.
Hope you enjoyed reading the article. Your feedback is appreciated.

MarioPosted Sep 22, 2016, 5:35 AM
Very Nice
Praveen SreeramPosted Sep 16, 2016, 8:56 AM
Thanks
Vignesh ManiPosted Sep 16, 2016, 8:33 AM
Nice
Praveen SreeramPosted Sep 14, 2016, 1:52 AM
Thanks Tarun
Tarun DPosted Sep 14, 2016, 1:36 AM
Nice one. Thanks for sharing
Praveen SreeramPosted Sep 14, 2016, 12:22 AM
Thanks Subash
SubashPosted Sep 14, 2016, 12:12 AM
Good one praveen
Bhavik PatelPosted Sep 13, 2016, 9:39 PM
Nice