

Overview
This article is about Azure Web Apps which is one of the services from Azure App Service. Azure Web Apps is a complete computing platform from Microsoft Azure which helps us to host, manage, create slots, go with Traffic Manager and many more flexible options to make web apps easier for the client and developer.
Web Apps is available on Microsoft Azure and is available as a resource on shared or a dedicated Virtual Machine (VM). Web Apps also falls on the App Service Plan and it is supported by multiple app languages or frameworks, such as ASP.NET, Node.js, Java, PHP, and Python. Web Apps also supports us to go with the existing tools like Visual Studio, FTP, etc., it helps us with the simple Azure AD Integration, ISO, SOC2, PCI Complaint. Azure Web Apps also comes with helping the client by having their application deployed in a region close to them and run pure computing jobs on a scheduler or as a trigger.
Let's understand few terminologies of Azure App Services now
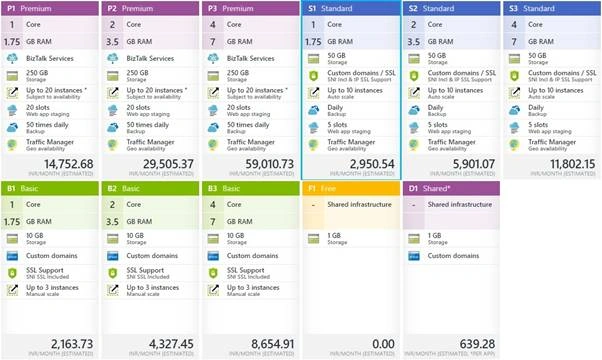
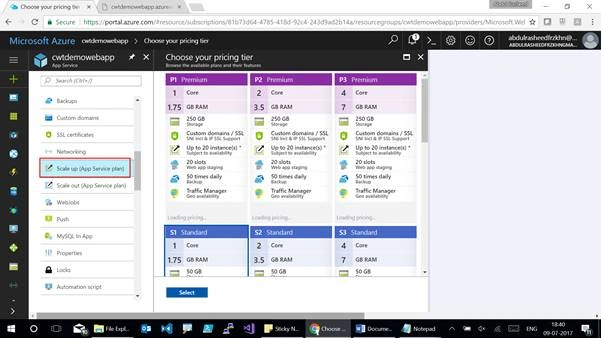
Azure App Service is an integrated cloud app platform for developing modern enterprise apps across cloud and mobile devices. An App Service Environment is a Premium service plan option of Azure App Service that provides a fully isolated and dedicated environment for securely running Azure App Service apps at high scale, including Web Apps, Mobile Apps, and API Apps. We have different App Service Plans, such as Basic, Shared, Standard and Premium which support different features like Instance, Slots, Core of machine, Storage, SSL, Custom Domains, Traffic Manager, Backup and BizTalk Services. Please surf for the below image to understand about the different App Service Plans tier, which specifies the cost plans too. It also supports us with deploying the App Services with the nearest region which is close to us as Microsoft Azure offers us with 34 regions across the globe.
Azure Resource Groups (RGs) Azure Resource Groups are logical containers that can span regions used to contain resources into groups that share a common life cycle. Resource Groups can hold Virtual Machines (VM’s), NIC’s, Storage, WebApps, SQL and Virtual Networks. Each and every resource that is available on Azure is tagged with a Resource Group. RGs can help the developers with RBAC (Role Based Access Control), it can help us with deployment under a RG using Powershell, Visual Studio, Azure Portal, etc., It’s not mandatory that all the resources should be available within a same RG which should follow the same life cycle as such, it all depends upon the developer or administrator.
Let's work with the following exercises now.
- Exercise 1 Creating a Web App from the Azure Portal and understanding the features.
- Exercise 2 Hosting a Web App using File Explorer.
- Exercise 3 Creating a Slot from Azure Portal.
- Exercise 4 Hosting a Web App from GitHub.
- Exercise 5 Swap using Deployment Slots.
Exercise 1 - Creating a Web App from the Azure Portal and understanding the features.
Follow the below steps to create a Web App from Azure Portal.
Step 1
Login to Azure Portal using this URL - https://portal.azure.com/
Note - if you don’t have an Azure account, get a temporary free trial subscription of free tier from here.
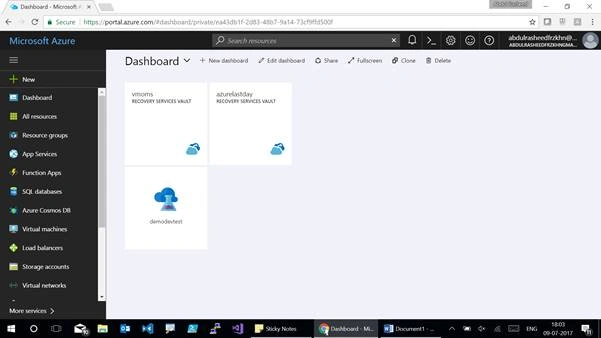
Here is how your Azure Portal looks like.
Step 2
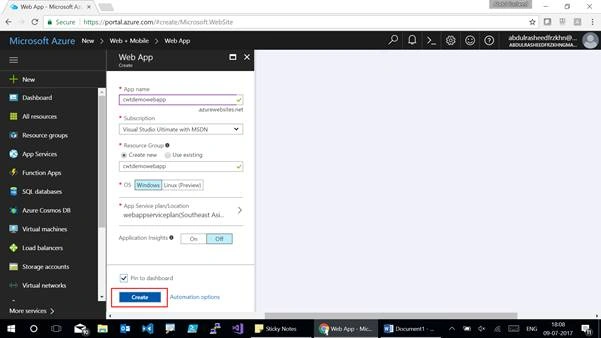
Click on New - Web + Mobile - Web App to create a Web App.
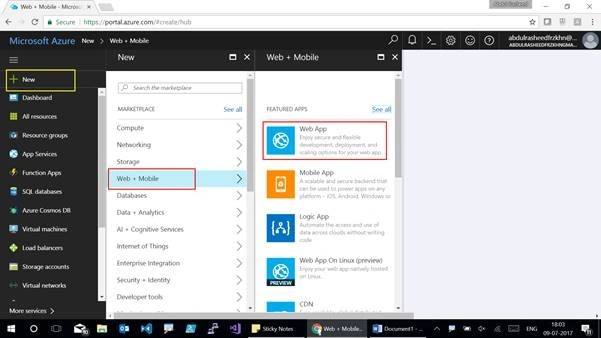
Create the Web App by configuring the below details,
- App name: Name the webapp here; we have named it as cwtdemowebapp.
- Subscription Select the subscription which you have for your Azure account.
- Resource Group (RG) Create a new Resource group or tag the resource of a web app towards an already existing one which will share the same life cycle.
- OS Select Windows or Linux in which you wish to host your Web App has to be deployed, here we have selected OS as Windows.
- App Service Plan/Location Click on the App Service Plan/Location - Create New.
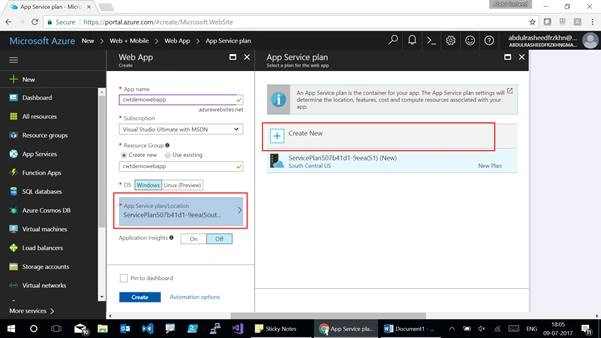
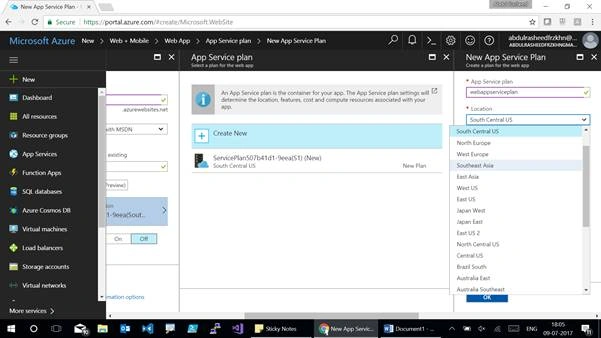
New App Service Plan - Name the new App Service Plan webappserviceplan
Location - Choose the location of your choice; I have chosen South East Asia
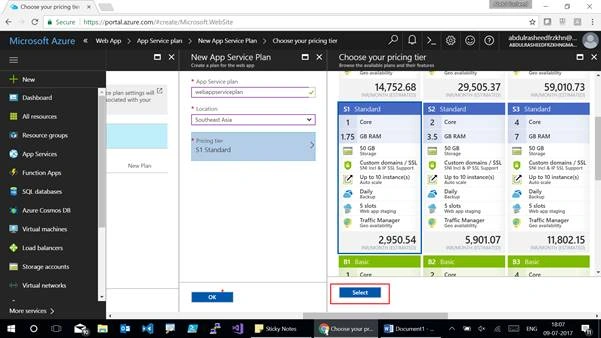
Pricing Tier - S1 Standard
Click on “Select” to select the specified App Service Pricing Tier.
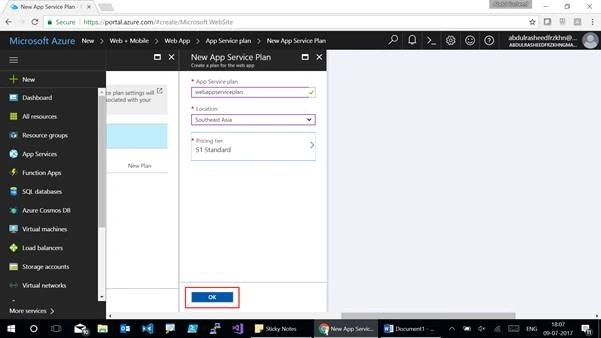
Click on “OK” after configuring the New App Service Plan.
Now click on “Create” to create the WebApp.
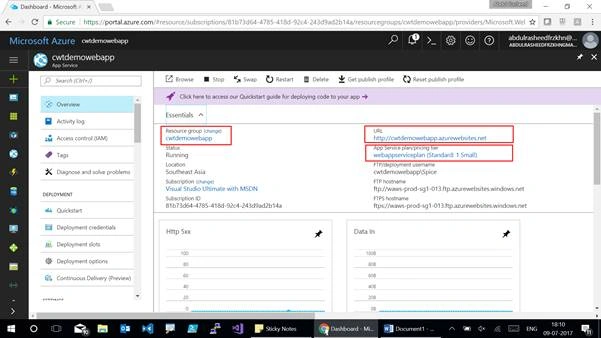
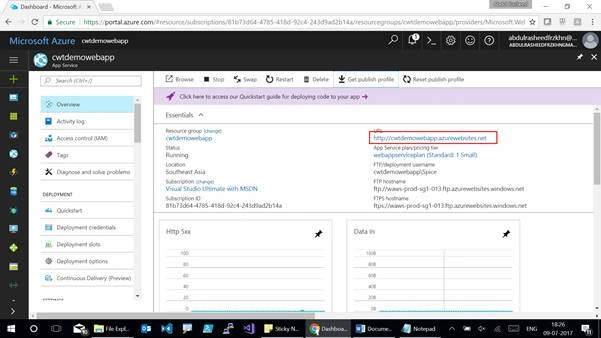
Here goes the WebApp created, you can also find the Resource Group name, URL of the WebApp and App Service Plan configured on the Overview blade of the WebApp created.
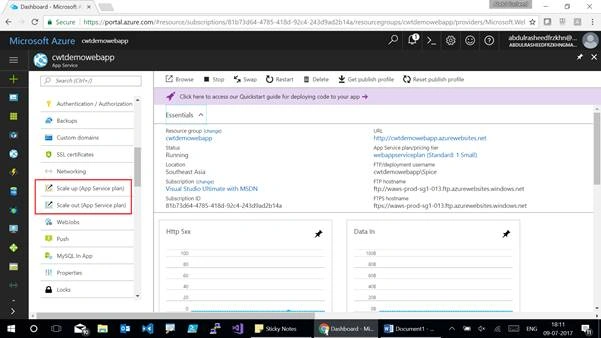
You also have a feature of scaling in and scaling out with the App Service Tier which you have specified now. You can always scale in and scale out depending upon the needs of your webapp with the help of these features.
Exercise 2 Hosting a Web App using File Explorer
Follow the below create an HTML file and to host it using a File Explorer,
Step 3
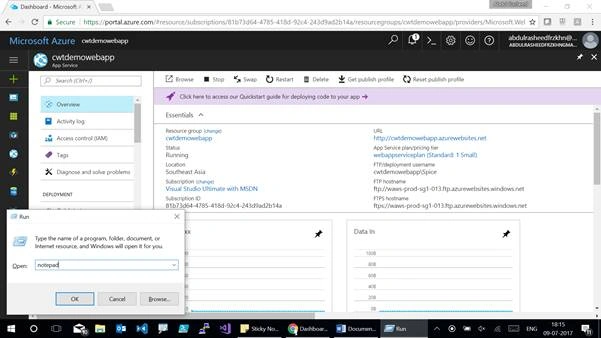
Open Notepad on your machine and create a HTML file. Run - notepad.
Copy the below HTML code to create a basic webapp.
Index.html
- <html>
- <h1>WebApp - Microsoft Azure</h1>
- <h2>This is a demo webapp for hosting a WebApp using File Explorer</h2>
- </html>
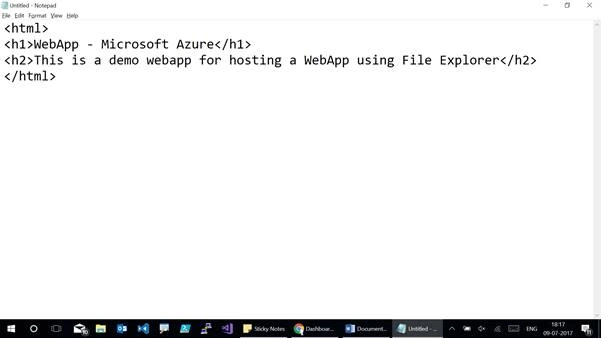
Save the notepad file as a HTML one using Save As with the format of HTML.
File - Save As
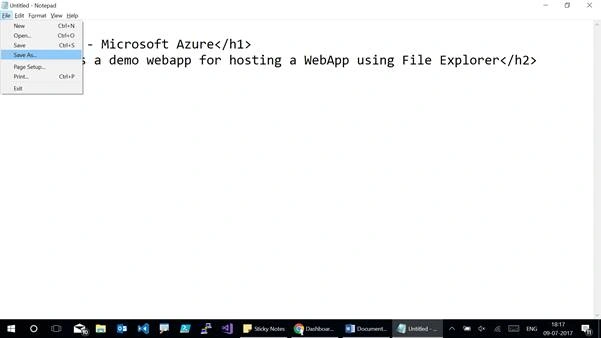
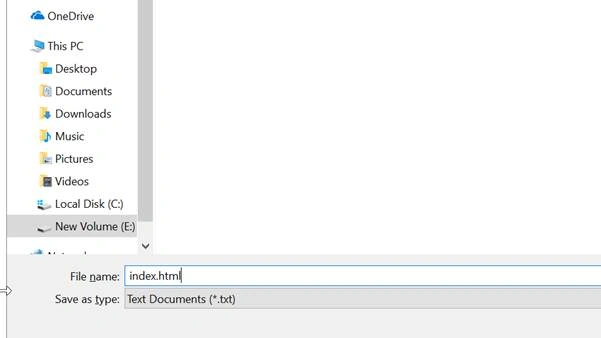
Name the file with html extension to save.
Name - index.html
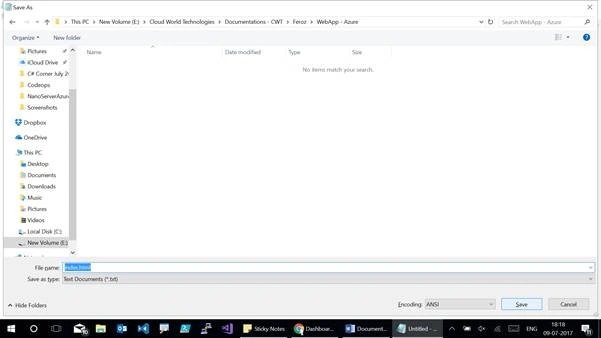
Click on Save.
Step 4
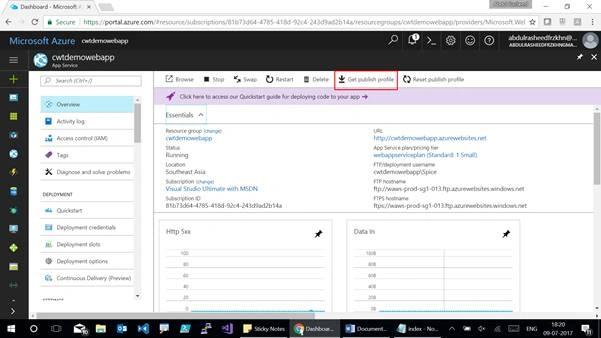
Download the Publish Profile of your WebApp to get the FTP details of your WebApp, Click here at “Get Publish Profile” to download the publish profile.
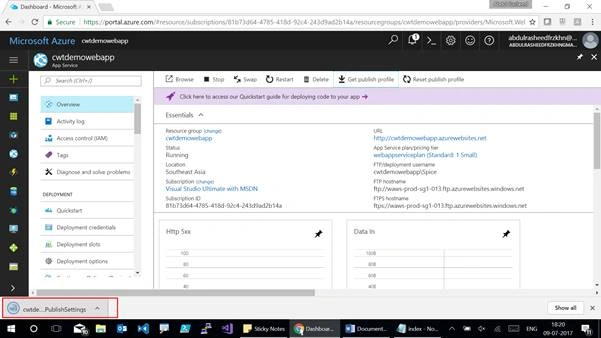
Here at the downloads pane you can find the ftp file which is getting downloaded.
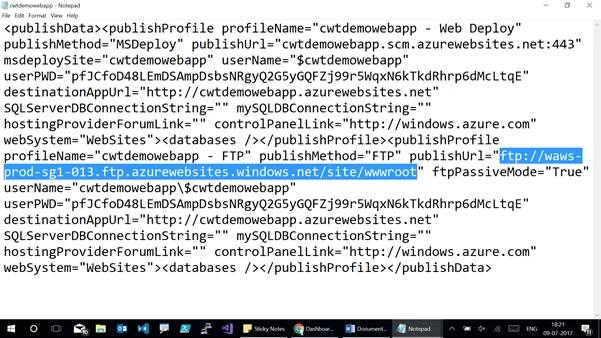
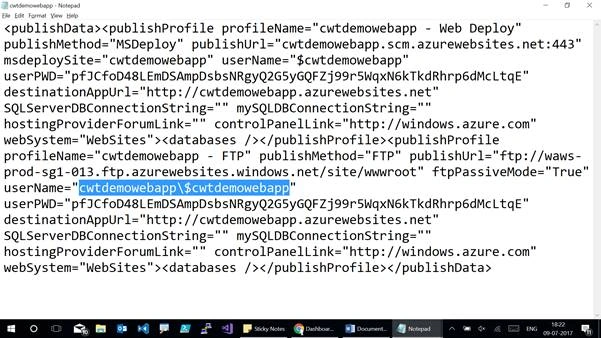
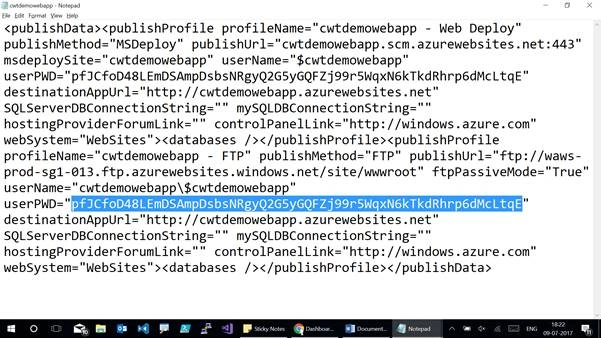
Open the downloaded file using notepad to find the ftp file information. Copy the publishUrl, Username and Password from the downloaded ftp file to get connected with the root access of the webapp.
Here in the below image we are copying the publishurl.
Username over here.
User Password over here.
Step 5
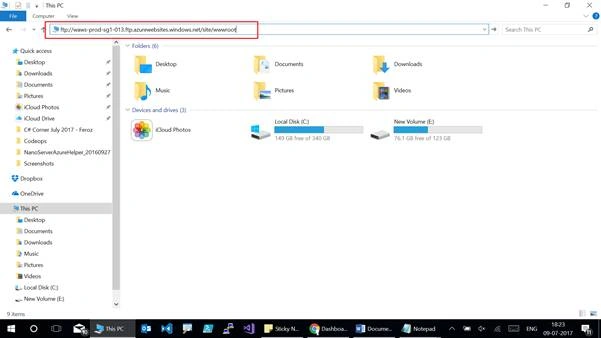
Open File Explorer and paste the Publish URL to get connected.
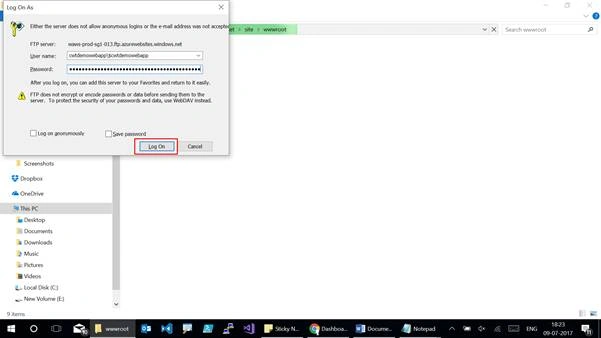
Provide the Username and Password which we copied before and followed by a click at “Log On”.
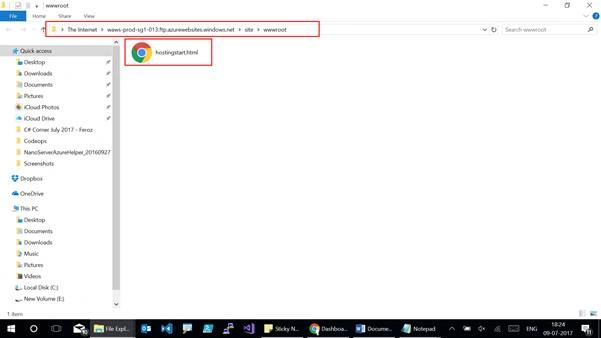
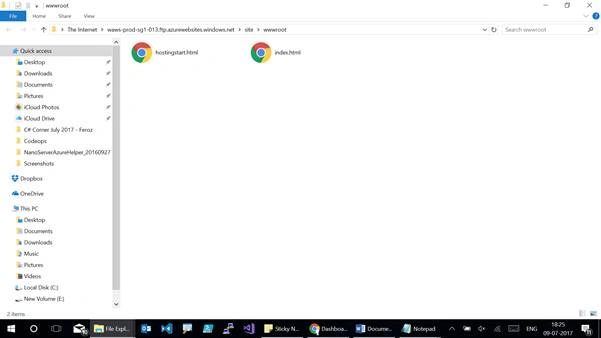
Now you can find the File Explorer has been logged on to the webapp towards the root folder where we have a default template of hostingstart.html
Step 6
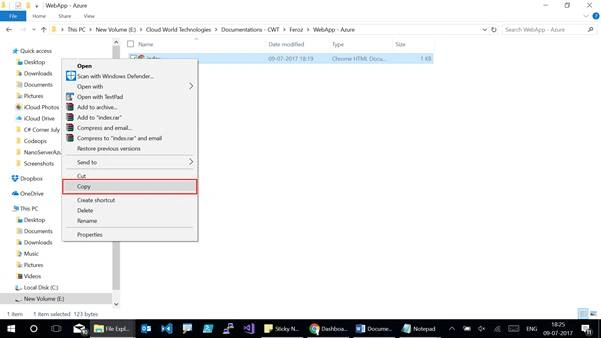
Copy the index.html file which we created before and paste it on the root folder of the webapp which has been logged on.
Now click on the URL of the WebApp by which you can find the newly published HTML file.
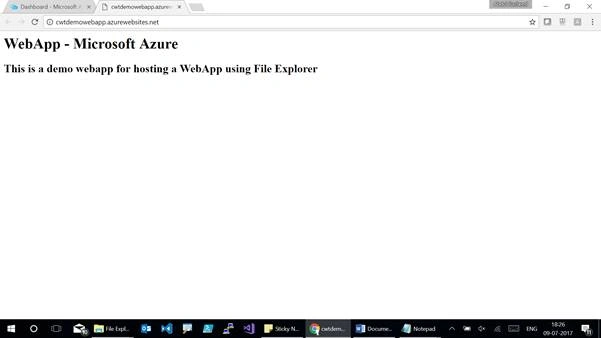
Here goes your WebApp on the below image which has been published!!
You can also Scale Up for the other app service plans using the scale up feature which is available on the master blades of WebApps, use Scale Down again to get down for smaller app service plans over here.
Exercise 3 Creating a Slot from Azure Portal
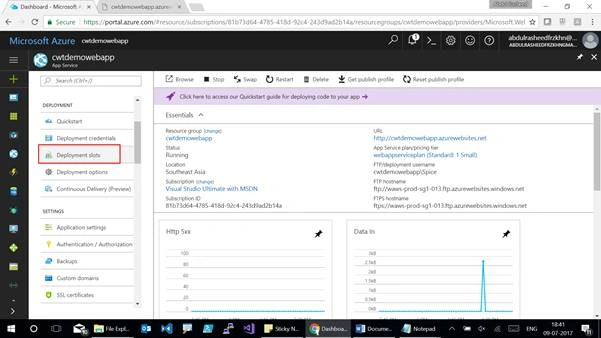
Deployment Slot helps you to create a slot in the master Azure WebApp which you have created, you can add data over that and you can swap at any time to move the data between different slots or versions of the website.
Step 7
Click on the Deployment Slots to move for the deployment slot.
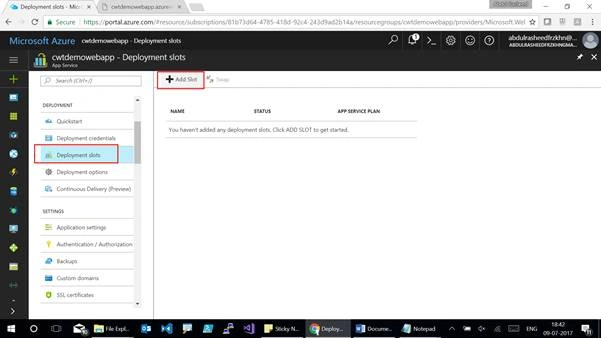
Click on Add Slot on the Deployment Slot.
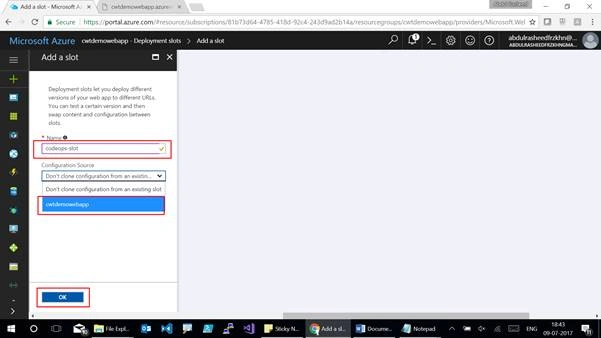
Name the slot the same as the WebApp which has been created, here I have named it as codeops-slot followed by the configuration source.
Once after the deployment slot has been configured click on OK to create the Deployment Slot.
Step 8
Create a new HTML file with the updated version as shown below,
Index.html
- <html>
- <h1>WebApp - Microsoft Azure</h1>
- <h2>This is a demo webapp for hosting a WebApp using Github - CodeOps Conference</h2>
- </html>
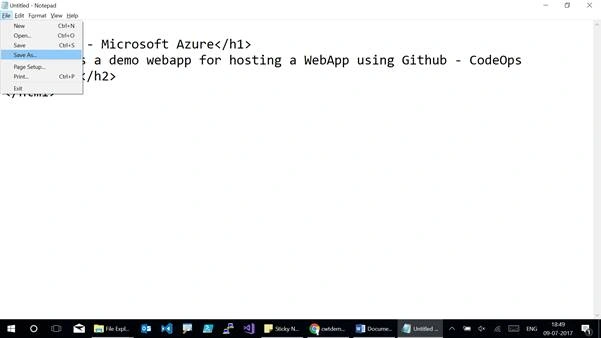
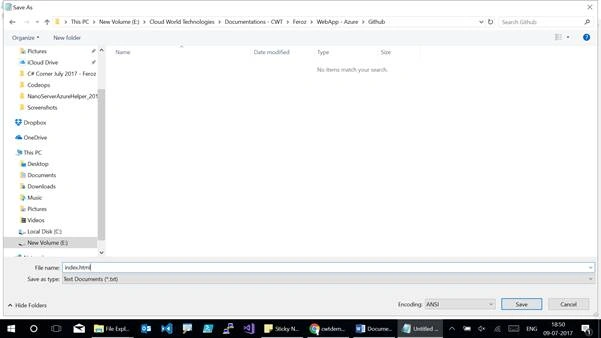
Click on File - Save As and save the file with the name of index.html
Step 9
Let's move this WebApp HTML file which has been created towards an Online repository say for example GitHub as shown:
Link for GitHub - https://github.com/
Sign up for a new account on GitHub over here.

Create a New Repository by clicking on New Repository.
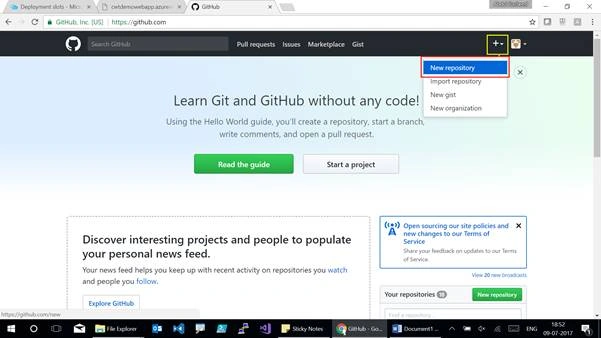
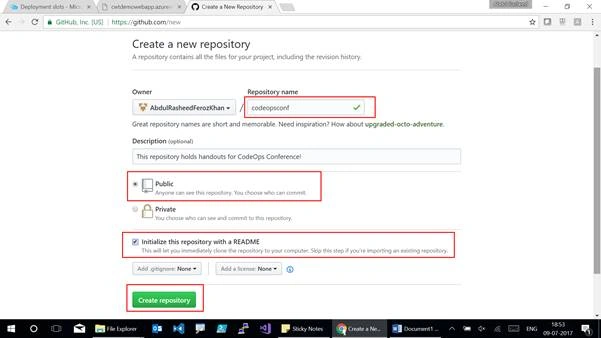
Name the Repository Name, make it Public and initialize the repository with a README followed by a click on Create Repository.
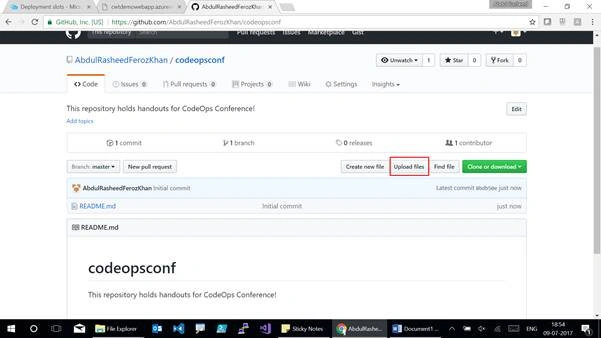
Click on Upload Files to upload the files at your Online Repository account.
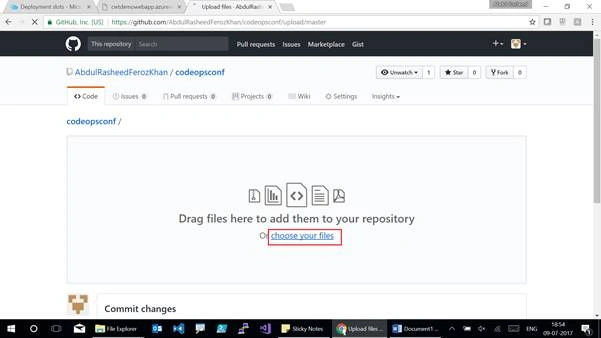
Either choose your files or drag and drop the files to share it on the Online Repository account.
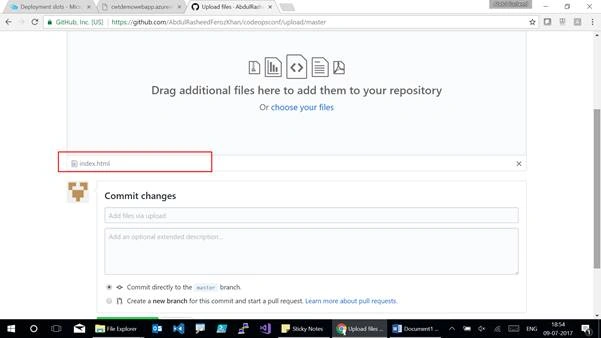
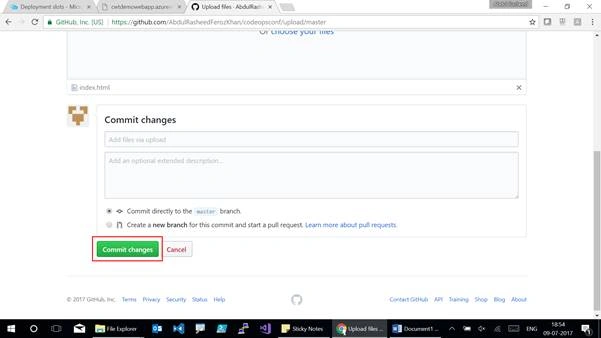
Click on Commit Changes to confirm it.
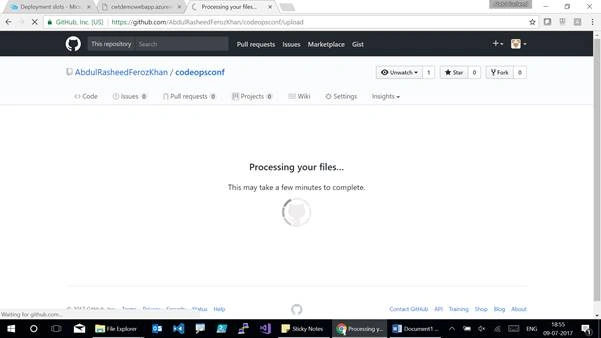
Here your files get processed for getting committed.
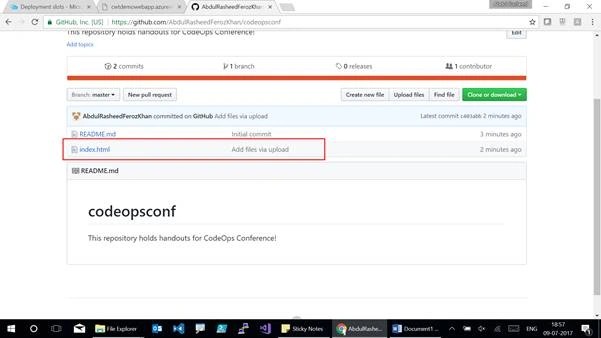
Now your html file has been uploaded on the Online Repository.
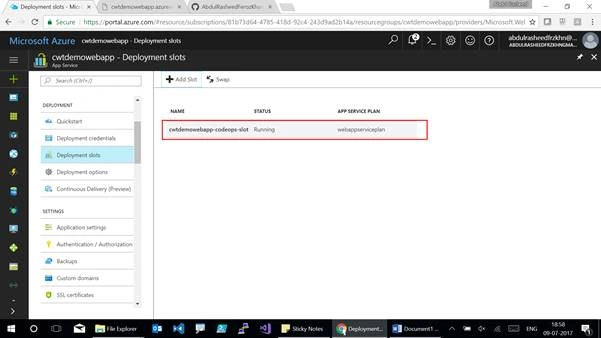
Move back to the Azure Portal and click on the Deployment Slots you can find the new slot which was created before.
Step 10
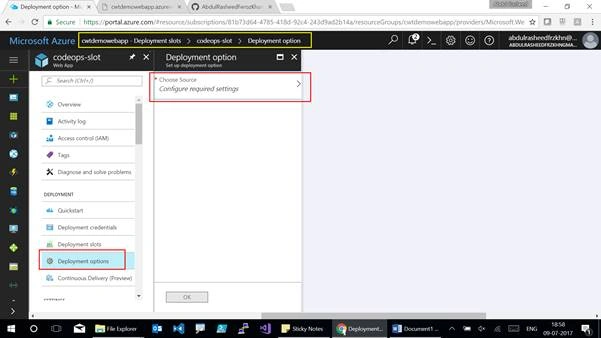
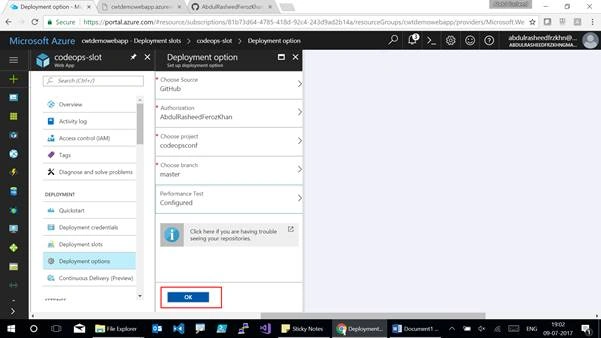
Go for Deployment Options to configure the Online repository of GitHub.
Deployment Options - Choose Source - GitHub.
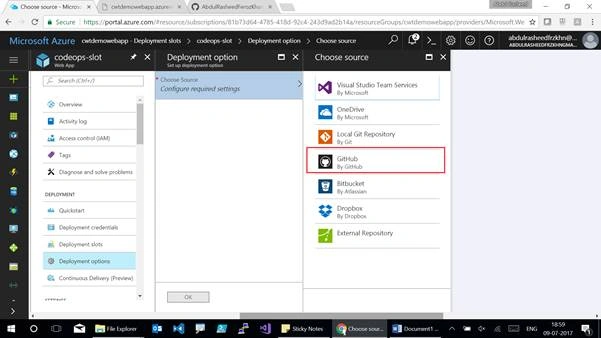
Authorize with your GitHub account.
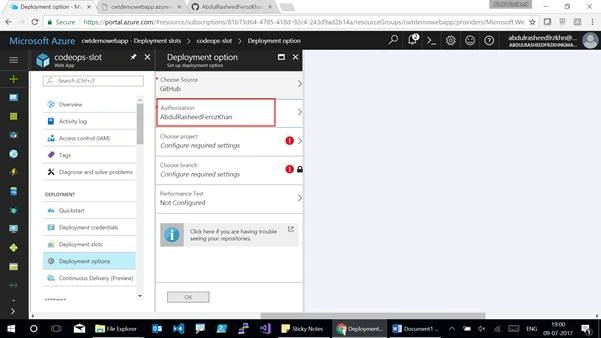
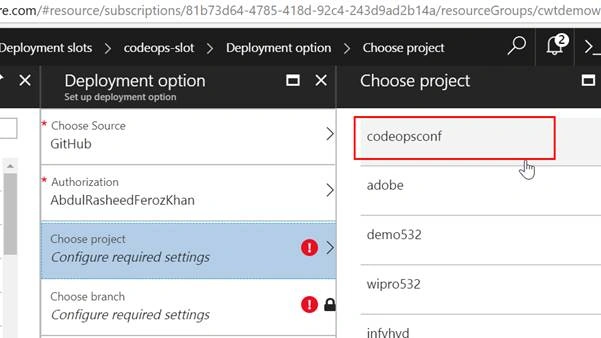
Choose Project - your project repository.
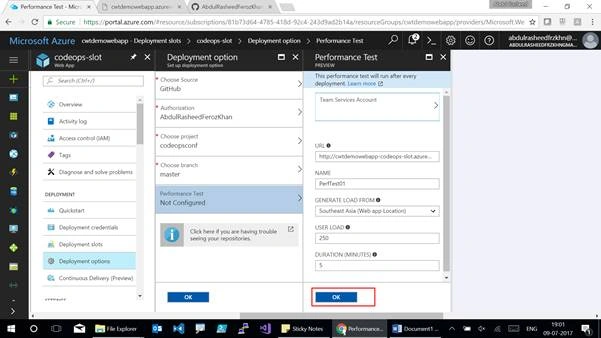
Configure your Performance Test with the load generation of the region for the load and the duration in time. Click on OK after it’s done.
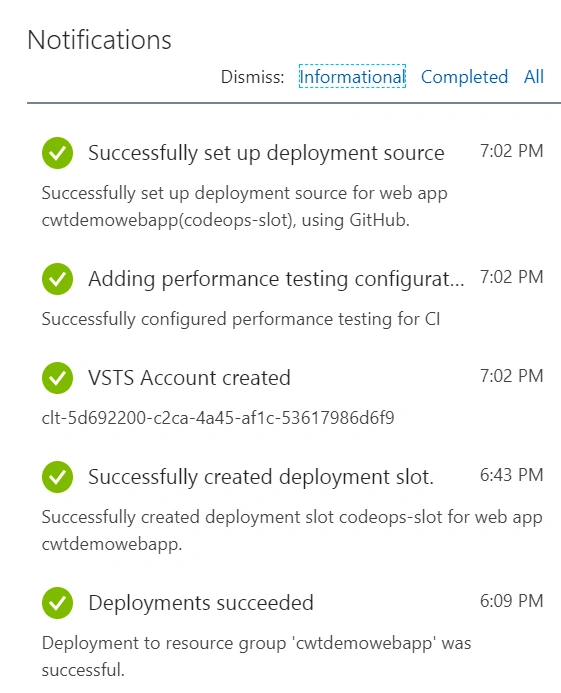
Here goes the notification for the deployment source and performance test which was configured now.
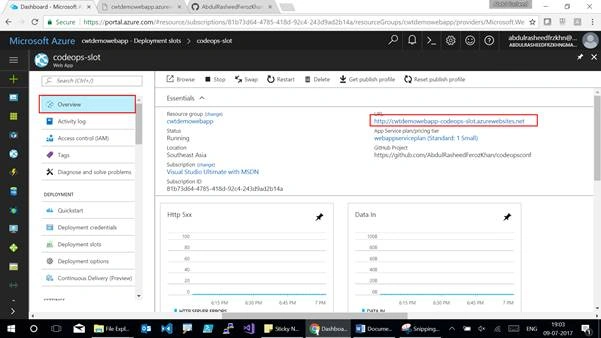
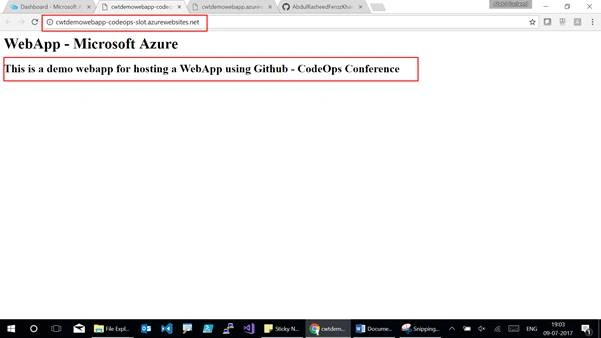
Go to the Overview of the new Deployment Slot and click on the URL. This will take you to the new content of the HTML file which has been hosted on the GitHub.
Exercise 5 Swap using Deployment Slots
Swap allows you to get swapped between the different versions of the WebApp which has been created.
Step 11
Go to the Overview of the new deployment slot which was created and click on "Swap" to swap the sites.
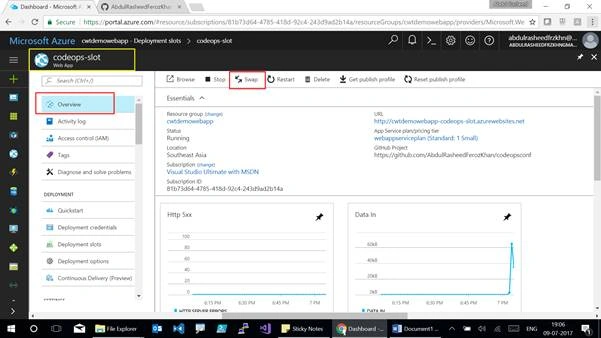
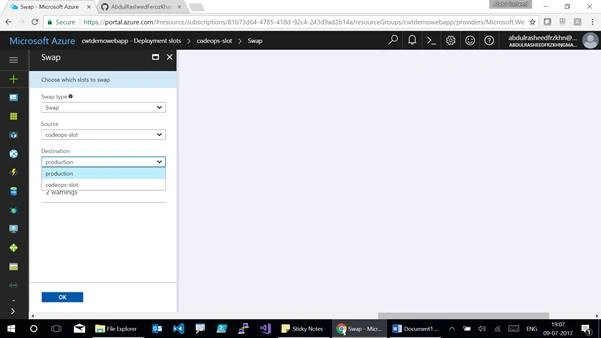
This takes you to the Swap blade. Select the Swap type, source either from the production site or the secondary site, destination towards the production site or secondary site.
Production site refers to the master site whereas the Secondary site refers to the slot which has been created.
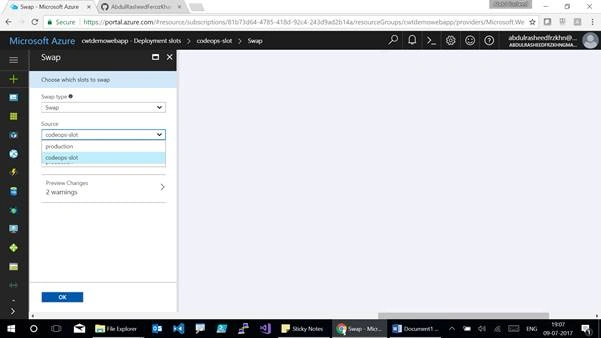
Once configured, click on OK.
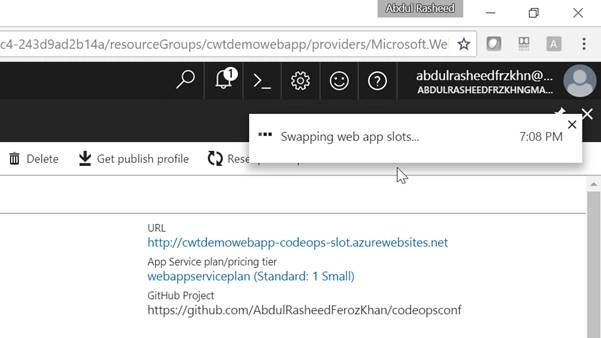
Here goes the notification for the Swap process.
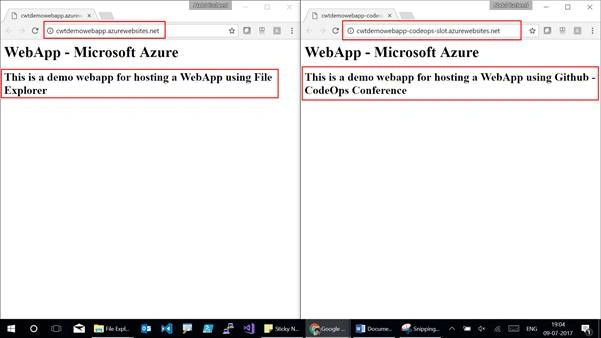
Go for both WebApp links and browse for the content, you can find the different versions of the WebApp between the slots and production site.
Shridhar SharmaPosted Jul 31, 2017, 2:50 AM
Nice share....good to go through it
Vipul MalhotraPosted Jul 30, 2017, 2:13 PM
Nice article. Really full of information.
Vidyadharran GPosted Jul 28, 2017, 9:44 PM
nice article.....thanks for sharing brother.:).