

In this article, I will be explaining the usage of Azure Worker Role along with Quartz.NET and a practical example showing 3 different jobs running under the same worker role.
What is Azure Worker Role?
"The WorkerRole element describes a role that is useful for generalized development and may perform background processing for a web role. A service may contain zero or more worker roles." Read more here.
What is Quartz.NET?
"Quartz.NET is a full-featured, open source job scheduling system that can be used from smallest apps to large-scale enterprise systems." Read more here.
Quartz.NET Key Features
What is Azure Worker Role?
"The WorkerRole element describes a role that is useful for generalized development and may perform background processing for a web role. A service may contain zero or more worker roles." Read more here.
What is Quartz.NET?
"Quartz.NET is a full-featured, open source job scheduling system that can be used from smallest apps to large-scale enterprise systems." Read more here.
Quartz.NET Key Features
- Job schedulling
- Job Persistence
- Clustering
- Job Execution
Read more about it's features here.
What are the benefits of using Azure Worker Role + Quartz.Net ?
Need help to create your database?
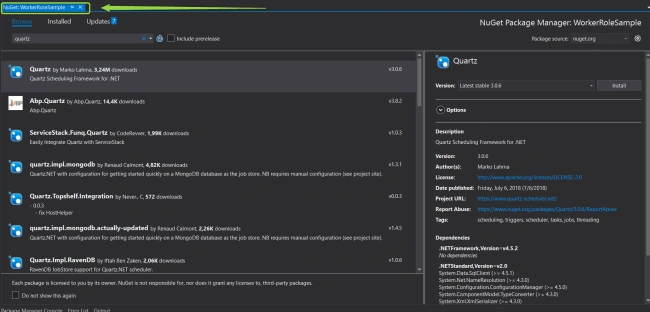
NuGet Packages required,
- EntityFramework (database access)
- Quartz
How to do it?
Create the project as a cloud service project, with the worker role as following.
Create the project as a cloud service project, with the worker role as following.
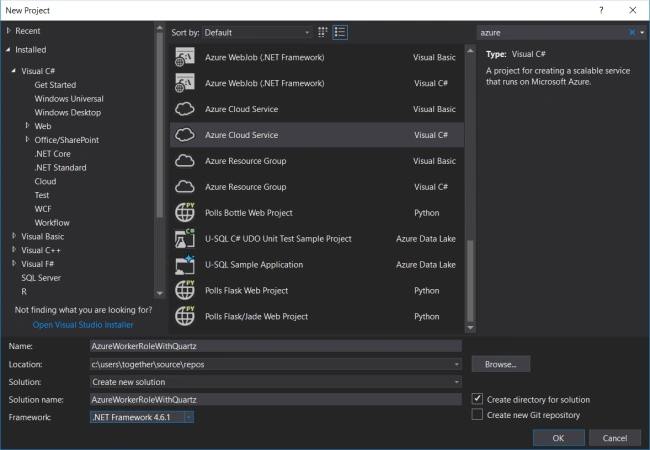
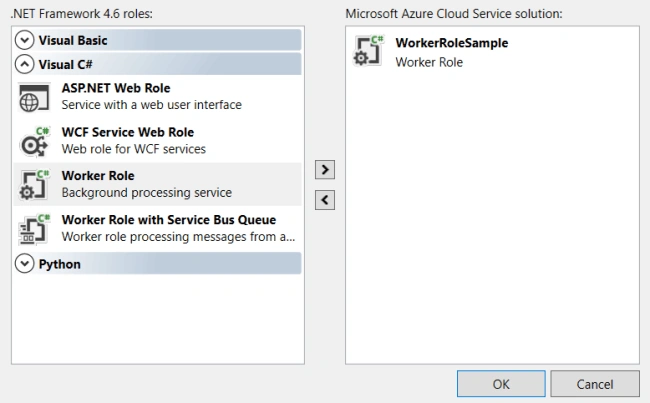
You are going to have two projects in your solution, pay attention in the current project when installing the NuGet Packages.
These are the jobs that are going to be used here, do not forget that they must inherit from IJob.
- public class JobSampleOne : IJob
- {
- private BusinessSample _business;
- public JobSampleOne()
- {
- _business = new BusinessSample( this.GetType().ToString() );
- }
- public Task Execute( IJobExecutionContext context )
- {
- return _business.Ping();
- }
- }
- public class JobSampleTwo : IJob
- {
- private BusinessSample _business;
- public JobSampleTwo()
- {
- _business = new BusinessSample( this.GetType().ToString() );
- }
- public async Task Execute( IJobExecutionContext context )
- {
- await _business.Ping();
- }
- }
- public class JobSampleThree : IJob
- {
- private BusinessSample _business;
- public JobSampleThree()
- {
- _business = new BusinessSample( this.GetType().ToString() );
- }
- public async Task Execute( IJobExecutionContext context )
- {
- await _business.Ping();
- }
- }
This is the business class definition.
- public class BusinessSample
- {
- private string _jobName;
- private SampleContext _sampleContext;
- public BusinessSample( string jobName )
- {
- _jobName = jobName;
- _sampleContext = new SampleContext();
- }
- public Task Ping()
- {
- _sampleContext.LogSample.Add( new LogSample
- {
- JobName = _jobName,
- LogDate = DateTime.Now
- } );
- return
- _sampleContext.SaveChangesAsync();
- }
- }
Now, let's schedule these jobs to run in different timing.
- public class WorkerRole : RoleEntryPoint
- {
- private readonly CancellationTokenSource cancellationTokenSource = new CancellationTokenSource();
- private readonly ManualResetEvent runCompleteEvent = new ManualResetEvent( false );
- private IScheduler scheduler;
- public override void Run()
- {
- Trace.TraceInformation( "WorkerRoleSample is running" );
- try
- {
- this.RunAsync( this.cancellationTokenSource.Token ).Wait();
- }
- finally
- {
- this.runCompleteEvent.Set();
- }
- }
- private void ConfigureScheduler()
- {
- var scheduleFactory = new StdSchedulerFactory();
- scheduler = scheduleFactory.GetScheduler().Result;
- IJobDetail job = new JobDetailImpl( "Sample1", typeof( JobSampleOne ) );
- IJobDetail jobTwo = new JobDetailImpl( "Sample2", typeof( JobSampleTwo ) );
- IJobDetail jobThree = new JobDetailImpl( "Sample3", typeof( JobSampleThree ) );
- ITrigger trigger = TriggerBuilder.Create()
- .WithSchedule( SimpleScheduleBuilder.RepeatMinutelyForever( 10 ) )
- .StartAt( DateTime.Now.AddMinutes( 1 ) )
- .Build();
- ITrigger triggerTwo = TriggerBuilder.Create()
- .WithSchedule( SimpleScheduleBuilder.RepeatMinutelyForever( 6 ) )
- .StartAt( DateTime.Now.AddMinutes( 4 ) )
- .Build();
- ITrigger triggerThree = TriggerBuilder.Create()
- .WithSchedule( SimpleScheduleBuilder.RepeatMinutelyForever( 8 ) )
- .StartAt( DateTime.Now.AddMinutes( 7 ) )
- .Build();
- scheduler.ScheduleJob( job, trigger );
- scheduler.ScheduleJob( jobTwo, triggerTwo );
- scheduler.ScheduleJob( jobThree, triggerThree );
- scheduler.Start();
- }
- public override bool OnStart()
- {
- // Set the maximum number of concurrent connections
- ServicePointManager.DefaultConnectionLimit = 12;
- // For information on handling configuration changes
- // see the MSDN topic at https://go.microsoft.com/fwlink/?LinkId=166357.
- bool result = base.OnStart();
- ConfigureScheduler();
- Trace.TraceInformation( "WorkerRoleSample has been started" );
- return result;
- }
- public override void OnStop()
- {
- Trace.TraceInformation( "WorkerRoleSample is stopping" );
- this.cancellationTokenSource.Cancel();
- this.runCompleteEvent.WaitOne();
- base.OnStop();
- Trace.TraceInformation( "WorkerRoleSample has stopped" );
- }
- private async Task RunAsync( CancellationToken cancellationToken )
- {
- // TODO: Replace the following with your own logic.
- while ( !cancellationToken.IsCancellationRequested )
- {
- Trace.TraceInformation( "Working" );
- await Task.Delay( 1000 );
- }
- }
- }
Here, we have the result of the worker role execution for 30 minutes.
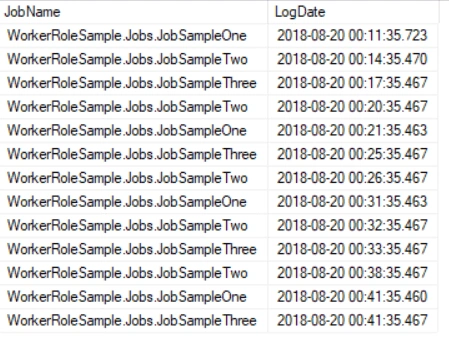
If you do not know how to publish, you have two options,
Congratulations, you have successfully set up your Azure Worker Role to run along with Quartz.NET.
Join the conversation! Your thoughts help the community grow.