

Let’s take a scenario that we want to design one action for our custom event entity to approve an event based on its budget field value, for example, if the budget is more than 50,000 then it will be approved, otherwise not. This action will have only one output parameter, which will return true or false based on if the event is approved or not. So let’s design our action first, usingthe following steps:
1. Navigate to Settings, Customizations, then Customize the system.
2. Navigate to Components, Entities, then New under solution and create a custom Event entity with two below custom attributes:
2. Navigate to Components, Entities, then New under solution and create a custom Event entity with two below custom attributes:
Name Data Type
Event Approved Two OptionsEvent Budget Currency
3. Place these fields over Main form and Publish your customization.
4. Navigate to Settings, Processes, then New and use the following details and click on Ok.
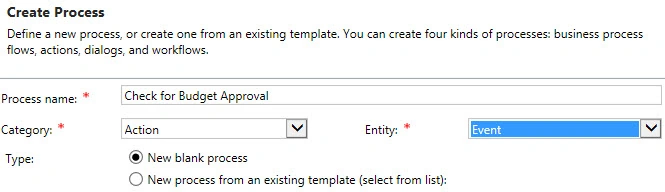
4. Navigate to Settings, Processes, then New and use the following details and click on Ok.
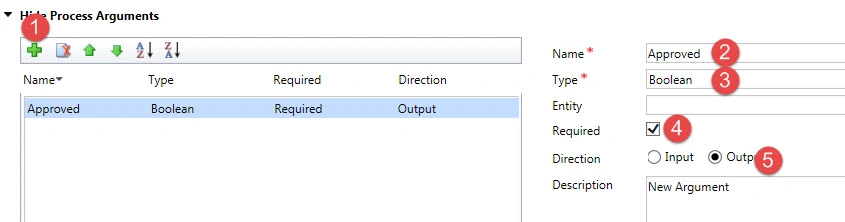
6. Click on Add Step drop down button and add a Check Condition step.
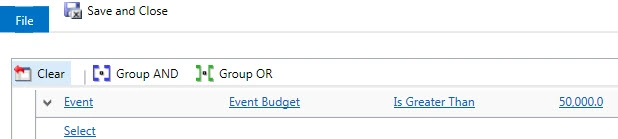
7. Configure this step using the following condition and click on Save and Close button:
8. Click on the row immediatly after Check Condition and add an update step.
9. Click on Set Properties button and set Event Approval to Yes, like below:

7. Configure this step using the following condition and click on Save and Close button:
8. Click on the row immediatly after Check Condition and add an update step.
9. Click on Set Properties button and set Event Approval to Yes, like below:
10. Now click on if condition and add Default step from Add Step drop down.
11. Similarly add update steps immediate after, Otherwise set and this time set Event Approved to false using Set Properties button.
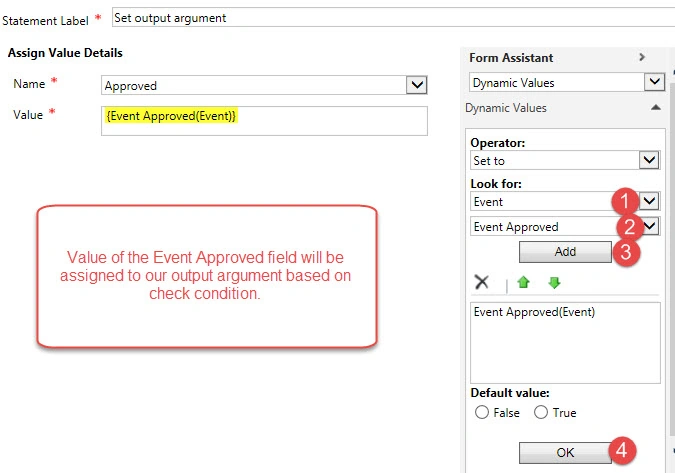
12. Now add an Assign Value step outside of if condition scope and assign Event Approved field value to output argument like the following screenshot:
11. Similarly add update steps immediate after, Otherwise set and this time set Event Approved to false using Set Properties button.
12. Now add an Assign Value step outside of if condition scope and assign Event Approved field value to output argument like the following screenshot:
13. Finally action steps should be similar to the following screenshot, now activate action using Activate button on toolbar.
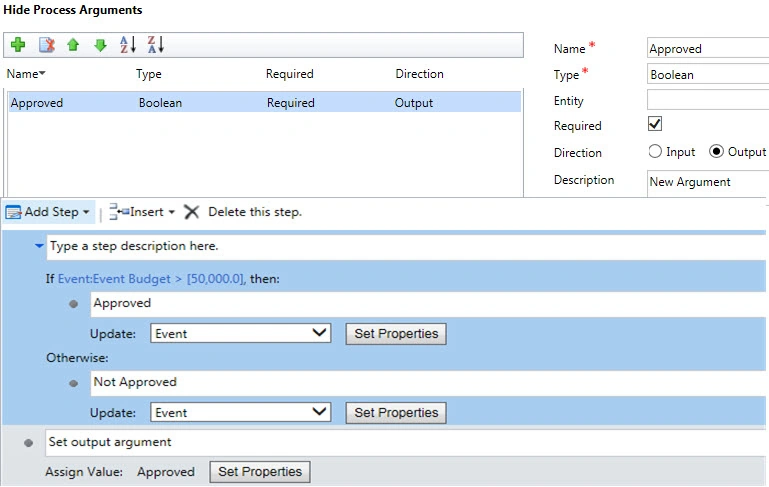
Now our action is ready, just make sure to note downthe name of the action and output argument during Web API call. As we don’t have any input argument that we need to pass, we can simply pass our event id and call our custom action using its name like below. After that we can capture output argument under data collection.
Very InterestedPosted Oct 10, 2016, 8:01 PM
Can this technique be used to call Dialogs or Workflows?
Vivek KumarPosted Apr 17, 2016, 2:06 PM
Nice sharing...
Kuppurasu NagarajPosted Apr 17, 2016, 4:12 AM
Nice Sharing..
Vignesh ManiPosted Apr 16, 2016, 8:33 AM
Nice
Kumaresh RajalingamPosted Apr 16, 2016, 8:31 AM
Good one
Rahul Kumar SaxenaPosted Apr 16, 2016, 5:18 AM
Good One
Debasis SahaPosted Apr 16, 2016, 2:34 AM
Nice One..