

What is RabbitMQ?
RabbitMQ is the most widely deployed open source message broker. It is based on Advanced Message Queuing Protocol (AMQP). AMQP is merely the protocol that is used to communicate with a message queueing broker like RabbitMQ. If you want to read further about AMQP, click here.
Now, coming back to RabbitMQ, you get a lot of things from RabbitMQ. You can send messages persistently with guaranteed delivery so they will arrive even if your app crashes, and even if the RabbitMQ broker ends up being restarted. You get load balancing between message consumers if you have multiple consumers on the same queue.
RabbitMQ is a bit more than mere messaging, it's a common platform that has the ability to interconnect applications. Using RabbitMQ, a java application can speak to a Linux server and/or a .net app, to a ruby & rails + almost anything that finds its place in the corporate web development.
Why do we need this?
As I have explained above, we can use RabbitMQ to establish communication between different type of technology-based projects.
So by this definition, it is perfect for a microservice architecture. We can make communication through different microservices in our application and by its features, we will be fully assured that the message will be received no matter what.
It is faster than using HttpClient requests because AMQP is a specific protocol whereas HTTP - general-purpose protocol. Thus, HTTP has very high overhead comparing to AMQP.
So now, let’s get started.
To use RabbitMQ you need to download and install a few things on to your machine/server. You can find this information on the web page of RabbitMQ but I’m telling you here step by step what to do.
So first, go to Erlang, download it and then install it. Choose your version correctly. Once you have installed it, the next step is to download and install RabbitMQ server from RabbitMQ website.
Once you are done with that, now we will create our projects. First, we will create a Console ASP.NET Core application namely ConsoleCoreSender.
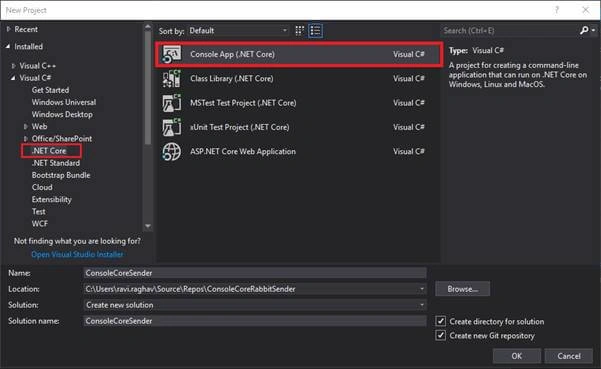
Now, we will create another console app namely ConsoleCoreReceiver. Now, that both our projects are created, we will open the NuGet package manager and add RabbitMq.Client in both our projects.
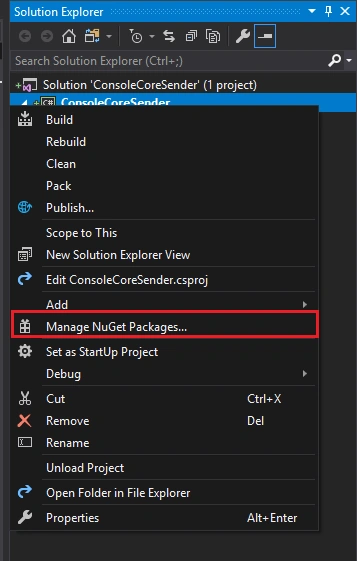
Right-click on project name and select the option highlighted in the screenshot.
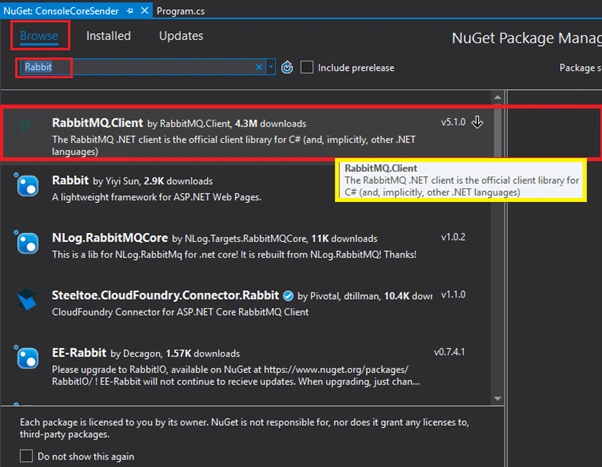
Now, click on the Browse tab, type Rabbit in the search bar and select the option highlighted one in the screenshot.
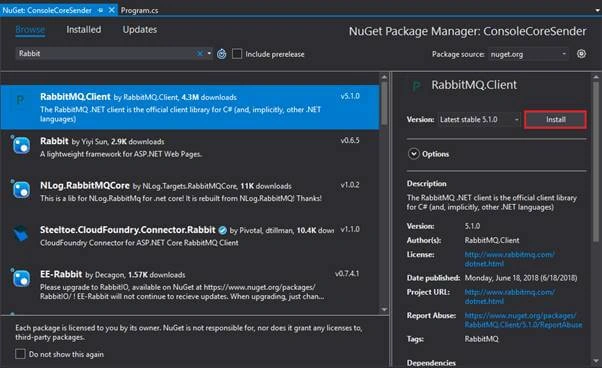
Now, click on it. Towards the right side, you should find its details with a button called install it.
Click it and let it install.
Do these steps in both the projects. Once you are done, open the sender project and open Program.cs.
In the main method, I have written the following code.
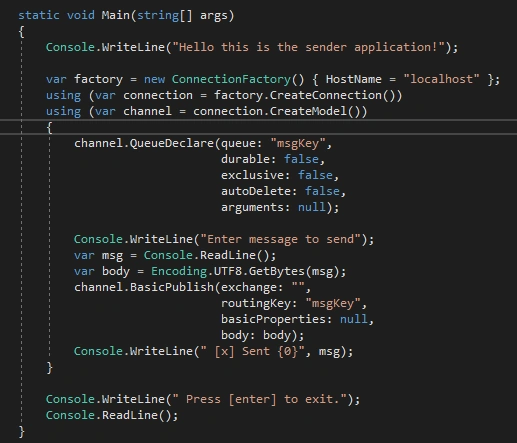
So, let me explain this step by step. The first line is just writing a text in the console.
Now, the next line is -
- var factory = new ConnectionFactory() { HostName = "localhost" };
In the above line, we just created an instance of ConnectionFactory class which will be used to establish a connection to RabbitMQ server that we installed. Here, localhost is because I’m running this application in the local environment. You can pass user id, password and many other parameters as per your settings and requirement. This is basically the server name where your RabbitMQ Server resides. Then, we just created a connection and from that connection, we have created a channel.
We will send our messages through a channel.
- channel.QueueDeclare(queue: "msgKey",
- durable: false,
- exclusive: false,
- autoDelete: false,
- arguments: null);
Now, the above code is important. We have declared a queue and passed it few parameters. The first one is a queue, and that is a secret key and it will be used to send a message and the same key will be used at the receiver end to receive messages and then turned it into bytes array.
In the next line, we have just shown a text to use to enter the message and in the next line, we have just received the user input.
- channel.BasicPublish(exchange: "",
- routingKey: "msgKey",
- basicProperties: null,
- body: body);
In the above code, I have tried to keep it as simple as possible. That’s why I haven't passed exchange or basicProperties. The body is my byte array from user input string and routingKey is our secret key.
For more information about the properties of publishing and create a factory, please click here.
So here is the complete Program.cs class of sender project.
- class Program
- {
- static void Main(string[] args)
- {
- Console.WriteLine("Hello this is the sender application!");
- var factory = new ConnectionFactory() { HostName = "localhost" };
- using (var connection = factory.CreateConnection())
- using (var channel = connection.CreateModel())
- {
- channel.QueueDeclare(queue: "msgKey",
- durable: false,
- exclusive: false,
- autoDelete: false,
- arguments: null);
- Console.WriteLine("Enter message to send");
- var msg = Console.ReadLine();
- var body = Encoding.UTF8.GetBytes(msg);
- channel.BasicPublish(exchange: "",
- routingKey: "msgKey",
- basicProperties: null,
- body: body);
- Console.WriteLine(" [x] Sent {0}", msg);
- }
- Console.WriteLine(" Press [enter] to exit.");
- Console.ReadLine();
- }
- }
Now, our work in sender is done. Now, we will go to the receiver project and open its Program.cs.
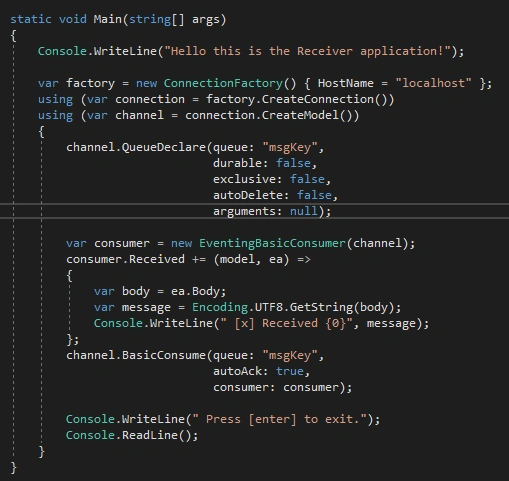
In this class also, there is just simple queueDelcaration.
- channel.QueueDeclare(queue: "msgKey",
- durable: false,
- exclusive: false,
- autoDelete: false,
- arguments: null);
As you can see I have kept this declaration to as simple as possible because the motive of this exercise to simply send a message and receive at the other end. You can customize it in the future. I’m just showing you the extreme basics.
Here again, our queue is the secret key that is used by the sender to send messages.
- var consumer = new EventingBasicConsumer(channel);
- consumer.Received += (model, ea) =>
- {
- var body = ea.Body;
- var message = Encoding.UTF8.GetString(body);
- Console.WriteLine(" [x] Received {0}", message);
- };
- channel.BasicConsume(queue: "msgKey",
- autoAck: true,
- consumer: consumer);
In the above code, I have just made an event so that every time a sender sends something, it automatically receives it and displays it in the console.
So, that’s it for our receiver class. Here is our entire class.
- class Program
- {
- static void Main(string[] args)
- {
- Console.WriteLine("Hello this is the Receiver application!");
- var factory = new ConnectionFactory() { HostName = "localhost" };
- using (var connection = factory.CreateConnection())
- using (var channel = connection.CreateModel())
- {
- channel.QueueDeclare(queue: "msgKey",
- durable: false,
- exclusive: false,
- autoDelete: false,
- arguments: null);
- var consumer = new EventingBasicConsumer(channel);
- consumer.Received += (model, ea) =>
- {
- var body = ea.Body;
- var message = Encoding.UTF8.GetString(body);
- Console.WriteLine(" [x] Received {0}", message);
- };
- channel.BasicConsume(queue: "msgKey",
- autoAck: true,
- consumer: consumer);
- Console.WriteLine(" Press [enter] to exit.");
- Console.ReadLine();
- }
- }
- }
Now, let's run and test these two applications.
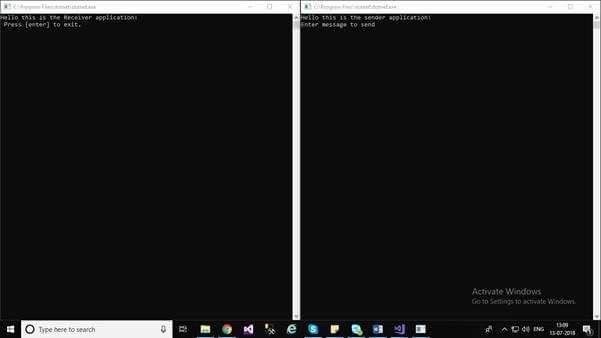
As you can see I have run both the solutions. Now, just type and hit enter in sender application and it should reflect in receiver application.

If you wish to see/download the code click here for the sender and here for the receiver.
Summary
In today’s article, we have seen how we can communicate between two different ASP.NET Core 2.0 console applications using RabbitMQ.
Hope you all liked it.
Happy Coding!
Chitranjan SharmaPosted Oct 3, 2019, 4:35 AM
How to this data insert in sql server
Stanislav RomashovPosted Aug 19, 2019, 3:01 PM
This is just copy of tutorial (part 1) from offical Rabbit MQ website... And nothing about ASP.NET Core. Shame...
Elvin MammadovPosted Feb 16, 2019, 1:59 AM
Where is the Asp.net Core application in there? it is just the same thing in the official tutorial. Where is the DI, registration in StartUp or other settings for ASP.NET Core?
Shashikala PatelPosted Nov 13, 2018, 3:08 AM
Thanks for sharing
Roddy HarrisPosted Jul 23, 2018, 1:36 AM
Thanks for sharing
Aseem GauravPosted Jul 19, 2018, 11:25 PM
Also, one question, is this suited for microservices performing crud operations where the result need to be sent back to the caller?
Aseem GauravPosted Jul 19, 2018, 11:24 PM
It is faster than using HttpClient requests because AMQP is a specific protocol whereas HTTP - general-purpose protocol. Thus, HTTP has very high overhead comparing to AMQP. - Can you provide link to some documentation which supports this?
Aseem GauravPosted Jul 19, 2018, 11:23 PM
"As I have explained above, we can use RabbitMQ to establish communication between different type of technology-based projects." - You can simply use REST also for connecting different technologies.
Viknaraj ManogararajahPosted Jul 18, 2018, 11:33 AM
nice article....
Hadshana KamalanathanPosted Jul 18, 2018, 10:13 AM
Thanks for sharing