
Microsoft has recently introduced changes to improve the security of Hybrid Exchange deployments . One of the key updates is the move from using a shared service principal to a dedicated Exchange Hybrid application in Microsoft Entra ID. This ensures stronger isolation, improved manageability, and enhanced security for hybrid authentication and features such as Free/Busy lookups, MailTips, and Photos between Exchange Server and Exchange Online.
These changes address the vulnerability documented under CVE-2025-53786 (Microsoft Exchange Server Hybrid Deployment Elevation of Privilege Vulnerability), which was announced by Microsoft in August 2025.
In this post, I'll walk you through the step-by-step process of configuring the new dedicated Exchange Hybrid application.
Step 1. Verify Prerequisites
Before you start, make sure your environment meets the following requirements:
Server Build Versions (minimum)
Exchange Server 2019 CU15 with April 2025 HU (or later)
Exchange Server 2019 CU14 with April 2025 HU (or later)
Exchange Server 2016 CU23 with April 2025 HU (or later)
Connectivity from Exchange Server (for All-in-One Config Mode)
    Test-NetConnection -ComputerName login.microsoftonline.com -Port 443
Test-NetConnection -ComputerName graph.microsoft.com -Port 443
Permissions
Microsoft Entra ID (Azure AD): Application Admin or Global Admin
Exchange On-Premises: Member of Organization Management
Exchange Role: Mailbox Role
Step 2. Download the Microsoft Script
On a mailbox Exchange Server, download the official Microsoft script:
Script: MonitorExchangeAuthCertificate.ps1
This script includes functionality for creating and configuring the Dedicated Exchange Hybrid App .
Step 3. Run the Script in Exchange PowerShell
Open Exchange Management Shell as Administrator.
Navigate to the folder where the script was downloaded.
Run the following command (All-in-One Config Mode):
.\ConfigureExchangeHybridApplication.ps1 -FullyConfigureExchangeHybridApplication
Authenticate when prompted using Global Admin credentials .
If successful, the script will:
Register a new dedicated Exchange Hybrid App in Entra ID
Update Certificate
Configure AuthServer
Configure TargetSharingEpr
Enable ExchangeHybridApplicationOverride
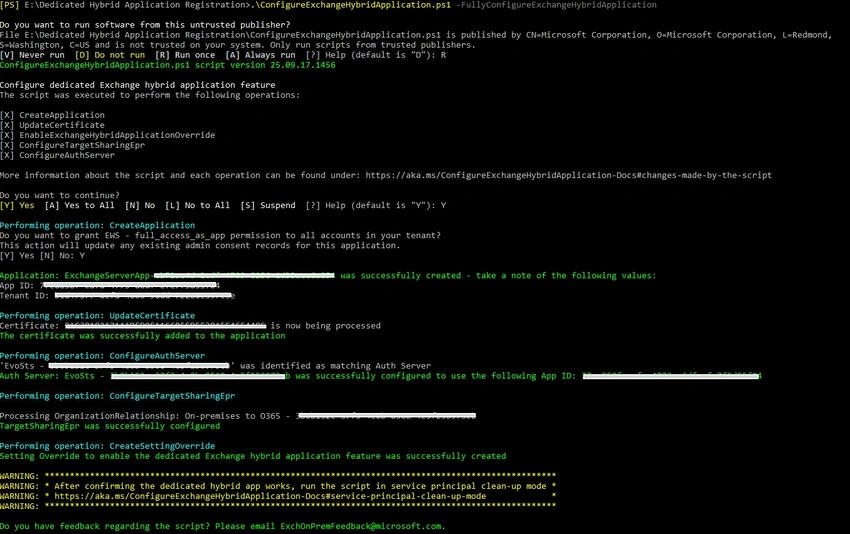
Step 4. Verify OAuth Connectivity
Once the script completes, you should verify that OAuth authentication is working between Exchange Server and Exchange Online.
Save script below as a ".ps1" and run the following command in Exchange Management Shell (On-Premises):
Note: Change the Email address before running the command.
    $OnPremisesMailbox = "[email protected]"

$result = Test-OAuthConnectivity -Service EWS -TargetUri https://outlook.office365.com -Mailbox $OnPremisesMailbox
Write-Host $result.ResultType

if (($result.Detail.FullId) -match '"appid":\s*"([^"]+)"') {
    $appid = $matches[1]
    Write-Output "Extracted appId: $appid"
} else {
    Write-Output "appId not found"
}
A following successful result confirms that the new dedicated application is being used.

Step 5. Audit Usage in Entra ID
After enabling the dedicated Exchange Hybrid App, you can monitor its activity via Entra ID Sign-in logs .
This helps confirm that authentication requests are routed through the new app and provides visibility for security and compliance auditing.
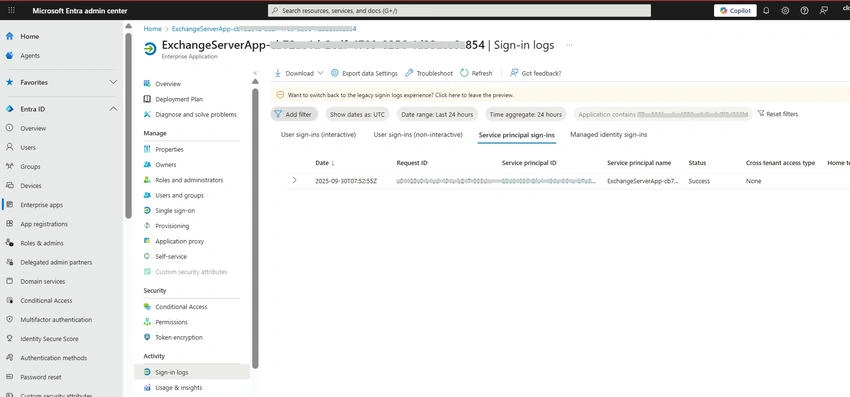
Step 6. Service Principal Clean-Up
As part of the previous Exchange hybrid design, the Hybrid Configuration Wizard (HCW) uploaded the current Auth Certificate from your Exchange organization to the first-party Service Principal. This practice is no longer recommended and should not be performed. The Auth Certificate must now be uploaded exclusively to the dedicated Exchange hybrid application.
Run the following command (All-in-One Config Mode):
.\ConfigureExchangeHybridApplication.ps1 -ResetFirstPartyServicePrincipalKeyCredentials
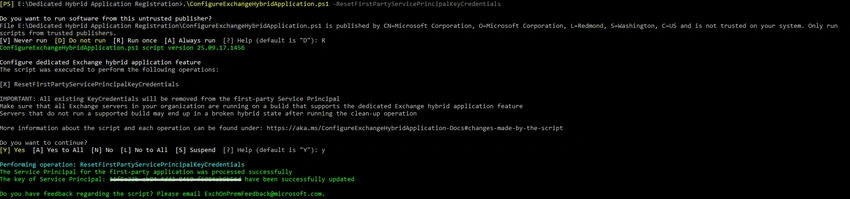
Conclusion
By replacing the shared service principal with a dedicated Exchange Hybrid application , Microsoft has strengthened the security of hybrid Exchange environments.
This change:
Improves isolation of permissions.
Enhances auditing and monitoring.
Ensures hybrid features like Free/Busy, MailTips, and Photos continue to work seamlessly.
If you haven't yet implemented this change, it's highly recommended to follow the steps above to continue and secure your hybrid Exchange deployment.
Join the conversation! Your thoughts help the community grow.