

Introduction
Today we are describing how to connect Windows Store apps to a SQL Server database using Windows Services. As we know, there is not an option in Windows Store apps to directly connect to a SQL Server database. So if you want to create a connection between Windows Store apps to SQL Server then you must use Windows Services.
This application connects a Windows Store app to a SQL Server database using WCF Services throough a Windows Service so no one can see the connection or no end user can easily close the service. That's why it is a better way than connecting the Windows Store apps to a Desktop application and the Desktop application does the database part. In this application we are using a database named "EmpDatabase" and a table named "EmployeeTable". In the EmployeeTable there are three fields, Id, Name and Address.
Step 1
Open Visual Studio 2012 and create a new project called "WCF Services library".
Step 2
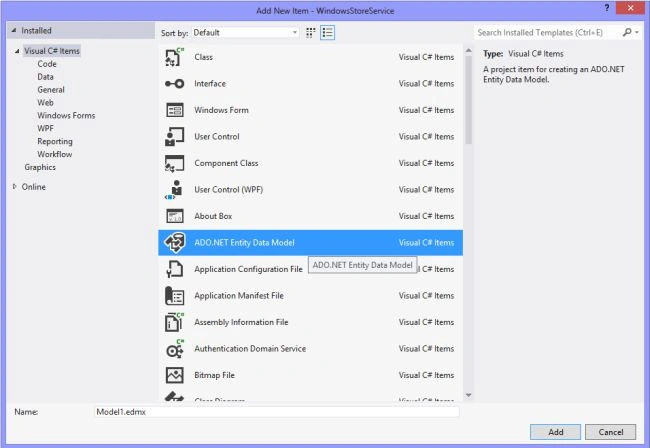
In this step add the database you want to use in your application using "ADO.NET Entity data model". To do that right-click on your services application in Solution Explorer and select "Add new item". Whatever table you are using in the application, must have a primary key.
Step 3
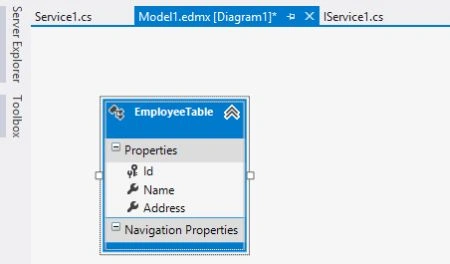
After adding an entity model your database table will be as follows:
Step 4
Go to the "IService.cs" page and replace all the code with the following code. In this page we declared the services interface.
using System;
using System.Collections.Generic;
using System.Linq;
using System.Runtime.Serialization;
using System.ServiceModel;
using System.Text;
namespace WindowsService1
{
[ServiceContract]
public interface IService1
{
[OperationContract]
bool InsertEmployee(Employee EmpInsert);
[OperationContract]
List<Employee> GetEmployee();
}
[DataContract]
public class Employee
{
private string id;
private string name;
private string address;
[DataMember]
public string EmpId
{
get { return id; }
set { id = value; }
}
[DataMember]
public string EmpName
{
get { return name; }
set { name = value; }
}
[DataMember]
public string EmpAddress
{
get { return address; }
set { address = value; }
}
}
}
Step 5
In "Service.cs" page replace all code with following code. In this page we declared services method.
using System;
using System.Collections.Generic;
using System.Linq;
using System.Runtime.Serialization;
using System.ServiceModel;
using System.Text;
namespace WindowsService1
{
public class Service1 : IService1
{
public bool InsertEmployee(Employee EmpInsert)
{
EmpDatabaseEntities EmpData = new EmpDatabaseEntities();
EmployeeTable NewEmp = new EmployeeTable();
NewEmp.Id = EmpInsert.EmpId;
NewEmp.Name = EmpInsert.EmpName;
NewEmp.Address = EmpInsert.EmpAddress;
EmpData.EmployeeTables.Add(NewEmp);
EmpData.SaveChanges();
return true;
}
public List<Employee> GetEmployee()
{
var Emplist = new List<Employee>();
EmpDatabaseEntities EmpData=new EmpDatabaseEntities();
foreach (var Emp in EmpData.EmployeeTables.ToList())
{
Employee GetEmp = new Employee();
GetEmp.EmpId = Emp.Id;
GetEmp.EmpName = Emp.Name;
GetEmp.EmpAddress = Emp.Address;
Emplist.Add(GetEmp);
}
return Emplist;
}
}
}
Step 6
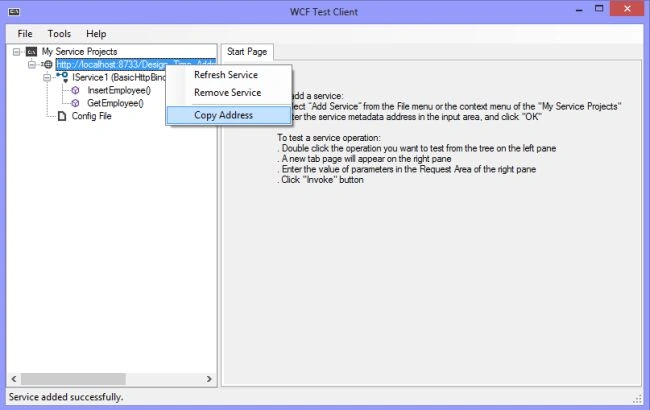
After doing that, run WCF services and copy to the services URL.
Step 7
Now open Visual Studio 2012 in a new window and start a new "Windows Store apps" project.
Step 8
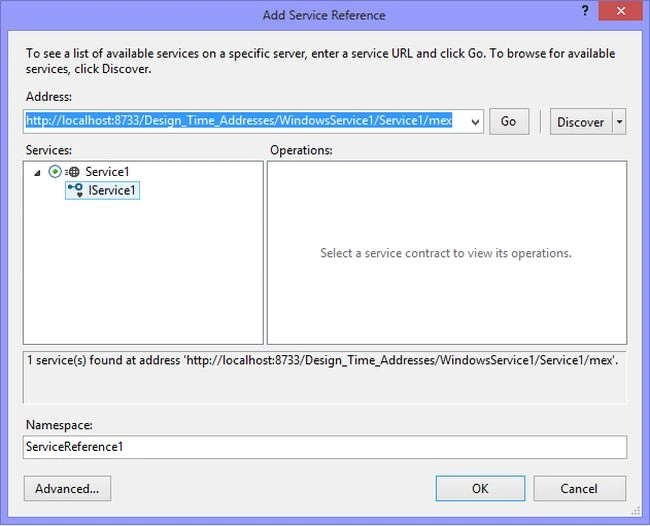
In this step, add a service reference. To do that right-click on the project and in Solution Explorer and select "Add Service Reference". Paste the Service URL and click on "Go". After finding the service click on "OK".
Step 9
Go to Solution Explorer and double-click on "MainPage.xaml". Your "MainPage.xaml" page is as in the following code:
<Page
x:Class="WindowsStoreToSql.MainPage"
xmlns="http://schemas.microsoft.com/winfx/2006/xaml/presentation"
xmlns:x="http://schemas.microsoft.com/winfx/2006/xaml"
xmlns:local="using:WindowsStoreToSql"
xmlns:d="http://schemas.microsoft.com/expression/blend/2008"
xmlns:mc="http://schemas.openxmlformats.org/markup-compatibility/2006"
mc:Ignorable="d">
<Grid Background="{StaticResource ApplicationPageBackgroundThemeBrush}" RenderTransformOrigin="0.508,0.484">
<TextBox HorizontalAlignment="Left" x:Name="IdTextbox" TextWrapping="Wrap" Text="" VerticalAlignment="Top" Margin="352,249,0,0" Width="246"/>
<TextBox HorizontalAlignment="Left" x:Name="NameTextbox" TextWrapping="Wrap" Text="" VerticalAlignment="Top" Margin="352,303,0,0" Width="246"/>
<TextBox HorizontalAlignment="Left" x:Name="AddTextBox" TextWrapping="Wrap" Text="" VerticalAlignment="Top" Margin="352,358,0,0" Width="246"/>
<Button Content="ShowData" x:Name="ShowData" HorizontalAlignment="Left" VerticalAlignment="Top" Margin="496,422,0,0" Click="ShowData_Click"/>
<Button Content="InsertData" x:Name="InsertData" HorizontalAlignment="Left" VerticalAlignment="Top" Margin="352,422,0,0" Click="InsertData_Click"/>
<GridView HorizontalAlignment="Left" x:Name="EmpGridview" VerticalAlignment="Top" Width="150" Margin="646,162,0,0" />
</Grid>
</Page>
Step 10
Your "MainPage.xaml.cs" page is as in the following code:
using System;
using System.Collections.Generic;
using System.IO;
using System.Linq;
using Windows.Foundation;
using Windows.Foundation.Collections;
using Windows.UI.Xaml;
using Windows.UI.Xaml.Controls;
using Windows.UI.Xaml.Controls.Primitives;
using Windows.UI.Xaml.Data;
using Windows.UI.Xaml.Input;
using Windows.UI.Xaml.Media;
using Windows.UI.Xaml.Navigation;
using Windows.UI.Popups;
namespace WindowsStoreToSql
{
public sealed partial class MainPage : Page
{
ServiceReference1.Service1Client MyService;
public MainPage()
{
this.InitializeComponent();
}
protected override void OnNavigatedTo(NavigationEventArgs e)
{
MyService = new ServiceReference1.Service1Client();
}
private async void InsertData_Click(object sender, RoutedEventArgs e)
{
await MyService.InsertEmployeeAsync(new ServiceReference1.Employee { EmpId = IdTextbox.Text, EmpName = NameTextbox.Text, EmpAddress = AddTextBox.Text });
}
private async void ShowData_Click(object sender, RoutedEventArgs e)
{
var EmpList = await MyService.GetEmployeeAsync();
foreach (var Emp in EmpList)
{
GridViewItem EmpView = new GridViewItem();
StackPanel Spanel = new StackPanel();
Spanel.Children.Add(new TextBlock() { Text = Emp.EmpId });
Spanel.Children.Add(new TextBox() { Text = Emp.EmpName });
Spanel.Children.Add(new TextBlock() { Text = Emp.EmpAddress });
EmpView.Content = Spanel;
EmpGridview.Items.Add(EmpView);
}
}
}
}
Step 11
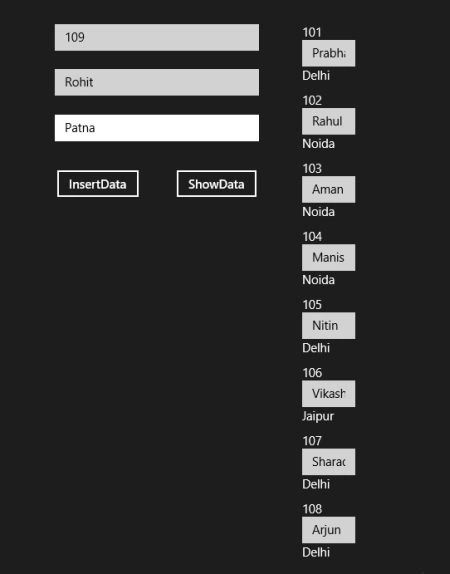
Now run project. Click on "ShowData" to show your table data and click on "InsertData" to insert data into the table.
Tchala BPosted May 24, 2015, 1:17 PM
Wow this is a great tutorial!,i just enjoyed it.May you please post something of the same type but using a universal app?
urang kitoPosted Mar 22, 2014, 12:33 PM
Hi, I am using 2013 and it working well. THank you very much.
Avish SharmaPosted Sep 11, 2013, 9:39 AM
Warning 1 Custom tool warning: Endpoint 'WSHttpBinding_IService1' at address 'http://localhost:8732/Design_Time_Addresses/WcfServiceLibrary2/Service1/' is not compatible with Silverlight 3. Skipping... c:\users\nilesh\documents\visual studio 2012\Projects\PhoneGapStarter8\PhoneGapStarter8\Service References\ServiceReference1\Reference.svcmap 1 1 PhoneGapStarter8
Avish SharmaPosted Sep 11, 2013, 9:38 AM
Hi Prabhakar, thank you for the wonderful tutorial. I am using Visual Studio 2010 to create the web service and getting following error. Is that we need to use Visual Studio 2012 for this tutorial. Please help. Thank you
Bugnion FrancoisPosted Jul 19, 2013, 8:55 AM
Hello thanks for the awesome work.
Prabhakar MauryaPosted May 23, 2013, 12:31 PM
Hi Friend. In this article all steps are correct, If you getting this of problem then firstly check your IIS are installed correctly and also check your WCF services are installed or not installed. Then after try again. To install WCF services follow this link.. http://www.c-sharpcorner.com/UploadFile/7e39ca/how-to-configure-wcf-services-in-windows-8/
sajid rajaPosted May 19, 2013, 4:20 PM
Please reply to this question if possible,. I am waiting for your reply.
mariameditedPosted May 17, 2013, 4:57 AMEdited May 17, 2013, 5:16 AM
i have an error on step 5 ... please look into it ... and reply! the error is here EmpDatabaseEntities EmpData = new EmpDatabaseEntities();EmployeeTable NewEmp = new EmployeeTable(); if i run the attached file ... this is what i get An unhandled exception of type 'System.ServiceModel.EndpointNotFoundException' occurred in mscorlib.dll Additional information: There was no endpoint listening at http://localhost:8733/Design_Time_Addresses/WindowsService1/Service1/ that could accept the message. This is often caused by an incorrect address or SOAP action. See InnerException, if present, for more details. ok then i fixed this and now its giving me this error A first chance exception of type 'System.ServiceModel.FaultException' occurred in System.ServiceModel.dll Additional information: The server was unable to process the request due to an internal error. For more information about the error, either turn on IncludeExceptionDetailInFaults (either from ServiceBehaviorAttribute or from the <serviceDebug> configuration behavior) on the server in order to send the exception information back to the client, or turn on tracing as per the Microsoft .NET Framework SDK documentation and inspect the server trace logs.
G AeditedPosted May 1, 2013, 12:47 PMEdited May 1, 2013, 12:48 PM
What kind of project do we choose in STEP 1 when we create the application in VS 2012?