

In this article, we will learn the step by step process of creating login and registration pages in a Web API using Angular 7.
Technologies we will use:
- ASP.NET Web API
- Angular 7
- SQL Server
- Bootstrap
Prerequisites
- We should have basic knowledge of Angular and Web API
- Visual Studio Code IDE should be installed
- SQL Server Management Studio
Step 1
Open SQL Server Management Studio, create a database named "Employee" and in this database, create a table. Give that table a name like "Employeemaster".
- CREATE TABLE [dbo].[Employeemaster](
- [UserId] [int] IDENTITY(1,1) NOT NULL,
- [UserName] [varchar](50) NOT NULL,
- [LoginName] [varchar](50) NULL,
- [Password] [varchar](50) NOT NULL,
- [Email] [varchar](50) NULL,
- [ContactNo] [varchar](15) NULL,
- [Address] [varchar](50) NULL,
- [IsApporved] [int] NULL,
- [Status] [int] NULL,
- [TotalCnt] [int] NULL,
- PRIMARY KEY CLUSTERED
- (
- [UserId] ASC
- )WITH (PAD_INDEX = OFF, STATISTICS_NORECOMPUTE = OFF, IGNORE_DUP_KEY = OFF, ALLOW_ROW_LOCKS = ON, ALLOW_PAGE_LOCKS = ON) ON [PRIMARY]
- ) ON [PRIMARY]
- GO
Now, create a stored procedure with a name Usp_Login for adding the login functionality.
- create proc [dbo].[Usp_Login]
- @UserName varchar(50)='',
- @Password varchar(50)=''
- as begin
- declare @UserId int =0,@TotalCnt int =0
- select @UserId=UserId,@TotalCnt=TotalCnt from Employeemaster um
- where LoginName=@UserName and Password=@Password and Status<>3 and IsApporved=1
- if(@TotalCnt>=5)
- begin
- select 0 UserId,'' UserName,'' LoginName,'' Password,'' Email,'' ContactNo,
- ''Address,0 IsApporved,-1 Status
- end
- if(@UserId>0)
- begin
- select UserId, UserName, LoginName, Password, Email, ContactNo,
- Address, IsApporved, Status from Employeemaster um
- where UserId=@UserId
- --update Employeemaster set Status=2 where UserId=@UserId
- end
- else
- begin
- Update Employeemaster set @TotalCnt=TotalCnt+1
- where LoginName=@UserName and Status=1 and IsApporved=1
- select 0 UserId,'' UserName,'' LoginName,'' Password,'' Email,'' ContactNo,
- ''Address,0 IsApporved,0 Status
- end
- end
Step 2
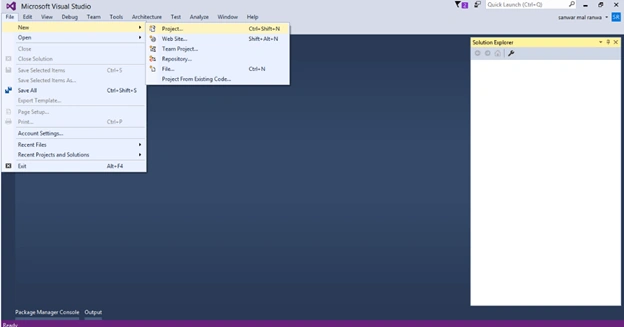
Open Visual Studio and create a new project.
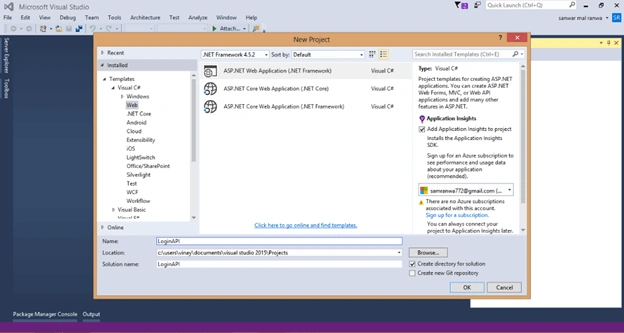
Change the name as LoginAPI and select Web API as its template.
Step 3
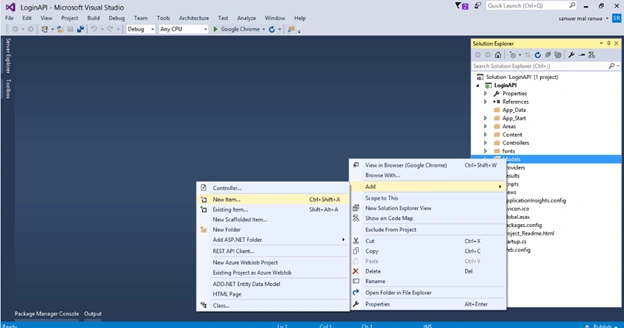
Right-click the Models folder from Solution Explorer and go to Add >> New Item >> data.
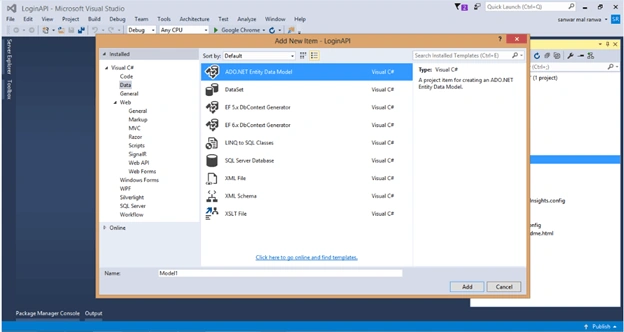
Click on the "ADO.NET Entity Data Model" option and click "Add".
Select EF designer from the database and click the "Next" button.
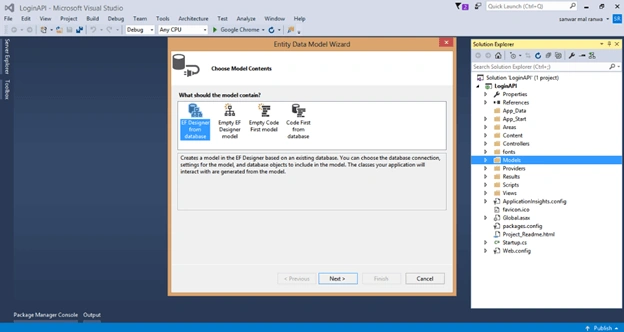
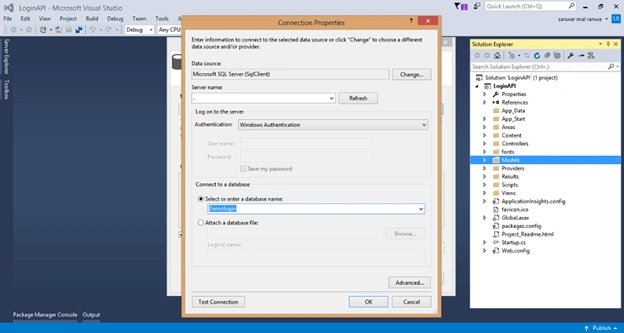
Add the connection properties and select database name on the next page and click OK.
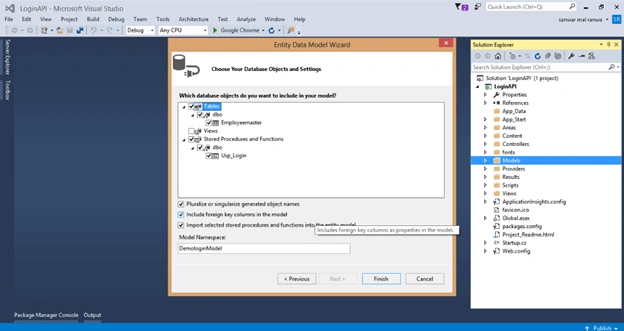
Check the Tables and Stored procedure checkboxes. The internal options will be selected by default. Now, click the "Finish" button.
Our data model is created now.
Step 4
Right-click on Models folder and add two classes - Login and Response respectively. Now, paste the following codes in these classes.
Login class and Registration class
- public class Login
- {
- public string UserName { set; get; }
- public string Password { set; get; }
- }
- public class Registration : Employeemaster { }
Response class
- public class Response
- {
- public string Status { set; get; }
- public string Message { set; get; }
- }
Step 5
Right-click on the Controllers folder and add a new controller. Name it as "Login controller".
Add the following namespace in the Login controller.
- using LoginAPI.Models;
Now, add a method to insert data into the database for user registration.
- [Route("Api/Login/createcontact")]
- [HttpPost]
- public object createcontact(Registration Lvm)
- {
- try
- {
- DemologinEntities db = new DemologinEntities();
- Employeemaster Em = new Employeemaster();
- if (Em.UserId == 0)
- {
- Em.UserName = Lvm.UserName;
- Em.LoginName = Lvm.LoginName;
- Em.Password = Lvm.Password;
- Em.Email = Lvm.Email;
- Em.ContactNo = Lvm.ContactNo;
- Em.Address = Lvm.Address;
- Em.IsApporved = Lvm.IsApporved;
- Em.Status = Lvm.Status;
- db.Employeemasters.Add(Em);
- db.SaveChanges();
- return new Response
- { Status = "Success", Message = "SuccessFully Saved." };
- }
- }
- catch (Exception)
- {
- throw;
- }
- return new Response
- { Status = "Error", Message = "Invalid Data." };
- }
Step 6
Add a new method for logging into the Login controller with the following lines of code.
- [Route("Api/Login/UserLogin")]
- [HttpPost]
- public Response Login(Login Lg)
- {
- DemologinEntities DB = new DemologinEntities();
- var Obj = DB.Usp_Login(Lg.UserName, Lg.Password).ToList<Usp_Login_Result>().FirstOrDefault();
- if (Obj.Status == 0)
- return new Response { Status = "Invalid", Message = "Invalid User." };
- if (Obj.Status == -1)
- return new Response { Status = "Inactive", Message = "User Inactive." };
- else
- return new Response { Status = "Success", Message = Lg.UserName };
- }
- using System;
- using System.Collections.Generic;
- using System.Linq;
- using System.Net;
- using System.Net.Http;
- using System.Web.Http;
- using LoginAPI.Models;
- namespace LoginAPI.Controllers
- {
- public class LoginController : ApiController
- {
- //For user login
- [Route("Api/Login/UserLogin")]
- [HttpPost]
- public Response Login(Login Lg)
- {
- DemologinEntities DB = new DemologinEntities();
- var Obj = DB.Usp_Login(Lg.UserName, Lg.Password).ToList<Usp_Login_Result>().FirstOrDefault();
- if (Obj.Status == 0)
- return new Response { Status = "Invalid", Message = "Invalid User." };
- if (Obj.Status == -1)
- return new Response { Status = "Inactive", Message = "User Inactive." };
- else
- return new Response { Status = "Success", Message = Lg.UserName };
- }
- //For new user Registration
- [Route("Api/Login/createcontact")]
- [HttpPost]
- public object createcontact(Registration Lvm)
- {
- try
- {
- DemologinEntities db = new DemologinEntities();
- Employeemaster Em = new Employeemaster();
- if (Em.UserId == 0)
- {
- Em.UserName = Lvm.UserName;
- Em.LoginName = Lvm.LoginName;
- Em.Password = Lvm.Password;
- Em.Email = Lvm.Email;
- Em.ContactNo = Lvm.ContactNo;
- Em.Address = Lvm.Address;
- Em.IsApporved = Lvm.IsApporved;
- Em.Status = Lvm.Status;
- db.Employeemasters.Add(Em);
- db.SaveChanges();
- return new Response
- { Status = "Success", Message = "SuccessFully Saved." };
- }
- }
- catch (Exception)
- {
- throw;
- }
- return new Response
- { Status = "Error", Message = "Invalid Data." };
- }
- }
- }
Step 7
Now, let's enable Cors. Go to Tools, open NuGet Package Manager, search for Cors, and install the "Microsoft.Asp.Net.WebApi.Cors" package.
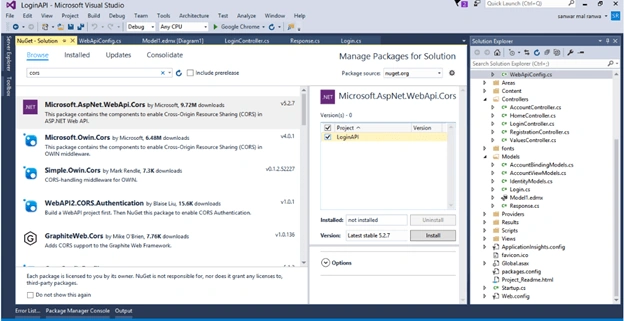
Open Webapiconfig.cs and add the following lines.
- EnableCorsAttribute cors = new EnableCorsAttribute("*", "*", "*");
- config.EnableCors(cors);
Step 8
Create an Angular 7 project with a name "login" by using the following command.
ng new login
Step 9
Open Visual Studio Code, open the newly created project and add bootstrap to this project.
npm install bootstrap --save
Step 10
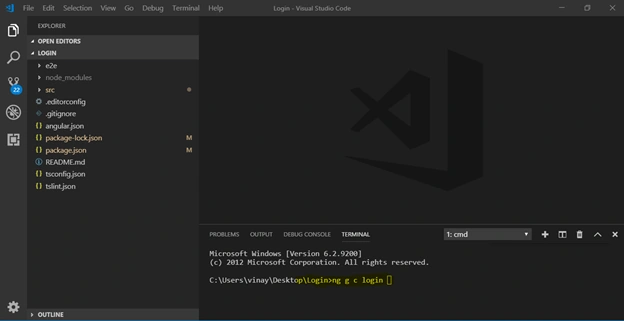
Now, create three components for the login page, registration page, and dashboard respectively. To create the components, open terminal and use the following commands.
- ng g c login
- ng g c register
- ng g c dashboard
Step 11
Create a class named "register".
ng g class register
Add the required properties in the class.
- export class Register {
- UserName:string;
- LoginName:string;
- Password:string;
- Email:string;
- ContactNo:string;
- Address:string
- }
Step 12
Create a service to call the Web API.
ng g s login
Open the login service and import required packages and classes. Add the following lines of code in the login.service.ts file.
- import { Injectable } from '@angular/core';
- import {HttpClient} from '@angular/common/http';
- import {HttpHeaders} from '@angular/common/http';
- import { from, Observable } from 'rxjs';
- import { Register } from "../app/register";
- @Injectable({
- providedIn: 'root'
- })
- export class LoginService {
- Url :string;
- token : string;
- header : any;
- constructor(private http : HttpClient) {
- this.Url = 'http://localhost:14812/api/Login/';
- const headerSettings: {[name: string]: string | string[]; } = {};
- this.header = new HttpHeaders(headerSettings);
- }
- Login(model : any){
- debugger;
- var a =this.Url+'UserLogin';
- return this.http.post<any>(this.Url+'UserLogin',model,{ headers: this.header});
- }
- CreateUser(register:Register)
- {
- const httpOptions = { headers: new HttpHeaders({ 'Content-Type': 'application/json' }) };
- return this.http.post<Register[]>(this.Url + '/createcontact/', register, httpOptions)
- }
- }
Step 13
Now, open register.component.html and add the following HTML code to design the registration form.
- <div class="container" style="padding-top:40px;">
- <div class="row">
- <div class="col-md-6 mx-auto">
- <div class="card mx-4">
- <div class="card-body p-4">
- <form [formGroup]="employeeForm" (ngSubmit)="onFormSubmit(employeeForm.value)">
- <h1 style="text-align:center">Register</h1>
- <div class="input-group mb-3">
- <input type="text" class="form-control" placeholder="Username" formControlName="UserName">
- </div>
- <div class="input-group mb-3">
- <input type="text" class="form-control" placeholder="Loginname" formControlName="LoginName">
- </div>
- <div class="input-group mb-3">
- <input type="password" class="form-control" placeholder="Password" formControlName="Password">
- </div>
- <div class="input-group mb-4">
- <input type="text" class="form-control" placeholder="Email" formControlName="Email">
- </div>
- <div class="input-group mb-4">
- <input type="text" class="form-control" placeholder="Contact No" formControlName="ContactNo">
- </div>
- <div class="input-group mb-4">
- <input type="text" class="form-control" placeholder="Address" formControlName="Address">
- </div>
- <button type="submit" class="btn btn-block btn-success">Add User</button>
- </form>
- </div>
- </div>
- </div>
- </div>
- </div>
Open register.componet.ts file and add following lines.
- import { Component, OnInit } from '@angular/core';
- import { LoginService } from '../login.service';
- import {Register} from '../register';
- import {Observable} from 'rxjs';
- import { NgForm, FormBuilder, FormGroup, Validators, FormControl } from '@angular/forms';
- @Component({
- selector: 'app-register',
- templateUrl: './register.component.html',
- styleUrls: ['./register.component.css']
- })
- export class RegisterComponent implements OnInit {
- data = false;
- UserForm: any;
- massage:string;
- constructor(private formbulider: FormBuilder,private loginService:LoginService) { }
- ngOnInit() {
- thisthis.UserForm = this.formbulider.group({
- UserName: ['', [Validators.required]],
- LoginName: ['', [Validators.required]],
- Password: ['', [Validators.required]],
- Email: ['', [Validators.required]],
- ContactNo: ['', [Validators.required]],
- Address: ['', [Validators.required]],
- });
- }
- onFormSubmit()
- {
- const user = this.UserForm.value;
- this.Createemployee(user);
- }
- Createemployee(register:Register)
- {
- this.loginService.CreateUser(register).subscribe(
- ()=>
- {
- this.data = true;
- this.massage = 'Data saved Successfully';
- this.UserForm.reset();
- });
- }
- }
Step 15
Open login.componet.html and add this HTML.
- <div class="container" style="padding-top:60px;">
- <div class="row">
- <div class="col-md-6 mx-auto">
- <div class="card-group">
- <div class="card p-4">
- <div class="card-body">
- <form name="form" (ngSubmit)="login()" #f="ngForm">
- <h1 style="text-align:center">Login</h1>
- <div class="input-group mb-3">
- <div class="input-group-prepend">
- <span class="input-group-text"><i class="icon-user"></i></span>
- </div>
- <input type="text" name="UserName" [(ngModel)]="model.UserName" class="form-control sty1" placeholder="Email" required>
- </div>
- <div class="input-group mb-4">
- <div class="input-group-prepend">
- <span class="input-group-text"><i class="icon-lock"></i></span>
- </div>
- <input type="password" name="Passward" [(ngModel)]="model.Password" class="form-control"
- placeholder="Password">
- </div>
- <div>
- <p style="color:#E92626;font-size:20px;font-weight:normal" Class="success" align="left">
- {{errorMessage}}
- </p>
- </div>
- <div class="row">
- <div class="col-6">
- <button type="submit" class="btn btn-primary px-4">Login</button>
- </div>
- <div class="col-6 text-right">
- <button type="button" class="btn btn-link px-0">Forgot password?</button>
- </div>
- </div>
- </form>
- </div>
- </div>
- </div>
- </div>
- </div>
- </div>
- import { Component, OnInit } from '@angular/core';
- import { Router } from '@angular/router';
- import { LoginService } from '../login.service';
- import { FormsModule } from '@angular/forms';
- @Component({
- selector: 'app-login',
- templateUrl: './login.component.html',
- styleUrls: ['./login.component.css']
- })
- export class LoginComponent {
- model : any={};
- errorMessage:string;
- constructor(private router:Router,private LoginService:LoginService) { }
- ngOnInit() {
- sessionStorage.removeItem('UserName');
- sessionStorage.clear();
- }
- login(){
- debugger;
- this.LoginService.Login(this.model).subscribe(
- data => {
- debugger;
- if(data.Status=="Success")
- {
- this.router.navigate(['/Dashboard']);
- debugger;
- }
- else{
- this.errorMessage = data.Message;
- }
- },
- error => {
- this.errorMessage = error.message;
- });
- };
- }
Step 16
Now, open dashboard.component.html and add the following lines.
- <div>
- <div class="row">
- <div class="col-sm-12 btn btn-primary">
- Welcome to DashBoard
- </div>
- </div>
- </div>
Now, open app-routing.module.ts file and add the following lines to create routing.
- import { NgModule } from '@angular/core';
- import { Routes, RouterModule } from '@angular/router';
- import { DashboardComponent } from './dashboard/dashboard.component';
- import { LoginComponent } from './login/login.component';
- import { RegisterComponent } from './register/register.component';
- export const routes: Routes = [
- {
- path: '',
- redirectTo: 'login',
- pathMatch: 'full',
- },
- {
- path: 'login',
- component: LoginComponent,
- data: {
- title: 'Login Page'
- }
- },
- {
- path: 'Dasboard',
- component: DashboardComponent,
- data: {
- title: 'Dashboard Page'
- }
- },
- {
- path: 'AddUser',
- component: RegisterComponent,
- data: {
- title: 'Add User Page'
- }
- },
- ];
- @NgModule({
- imports: [RouterModule.forRoot(routes)],
- exports: [RouterModule]
- })
- export class AppRoutingModule { }
Step 18
Now, let us run the project and redirect the URL to the "Add User" page.
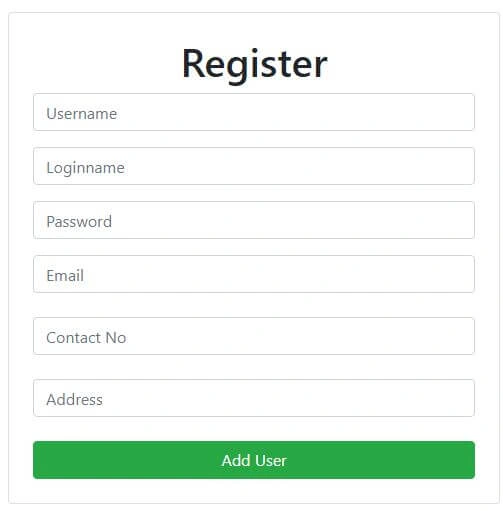
Enter the details and click on the "Add User" button.
Step 19
Now, run the project's default URL which takes us to the login page. Enter the username and password and click "Login".
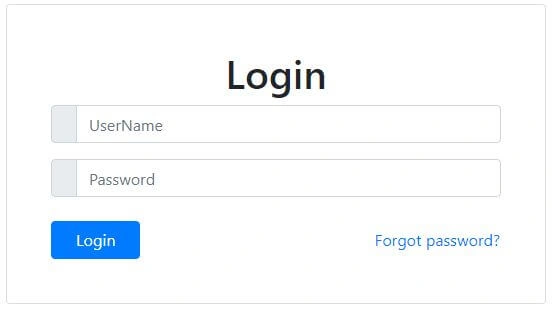
The following message will be displayed.

Summary
In this article, we discussed the process of Login and Registration page creation in an application using Angular 7 and Web API.
Gladis rajaPosted Aug 27, 2022, 6:23 AM
<form [formGroup]="employeeForm" (ngSubmit)="onFormSubmit(employeeForm.value)" > ~~~~~~~~~~~~ src/app/register/register.component.ts:11:16 11 templateUrl: './register.component.html', ~~~~~~~~~~~~~~~~~~~~~~~~~~~ Error occurs in the template of component RegisterComponent.
Gladis rajaPosted Aug 27, 2022, 6:23 AM
Getting error
Gladis rajaPosted Aug 27, 2022, 6:23 AM
Getting error
jim fowlerPosted Aug 20, 2020, 6:51 PM
Getting error: Http failure response for http://localhost:14812/api/Login/UserLogin: 0 Unknown Error. F12 on the web page suggests "Failed to load resource: net::ERR_CONNECTION_REFUSED". I suspect it may have something to do with CORS but do not know. Any help appreciated.
Garima SinghPosted Apr 22, 2020, 10:26 AM
Hi... in this above particular code... i am getting error cannot find module "register" import { Register } from "../app/register";
Ajlani WaelPosted Sep 25, 2019, 7:04 AM
Need source code please
Subhashkumar YadavPosted Aug 26, 2019, 8:05 AM
Please shere the Source code
Brandon DozierPosted Jul 19, 2019, 1:04 PM
If I wanted to implement session time-out where would I implement that, in the AngularJS app or Web API?
Brandon DozierPosted Jul 17, 2019, 3:44 PM
Sanwar Ranwafor some reason when I try to run the angular app it shows up as a blank page on local host. I also tried seeing it would show differently if I was running the Web API, but I still get a blank page. What could the reasons for this issue be?
Brandon DozierPosted Jul 17, 2019, 11:54 AM
Sanwar Ranwa I have been having trouble with creating the Entity Data Model because I am having trouble with being able to connect to the database, mainly because nothing seems to be popping up "Server Name" in the Connection Properties.
Wellington deOliveiraPosted May 30, 2019, 12:51 PM
Need link to download
Damodaran NPosted May 24, 2019, 4:25 AM
Nice article this is very helpful to me. Thank you so much.....
Sam SorcererPosted May 24, 2019, 1:53 AM
Nice article. However, when I run the app all I see is a blank page. Can you please tell me why this might be??
Selenium AllPosted Apr 26, 2019, 3:51 AM
Provide class implementation for "DemologinEntities" and "Employeemaster"
sanjay patelPosted Apr 23, 2019, 6:45 AM
How to redirect without routing in angular 7?
Imran RizviPosted Apr 11, 2019, 11:04 AM
If server is generating json web tokens .. is this procedure valid ? or i have to change something?
Vicky PathaniaPosted Mar 24, 2019, 8:17 AM
Can I get the download link for this exaple?
Hamid KhanPosted Mar 12, 2019, 2:07 AM
Good explanation...........
Talaviya BhavdipPosted Feb 25, 2019, 5:14 AM
Thanks a lot, dear @Sanwar Ranwa, this article very helpful to me.
Muthu KumarPosted Feb 22, 2019, 10:25 AM
Nice article Sanwar. Thanks for sharing..
Susanta KumarPosted Feb 19, 2019, 12:20 AM
Please provide source code, i am getting assembly reference error on Login method( var Obj = DB.Usp_Login(Lg.UserName, Lg.Password).ToList<Usp_Login_Result>().FirstOrDefault();)
Arvind SinghPosted Feb 18, 2019, 11:05 PM
Nice article...
Sarathlal SaseendranPosted Feb 18, 2019, 9:34 AM
Very useful one Sanwar. Keep it up