

A TreeView control is a useful control in ASP.NET.
Introduction
Create TreeView in ASP.NET C# with SQL Database.
Step 1: Database
First create a table in the database as in the following.
Table 1: State
- create table IN_State
- (
- S_Id int identity(1,1) primary key,
- S_Name varchar(30)
- )
- create table IN_City
- (
- C_Id int identity(1,1) primary key,
- C_Name varchar(30),
- S_Id int foreign key references IN_State(S_Id)
- )
- Go to the project the Solution Explorer.
- Add a new item as in the following:

Figure 1: Add new Item - Add a Web Form.

Figure 2: Add Web From
Step 3: From UI Side
Now add a TreeView control on the .aspx page as in the following UI code:
- <%@ Page Title="" Language="C#" MasterPageFile="~/Master/Master.master" AutoEventWireup="true" CodeFile="TreeView.aspx.cs" Inherits="UI_TreeView" %>
- <asp:Content ID="Content1" ContentPlaceHolderID="head" Runat="Server">
- </asp:Content>
- <asp:Content ID="Content2" ContentPlaceHolderID="ContentPlaceHolder1" Runat="Server">
- <asp:TreeView runat="server" ID="tview">
- </asp:TreeView>
- </asp:Content>
Now right-click on the page design and go to View Code and click it.
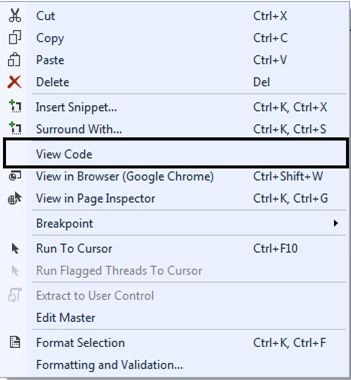
Figure 3: Viewcode
Code
- using System;
- using System.Collections.Generic;
- using System.Linq;
- using System.Web;
- using System.Web.UI;
- using System.Web.UI.WebControls;
- using System.Configuration;
- using System.Data;
- using System.Data.SqlClient;
- public partial class UI_TreeView : System.Web.UI.Page
- {
- protected void Page_Load(object sender, EventArgs e)
- {
- if (!Page.IsPostBack)
- {
- string connection = ConfigurationManager.ConnectionStrings["connstring"].ConnectionString;
- using (SqlConnection Conn = new SqlConnection(connection))
- {
- string State = "Select * from IN_State";
- string City = "Select * from IN_City";
- string Treeview = State + ";" + City;
- DataSet ds = new DataSet();
- SqlDataAdapter da = new SqlDataAdapter(Treeview, Conn);
- da.Fill(ds);
- ds.Tables[0].TableName = "IN_State";
- ds.Tables[1].TableName = "IN_City";
- DataRelation dr = new DataRelation("StateCity", ds.Tables["IN_State"].Columns["S_Id"], ds.Tables["IN_City"].Columns["S_Id"]);
- ds.Relations.Add(dr);
- foreach (DataRow drState in ds.Tables["IN_State"].Rows)
- {
- TreeNode NDState = new TreeNode();
- NDState.Text = drState["S_Name"].ToString();
- NDState.Value = drState["S_Id"].ToString();
- tview.Nodes.Add(NDState);
- foreach (DataRow drCity in drState.GetChildRows("StateCity"))
- {
- TreeNode NDCity = new TreeNode();
- NDCity.Text = drCity["C_Name"].ToString();
- NDCity.Value = drCity["C_Id"].ToString();
- NDState.ChildNodes.Add(NDCity);
- }
- }
- }
- }
- }
- }
Now the TreeView control code is complete. Run the design page and display the created TreeView as in the following.
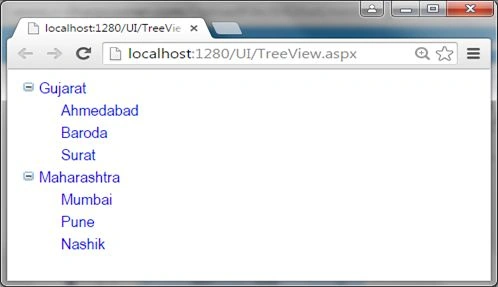
Figure 4: Treeview
I hope you have understood how to create a TreeView with a SQL table.
RakeshPosted Aug 8, 2015, 1:28 AM
thanks Neeraj kumar
Neeraj KumarPosted Aug 5, 2015, 5:41 PM
Nice
RakeshPosted Aug 5, 2015, 10:25 AM
Thanks Sibeesh Venu
Sibeesh VenuPosted Aug 5, 2015, 6:33 AM
Nice Share
RakeshPosted Aug 5, 2015, 12:04 AM
Thank you Santhakumar Sir
Santhakumar MunuswamyPosted Aug 4, 2015, 10:03 PM
Good Article. Thanks for sharing :)
RakeshPosted Aug 4, 2015, 1:56 PM
Thank you Gopi Chand sir
RakeshPosted Aug 4, 2015, 1:56 PM
Thank you Rajeesh Menoth
Gopi ChandPosted Aug 4, 2015, 6:20 AM
Good one
Rajeesh MenothPosted Aug 4, 2015, 5:31 AM
Really Good