Today you are going to learn how to create a simple Metro Map app. This app is being created just to show you how to switch among various activities and how to add an image in Android programming.
I used Android studio to make this app since we can preview the layout any time easily in it. You can use any other IDE like Eclipse.
Step 1:
Open the layout XML file (in my case activity_main.xml) present in the layout folder of your project. Initially, you will get the following code:
- <RelativeLayout xmlns:android="http://schemas.android.com/apk/res/android"
- xmlns:tools="http://schemas.android.com/tools"
- android:layout_width="match_parent"
- android:layout_height="match_parent"
- android:paddingLeft="@dimen/activity_horizontal_margin"
- android:paddingRight="@dimen/activity_horizontal_margin"
- android:paddingTop="@dimen/activity_vertical_margin"
- android:paddingBottom="@dimen/activity_vertical_margin"
- tools:context=".MainActivity">
- <TextView
- android:layout_width="wrap_content"
- android:layout_height="wrap_content"
- android:text="@string/hello_world" />
- </RelativeLayout>
Step 2:
Do the following changes in your layout file (I am changing the RealtiveLayout to LinearLayout because my layout just exists so my final view of the layout does not require any relative placing of components).
- <LinearLayout xmlns:android="http://schemas.android.com/apk/res/android"
- xmlns:tools="http://schemas.android.com/tools"
- android:layout_width="match_parent"
- android:layout_height="match_parent"
- android:paddingBottom="@dimen/activity_vertical_margin"
- android:paddingLeft="@dimen/activity_horizontal_margin"
- android:paddingRight="@dimen/activity_horizontal_margin"
- android:paddingTop="@dimen/activity_vertical_margin"
- tools:context=".MainActivity"
- android:orientation="vertical">
- <TextView
- android:id="@+id/txt"
- android:layout_width="wrap_content"
- android:layout_height="wrap_content"
- android:text="@string/hello_world"
- android:layout_marginBottom="5dp"/>
- </LinearLayout>
Step 3:
Now let us create the buttons in the XML file as required in this app:
- <Button
- android:id="@+id/fullMap"
- android:layout_width="fill_parent"
- android:layout_height="wrap_content"
- android:text="@string/full"
- android:textColor="@color/fullCol"
- android:background="@color/bg"
- />
- <Button
- android:id="@+id/redMap"
- android:layout_width="fill_parent"
- android:layout_height="wrap_content"
- android:text="@string/red"
- android:textColor="@color/redCol"
- />
- <Button
- android:id="@+id/blueMap"
- android:layout_width="fill_parent"
- android:layout_height="wrap_content"
- android:text="@string/blue"
- android:textColor="@color/blueCol"
- />
- <Button
- android:id="@+id/greenMap"
- android:layout_width="fill_parent"
- android:layout_height="wrap_content"
- android:text="@string/green"
- android:textColor="@color/greenCol"
- />
- <Button
- android:id="@+id/orangeMap"
- android:layout_width="fill_parent"
- android:layout_height="wrap_content"
- android:text="@string/orange"
- android:textColor="@color/orangeCol"
- />
Step 4:
The changes in "string.xml" file in the "values" folder are:
- <resources>
- <string name="app_name">metro</string>
- <string name="action_settings">Settings</string>
- <string name="hello_world">Welcome to metro maps.......</string>
- <string name="full">Full Map</string>
- <string name="red">Red Line Map</string>
- <string name="blue">Blue Line Map</string>
- <string name="green">Green Line Map</string>
- <string name="orange">Orange Line Map</string>
- <string name="back">Back</string>
- </resources>
Step 5:
Since I wanted to change the text colors in the Buttons to make the layout more appealing, let us create a "colors.xml" file. Right-click on Values then select "New" -> "Values Resource File". The contents of this file are:
- <?xml version="1.0" encoding="utf-8"?>
- <resources>
- <color name="bg">#957AFF</color>
- <color name="fullCol">#000000</color>
- <color name="redCol">#b93131</color>
- <color name="blueCol">#269cb5</color>
- <color name="greenCol">#63b6ab</color>
- <color name="orangeCol">#b43f26</color>
- </resources>
Note the use of reference of the colors created above in the layout's XML file.
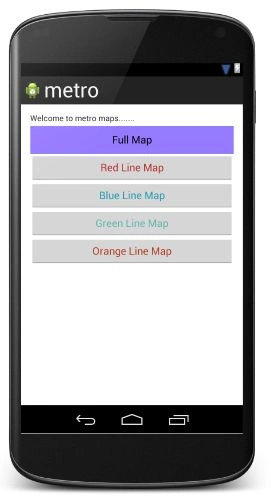
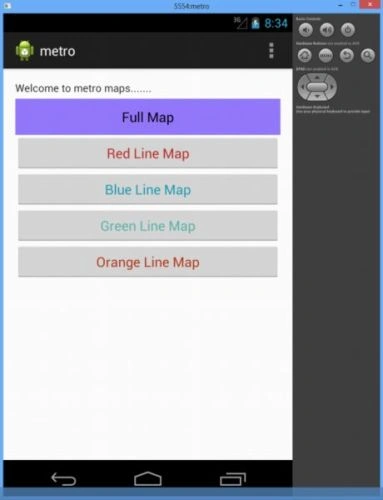
Finally the layout looks like:
Step 6:
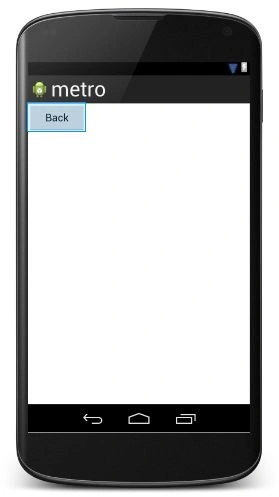
Let us create another layout file to make the layout of the page displaying the image. Right-click on Layout then select "New" -> "Values Resource File". Name it as "activity_fullmap". The contents of this file are:
- <Button
- android:id="@+id/back"
- android:layout_width="100dp"
- android:layout_height="50dp"
- android:text="@string/back"/>
- <ImageView
- android:id="@+id/im"
- android:layout_height="410dp"
- android:layout_width="350dp"
- android:layout_marginTop="50dp"
- android:layout_marginLeft="20dp"
- />
ImageView has been added for the display of the image of the Metro Maps.
Note: The name of the new XML file must contain an underscore, otherwise it will show you an error in the later stages of project completion.
This will look like:
Step 7:
Download all the images required from Google, in other words, the images of the Metro Maps. I have used a Metro full map, Blue Line map, Red Line map, Green Line map and Orange Line map. Copy these jpeg images and paste them in "drawable". You can paste these images in all the drawable like drawable-hdpi, drawable-ldpi, etc to have a view in all sizes. The names of the image files used by me are: blue, red, green, orange, full.
Now let us start with the Java coding...
Step 8:
Make a new activity namely "FulllMap.java" to display the complete map of Metro. Right-click on "src" then select "Java Class". Name this class "FullMap". The contents of this file are:
- package com.metro;
-
- import android.app.Activity;
- import android.content.Context;
- import android.content.Intent;
- import android.os.Bundle;
- import android.view.View;
- import android.view.View.OnClickListener;
- import android.widget.Button;
- import android.widget.ImageView;
-
- public class FullMap extends Activity
- {
- ImageView v;
- Button b;
- final Context context=this;
- @Override
- protected void onCreate(Bundle savedInstanceState) {
- super.onCreate(savedInstanceState);
- setContentView(R.layout.activity_fullmap);
- v=(ImageView)findViewById(R.id.im);
- v.setImageResource(R.drawable.full);
-
- b=(Button)findViewById(R.id.back);
- b.setOnClickListener(new OnClickListener() {
- @Override
- public void onClick(View v) {
- Intent i=new Intent(context,MainActivity.class);
- startActivity(i);
-
- }
- });
-
- }
- }
Step 9:
Similarly, make activities for the remaining maps to be displayed. So make 4 more activities in the same way and name them "RedMap", "BlueMap", "GreenMap", "OrangeMap". The code remains the same as above except the name of the image file to be opened. Also, the package has to be the same.
In RedMap.java: v.setImageResource(R.drawable.red);
In BlueMap.java: v.setImageResource(R.drawable.blue);
In GreenMap.java: v.setImageResource(R.drawable.green);
In OrangeMap.java: v.setImageResource(R.drawable.orange);
Rest of the code remains same as that of FullMap.java
Step10:
Make the changes in "MainActivity.java" (created by default) in "src" as follows:
- package com.metro;
-
- import android.content.Context;
- import android.content.Intent;
- import android.os.Bundle;
- import android.app.Activity;
- import android.view.Menu;
- import android.view.View;
- import android.view.View.OnClickListener;
- import android.widget.Button;
- import android.widget.ImageView;
-
- public class MainActivity extends Activity implements OnClickListener {
- ImageView image;
- @Override
- protected void onCreate(Bundle savedInstanceState) {
- super.onCreate(savedInstanceState);
- setContentView(R.layout.activity_main);
-
- ((Button)findViewById(R.id.fullMap)).setOnClickListener(this);
- ((Button)findViewById(R.id.redMap)).setOnClickListener(this);
- ((Button)findViewById(R.id.blueMap)).setOnClickListener(this);
- ((Button)findViewById(R.id.greenMap)).setOnClickListener(this);
- ((Button)findViewById(R.id.orangeMap)).setOnClickListener(this);
- }
-
- @Override
- public boolean onCreateOptionsMenu(Menu menu) {
-
- getMenuInflater().inflate(R.menu.main, menu);
- return true;
- }
-
- @Override
-
- public void onClick(View v) {
-
- final Context context=this;
- switch(v.getId())
- {
-
- case R.id.redMap:
- Intent i=new Intent(context,RedMap.class);
- startActivity(i);
- break;
-
- case R.id.blueMap:
- Intent i1=new Intent(context,BlueMap.class);
- startActivity(i1);
- break;
-
- case R.id.greenMap:
- Intent i2=new Intent(context,GreenMap.class);
- startActivity(i2);
- break;
-
- case R.id.orangeMap:
- Intent i3=new Intent(context,OrangeMap.class);
- startActivity(i3);
- break;
-
- case R.id.fullMap:
- Intent i4=new Intent(context,FullMap.class);
- startActivity(i4);
- break;
- }
- }
-
- }
Step 11:
Don't forget to make changes in the Manifest file, otherwise, the new activities will not run. Open the manifest file "AndroidManifest.xml" (in my case). Initially, you will see the following code:
- <?xml version="1.0" encoding="utf-8"?>
- <manifest xmlns:android="http://schemas.android.com/apk/res/android"
- package="com.metro"
- android:versionCode="1"
- android:versionName="1.0" >
-
- <uses-sdk
- android:minSdkVersion="8"
- android:targetSdkVersion="17" />
-
- <application
- android:allowBackup="true"
- android:icon="@drawable/ic_launcher"
- android:label="@string/app_name"
- android:theme="@style/AppTheme" >
- <activity
- android:name="com.metro.MainActivity"
- android:label="@string/app_name" >
- <intent-filter>
- <action android:name="android.intent.action.MAIN" />
-
- <category android:name="android.intent.category.LAUNCHER" />
- </intent-filter>
- </activity>
- </application>
-
- </manifest>
Now make the following changes in this file to add other activities: ( write this between the closing tag of the activity and application in the preceding shown file)
- <activity
- android:name="com.metro.BlueMap"
- android:label="metro">
- </activity>
-
- <activity
- android:name="com.metro.RedMap"
- android:label="metro">
- </activity>
-
- <activity
- android:name="com.metro.GreenMap"
- android:label="metro">
- </activity>
-
- <activity
- android:name="com.metro.OrangeMap"
- android:label="metro">
- </activity>
-
- <activity
- android:name="com.metro.FullMap"
- android:label="metro">
- </activity>
Step 12:
Now your Metro app is ready to run.
On running the first screen looks like:
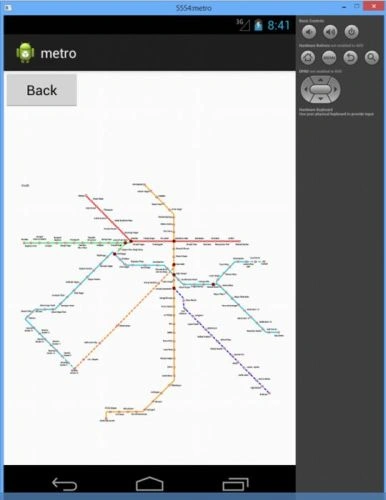
When you click on the Full Map button, you will get:
You can click on other buttons and see the output.
Thank you... enjoy coding :)


mohamed abubackerPosted Feb 28, 2015, 1:16 AM
thank you
mohamed abubackerPosted Feb 28, 2015, 1:15 AM
good tut
arya kumarPosted Dec 22, 2014, 12:58 AM
Good work.............also get a detail tutorial with sample project at......http://androidtutorialsrkt.blogspot.in/
Himanshu groverPosted Nov 8, 2014, 4:20 AM
It helped me a lot thanks :)
Deepak GoyalPosted Jun 4, 2013, 7:50 AM
Nice explanation..
Surender KumarPosted Jun 4, 2013, 3:34 AM
Nice article
Chhavi GoelPosted Jun 4, 2013, 2:01 AM
thank you sir
Naveed ZamanPosted Jun 3, 2013, 11:45 PM
wel come to c sharp corner its nice to see your first article its informative