

In our previous article, we have seen how to startup with .NET Core. In this article, we will take a look at database operations according to previous sample applications based on previous concepts.
If you are new to .NET Core, please read my previous post about .Net Core Startup
In this article, we are going to explore the following:
- Create Database
- Use Entity Framework Core (Db First Approach),
- Overview EF Core
- Install Entity Framework
- Create Models
- Configure EF Service
- Use MVC 6
- Overview MVC6
- Use WebAPI
- Use AngularJS2
- Component,
- Route
- Service
- Configure Server
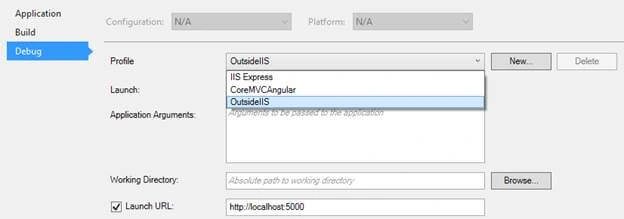
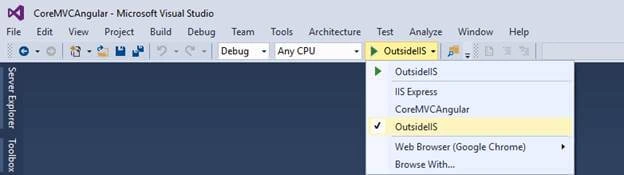
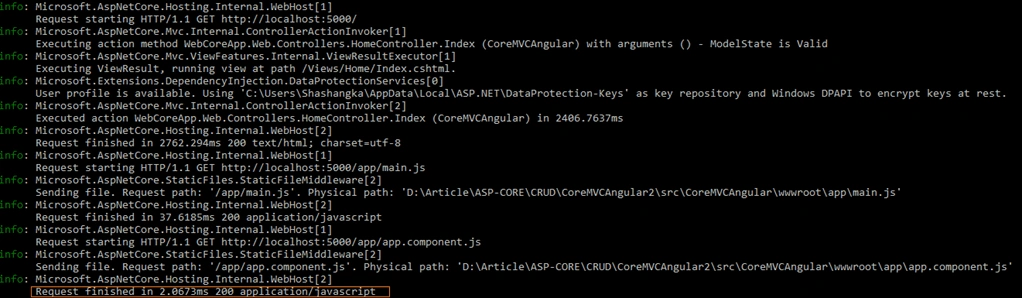
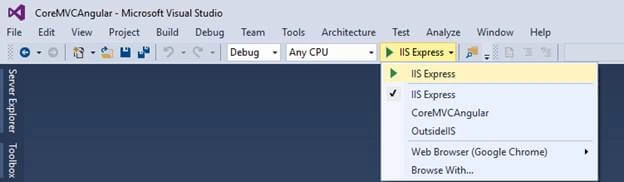
- Run App inside/outside IIS
Let’s get started.
Create Database
Before we get started with IDE, let's create a new database using SSMS 2014 (SQL Server Management System). Name it as PhoneBook.
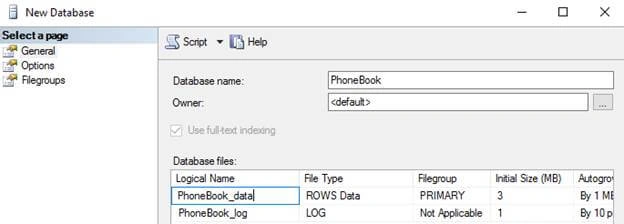
Create a table named Contacts, copy & run the below script in SSMS 2014:
- USE [PhoneBook]
- GO
- /****** Object: Table [dbo].[Contacts] Script Date: 8/7/2016 11:28:55 AM ******/
- SET ANSI_NULLS ON
- GO
- SET QUOTED_IDENTIFIER ON
- GO
- CREATE TABLE [dbo].[Contacts](
- [ContactID] [int] IDENTITY(1,1) NOT NULL,
- [FirstName] [nvarchar](50) NULL,
- [LastName] [nvarchar](50) NULL,
- [Phone] [nvarchar](50) NULL,
- [Email] [nvarchar](50) NULL,
- CONSTRAINT [PK_Contacts] PRIMARY KEY CLUSTERED
- (
- [ContactID] ASC
- )WITH (PAD_INDEX = OFF, STATISTICS_NORECOMPUTE = OFF, IGNORE_DUP_KEY = OFF, ALLOW_ROW_LOCKS = ON, ALLOW_PAGE_LOCKS = ON) ON [PRIMARY]
- ) ON [PRIMARY]
- GO
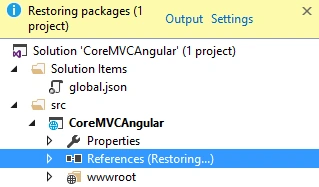
It will automatically start restoring the dependencies. Build & run it. The application is working perfectly.
Install Entity Framework: Before installation, let’s have an overview on EF Core new features
- Modelling: This includes Basic Modelling, Data Annotations, Relationships, and much more.
- Change Tracking: This includes Accessing tracked state, Snapshot, Notification change tracking.
- SaveChanges: This includes Basic save functionality, Async SaveChanges,Transactions.
- Query: This includes Basic LINQ support, Async query, Raw SQL queries
- Database schema management: This includes database creation/deletion, APIs, Relational database migrations, and Reverse engineering from database.
- Database providers: This includes EntityFramework, SQL Server, Sqlite, InMemory
- Platforms: Supports Universal Windows Platform (UWP), .NET Core, Full .NET
Get more details about EF Core.
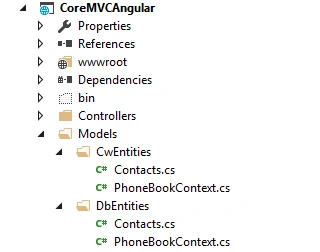
Let’s add folders for Entity models in our sample app solution.

DbEntities: for model entities.
The installation of EF is pretty much simple. Open project.json file, point tools section, modify the section with below lines.
- "Microsoft.EntityFrameworkCore.SqlServer": "1.0.0",
- "Microsoft.EntityFrameworkCore.Tools": "1.0.0-preview2-final",
- "Microsoft.EntityFrameworkCore.SqlServer.Design": "1.0.0"
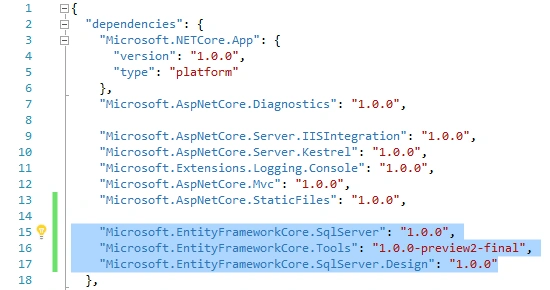
Save changes after modification.
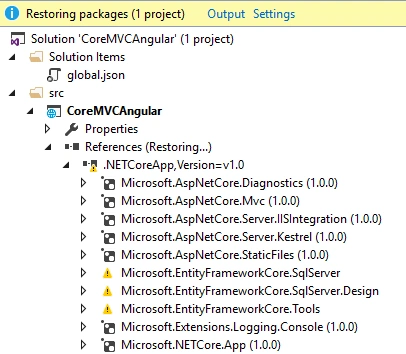
Packages will be automatically restored. Let’s get an explanation of what those are.
EntityFrameworkCore.SqlServer: Database Provider, that allows Entity Framework Core to be used with Microsoft SQL Server.
- Scaffold-DbContext,
- Add-Migration,
- Udate-Database
For Command Window
- dotnet ef dbcontext scaffold
We will see how to use both commands.
EntityFrameworkCore.SqlServer.Design: Design-time that allows Entity Framework Core functionality (EF Core Migration) to be used with Microsoft SQL Server.
To access the Command line tools. we need to add EntityFrameworkCore.Tools in tools section of our project.json.
"Microsoft.EntityFrameworkCore.Tools": "1.0.0-preview2-final"

Save changes after modification.
Command in Package Manager Console: Open Package Manager console.
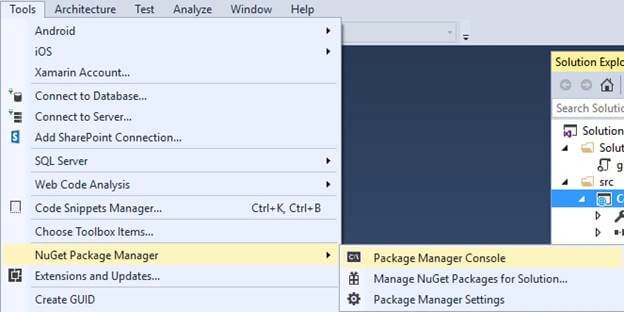
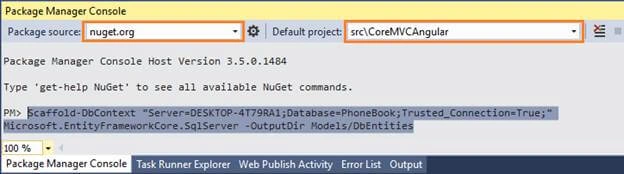
Input the following commands and hit enter.
Scaffold-DbContext "Server=DESKTOP-4T79RA1;Database=PhoneBook;Trusted_Connection=True;" Microsoft.EntityFrameworkCore.SqlServer -OutputDir Models/DbEntities
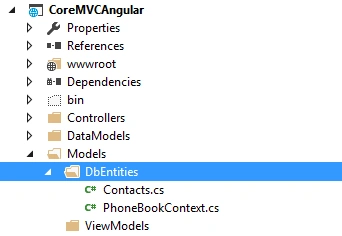
Command in Command Window: Open Command Window, navigate to project directory, and type,
D:\Article\ASP-CORE\CRUD\CoreMVCAngular2\src\CoreMVCAngular>dotnet ef –help
Here, a list of options will be shown in command window. We are going to use dbcontext in Commands.
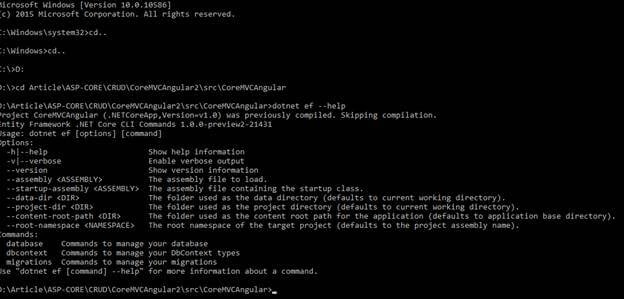
Next, input the below command and hit enter,
D:\Article\ASP-CORE\CRUD\CoreMVCAngular2\src\CoreMVCAngular>dotnet ef dbcontext scaffold "Server=DESKTOP-4T79RA1;Database=PhoneBook;Trusted_Connection=True;" Microsoft.EntityFrameworkCore.SqlServer --output-dir Models/CwEntities

Here is a screenshot of both processes that execute & generate models. We will keep DbEntities folder to work with & will delete the other folder.
Configure EF Service
In PhoneBookContext Class, add constructor.
- public PhoneBookContext(DbContextOptions<PhoneBookContext> options) :
- base(options)
- {
- }
- public void ConfigureServices(IServiceCollection services) {
- services.AddMvc();
- var connection = @ "Server=DESKTOP-4T79RA1;Database=PhoneBook;Trusted_Connection=True;";
- services.AddDbContext < PhoneBookContext > (options => options.UseSqlServer(connection));
- }
MVC 6: We have already discussed about MVC 6 in our previous post. Let's have an overview on MVC 6 new features, once again:
- MVC+Web API+Web Pages = MVC6
- No System.Web
- Web pages & HTTP services is Unified
- Dependency injection built in
- Dynamic code compilation (Roslyn compiler)
- Open source &
- Support cross-platform build & run.
- Can be hosted in IIS or self-hosted(Outside IIS)
OK. Now, let’s add a WebAPI Controller to perform the CRUD operation to database table.
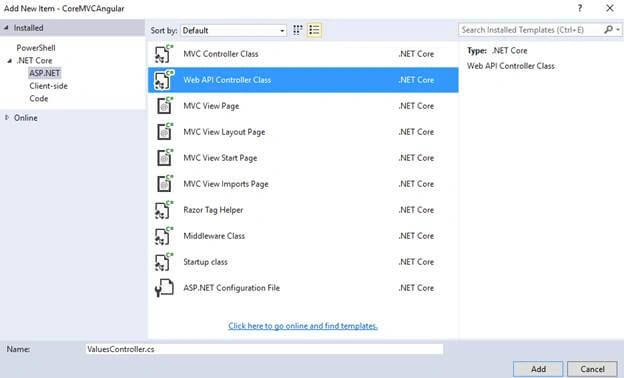
In Solution Explorer, add a new API folder. Right click on it > Add New Item > Web API Controller Class > Add. Modify the initial template.
API Controller
- [Route("api/[controller]")]
- public class ContactController: Controller {
- private PhoneBookContext _ctx = null;
- public ContactController(PhoneBookContext context) {
- _ctx = context;
- }
- }

You may have noticed that there is a new pattern [ ] in MVC 6 attribute route, [RouteToken]. This means that the route token has automatically taken the controller name.
Like [Route("api/[controller]")] > [Route("api/Contact")]
Another thing, we know Web API produces XML by default. Now, in MVC 6, we can set an attribute to change the default produces to JSON type by putting attribute in Class label or on method label. In our case, we have set it on method label.
[HttpGet("GetContact"), Produces("application/json")]
GET
- // GET: api/Contact/GetContact
- [HttpGet("GetContact"), Produces("application/json")]
- public async Task<object> GetContact()
- {
- List<Contacts> contacts = null;
- object result = null;
- try
- {
- using (_ctx)
- {
- contacts = await _ctx.Contacts.ToListAsync();
- result = new
- {
- contacts
- };
- }
- }
- catch (Exception ex)
- {
- ex.ToString();
- }
- return result;
- }
- // POST api/Contact/PostContact
- [HttpPost, Route("PostContact")]
- public async Task<object> PostContact([FromBody]Contacts model)
- {
- object result = null; int message = 0;
- if (model == null)
- {
- return BadRequest();
- }
- using (_ctx)
- {
- using (var _ctxTransaction = _ctx.Database.BeginTransaction())
- {
- try
- {
- _ctx.Contacts.Add(model);
- await _ctx.SaveChangesAsync();
- _ctxTransaction.Commit();
- message = (int)responseMessage.Success;
- }
- catch (Exception e)
- {
- _ctxTransaction.Rollback();
- e.ToString();
- message = (int)responseMessage.Error;
- }
- result = new
- {
- message
- };
- }
- }
- return result;
- }
- // PUT api/Contact/PutContact/5
- [HttpPut, Route("PutContact/{id}")]
- public async Task<object> PutContact(int id, [FromBody]Contacts model)
- {
- object result = null; int message = 0;
- if (model == null)
- {
- return BadRequest();
- }
- using (_ctx)
- {
- using (var _ctxTransaction = _ctx.Database.BeginTransaction())
- {
- try
- {
- var entityUpdate = _ctx.Contacts.FirstOrDefault(x => x.ContactId == id);
- if (entityUpdate != null)
- {
- entityUpdate.FirstName = model.FirstName;
- entityUpdate.LastName = model.LastName;
- entityUpdate.Phone = model.Phone;
- entityUpdate.Email = model.Email;
- await _ctx.SaveChangesAsync();
- }
- _ctxTransaction.Commit();
- message = (int)responseMessage.Success;
- }
- catch (Exception e)
- {
- _ctxTransaction.Rollback(); e.ToString();
- message = (int)responseMessage.Error;
- }
- result = new
- {
- message
- };
- }
- }
- return result;
- }
- // DELETE api/Contact/DeleteContactByID/5
- [HttpDelete, Route("DeleteContactByID/{id}")]
- public async Task<object> DeleteContactByID(int id)
- {
- object result = null; int message = 0;
- using (_ctx)
- {
- using (var _ctxTransaction = _ctx.Database.BeginTransaction())
- {
- try
- {
- var idToRemove = _ctx.Contacts.SingleOrDefault(x => x.ContactId == id);
- if (idToRemove != null)
- {
- _ctx.Contacts.Remove(idToRemove);
- await _ctx.SaveChangesAsync();
- }
- _ctxTransaction.Commit();
- message = (int)responseMessage.Success;
- }
- catch (Exception e)
- {
- _ctxTransaction.Rollback(); e.ToString();
- message = (int)responseMessage.Error;
- }
- result = new
- {
- message
- };
- }
- }
- return result;
- }
AngularJS2
Our WebAPI is ready to deal with the data from server. Now, we are going to work in client-side code with typescript (.ts) files.
First of all, we need to create a Master page to present our views in it.
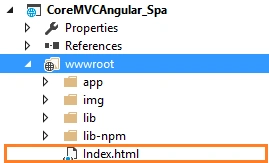
Then, we need to point this HTML file while app starts. So, let’s go to the startup.cs file to add below code snippet.
This is the configuration for the default files Middleware.
Startup.cs
- // app-specific root page(Index.html)
- DefaultFilesOptions options = new DefaultFilesOptions();
- options.DefaultFileNames.Clear();
- options.DefaultFileNames.Add("/Index.html");
- need to add library
- using Microsoft.AspNetCore.Builder;
- Now add script library reference to the html page & define view point to load our app component views.
- <spa-app>
- <p>
- <img src="img/ajax_small.gif" /> Please wait ...
- </p>
- </spa-app>
- <script>
- System.config({
- packages: {
- 'app': {
- defaultExtension: 'js'
- }
- },
- });
- System.import('app/main').then(null, console.error.bind(console));
- </script>
Index.html
- <!DOCTYPE html>
- <html>
- <head>
- <meta charset="utf-8" />
- <meta name="viewport" content="width=device-width" />
- <title></title>
- <base href="/">
- <script>document.write('<base href="' + document.location + '" />');</script>
- <script src="../lib-npm/es6-shim/es6-shim.js"></script>
- <script src="../lib-npm/angular2/angular2-polyfills.js"></script>
- <script src="../lib-npm/systemjs/system.src.js"></script>
- <script src="../lib-npm/rxjs/Rx.js"></script>
- <script src="../lib-npm/angular2/angular2.js"></script>
- <script src="../lib-npm/angular2/router.js"></script>
- <script src="../lib-npm/angular2/http.js"></script>
- <link href="../lib/bootstrap/dist/css/bootstrap.min.css" rel="stylesheet" />
- </head>
- <body>
- <div class="container">
- <spa-app>
- <p>
- <img src="img/ajax_small.gif" /> Please wait ...
- </p>
- </spa-app>
- </div>
- <script src="../lib/jquery/dist/jquery.min.js"></script>
- <script src="../lib/bootstrap/dist/js/bootstrap.min.js"></script>
- <script>
- System.config({ packages: { 'app': { defaultExtension: 'js' } }, });
- System.import('app/main').then(null, console.error.bind(console));
- </script>
- </body>
- </html>
Main.ts
- /*This is the spa bootstrap File*/
- //---------Import Angular2------------
- import {bootstrap} from 'angular2/platform/browser';
- import {enableProdMode, provide} from 'angular2/core';
- //---------Import External Components(Main Component)---------
- import {MainComponent} from './app.component';
- //---------Bootstrap Component---------
- enableProdMode();
- bootstrap(MainComponent);
- /*Component Default view For SpaRoute */
- //---------Import Angular2------------
- import {Component, provide} from 'angular2/core';
- import {RouteConfig, ROUTER_DIRECTIVES, ROUTER_PROVIDERS, LocationStrategy, HashLocationStrategy, APP_BASE_HREF} from 'angular2/router';
- //---------Import External Components---------
- import {Home} from './home/home.component';
- import {Contact} from './contact/contact.component';
- //---------Declare Components---------
- @Component({
- selector: 'spa-app',
- directives: [ROUTER_DIRECTIVES], //decorate link
- templateUrl: 'app/main.view.html',
- providers: [
- ROUTER_PROVIDERS,
- //provide(APP_BASE_HREF, { useValue: '/' })
- provide(LocationStrategy, { useClass: HashLocationStrategy })
- ]
- })
- //---------Declare Route Config---------
- @RouteConfig([
- { path: '/', name: 'Home', component: Home, useAsDefault: true },
- { path: '/Contact/...', name: 'Contact', component: Contact }
- ])
- //---------Export This Component Class---------
- export class MainComponent {
- title: string;
- constructor() {
- this.title = 'Welcome to [.NetCore+MVC6+Angular2] SPA';
- }
- }
- import {
- Component
- } from 'angular2/core';
- @Component({
- selector: 'home',
- templateUrl: `app/home/home.view.html`
- })
- export class Home {
- constructor() {}
- }
- export class ContactModel {
- contactId: number;
- firstName: string;
- lastName: string;
- phone: string;
- email: string;
- }
- //---------Import Angular2------------
- import {
- Component
- } from 'angular2/core';
- import {
- ROUTER_DIRECTIVES,
- RouteConfig
- } from 'angular2/router';
- //---------Import External Components---------
- import {
- ContactMain
- } from './contact.main';
- //---------Declare Components---------
- @Component({
- selector: 'contacts',
- template: `<router-outlet></router-outlet>`,
- directives: [ROUTER_DIRECTIVES]
- })
- @RouteConfig([{
- path: '/',
- name: 'ManageContact',
- component: ContactMain,
- useAsDefault: true
- }, ])
- export class Contact {
- constructor() {}
- }

Dhruvin ShahPosted Jul 6, 2017, 10:49 PM
Very Useful . Thanks for Sharing. Keep writing.
ukeypunchPosted Nov 15, 2016, 6:56 AM
Awesome article awesome article awesome article awesome article
Vignesh ManiPosted Aug 17, 2016, 7:49 AM
Nice
Shamim UddinPosted Aug 17, 2016, 3:30 AM
Nice Post
Md. Mokhlesur RahmanPosted Aug 16, 2016, 7:54 PM
Good job .... its helpful to me ....
Ramesh PalaniappanPosted Aug 16, 2016, 8:29 AM
Nice content
Bhavik PatelPosted Aug 16, 2016, 7:16 AM
Nicely explained!
Debasis SahaPosted Aug 16, 2016, 12:57 AM
Nice one..
Mahfuz BappyPosted Aug 16, 2016, 12:49 AM
Always waiting for your new article . Thanks bro. go on ...