

In this article I describe how to create a Windows Store App for Data Adapter using JavaScript. This app demonstrates how to create a data adapter to interface with a web service. A data adapter is the component to interface between the list view and the supply of data, enabling virtualization.
I assume you can create a simple Windows Store App using JavaScript; for more help visit Simple Windows Store Apps using JavaScript.
To start the creation of the app, add one JavaScript page by right-clicking on the js folder in the Solution Explorer and select "Add" > "New item" > "JavaScript Page" and then provide an appropriate name. In the same way, add a HTML page to your project.
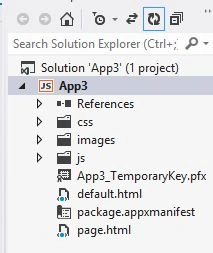
Write the following code in the default.html:
<!DOCTYPE html>
<html>
<head>
<meta charset="utf-8" />
<title></title>
<link rel="stylesheet" href="//Microsoft.WinJS.1.0/css/ui-light.css" />
<script src="//Microsoft.WinJS.1.0/js/base.js"></script>
<script src="//Microsoft.WinJS.1.0/js/ui.js"></script>
<link rel="stylesheet" href="/css/default.css" />
<script src="/js/default.js"></script>
</head>
<body role="application" style="background-color: lightgreen">
<center><div id="rootGrid">
<div id="content">
<h1 id="featureLabel"></h1>
<div id="contentHost"></div>
</div>
</div></center>
</body>
</html>
Write the following code in the default.js:
(function () {
"use strict";
var AppTitle = "";
var pages = [
{ url: "page.html" }
];
function activated(eventObject) {
if (eventObject.detail.kind === Windows.ApplicationModel.Activation.ActivationKind.launch) {
eventObject.setPromise(WinJS.UI.processAll().then(function () {
var url = WinJS.Application.sessionState.lastUrl || pages[0].url;
return WinJS.Navigation.navigate(url);
}));
}
}
WinJS.Navigation.addEventListener("navigated", function (eventObject) {
var url = eventObject.detail.location;
var host = document.getElementById("contentHost");
host.winControl && host.winControl.unload && host.winControl.unload();
WinJS.Utilities.empty(host);
eventObject.detail.setPromise(WinJS.UI.Pages.render(url, host, eventObject.detail.state).done(function () {
WinJS.Application.sessionState.lastUrl = url;
}));
});
WinJS.Namespace.define("app", {
AppTitle: AppTitle,
pages: pages
});
WinJS.Application.addEventListener("activated", activated, false);
WinJS.Application.start();
})();
Write the following code in the page.html:
<!DOCTYPE html>
<html>
<head>
<title></title>
<link rel="stylesheet" href="/css/page1.css" />
<script src="/js/script.js"></script>
</head>
<body>
<div data-win-control="app.pageInput">
<div>
<label for="devkey">
ID:
</label>
<input id="devkey" placeholder="Enter your Id" />
<button class="action secondary" id="savekey">
Click Here
</button>
</div>
<br />
<div id="queryCtrls">
<label for="query">
Type here for search
</label>
<input id="query" value="Deepak Arora" />
<button class="action" id="runquery">
Search
</button>
</div>
</div>
<div data-win-control="app.pageOutput">
<div id="itemTemplate" data-win-control="WinJS.Binding.Template">
<div class="itemTempl">
<img data-win-bind="src: thumbnail" alt="Databound image" />
<span class="content" data-win-bind="innerText: title"></span>
</div>
</div>
<div id="listview1" class="box"
data-win-control="WinJS.UI.ListView"
data-win-options="{ selectionMode: 'none', tapBehavior: 'none', swipeBehavior: 'none', layout: { type: WinJS.UI.GridLayout, maxRows: 2 } }"
></div>
</div>
</body>
</html>
Write the following code in the script.js:
(function () {
"use strict";
var page = WinJS.UI.Pages.define("/html/page1.html", {
ready: function (element, options) {
WinJS.Utilities.query("#savekey").listen("click", saveKey);
WinJS.Utilities.query("#runquery").listen("click", doSearch);
loadKey();
}
});
function saveKey() {
var devkey = document.getElementById("devkey").value;
if (devkey !== "" && devkey.length > 12) {
try {
var localSettings = Windows.Storage.ApplicationData.current.localSettings;
localSettings.values["devkey"] = devkey;
}
catch (err) {
}
toggleControls(true);
doSearch();
} else {
toggleControls(false);
}
}
function doSearch() {
var devkey = document.getElementById("devkey").value;
if (devkey !== "" && devkey.length > 12) {
var searchTerm = document.getElementById("query").value;
var listview = document.getElementById("listview1").winControl;
var myTemplate = document.getElementById("itemTemplate");
var myDataSrc = new bingImageSearchDataSource.datasource(devkey, searchTerm);
listview.itemDataSource = myDataSrc;
listview.itemTemplate = myTemplate;
}
}
})();
Output: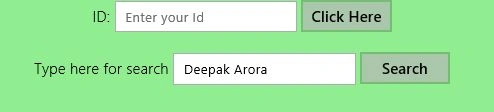
Summary:
In this article I described how to create a Windows Store App for Data Adapter using JavaScript. I hope this article has helped you to understand this topic. Please share it. If you know more about this, your feedback and constructive contributions are welcome.
Preeti ZutshiPosted Jan 28, 2013, 10:21 PM
well done..........