

Introduction. My Docker🐳 Disaster (And How IT-Tools Saved My Sanity)
Let me start with a confession: I used to hate Docker. A few years ago, I was trying to demo a project for a client. The app worked flawlessly on my laptop, but when I tried to run it on their server? Chaos. Missing dependencies, version conflicts, cryptic error messages—it felt like the tech gods were laughing at me. After 14 hours of Googling, crying, and caffeine overload, I finally stumbled into Docker 🐳. Suddenly, deploying apps felt less like defusing a bomb and more like microwaving leftovers.
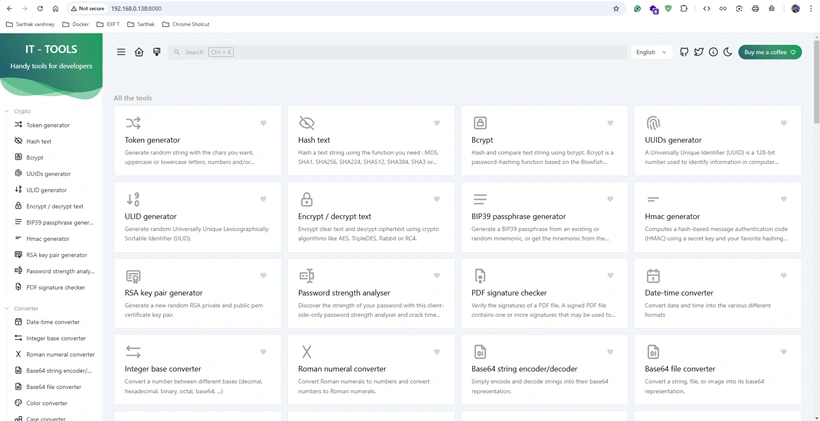
That’s why I’m excited about IT-Tools, a developer’s playground packed with utilities like UUID generators, password analyzers, and encryption tools. But here’s the kicker: deploying it without Docker 🐳 is like eating soup with a fork. Possible? Maybe. Enjoyable? Absolutely not.
In this article, I’ll walk you through deploying IT-Tools using Docker—without the jargon, panic, or existential dread. Let’s turn that "Ugh, DevOps" into "Oh, that’s it?"
What You’ll Need (Spoiler: It’s Not Much)
- Docker 🐳 installed: Docker Desktop for beginners (Windows/Mac) or Docker Engine for Linux you can follow my article.
- A Terminal: Yes, the black screen with green text. No, you don’t need to be a hacker.
- 10 Minutes: Less time than it takes to rewatch your favorite cat video.
Step 1. Docker 🐳 Demystified (No, It’s Not a Whale)
Imagine you’re moving apartments. Instead of packing dishes, books, and that questionable lava lamp separately, you toss everything into labeled boxes. Docker does the same for apps. It wraps your code, settings, and dependencies into a container—a portable box that runs anywhere.
IT-Tools is a Vue.js app, meaning it’s like a fancy website that lives on your machine. Docker🐳 lets you stuff it into a container with a tiny server (Nginx) so you can access it from your browser. No Node.js installs, no dependency drama. Just poof—it works.
Step 2. Grab the Code (Like Borrowing Sugar from a Neighbor)
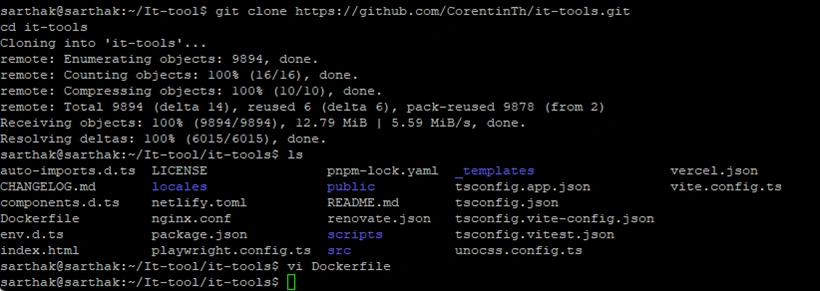
First, let’s “borrow” the IT-Tools code from GitHub. Open your terminal and type:
git clone https://github.com/CorentinTh/it-tools.git
cd it-tools
This copies the code to your machine and moves you into the project folder. If you’re nervous about Git, don’t be—this is the only command you’ll need.
Step 3. Write a Dockerfile (Your Container’s Recipe Card)
A Dockerfile is like an IKEA manual for Docker. It tells it how to build your app. Create a file named Dockerfile in the project folder and add this:
# build stage
FROM node:lts-alpine AS build-stage
# Set environment variables for non-interactive npm installs
ENV NPM_CONFIG_LOGLEVEL warn
ENV CI true
WORKDIR /app
COPY package.json pnpm-lock.yaml ./
RUN npm install -g pnpm && pnpm i --frozen-lockfile
COPY . .
RUN pnpm build

# production stage
FROM nginx:stable-alpine AS production-stage
COPY --from=build-stage /app/dist /usr/share/nginx/html
COPY nginx.conf /etc/nginx/conf.d/default.conf
EXPOSE 80
CMD ["nginx", "-g", "daemon off;"]
Translation for Humans
- Phase 1: Uses Node.js to install dependencies and compile the app.
- Phase 2: Takes the compiled files and serves them via Nginx on port 80.
Why two phases? It keeps the final container small. Think of it as tossing the eggshells after baking—nobody needs that clutter.
Join the conversation! Your thoughts help the community grow.