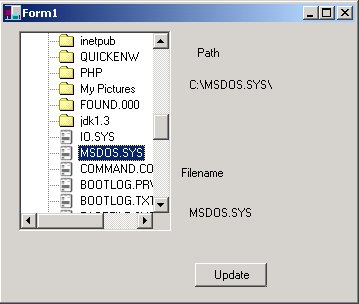
This article illustrates the use of a treeview in a directory tree user control. You can use this control to visually select files or directories from any file structure on your computer system.
The treeview has been a common way to display hierarchies of data. In C# it's fairly easy to manipulate a tree because the design of the treeview is based on a recursive Node Structure:
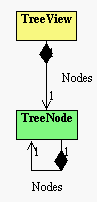
This design was drawn using WithClass 2000 UML Design Tool
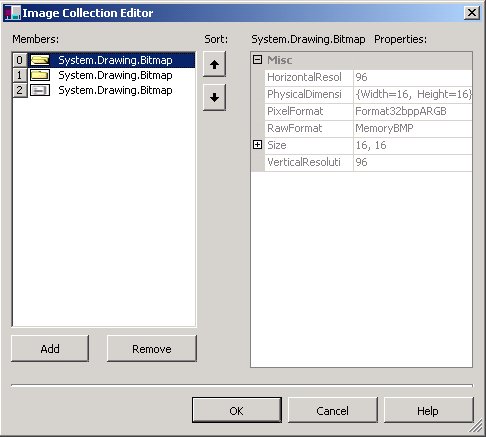
The treeview uses these node structures for handling most of its data population. The images from the tree view come from an ImageList component. The ImageList must be constructed seperately, and the icons used in the imagelist are added to the Images Collection from pictures created in an image editor (like mspaint or something):
The ImageList is then associated to the TreeView via the ImageList property:
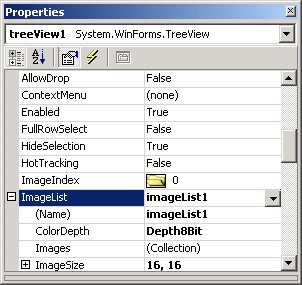
When nodes are constructed, they are assigned indexes that point to a particular image in the list.
Now let's take a good look at our directory tree user control. The code for populating the directory nodes takes advantage of the Directory class in the System.IO namespace. A tree is built by first constructing the node with the name, image index, and image index when a node is selected. Then the node is added to the parent node.
protected
void PopulateNode(TreeNode aNode)
{
this.Cursor = Cursors.WaitCursor; // Set up the wait cursor
string strDir = BuildDirectory(aNode); // Build the directory tree string from the tree node
Directory Dir = new Directory(strDir); // Use the Directory class to get the files and directory names in the directory
int count = 0;
// Get each directory name and add it as a directory folder tree node
for (int i = 0; i < Dir.GetDirectories().Length; i++)
{
TreeNode ChildNode = new TreeNode(Dir.GetDirectories()[i].Name, 1,0);
aNode.Nodes.Add(i, ChildNode);
count++;
}
// Get each file name and add it as a file tree node
for (int i = 0; i < Dir.GetFiles(m_strFilter).Length; i++)
{
TreeNode ChildNode = new TreeNode(Dir.GetFiles(m_strFilter)[i].Name, 2,2);
aNode.Nodes.Add(i+count, ChildNode);
}
aNode.Expand(); // show the children nodes
this.Cursor = Cursors.Arrow; // restore the cursor
}
The function BuildDirectoryTree is used to construct the string needed to go to the file directory being populated and is shown below:
protected
string BuildDirectory(TreeNode aNode)
{
TreeNode theNode = aNode;
string strDir = "";
// Cycle through the node and all its parents to build the full path of the directory
while (theNode != null)
{
if (theNode.Text[theNode.Text.Length - 1] != '\\')
{
strDir = "\\" + strDir;
}
strDir = theNode.Text + strDir;
theNode = theNode.Parent;
}
return strDir;
}
The event AfterSelect on a TreeView, can be used to trap the selection event of a particular node. In the case of the directory tree component, we use this selection event as an opportunity to populate an empty node:
public
void treeView1_AfterSelect (object sender, System.WinForms.TreeViewEventArgs e)
{
// check to see if the selected node is already populated
if (e.node.Nodes.Count > 0 || e.node.ImageIndex == 2)
{
return;
}
// The node is not populated, so populate the selected node
PopulateNode(e.node);
}
This control can be used as a starting point for creating explorer like applications. The Path and FileName
properties serve as outputs of the control for obtaining directory information selected by the user. The following code illustrates how the information can be obtained by the user after a button is pressed.
protected
void button1_Click (object sender, System.EventArgs e)
{
label3.Text = dirTree1.Path;
label4.Text = dirTree1.FileName;
}
In future articles we will explore the ability of trapping events directly from the control rather than from a button press. Please write or post comments in the discussion forum if you have any ideas on expanding the capability of this control.