

Introduction
Azure Logic Apps is a cloud-based integration service that allows you to create workflows and automate business processes using a visual designer and a wide range of pre-built connectors. However, there may be times when you need to integrate with a custom API, web service, or other system that isn't available as a pre-built connector. In such cases, you can create a custom connector in Logic Apps to extend the platform's capabilities.
A custom connector is a configuration file that defines how to connect to a particular system or service. It includes information about the system's APIs, authentication requirements, and other settings necessary to establish a connection. With a custom connector, you can create reusable connections that can be used across multiple Logic Apps workflows.
How to create a custom connector in Logic Apps?
1. Define the connector metadata: This includes information such as the connector name, description, logo, and other details that will help users identify the connector in the Logic Apps Designer.
2. Define connector actions: An action is a specific operation that the connector can perform, such as sending an email, creating a new record in a database, or retrieving data from a web service. You'll need to define the inputs and outputs for each action, as well as any authentication or authorization requirements.
3. Define the connector triggers: A trigger is an event that initiates a workflow, such as a new email arriving in a mailbox or a new record being added to a database. You'll need to define the inputs and outputs for each trigger, as well as any authentication or authorization requirements.
4. Test the connector: Once you've defined the connector metadata, actions, and triggers, you can test the connector to make sure it works as expected. You can do this by creating a test workflow in Logic Apps that use the custom connector and then running the workflow to see the results.
5. Publish the connector: Once satisfied with the connector, you can publish it to the Azure Marketplace or a private endpoint for use in your Logic Apps workflows. This will make the connector available to other Logic Apps users who may need to integrate with the same system or service.
When creating a custom connector, there are several key concepts and settings to be aware of the following,
- Authentication: You'll need to specify the authentication method that the system or service uses, such as OAuth, API key, or basic authentication. You may also need to provide additional authentication details, such as client IDs, secrets, or tokens.
- Host and base URL: These settings specify the web address where the system or service is hosted and the URL for its APIs or web services.
- Inputs and outputs: These are the parameters and results passed between the custom connector and the Logic Apps workflows that use it. You'll need to define the data types and formats for each input and output and specify any validation rules or default values.
- Operation ID: This is a unique identifier for each action or trigger in the custom connector. It's used to distinguish between different operations and enable Logic Apps to generate the correct code and metadata for each.
- Security: You'll need to specify the security settings for the custom connector, such as whether it's encrypted or signed and whether it requires HTTPS or other security protocols.
- API Definition: Custom connectors use an OpenAPI (formerly known as Swagger) definition file to describe the API of the system or service. This file specifies the API's endpoints, operations, and parameters and is used by Logic Apps to generate the code and metadata for the connector.
- SDK Generation: Once you have defined the API of the system or service, you can generate a software development kit (SDK) for the custom connector. The SDK can be used by developers to create client applications that integrate with the system or service using the custom connector.
- Testing and Debugging: Logic Apps provides a range of tools for testing and debugging custom connectors, including a test panel that allows you to simulate inputs and outputs for each action and trigger and a trace viewer that shows the execution history of the connector.
- Sharing Connectors: Once you have created a custom connector, you can share it with other Logic Apps users by publishing it to the Azure Marketplace. This allows other users to discover and use your connector in their workflows. You can also share the connector privately with specific users or groups by publishing it to a private endpoint.
The following steps to create a Logic Apps custom connector are performed in the Azure portal.
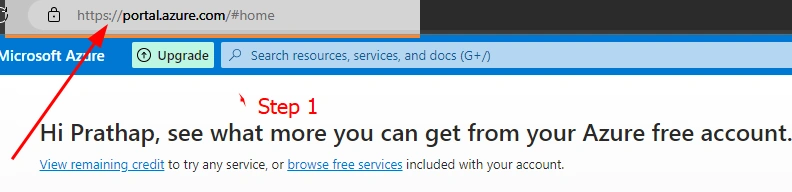
Step 1. Sign in to the Azure portal (https://portal.azure.com/)
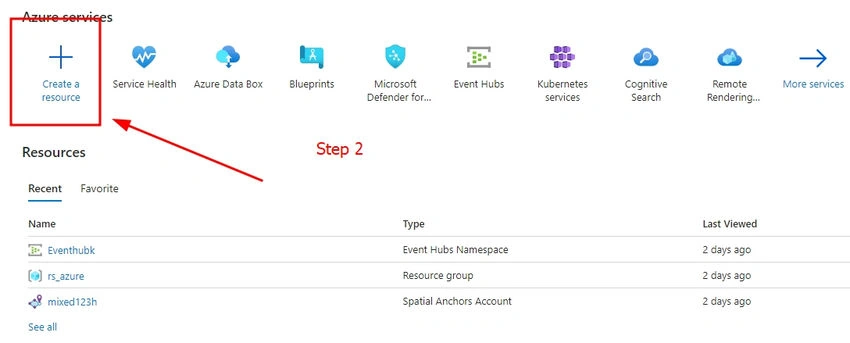
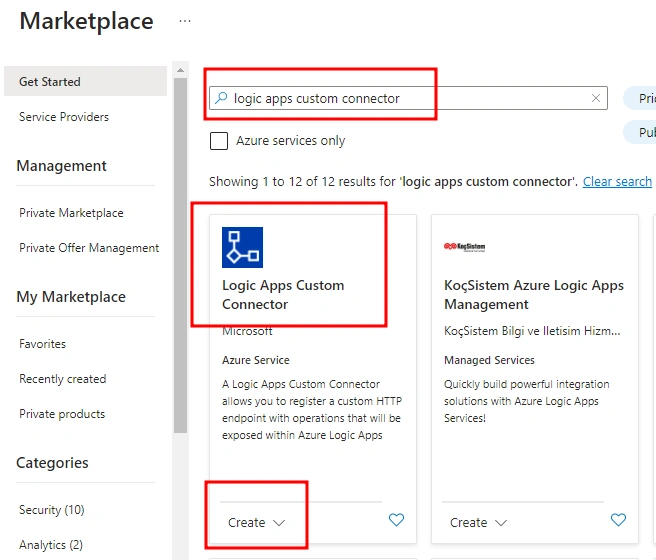
Step 2. Click "Create a resource" and search for "Logic apps custom connector".
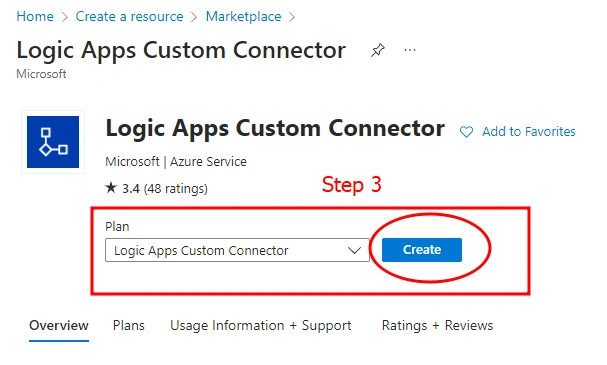
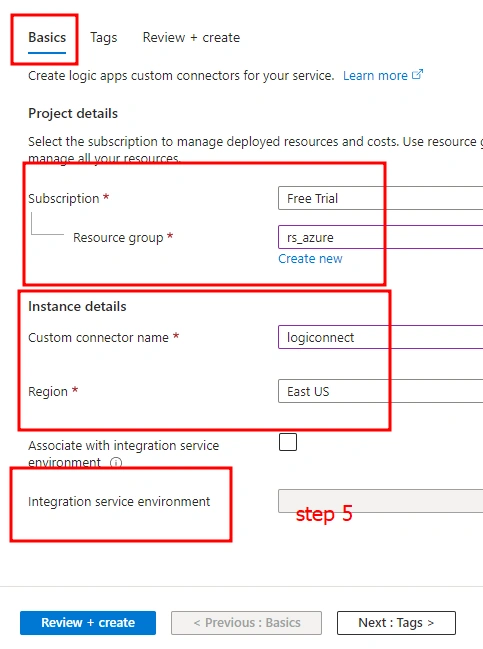
Step 3. In the "Basics" tab of the logic apps account creation, you must provide basic information about your account, such as the subscription and resource group you want to use. You'll also need to choose a name for your account and select a region where your data will be stored.
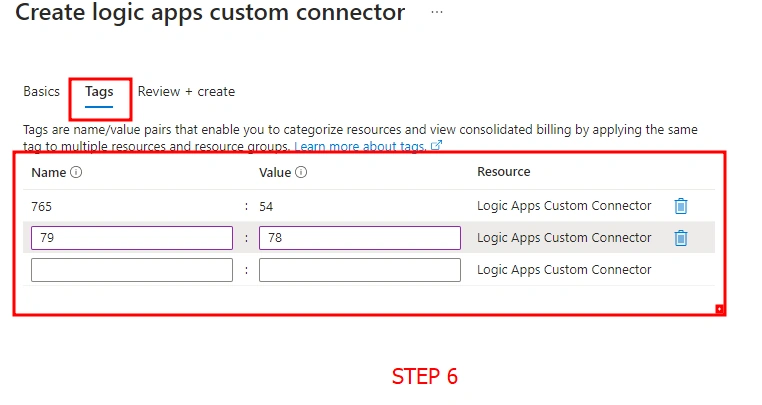
Step 4. Set up TAGS- In the "Tags" tab of the logic apps custom connector account creation, Tags are name/value pairs that enable you to categorize resources and view consolidated billing by applying the same tag to multiple resources and resource groups.
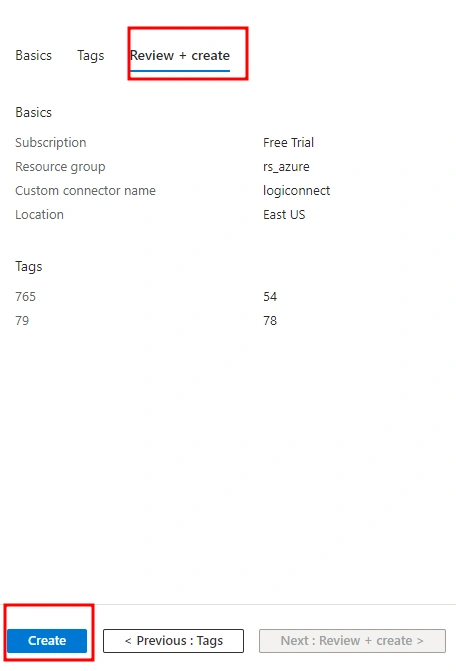
Step 5. Review and create your account- Once you've configured all the settings for your logic apps custom connector account, review your settings and click "Create" to create your account. Once deployment is completed, you must go to resource and use the account.
Step 6. Use the Account: After completing the validation and deployment, we must use our LOGIC APPS CUSTOM CONNECTOR.
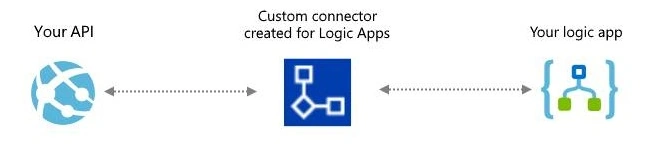
Image source :( https://mindmajix.com/overview-of-azure-logic-apps)
Conclusion
Finally, creating a custom connector in Azure Logic Apps can be a powerful way to extend the platform's capabilities and integrate with custom systems or services. By defining the connector metadata, actions, and triggers, you can create reusable connections that can be easily used across multiple workflows. With the right configuration and testing, custom connectors can help you automate complex business processes and improve the efficiency of your organization's workflows.
Konga MounikaPosted May 19, 2023, 5:40 AM
Very informative one