

My previous tutorial showed "How to add Ajax Toolkit in Visual Studio 2010". Based on it, I will show you "How to use an Ajax Control". Here, how to make a registration form inside an Ajax Accordion will also be described.
Initial Chamber
Step 1
Open Visual Studio 2010 and create an Empty Website. Name it Accordion_ demo.
Step 2
In Solution Explorer, you will get your empty website. Next, add a web form and SQL Database. Now use the following procedure.
To create a Web Form, right-click the Accordion_demo (your empty website), then select Add New Item -> Web Form. Name it Accordion_demo.aspx.
To create the SQL Server Database, right-click the Accordion_demo (your empty website), then select Add New Item -> SQL Server Database. (Add the database inside the App_Data_folder.)
Database Chamber
Step 3
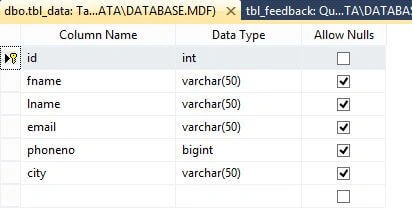
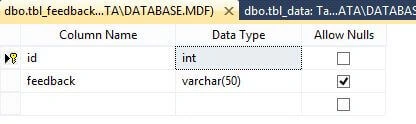
In Server Explorer, click on the arrow sign of your database (“Database.mdf”). Right-click on the tables and select Add New Table.
- tbl_data (Don't forgot IS INDENTITY = “TRUE”.)
- tbl_feedback (Don't forgot IS INDENTITY = “TRUE”.)
If you are at the beginner level in ASP.NET and not aware of VS10, then check it out on Google or my previous tutorials will help you out. I am keeping this as simple as possible, so that you can understand it properly.
Now to make a Stored Procedure for inserting data from the registration form into your database. So, here we will make a Stored Procedure for inserting data.
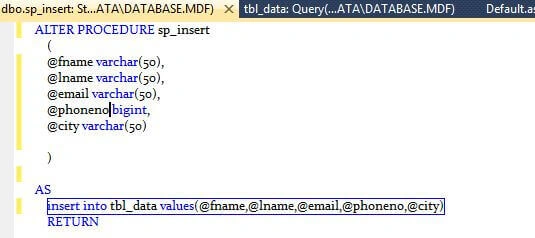
I believe you will make your own Stored Procedure for the feedback form (Home Work).
Design Chamber
Step 4
Open your Accordion.aspx file from Solution Explorer and start designing your application.
Here is the code:
- <html xmlns="http://www.w3.org/1999/xhtml">
- <head runat="server">
- <title></title>
- <style type="text/css">
- .header
- {
- background-color: #2E4D7B;
- border: 1px solid #2F4F4F;
- color:White;
- cursor:pointer;
- font-family:Arial, Sans-Serif;
- font-size:12px;
- font-weight:bold;
- margin-top:5px;
- padding:5px;
- width:40%;
- }
- .accordianheaderselected
- {
- background-color: #5078B3;
- border:1px solid #2F4F4F;
- color:White;
- cursor:pointer;
- font-family:Arial, Sans-Serif;
- font-size:12px;
- font-weight:bold;
- margin-top:5px;
- padding:5px;
- width:40%;
- }
- </style>
- </head>
- <body>
- <form id="form1" runat="server">
- <asp:ToolkitScriptManager ID="ToolkitScriptManager1" runat="server">
- </asp:ToolkitScriptManager>
- <div align="center">
- <asp:Accordion ID="Accordion1" runat="server" FadeTransitions="True"
- ForeColor="#3366FF" HeaderCssClass="header" BorderColor="#993333"
- BorderStyle="Dotted" BorderWidth="1px"
- RequireOpenedPane="False" ContentCssClass=""
- HeaderSelectedCssClass="accordianheaderselected" Width="700px">
- <Panes>
- <asp:AccordionPane ID="AccordionPane1" Font-Names="Verdana" BorderColor="AliceBlue" runat="server">
- <Header>Registration form</Header>
- <Content>
- <asp:Panel ID="panel12" runat="server">
- <table style="width: 100%;">
- <tr>
- <td>
- <asp:Label ID="Label1" runat="server" Text="FirstName:"></asp:Label>
- </td>
- <td>
- <asp:TextBox ID="TextBox1" runat="server"></asp:TextBox>
- </td>
- </tr>
- <tr>
- <td>
- <asp:Label ID="Label2" runat="server" Text="LastName:"></asp:Label>
- </td>
- <td>
- <asp:TextBox ID="TextBox2" runat="server"></asp:TextBox>
- </td>
- </tr>
- <tr>
- <td>
- <asp:Label ID="Label3" runat="server" Text="Email:"></asp:Label>
- </td>
- <td>
- <asp:TextBox ID="TextBox3" runat="server"></asp:TextBox>
- </td>
- </tr>
- <tr>
- <td>
- <asp:Label ID="Label4" runat="server" Text="PhoneNo:"></asp:Label>
- </td>
- <td>
- <asp:TextBox ID="TextBox4" runat="server"></asp:TextBox>
- </td>
- <tr>
- <td>
- <asp:Label ID="Label5" runat="server" Text="City:"></asp:Label>
- </td>
- <td>
- <asp:TextBox ID="TextBox5" runat="server"></asp:TextBox>
- </td>
- <tr>
- <td>
- </td>
- <td>
- <asp:Button ID="Button1" runat="server" OnClick="Button1_Click" Text="Submit" />
- </td>
- </table>
- </asp:Panel>
- </Content>
- </asp:AccordionPane>
- <asp:AccordionPane ID="AccordionPane2" runat="server">
- <Header>Give me some Feedback</Header>
- <Content>
- <table>
- <tr>
- <td>
- <asp:TextBox ID="TextBox6" TextMode="MultiLine" runat="server"></asp:TextBox>
- </td>
- </tr>
- <tr>
- <td>
- <asp:Button ID="Button2" runat="server" OnClick="Button2_Click" Text="Submit" />
- </td>
- </tr>
- </table>
- </Content>
- </asp:AccordionPane>
- </Panes>
- </asp:Accordion>
- </div>
- </form>
- </body>
- </html>
Don't forget to add ToolScriptManager for Ajax in VS10 after the form tag as in the following code.
- <form id="form1" runat="server">
- <asp:ToolkitScriptManager ID="ToolkitScriptManager1" runat="server">
- </asp:ToolkitScriptManager>
As you use this tag, you will see the namespace in the topmost part of your .aspx file as shown in the following code.
- <%@ Register Assembly="AjaxControlToolkit" Namespace="AjaxControlToolkit" TagPrefix="asp" %>
This is the namespace for Ajax from where we can get complete use of your AjaxToolkit.
Coding Chamber
Step 5
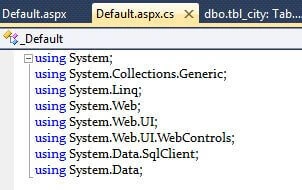
Now we are entering into our Code Zone. Let's begin by adding some namespaces into the Accordion.aspx.cs file.
Next, it's time for the real coding. Go through the following lines.
- protected void Page_Load(object sender, EventArgs e)
- {
- }
- protected void Button1_Click(object sender, EventArgs e)
- {
- SqlConnection con = new SqlConnection(@"Data Source=.\SQLEXPRESS;AttachDbFilename=|DataDirectory|\Database.mdf;Integrated Security=True;User Instance=True");
- SqlCommand cmd = new SqlCommand("sp_insert", con);
- cmd.CommandType = CommandType.StoredProcedure;
- cmd.Parameters.AddWithValue("fname", TextBox1.Text);
- cmd.Parameters.AddWithValue("lname", TextBox2.Text);
- cmd.Parameters.AddWithValue("email", TextBox3.Text);
- cmd.Parameters.AddWithValue("phoneno", TextBox4.Text);
- cmd.Parameters.AddWithValue("city", TextBox5.Text);
- con.Open();
- int i = cmd.ExecuteNonQuery();
- con.Close();
- }
- protected void Button2_Click(object sender, EventArgs e)
- {
- SqlConnection con = new SqlConnection(@"Data Source=.\SQLEXPRESS;AttachDbFilename=|DataDirectory|\Database.mdf;Integrated Security=True;User Instance=True");
- SqlCommand cmd = new SqlCommand("sp_feedback", con);
- cmd.CommandType = CommandType.StoredProcedure;
- cmd.Parameters.AddWithValue("feedback", TextBox6.Text);
- con.Open();
- int i = cmd.ExecuteNonQuery();
- con.Close();
- if (i != 0)
- {
- Response.Write("success");
- }
- else
- {
- Response.Write("Temporary Failure");
- }
- }
Output Chamber
Here is your output.
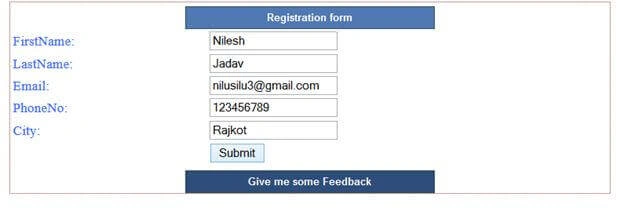
I have attached a GIF image to give you a better idea of how to use your application. I hope you liked it. Have a good day and don't forget to do your homework and specify it in the comments (Stored Procedure of Feedback Form).
Arul RPosted Oct 28, 2015, 5:46 AM
Nice share!!!
Rupali ShindePosted Oct 13, 2015, 5:22 AM
nice
Ankit BansalPosted Aug 6, 2015, 6:25 AM
nicely explained
Jaipal ReddyPosted Jun 15, 2015, 8:09 AM
good work.
Sibeesh VenuPosted May 26, 2015, 7:07 AM
Good one.
Rahul Kumar SaxenaPosted May 21, 2015, 5:32 AM
Good Show..
Santhakumar MunuswamyPosted May 18, 2015, 2:15 PM
Thanks for nice article
Gowtham RajamanickamPosted May 18, 2015, 12:38 PM
informative..
Gowtham RajamanickamPosted May 18, 2015, 12:38 PM
useful
Gowtham RajamanickamPosted May 18, 2015, 12:38 PM
informative..